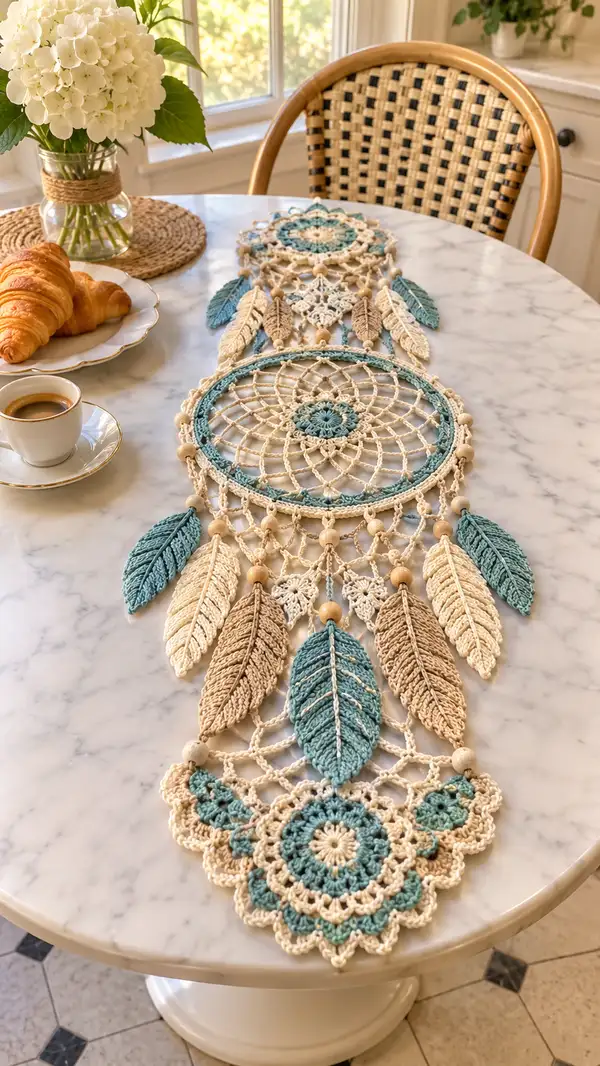
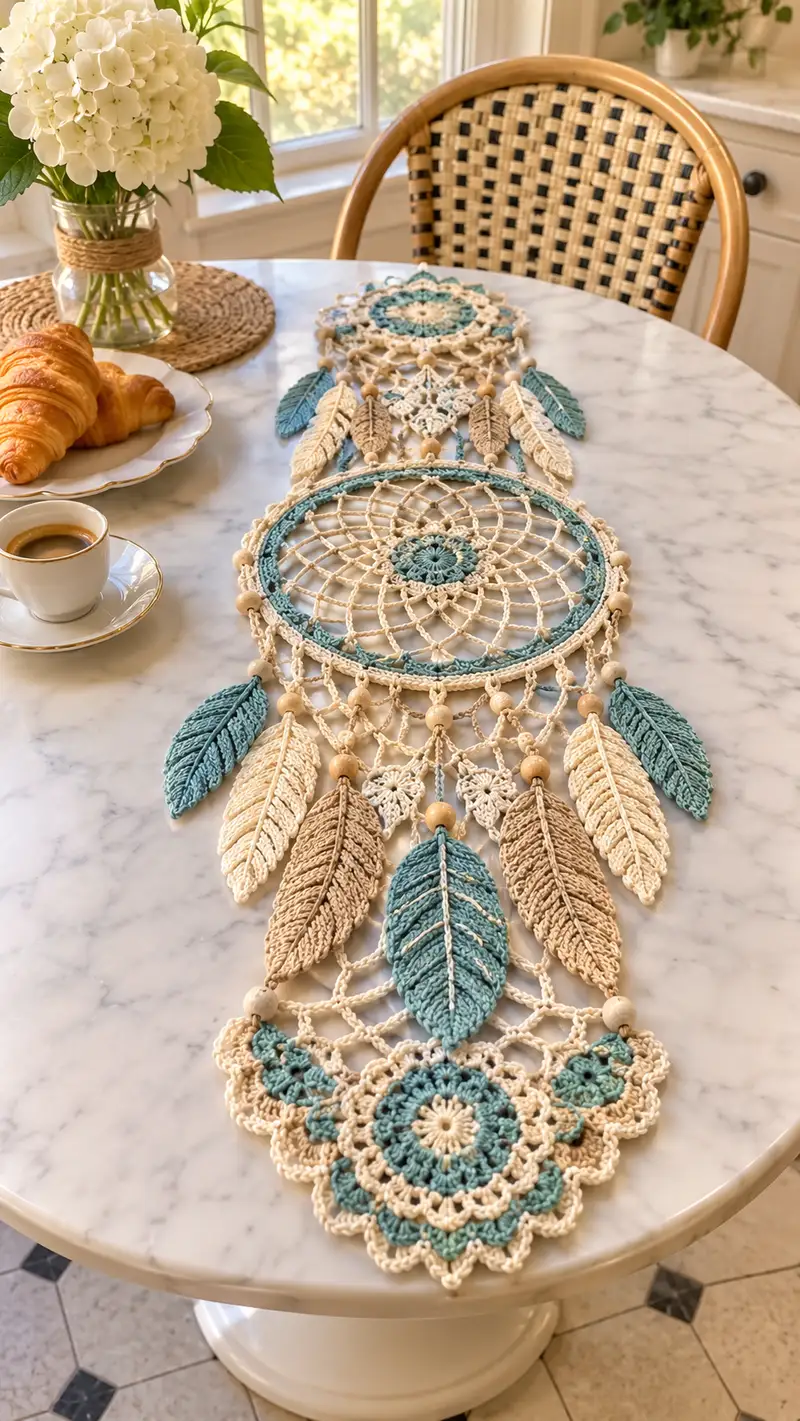
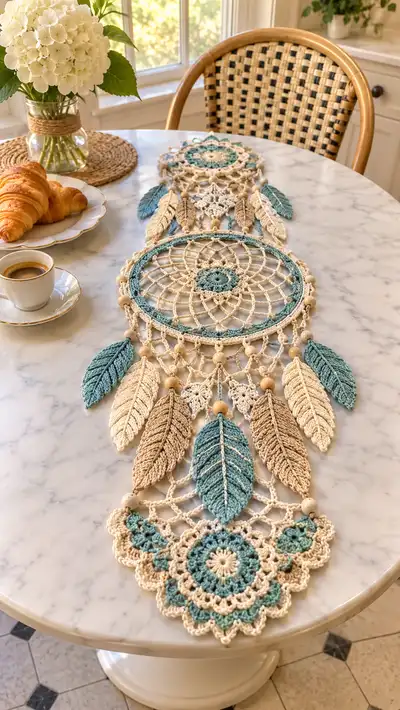
A stunning boho-inspired table runner that combines intricate mandala motifs, a large crochet dreamcatcher hoop, and delicate crocheted feathers accented with wooden beads. Worked in soft cream, sandy taupe and muted teal cotton for a natural, airy look. Perfect as a centerpiece on a dining table or a decorative runner on a console.
Progress Tracker
0% Complete
— Bottom Scalloped Mandala (anchoring end) :
Round 1 :
MR, ch2 (counts as first dc), 11 dc into ring; pull tight and join with sl st to top of ch2 (12)
Round 2 :
Ch1, sc in same st, *ch3, skip next dc, sc in next dc; rep from * around to create 6 ch3 loops; join with sl st (12 sc and 6 ch3 loops)
Round 3 :
Into each ch3 loop: (sc, hdc, 3 dc, hdc, sc) to form petals; join with sl st (6 petals)
Info :
Use muted teal for Round 1-3 center to echo the runner's color palette. Keep tension even to maintain round shape
Round 4 :
Ch1, sc in same st, *ch5, sc between next petal peaks; rep around to form decorative arches; join (6 arches)
Round 5 :
Into each ch5 arch: (sc, ch2, 5 dc, ch2, sc) to create larger scallops; join with sl st (6 large scallops)
Round 6 :
Switch to cream yarn. Ch1, sc around scallop edge placing 6 sc evenly into each large scallop; join (36 sc)
Round 7 :
(Ch3, skip 1 sc, sc in next sc) x12 around to form lacy arches; join (12 arches)
Info :
Block this motif flat after Round 7 to open the scallops; pin on blocking mat until dry so it sits flat when joined to mesh
Round 8 :
Into each arch: sc, hdc, 3 dc, hdc, sc — create a tidy raised scallop; join (12 scallops)
Round 9 :
Ch1, work 1 sc in each stitch around, making sure to place 2 sc where the scallops meet to smooth transitions (approx. 48 sc)
Round 10 :
Ch4 (counts as tr), *skip next sc, tr into next sc; rep around to create openwork radial lines; join (approx 24 tr)
Round 11 :
BLO: ch1, sc in each tr base around to create a textured ridge and stable join edge (24 sc)
Round 12 :
Switch to sandy taupe. Ch6, *skip 2 sc, sl st into next sc, ch6; rep around to build long loops for bead attachment points (12 loops)
Info :
These longer ch loops will be used later to attach wooden beads and short chains that link to the larger center hoop. Make sure loops are even by blocking and re-stretching if needed
Round 13 :
Into each ch6 loop: (sc, ch3, 3 dc, ch3, sc) to make decorative shields; join and fasten off, leaving 20cm tail for sewing to mesh panel
— Central Large Dreamcatcher Hoop (webbed round) :
Info :
Use the 22-24cm hoop. Cover hoop with single crochet or slip-stitched seam then attach the inner medallion
Round 1 :
With teal, MR, ch2, 11 dc into ring; join (12)
Round 2 :
Ch1, sc in same st, *ch4, sc in next dc; rep around making 12 ch4 spaces; join
Round 3 :
Into each ch4: sc, hdc, 5 dc, hdc, sc — form petal fans (12 fans)
Round 4 :
Switch to cream. Ch8, *sl st into center of next fan, ch8; rep around to create 12 long-chain loops that will be the web anchors; join
Round 5 :
Round 5: Working on RS, join yarn in first ch8 loop, ch1, 12 sc evenly inside loop, ch4 repeat decreasing to create a small ring of sc inside each ch8. Work across all loops to create uniform anchors (approx 12 x 12 sc clusters)
Round 6 :
Form the web: Move to inside ring and ch6, sl st into anchor at every second ch to create a radial pattern, working a web stitch by chaining and sl st over several rounds. Example path: ch6, sl st into anchor 1, ch6, sl st into anchor 2 — repeat around until you have a circle of 6 sl st points forming the first web round.
Info :
The dreamcatcher web is worked in chain-and-slip-stitch rounds. Keep chains even and pull gently on each loop to create a flat, nicely tensioned web. Use stitch markers to mark anchor points.
Round 7 :
Web round 2: From each sl st anchor, ch5, sl st into the middle of the chain of previous round to draw the web tighter; repeat for full circle. Maintain symmetry until web approximates 8–10 cm across.
Round 8 :
Web round 3: Continue with ch4 loops sl st into center repeats; tighten web by reducing chain lengths to ch4 then ch3 over successive rounds — this creates the concentric spiral web effect (repeat until you reach center).
Round 9 :
Center medallion: In center make a small MR motif of 6 sc, (1 sc, inc) rounds to create a rosette. Join securely to center of web with long tail sewn through loops.
Info :
Insert small wooden beads around the hoop by slipping them onto connecting chains before joining them to the hoop. Space 8-12 beads evenly for the featured look.
Round 10 :
Trim and fasten off the web yarn, leaving a long tail to stitch the inner medallion to the hoop covering. Cover the outer hoop edge with sc in cream around the hoop to hide metal and provide attachment points (approx 120 sc around hoop depending on hoop circumference)
Round 11 :
BLO: Work 1 sc in each st on hoop edge BLO for a neat ridge and to create loops to hang connecting net panels (same count as previous round) — join and fasten off
— Upper Small Medallion (top of runner) :
Round 1 :
MR, ch2, 11 dc into ring; join (12)
Round 2 :
Ch1, sc in same st, *ch3, sc into next dc; rep to make 6 ch3 loops; join
Round 3 :
Into each ch3 loop: sc, hdc, 3 dc, hdc, sc (6 petals)
Round 4 :
Switch to cream. Ch5, *sl st into petal center, ch5; rep to create 6 long chain loops; join
Round 5 :
Into each chain loop: (sc, ch2, 3 dc, ch2, sc) to form trimmed scallops; join and fasten off leaving 15cm tail
Info :
Block the small medallion so it sits flat and matches the scale of the large hoop when joined with chain netting. Use the tail to whip-stitch to the net panel later
— Net Lace Connector Panels (linking motifs) :
Info :
These panels form the triangular mesh sections that connect hoops and motifs. They are worked in rows of chain loops and joining stitches. Tension is important to produce consistent triangle sizes.
Row 1 :
Join cream yarn to edge of top medallion where you want to begin connector. Ch6, sc into adjacent point on medallion edge. Repeat to create a vertical ladder of ch6 loops—make 7 repeats (7 loops)
Row 2 :
Working down: Turn, ch6, sl st into bottom of previous loop to lock; ch6 and sl st down forming a diamond lattice; continue until panel height reaches about 7–9cm for the first connector
Row 3 :
On reaching desired height, create bridging chains across to the central hoop: ch12, sl st into hoop sc covering, ch12 back to panel and continue lace repeats to form symmetrical netting; fasten off when both sides attached
Info :
Make sure to add wooden beads on long bridge chains before securing them to the hoop if you want beads between panels. Slide bead onto chain then secure with sl st; or tie a small knot below bead to hold in place
Row 4 :
Repeat similar connecting nets on both sides of central hoop to create a balanced, mirrored look; ensure equal counts of chain repeats so the runner hangs straight
— Feather Motifs (Make 10 total; 5 large and 5 medium) :
Info :
Feathers are worked flat in rows with a center spine (chain) and alternating side repeats forming leaf veins. Use a 3.25–3.5mm hook for crisp definition. Instructions below form one feather; repeat for total indicated, changing colors per the photo: teal, cream, taupe alternating.
Feather (Large) - Repeat 5 times - Round/Row 1 :
Ch21 (this is the center spine), sc in 2nd ch from hook and next 4 ch (5 sc), turn (5)
Round/Row 2 :
Ch1, sc in next 5, ch1, sc into side of spine (pick up the spine chain), repeat along to end creating a small ridge; work evenly (5)
Round/Row 3 :
Turn, ch1, along side edge: (hdc, dc, tr, dc, hdc) into each side segment to form a graduated feather edge; on opposite side mirror these stitches back along the chain base; maintain even stitch counts
Round/Row 4 :
Work a second row of textured stitches to bulk the feather: (sc in each st across, then join to next side and repeat) - the feather widens to approx 12–14 sts across at the center
Round/Row 5 :
FLO: sc in each st across the feather to form a visible ridge; this will make veins pop. At center place a slightly taller stitch (dc) to accentuate the midrib
Round/Row 6 :
Decrease the tip by working sc2tog at ends of rows for the next 4 rows to taper the feather to a point; maintain mirrored decreases on both sides
Round/Row 7 :
Add center embroidery vein: Using contrast color (cream on teal or teal on cream), work a surface slip-stitch or chain-and-sl st along the spine to create visible vein lines. Secure ends and weave through to underside
Round/Row 8 :
Trim shape by carefully sc around the perimeter, tightening corners to keep a crisp leaf outline. Fasten off leaving long tail for attachment
Info :
For medium feathers use ch17 spine and otherwise follow same shaping; for smaller accent feathers use ch13. Block feathers lightly, pinning edges to shape and flatten the felled grooves
Feather (Medium) - Repeat 5 times - Round/Row 1 :
Ch17, sc in 2nd ch from hook and next 4 ch (5 sc). Then follow same sequence as large feather but reduce increases to reach 10-12 sts at center, and fewer taper rows (approx 2-3)
Info :
Alternate colors in the order shown in the photo: teal, cream, taupe, cream, teal for a visually balanced runner. Emphasize blocking so feathers sit flat when attached to the netting
— Individual Feather Subsections (Detailed Make 1 to Make 10) :
Feather 1 :
Follow 'Feather (Large)' rows 1-8. Use teal yarn for body and cream for veins. Leave 18cm tail for joining. Bead note: Before sewing, thread a 12mm wooden bead onto the connector chain that will attach this feather.
Feather 2 :
Follow 'Feather (Medium)' rows 1-6. Use cream yarn and taupe vein embroidery. Leave tail. Add bead as above.
Feather 3 :
Repeat large feather in taupe body with cream veins. Block and leave tails for joining.
Feather 4 :
Repeat medium feather in teal. Embroider central vein with taupe. Leave tail.
Feather 5 :
Repeat large feather in cream. Add teal vein embroidery. Leave tail.
Feather 6 :
Repeat large feather in teal (same as Feather 1), but mirror the veins for visual alternation. Leave tail and block.
Feather 7 :
Repeat medium feather in taupe with cream veins. Leave tail.
Feather 8 :
Repeat large feather in cream with taupe veins. Block and leave tail long for secure attachment.
Feather 9 :
Repeat medium feather in teal with cream veins. Leave tail.
Feather 10 :
Repeat large feather in taupe with teal veins. Leave tail for sewing.
Info :
These ten detailed feather subsections create the layered fringe. Because they are worked separately, keep a consistent gauge across all feathers to maintain symmetry when attaching to the connecting net.
— Edging & Decorative Chains (create fringe loops and bead attachments) :
Round 1 :
With cream yarn, join at hoop lower edge and ch10, sl st into hoop sc covering, ch10 again to create repeating long loops; repeat around every 6-8 sc to create 12-18 hanging loops around hoop
Round 2 :
Into each long ch loop attach a small diamond motif: MR, ch1, 8 sc in ring, join, then ch6 and attach to loop with sl st; fasten off (one diamond per loop)
Info :
Before attaching diamonds or feathers, slide beads onto the hanging chains in the order you prefer. Tie a small knot under each bead for security if necessary
Round 3 :
Create short connecting chains that will hold the feathers: ch12, fold to hook directly beneath bead and sl st to diamond point to create a neat hanging line. Sew feather tail to bottom of chain.
— Assembly & Joining (joining motifs, hoop, panels and feathers) :
Info :
Assembly is the final and most delicate step. Block all major pieces flat. Lay motifs aligned on flat surface and pin in place to test spacing before sewing. Keep photograph or diagram handy for placement reference.
Step 1 :
Attach bottom scalloped mandala to lower net panel: using long tail from Round 13 of mandala, whip-stitch evenly through chain loops of net so seam is invisible. Aim to match scallop peaks to the net points (approx 12 attachment points)
Step 2 :
Cover central metal hoop with a round of sc in cream prior to stitching inner web: join yarn and sc around outer hoop edge placing 2 sc in each 1 cm area until hoop is fully covered (approx 100-130 sc depending on hoop). This becomes the ladder for net attachments
Step 3 :
Position the central web so that its decorative scallops line up with the attached net panels from the top medallion and bottom mandala. Use the ch12 bridging chains to attach to the hoop with sl st and reinforce with sewing where necessary
Info :
When attaching net panels to the hoop, space them evenly and count repeats so the runner hangs symmetrically. Pin both sides and compare left to right before sewing in place
Step 4 :
Sew the small top medallion to the top end of the lace net using its 15cm tail. Use matched thread color so stitches are invisible. Reinforce join with a second pass of stitches if the runner will be mobile
Step 5 :
Attach feathers to bottom of hoop and net bridging chains: thread wooden bead onto connecting chain, knot or secure bead into position, then sew feather tail directly under bead to chain using sturdy overcast stitches. Trim excess tail and weave in securely
Step 6 :
Final checks: align beads, trim stray yarn, and block the entire assembled runner to ensure flatness. Secure any wobbling joins with additional stitching or a small dab of glue where necessary
Info :
For longevity, consider reinforcing the seam where hoop meets net with a couple of extra rounds of slip stitches or sc around the connection to distribute tension across multiple stitches
Finishing this boho runner is such a joy — watching the mandalas, hoop and feathers come together feels like assembling a piece of art. The tactile mix of cotton yarn and wooden beads adds natural warmth, while the lacy netting and delicate feathers lend airy movement. Hang or lay the runner and enjoy the little details you added — each stitch shows your care. 🧶🌿✨