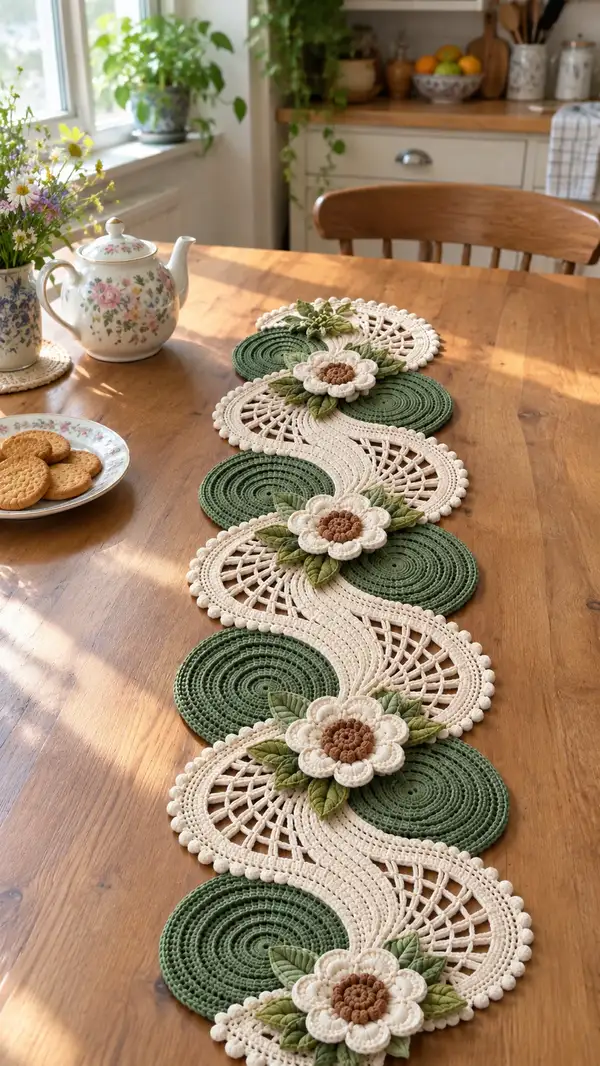
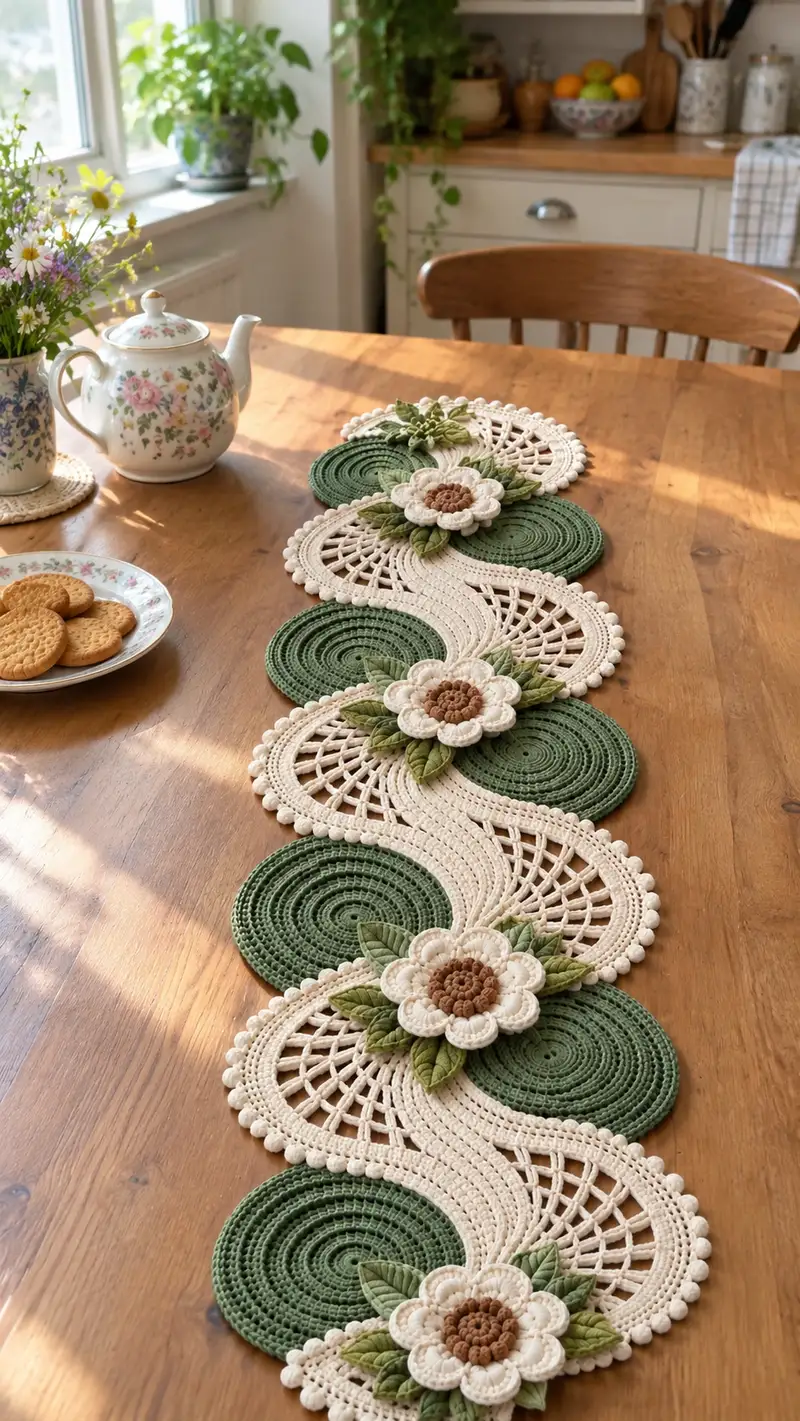
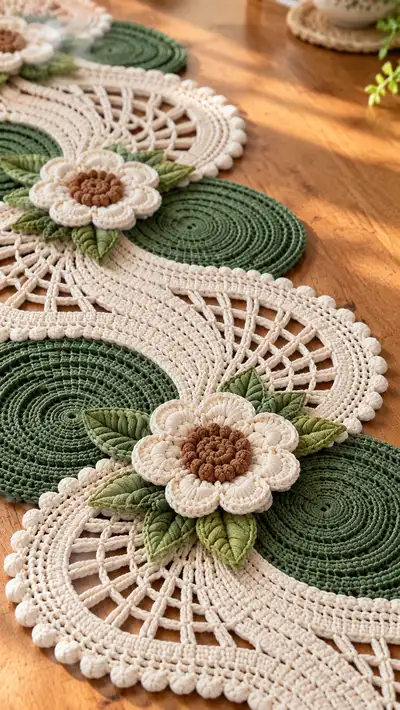
A graceful, scalloped botanical table runner that pairs spiral green motifs with elegant cream lace fans and layered floral appliques. This pattern creates a statement piece with textured flowers, sculpted leaves, and a bobble-edge finish. Designed to lay flat on tables and dressers, it brings a fresh, cottagecore look to any room. Perfect for gifting or adding a handcrafted centerpiece to your home decor.
Progress Tracker
0% Complete
— Notes & Gauge :
Info :
This pattern uses thicker cotton or yarn to achieve a flat, stable table runner. Gauge is flexible; aim for firm stitching so that a 12cm spiral disc is achieved in ~24 rounds using your chosen yarn and hook. Make a sample disc to confirm gauge and adjust hook size if disc cups or ripples.
Info :
Throughout the pattern rounds, work in continuous rounds for spiral discs to avoid a visible seam. For fan/lace sections you may use joined rounds depending on the stitch used; instructions will indicate when to join. Use stitch markers to mark first stitch of each round.
— Green Spiral Disc (Make 6 for standard runner; repeat to lengthen) :
Round 1 :
6 sc in magic ring (6)
Round 3 :
(1 sc, inc) x 6 (18)
Round 4 :
(2 sc, inc) x 6 (24)
Round 5 :
(3 sc, inc) x 6 (30)
Info :
Check your disc after round 5; it should begin to lay flat. If cupping, loosen tension slightly or add a single extra sc between increases in the next round to spread increases more gradually.
Round 6 :
(4 sc, inc) x 6 (36)
Round 7 :
(5 sc, inc) x 6 (42)
Round 8 :
(6 sc, inc) x 6 (48)
Round 9 :
(7 sc, inc) x 6 (54)
Info :
From this stage the disc becomes visually denser. Keep rounds in single crochet to maintain structural integrity for later joining. If your yarn is very bulky, you may stop increasing earlier and maintain even rounds to avoid an oversized disc.
Round 10 :
(8 sc, inc) x 6 (60)
Round 11 :
(9 sc, inc) x 6 (66)
Round 12 :
(10 sc, inc) x 6 (72)
Round 13-16 :
1 sc in each st (72)
Info :
Rounds 13-16 build a thick wall for the disc; if you need a slightly smaller disc reduce even rounds accordingly. Keep a note of final stitch count for uniform discs.
Round 17 :
(10 sc, dec) x 6 (66)
Round 18 :
(9 sc, dec) x 6 (60)
Round 19 :
(8 sc, dec) x 6 (54)
Round 20 :
(7 sc, dec) x 6 (48)
Info :
Start to shape the disc slightly toward a defined edge so it sits beneath the cream panel. If discs flatten excessively, stop decreasing and work even rounds to maintain diameter.
Round 21 :
1 sc in each st BLO (48)
Round 22 :
1 sc in each st (48)
Round 23 :
Work a decorative spiral ridge: *ch1, skip next st, sl st in next* around to create a narrow chain ridge (48)
Round 24 :
Fasten off leaving long tail for joining discs to cream panels. Weave tail under the disc stitches and keep aside for assembly (48)
Info :
Make all green discs identical. Blocking flat while slightly stretching can help them sit evenly under the cream fans. For a larger disc, continue with 1 sc rounds until desired diameter, adjusting final even rounds and decreasing steps accordingly.
— Cream Fan / Lace Panel (Make 6 to pair with discs) :
Info :
The cream fan is worked as a semicircular fan that later connects in an S-flow between discs. Work in joined rounds unless stated otherwise. Using slightly thinner hook than for discs will keep the fan lace delicate; match gauge so fans edge neatly against discs.
Round 1 :
Make a magic ring, ch1, 6 sc in ring (6)
Round 2 :
Inc in each st around (12)
Round 3 :
(1 sc, inc) x 6 then turn to work a partial circle: work another (1 sc, inc) x 6 into second half of ring to form a shallow oval (24)
Round 4 :
(2 sc, inc) x 12 (36)
Round 5 :
(3 sc, inc) x 12 (48)
Info :
At this point you have an approximate semicircular base. The next rounds establish the inner lattice. Use stitch counts precisely to keep even spacing for vertical chain arches.
Round 6 :
Ch5 (counts as tr+ch2), skip 2, sl st in next; *ch5, skip 2, sl st in next* across to form 12 chain arches. Turn and secure with sl st, join (48)
Round 7 :
In each ch5 arch: sl st, ch3, 8 dc in arch, ch3, sl st (creates a fan within each arch). Evenly space to maintain 12 fans (48)
Round 8 :
1 sc in each st across the semicircular base to stabilize fans (48)
Round 9 :
BLO 1 sc in each st for a neat ridge (48)
Round 10 :
Start shaping outer scallop: *(3 sc, 1 bp bobble, 3 sc) in next big fan top, sl st in next single stitch* repeat across semicircle (12 bobbles, stitch count effectively 48)
Info :
Bobble (bp) worked as: [dc3tog cluster, pull through to create bobble] or follow your preferred bobble stitch with consistent height for decorative edging.
Round 11 :
1 sc between bobbles, sc around bobble post to anchor (48)
Round 12 :
Repeat round 10 for pronounced scallop edge, placing bobbles into the same fan tops (12 bobbles)
Round 13-16 :
1 sc in each st (48)
Info :
These even rounds add stability and thickness to the cream panel. If your cream panels seem too floppy, add an extra sc round before final bobble edging.
Round 17 :
Work an outer decorative ridge: *ch3, sl st in second st away, repeat creating small loops that will later be used to join to discs (48)
Round 18 :
Fasten off leaving a long tail for joining to green disc; weave tail under stitches and set aside (48)
Info :
Make all six cream fans identical. Block fans to the desired semicircle shape and pin flat so their bobble edges look even and lace arches open nicely.
— Connecting S-Shaped Panel (Worked as long curved strip that joins fans & discs) :
Info :
The S-shaped connecting strip is worked in alternating arcs that align to the disc centers and fan edges to create a flowing wave. Work this as a long strip in joined rounds and then shape by sewing to motifs.
Round 1 :
Ch40 (foundation chain for a narrow strip; adjust length to match your circle spacing), turn, 1 sc in 2nd ch from hook and each across (39)
Round 2 :
Ch1, turn, 1 sc in each st (39)
Round 3 :
Ch2, turn, *1 hdc in next 3 sts, 1 dc in next 3, 1 hdc in next 3* repeat to last 3 sts, 1 sc (39)
Round 4 :
Ch1, turn, 1 sc in each st BLO to create a subtle ridge (39)
Round 5 :
Start the curve shaping: (work increases at start and end of the strip) inc in first st, 1 sc in next 35, inc in last st (41)
Round 6 :
1 sc in each st (41)
Info :
Alternate sections of this strip are later flared with openwork arches to align with the cream fans' lattice. Block this strip slightly curved to prepare for sewing, or add targeted increases to shape stronger curves.
Round 7 :
*(ch5, skip 2 sts, sl st) across the middle 30 sts to create 6 arches; secure ends with sc (41)
Round 8 :
Work each arch as: sl st, ch3, 6 dc, ch3, sl st, then sc across rest (41)
Round 9-12 :
1 sc in each st (41)
Round 13 :
At intervals matching disc centers, work an extended oval: inc, (2 sc, inc) x 4, 1 sc in next 29, (inc, 2 sc) x 4, inc (49)
Info :
These oval flares will tuck beneath the green discs when assembled. Use pins to fit the oval to disc diameter before permanently sewing. Keep the strip long enough to connect all six module pairs; for longer runners repeat the module pattern in additional strips.
Round 14-18 :
1 sc in each st (49)
Round 19 :
Work decorative edges: *sc, ch3, skip 2, sc* around to create loops for final bobble edging (49)
Round 20 :
Fasten off leaving long tail for joining to fans and discs; weave tail under the strip stitches (49)
— Flower Center (Make 3 per runner) :
Round 1 :
6 sc in magic ring using warm brown (6)
Round 3 :
(1 sc, inc) x 6 (18)
Round 4 :
Work raised popcorn texture: *(bp), sc in next* around creating 9 brown bobbles (18)
Round 5 :
Fasten off leaving long tail for sewing onto petal base
Info :
Create a tight, slightly raised brown center that will be sewn onto the cream petal base to create a realistic flower center. Use consistent bobble size for neat centers.
— Cream Petals (Make 6 petals per flower; 3 flowers total) :
Round 1 :
With cream yarn ch6, sl st to first ch to form ring, or make mr and work 6 sc (6)
Round 2 :
Inc in each st around (12)
Round 3 :
(1 sc, inc) x 6 (18)
Round 4 :
Ch2, 1 hdc in next st, 3 dc in next, 1 hdc in next, ch2, sl st in base stitch to create petal tip. Repeat to make 6 petal loops around (18)
Round 5 :
Work a puff-round to create thickness at petal top: in each petal top work (yarn over, insert, pull up loop) x3, pull through all loops, ch1 to close for a small puff; sc between petals (18)
Round 6 :
Secure petals with 1 sc around base, tighten center and fasten off leaving long tail for attaching the brown center (18)
Info :
Make six petals then sew them together around a small cream base to form a layered flower. Stagger petals slightly for a full 3D look. Repeat for each flower cluster.
— Leaves (Make 4 leaves per flower — two light olive, two mid olive) :
Round 1 :
Ch8, sc in 2nd ch from hook and next 2, hdc in next 2, dc in next, hdc in next, sc in last; work along the other side of chain mirroring stitches, sl st to starting st to form leaf base (14)
Round 2 :
1 sc in first 3 sts, 1 hdc in next 3, 3 dc in center st, 1 hdc in next 3, 1 sc in last 3 (14)
Round 3 :
Work surface slip stitch veins: with contrasting shade, embroider a central line of sl sts from base to tip and mirror smaller veins by working sl sts radiating off the center. Fasten off, leave tail for sewing (14)
Info :
Use a slightly smaller hook for leaves to make them slightly firmer than petals. Block leaves with a light steam and pin them with a gentle curve for a sculpted look before assembly.
— Assembly & Joining (Major assembly section — detailed step-by-step) :
Info :
Layout your runner on a flat blocking board or table. Arrange the modules in the repeating order: green disc, cream fan, green disc, cream fan, ending with a green disc. Pin each disc so its outer ridge slightly overlaps the inner curve of the adjacent cream fan.
Step 1 :
Align a green disc at one end and position a cream fan so the straight base of the fan overlaps the disc by approximately 6-8 sts worth of edge; use pins to hold in place (48)
Step 2 :
Sew using yarn tail from disc and mattress or whip stitch through both layers, using small even stitches. When sewing through bulky rope/gauge yarn, pass the needle through several plies and pull snugly to create a flat join. Repeat on both sides of the fan base for secure attachment.
Info :
Make sure seam is flat and not puckering; stretch gently as you sew to match edge curves. Add extra reinforcement stitches where thread passes crosswise to prevent movement when the runner is in use.
Step 3 :
Join connecting S-strip to the opposite edge of the fan or to the next disc by matching the pre-made loops and oval flares. Use a long tail from the strip to mattress-stitch along the connecting loops. Work slowly and pin frequently to maintain the flowing S-shape.
Step 4 :
Repeat the sewing sequence for all six modules (disc+fan pairs) until runner length is achieved. Use blocking pins between joins to preserve the sinuous S curve during final finishing.
Info :
For a seamless look, weave tails of joining yarn to the underside and use a matching thickness of yarn for sewing. If necessary, use a fine upholstery curved needle to navigate the thickness of rope yarn without compromising stitches.
Step 5 :
Sew flower base: attach the brown center to the assembled cream petal unit with small whip stitches, then sew the completed flower onto the intersection where the cream fan meets the green disc. Position the flower center over the point where the two motifs meet to conceal join stitches and reinforce both modules.
Step 6 :
Sew leaves beneath and around the flower, alternating light and mid olive shades so the leaves radiate outwards. Use a tight ladder stitch at leaf bases and secure leaf tips with a couple of tiny stitches to keep shape.
Info :
Placement tip: set flowers approximately centered on the seam between disc and fan. For a natural look stagger the angle of leaves; some leaves may tuck slightly under a disc or fan edge to look integrated rather than glued on top.
— Final Bobble Scallop Edging (worked around whole runner for finishing) :
Round 1 :
With cream yarn, join to outer edge at one end of runner, ch1, 1 sc evenly around the entirety of the runner's outer edge, placing 1 sc at each small loop or each half-stitch to maintain spacing (use about 260-320 sc total depending on runner length)
Round 2 :
*sc in next 3 sts, bp (bobble), sc in next 3 sts, picot (ch3, sl st in base)* repeat around. Adjust repeat to maintain even bobble spacing across curves (same number of bobbles as fan bobbles plus disc rim accents)
Round 3 :
1 sc in each st to tidy and secure bobble row, sl st to join, fasten off and weave in ends
Info :
The final edging unifies discs and fans. When working bobble scallops on convex curves, add an extra sc or two in that area to prevent puckering. For concave curves, remove a sc occasionally to keep a smooth edge.
— Finishing Touches & Blocking :
Info :
After assembly, press the runner lightly using steam blocking or a damp towel and a warm iron on low, pinning motifs flat. Cotton tends to relax into position with blocking; leave pinned overnight for best results. Trim any stray fuzz and ensure all ends are woven in and concealed under motifs.
Info :
If runner is meant for heavy use, consider backing the runner with a thin non-slip felt cut to shape and hand-sewn to the underside using invisible ladder stitch, which protects the table finish and keeps the runner flat during use.
Info :
To lengthen your runner, simply add additional disc+fan module repeats and make a correspondingly longer connecting strip section. The pattern is modular and highly customizable.
This botanical table runner turns simple yarn into a flowing garden of texture and color. Each spiral disc, lace fan and layered flower adds personality and handcrafted warmth to your table. With patient stitching and careful assembly, the finished runner will feel like an heirloom accent that invites compliments and cozy afternoons. 🧶🌿✨