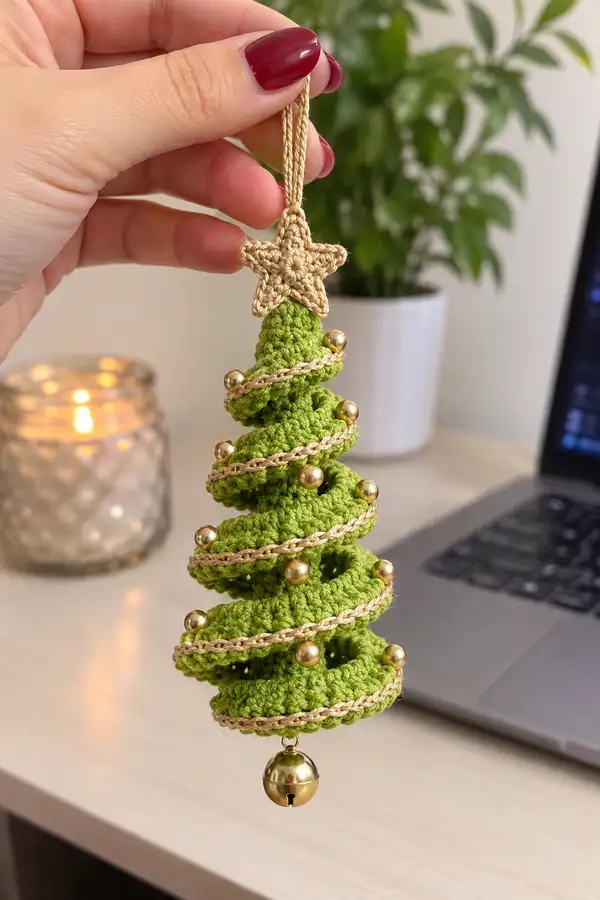
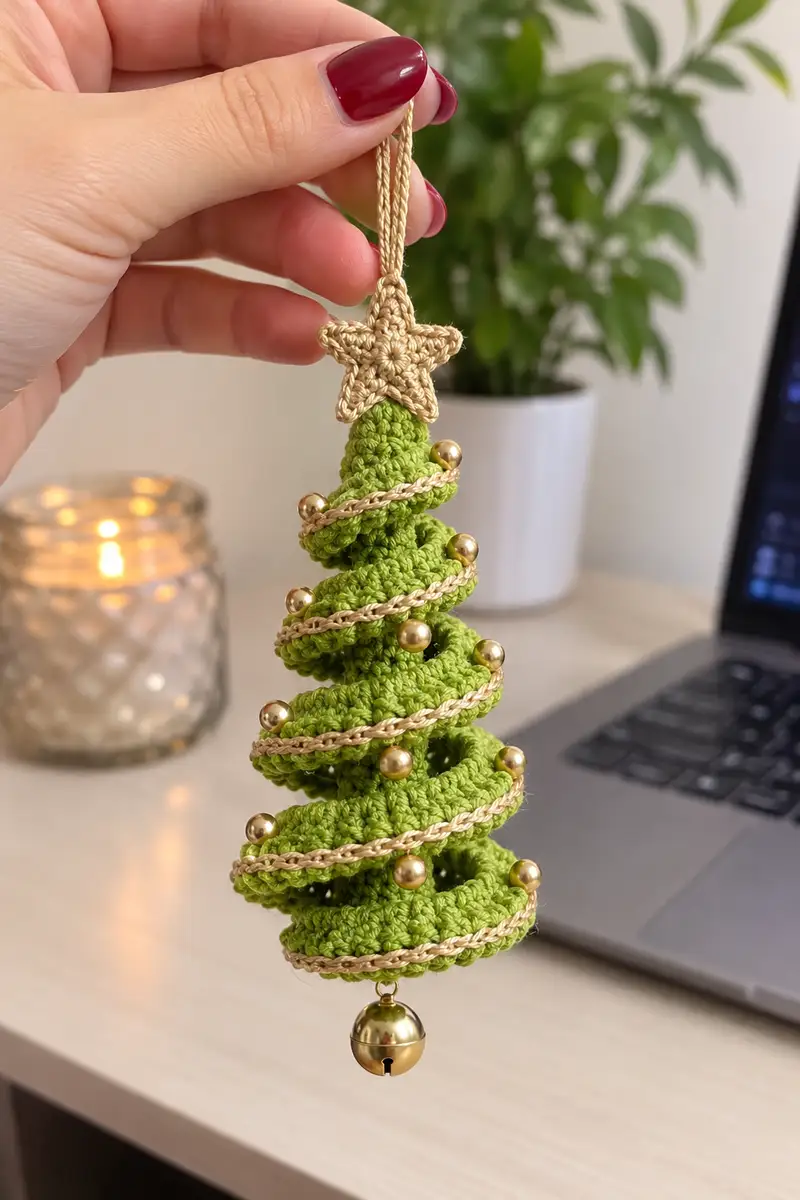
Create a charming, bouncy spiral Christmas tree ornament with this detailed pattern. The ornament features a stacked spiral ruffle tree body worked around a central cone, a small crocheted star topper, a metallic garland braid, gold bead decorations and a jingle bell at the base. Finished is a lightweight hanging decoration perfect for branches, garlands or gifts. Clear round-by-round instructions and practical tips help you assemble a neat, sturdy ornament.
Progress Tracker
0% Complete
— Central Cone (core) :
Round 1 :
6 sc in magic ring (6)
Round 3 :
(1 sc, 1 inc) x 6 (18)
Round 4 :
(2 sc, 1 inc) x 6 (24)
Round 5 :
(3 sc, 1 inc) x 6 (30)
Info :
This cone will be the structural spine of the tree. Work fairly firmly so the cone holds shape well. Place a stitch marker at the start of each round.
Round 6 :
(4 sc, 1 inc) x 6 (36)
Round 7 :
(5 sc, 1 inc) x 6 (42)
Round 8 :
1 sc in each st (42)
Round 9 :
1 sc in each st (42)
Info :
We will use the top portion of the cone to attach spiral tiers; keep track of the round numbers where tiers will be sewn. Optionally stuff very lightly from the base upwards to create a small padded core (not required).
Round 10 :
1 sc in each st (42)
Round 11 :
1 sc in each st (42)
Round 12 :
1 sc in each st (42)
Round 13 :
(6 sc, 1 dec) x 6 (36)
Round 14 :
(5 sc, 1 dec) x 6 (30)
Round 15 :
(4 sc, 1 dec) x 6 (24)
Info :
At round 15 the cone tapers. Decide where each crochet ruffle tier will be attached; typical layout in this pattern attaches tiers at rounds 8, 11, 13, 15 and additional tailored anchor points. Mark those rounds now with small safety pins or washable marker so you can align tiers consistently.
Round 16 :
(3 sc, 1 dec) x 6 (18)
Round 17 :
(2 sc, 1 dec) x 6 (12)
Round 18 :
(1 sc, 1 dec) x 6 (6)
Round 19 :
6 dec (3) - optional to close very small tip; OR stop and leave opening for the star stem. If you prefer a small solid tip, close now and leave a tail for attaching star
Info :
Fasten off leaving a 30 cm (12 in) tail if you plan to sew the star directly at the tip, or leave open for inserting the star stem. Do not overstuff the cone; a lightly firm cone holds the tiers neatly without stretching the ruffles.
— Spiral Tier 1 (Bottom widest ruffle) :
Info :
We will create ruffled discs that are later sewn to the cone at defined anchor rounds. Each tier is worked as a separate flat circle plus 1–2 ruffle rounds to create the wavy edge that forms the spiral shape.
Round 1 :
6 sc in magic ring (6)
Round 3 :
(1 sc, 1 inc) x 6 (18)
Round 4 :
(2 sc, 1 inc) x 6 (24)
Round 5 :
(3 sc, 1 inc) x 6 (30)
Round 6 :
1 sc in each st (30)
Round 7 :
1 sc in each st (30)
Round 8 :
BLO: 1 sc in each st BLO (30)
Round 9 :
Ruffle row: (2 sc in each st) x 30 (60)
Round 10 :
Ruffle shaping: (1 sc, 2 sc in next st) x 60/3 pattern to maintain gentle ripples (80) — rearrange increases across the round to create an even ruffle (80)
Info :
Block the ruffle flat with a steam iron at low setting or pin into shape while damp to encourage the wave. Leave a 30 cm tail for sewing. This bottom tier will be attached at the widest part of the cone (around cone rounds 8-10).
— Spiral Tier 2 (next up) :
Round 1 :
6 sc in magic ring (6)
Round 3 :
(1 sc, 1 inc) x 6 (18)
Round 4 :
(2 sc, 1 inc) x 6 (24)
Round 5 :
1 sc in each st (24)
Round 6 :
BLO: 1 sc in each st (24)
Round 7 :
Ruffle row: (2 sc in each st) x 24 (48)
Round 8 :
Ruffle shaping: (1 sc, 2 sc in next st) x 48/3 pattern to create soft scallops (64)
Info :
Sew this tier to the cone around cone rounds 11-12 using mattress stitch or whip stitch, offsetting it slightly so it stands off the cone and creates a spiral gap to show the layer beneath.
— Spiral Tier 3 :
Round 1 :
6 sc in magic ring (6)
Round 3 :
(1 sc, 1 inc) x 6 (18)
Round 4 :
(2 sc, 1 inc) x 6 (24)
Round 5 :
1 sc in each st (24)
Round 6 :
1 sc in each st (24)
Round 7 :
BLO 1 sc in each st (24)
Round 8 :
Ruffle row: (2 sc in every other st) x 12 (36)
Round 9 :
Ruffle shaping: (1 sc, 2 sc in next st) x 36/3 pattern to balance scallops (48)
Info :
Attach this tier to cone rounds 13-14 offset from Tier 2 to create the visual spiral. Use pins to hold the tier lifted slightly as you sew around every 6-8 stitches to maintain the gap.
— Spiral Tier 4 :
Round 1 :
6 sc in magic ring (6)
Round 3 :
(1 sc, 1 inc) x 6 (18)
Round 4 :
(2 sc, 1 inc) x 6 (24)
Round 5 :
1 sc in each st (24)
Round 6 :
BLO: 1 sc in each st (24)
Round 7 :
Ruffle row: (2 sc in each st) x 24 (48)
Round 8 :
Ruffle shaping: alternate groups of (1 sc, 2 sc in next) and (2 sc, 2 sc in next) around to produce varied ripples (64)
Info :
This mid-tier should be slightly narrower than the bottom tier; sew to cone rounds 15-16. Pin carefully so the ruffle naturally leans upward in a spiral fashion rather than horizontally.
— Spiral Tier 5 :
Round 1 :
6 sc in magic ring (6)
Round 3 :
(1 sc, 1 inc) x 6 (18)
Round 4 :
1 sc in each st (18)
Round 5 :
BLO 1 sc in each st (18)
Round 6 :
Ruffle row: (2 sc in each st) x 18 (36)
Round 7 :
Ruffle shaping: (1 sc, 2 sc in next st) x 36/3 pattern (48)
Info :
Attach to cone around earlier taper rounds (rounds 16-17). Keep this and subsequent tiers progressively narrower to move toward the tree top.
— Spiral Tier 6 :
Round 1 :
6 sc in magic ring (6)
Round 3 :
(1 sc, 1 inc) x 6 (18)
Round 4 :
1 sc in each st (18)
Round 5 :
BLO 1 sc in each st (18)
Round 6 :
Ruffle: (2 sc in every 3rd st) x 6 (24)
Round 7 :
Ruffle shaping: evenly distribute increases to reach (36)
Info :
Sew this tier to upper cone rounds 18-19. You will have small gaps by design between tiers to emphasize the spiral. Pin the tier so that the open scallops lean slightly outward.
— Spiral Tier 7 (upper small ruffle) :
Round 1 :
6 sc in magic ring (6)
Round 3 :
(1 sc, 1 inc) x 6 (18)
Round 4 :
1 sc in each st (18)
Round 5 :
BLO 1 sc in each st (18)
Round 6 :
Ruffle row: (2 sc in every other st) x 9 (27)
Round 7 :
Ruffle shaping: (1 sc, 2 sc in next st) x 27/3 pattern (36)
Info :
This smaller top ruffle will be attached very near the top of the cone so it flares to create the final spiral curves under the star. Sew around cone rounds 20-21.
— Star Topper :
Info :
The star is a small 5-point motif crocheted flat using metallic gold yarn or cord for a polished finish. Work tightly for a neat star. You will attach it to the tip of the cone with the long tail.
Round 1 :
ch 2, 5 sc in 2nd ch from hook (5) - or 6 sc in magic ring as preferred
Round 2 :
*ch 2, (hdc, sc, sl st) in next stitch to form point; sl st to next stitch to anchor*
Round 3 :
Repeat *point sequence* 5 times to create 5 points. Fasten off leaving long tail for sewing (approx. 30 cm)
Info :
For a slightly fuller star, work rounds as: mr6, (sc, ch2, sc) into each star point, then single crochet around the outer edge to give thickness. Use the long tail to stitch star to cone tip. Alternatively, leave a 6 cm stem of yarn to tuck into the cone and sew from the inside for a clean finish.
— Hanging Loop and Neck Finish :
Round 1 :
With gold yarn at the top of the star, ch 20 (or adjust for desired loop length). Fold and join with sl st to star edge and secure with a few sc. Fasten off leaving ends to weave in.
Info :
For a neater, stronger loop twist two short strands of metallic yarn into a cord and knot; then sew that cord into the star base. You can also slip a small metal jump ring through the loop for hanging on tree branches.
— Gold Garland (braided or crocheted) :
Info :
Two options: a simple crocheted chain worked in gold or a small three-strand braid of thin decorative cord. The chain is easiest and lightest.
Option A - Crochet Chain :
ch 120 (or enough to spiral around the completed tree 3-4 times). Fasten off and weave in ends. To add texture, sc in each ch across a second pass to create a thicker cord.
Option B - Braided Cord :
Cut three strands of metallic cord each 170 cm long, knot one end and braid; knot the other end and trim. Use a narrow strip of glue or a few stitches to secure each knot so braid doesn't unravel.
Info :
When placing the garland, follow the spiral created by the tiers. Temporarily pin the garland in place at 6-8 points and hand-stitch discreetly through the ruffle ridges to attach without flattening the waves.
— Bead Baubles and Embellishment :
Info :
Select light-weight metallic beads (6-12 beads). Thread a short piece of matching thread through each bead and secure it by sewing it at evenly spaced positions around the ruffles; anchor each bead to both the ruffle and the cone for sturdiness.
Tip :
Distribute beads visually: bottom 3 beads, middle 3-4 beads, top 1-2 beads. This keeps the ornament balanced and prevents heavy spots that distort the spiral.
— Bell Attachment :
Info :
Use a small jingle bell with a jump ring. Attach the jump ring to the base center of the lowest tier using a short loop of yarn or cord, then stitch and knot securely through the lowest ruffle and cone base. Reinforce with a drop of fabric glue if desired.
— Final Assembly and Finishing Touches :
Info :
Before final sewing, block each ruffle flat and shape the waves. Lay the cone down and pin each ruffle tier in place using the placement rounds noted earlier: bottom tier at cone rounds 8-10, tier 2 at rounds 11-12, tier 3 at rounds 13-14, tier 4 at 15-16, tier 5 at 16-17, tier 6 at 18-19 and top ruffle at 20-21. This staggered attachment creates the spiral.
Step :
Sew each tier to the cone using a matching yarn tail and yarn needle. Use small whip stitches or mattress stitch; take care to sew into the cone fabric and into the inner edge of each ruffle so the outer wavy edge is free to stand.
Info :
After all tiers are attached, wrap the gold garland in a spiral following the same path and tack it down every 4-6 cm with small stitches. Add beads by stitching them into place through both the garland and ruffle for extra security.
Step :
Stitch the star to the very top of the cone with the long tail. Hide knots inside the cone and weave ends into the cone to the inside and trim closely. Attach the bell at the bottom center and make sure the entire ornament hangs straight by testing the loop and adjusting attachment points if necessary.
Info :
Trim and weave all loose ends. If you used metallic cord for the garland, hide its ends behind the ruffle layers to maintain a tidy finish. Optionally add a dab of glue on sewn bead knots for long-term security.
— Alternate Sizes and Adjustments :
Info :
To make a smaller ornament, work fewer increase rounds on the cone (stop before round 7) and reduce the size of each ruffle tier by decreasing the number of increase rounds by 1–2. For a larger table-top spiral, enlarge cone rounds to 48 or 54 and make additional ruffle tiers following the same proportion rules.
Tip :
Change yarn weight or hook size for different effects: cotton DK gives crisp ruffles; a softer acrylic will produce looser waves. Always adjust hook size slightly smaller for amigurumi-style firmness on the cone core and slightly larger for the ruffle tiers so they puff freely.
This bouncy spiral tree ornament is a delightful blend of texture and holiday sparkle — each ruffled tier stacks into a playful spiral crowned by a tiny star and finished with gold beads and a jingling bell. The assembly pulls simple crochet techniques into a polished seasonal decoration you can gift or hang with pride. I hope this pattern brings you as much joy to make as it will to display! 🎄✨🧶