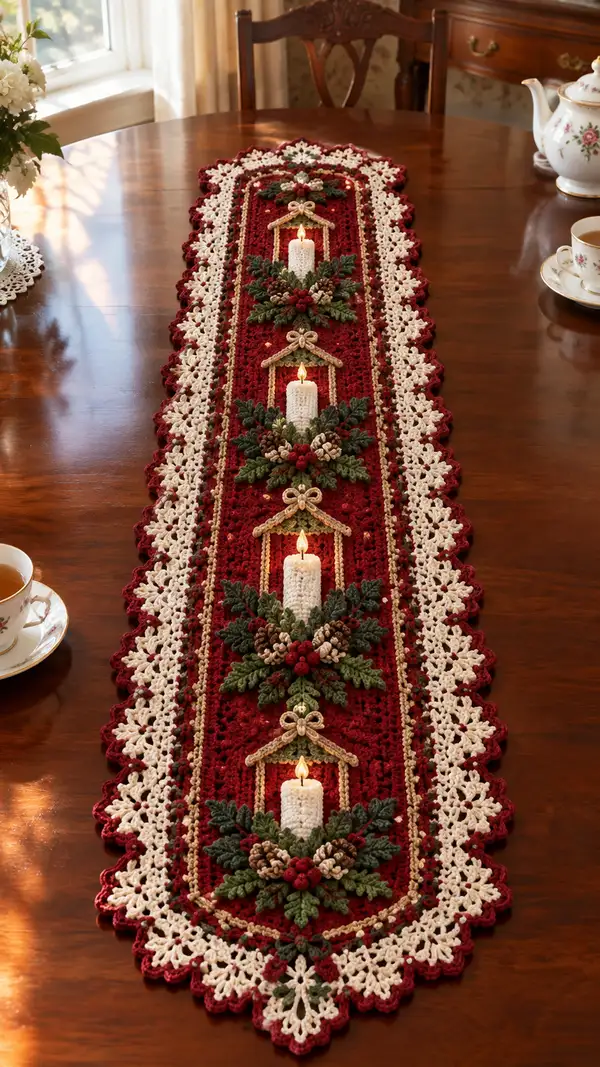
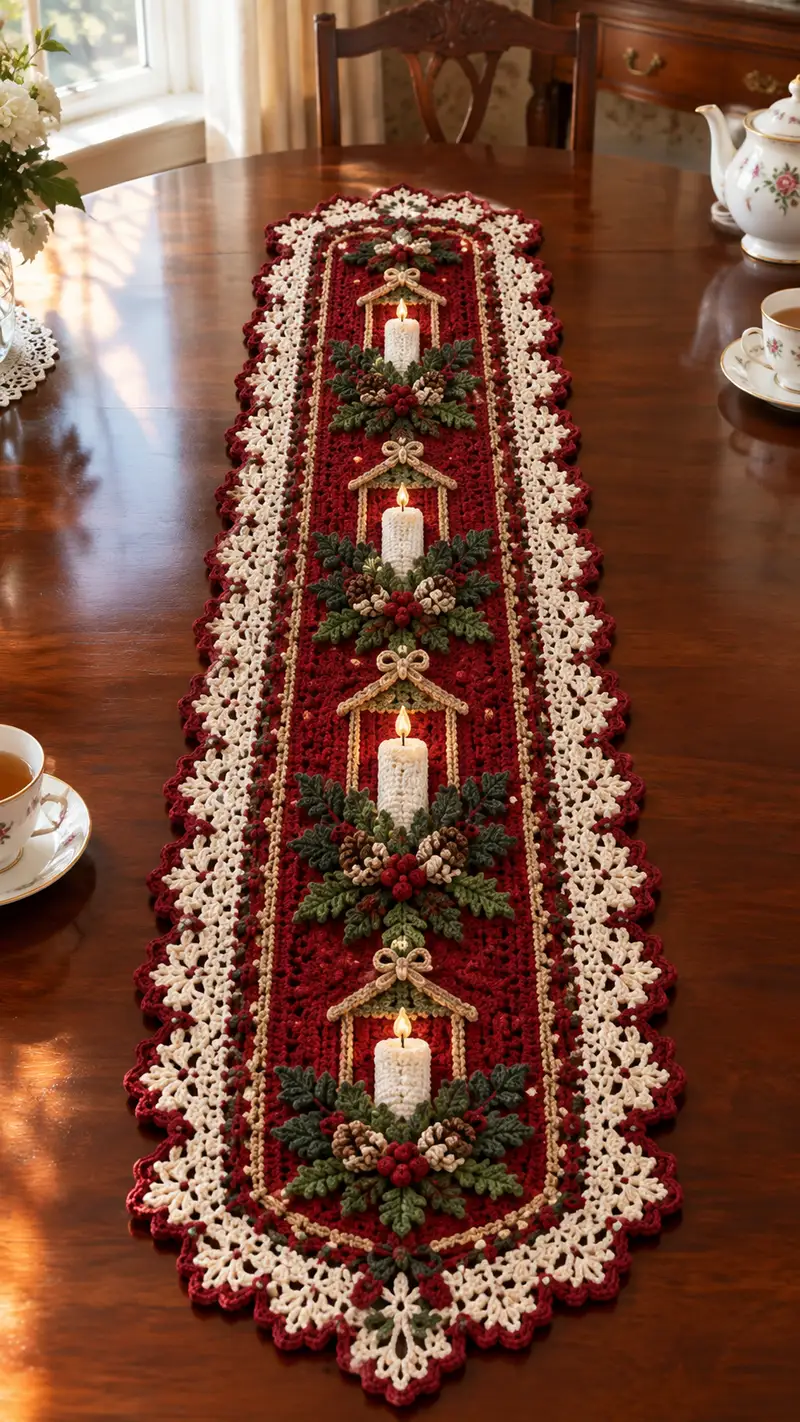
Create a festive burgundy table runner richly textured with candle motifs, pinecone clusters, evergreen leaves and a delicate cream lace edge. This pattern includes step-by-step instructions for the central textured panel, three carved candle appliques, layered pinecone and foliage clusters, small decorative bows and a scalloped lacy border. Perfect for holiday tables, this runner is worked in pieces and appliqued for depth and seasonal charm.
Progress Tracker
0% Complete
— Notes & Gauge :
Info :
Pattern is written in US terms. Gauge is not critical for size but affects finished look: approx 14 sc x 16 rows = 4 in using 4.0mm hook. Work slightly tighter for amigurumi-like dense texture on appliques. Block center panel before attaching border for best fit.
— Center Panel (worked in joined rounds around a foundation chain) :
Setup :
Using burgundy yarn and 4.0mm hook, foundation chain 67 (this forms the flat long oval width). Join with sl st to first ch to form a ring without twisting. Count across to ensure 67 chains. This width will produce an approximately 10-12 inch wide runner after finishing and blocking.
Round 1 :
Ch1, 1 sc in 2nd ch from hook and in each ch across (65), 3 sc in last ch (turning corner), 1 sc in each sc across opposite foundation (65), 3 sc in last st (turning corner) — total (65+3+65+3=136)
Round 2 :
Ch1, sc in each st around, placing 3 sc in each corner st (maintain 136)
Round 3 :
Ch2 (counts as hdc), *hdc in next 6 sts, 2 hdc in next st* rep around placing increases evenly at corners (calculate: original 136 means pattern of (6 hdc, inc) x 17 = 136+17=153? For evenness instead place 3 extra hdc in corners only: hdc in each st around, 3 hdc in each corner st — total stays 136+6=142; to keep math precise we maintain 136+6 corner increases=142. After round 3 total 142
Info :
When making rectangular/joined-round pieces, treat the 4 corner 3-sc clusters as units. This creates a neat oval rectangle. Place a stitch marker in the first stitch after joining to mark the beginning of rounds.
Round 4 :
Ch1, sc in each st around (142)
Round 5 :
Ch3 (counts as dc), *dc in next 7 sts, (dc, ch1, dc) in corner cluster base to create a small picot corner* rep around keeping even. Work dc in each st along sides. Maintain approximate count 142
Round 6-10 :
Change to working textured mesh rows: Ch3, dc in each st around for three rounds (142). On round 8 insert subtle moss-like textured stitches by doing *sc, ch1, sk next st* along center panels to create tiny openwork squares (still 142).
Info :
These rounds form the basic field in burgundy. Do not worry about exact stitch changes on dotted mesh rounds — maintain 142 total stitches around, distributing ch-1 spaces evenly between sc or dc so the circumference stays constant.
Round 11 :
In burgundy: Ch1, *(sc in next 2 sts, puff in next st)* repeat around to add a subtle raised texture (puff stitch: yo, insert hook, pull up loop 3 times, yo, pull through all loops), counting puff as one st — total 142
Round 12-15 :
Sc in each st around (142). These rounds create a stable band for later applique placement. Place temporary stitch markers where the three candle centers will be positioned: divide length into four equal segments and mark the centers of the middle three segments. Typical spacing: measure about 8-9 inches between candle centers on a runner approx 36-40 in long.
Info :
Mark candle positions carefully now before adding texture; the appliques will be sewn in place precisely at these markers. Use removable stitch markers or safety pins through the fabric for placement checks.
Round 16 :
Switch to gold/tan accent: Ch1, 1 sc in each st around (142). Work a slender gold trim: 1 sc in each st to emphasize the candle channel borders.
Round 17 :
Change back to burgundy: Ch1, sc in each st around (142). This creates the inner frame where candle motifs will sit.
Round 18-22 :
In burgundy, work 5 rounds of even sc (142) to create the main field height for appliques. Add an Info round after two rounds.
Info :
At the end of Round 20 lay the runner flat and re-check spacing between markers — you may move them slightly to balance the runner visually depending on your final length.
Round 23 :
Start building a slightly open shell background behind the candle motifs. Ch3, *sk1, (3 dc in next st), sk1, dc in next 2 sts* rep around. This introduces a gentle lacy texture (approx 142)
Round 24-28 :
Work alternate rounds of sc and shell to even out texture, keeping the total counts approximately constant (142). These rounds provide a subtle contrast so appliques stand out.
Info :
Block the center panel flat now if you prefer before adding the large side border; blocking ensures the lace border will fit neatly later.
— Candle Body Applique (Make 3) :
Info :
Each candle is a simple cream cylinder worked in the round and sewn to runner; top will be open to show a tiny sewn flame or an LED candle can be slipped in place. Make 3 identical candles.
Round 1 :
Using cream yarn and 3.5mm hook: mr, 6 sc in mr (6)
Round 2 :
Inc in each st around (12)
Round 3 :
(1 sc, inc) x6 (18)
Round 4 :
(2 sc, inc) x6 (24)
Round 5-12 :
1 sc in each st around (24) — continue until candle cylinder reaches desired height approx 24 rounds total height including base. For a short candle use 10-12 rounds; for a taller candle add extra rounds but keep even (24)
Info :
Lightly stuff the bottom of candle with a bit of fiberfill if you want a slightly raised look. Do not overstuff; the cylinder should remain soft but stable. Leave top open for a faux flame applique or small LED to be inserted later if desired.
Round 13 :
Optional: switch to textured stitch around the candle (sc in BLO) for wax-drip effect — 1 sc in each st BLO around (24)
Round 14 :
Fasten off leaving long tail for sewing. Make 3 candles.
— Candle Flame Applique (Make 3) :
Round 1 :
Using gold or soft yellow, ch4, sl st to form ring; ch1, 6 sc into ring (6) — flatten into a small teardrop shape
Round 2 :
(1 sc, inc) x3 (9) — shape slightly elongated by adding a sc and then 2 sc in same st at one end
Round 3 :
Sc around 9 sts to tidy, fasten off leaving a long tail to embroider or sew to top of candle
Info :
Sew flame to top center of candle or use a tiny dab of fabric glue. If using LED candles, place flame nearby rather than directly on top so LED light shines unobstructed.
— Candle Housing / Frame (Make 3) :
Round 1 :
Using gold/tan and 3.5mm hook: ch10, sl st in 2nd ch from hook and across (9), ch1, rotate and 1 sc in base loops along back to form a shallow arch. Work 3 sc in the top corner to form a small peaked roof impression. The arch will be sewn above each candle base.
Round 2 :
Work sc around the arch adding 2 sc in the two top corner sts to form a slightly raised ridge. Fasten off leaving long tail for sewing (approx 20 sts total including edge)
Info :
These small housings are decorative and give the vertical candle element a framed look. Make three and attach a small gold bow to their top center.
— Pinecone Base & Berry Cluster Appliques (Make 3 clusters) :
Info :
Each cluster is formed of layered leaves (fern fronds), pinecones (bobble clusters) and small berry bobbles. Work leaves in forest green, pinecones in two-tone brown, and berries in garnet/berry.
Leaf - Long (Make 6 per cluster) :
Using forest green and 3.5mm hook: ch12, sc in 2nd ch from hook, hdc in next, dc in next 2, tr in next 2, dc in next 2, hdc in next, sc in last — turn to work back along foundation chain: sl st into next 2, sc into next, (sc2tog slightly at tip if needed). Fasten off leaving tail for sewing. Make 6 long leaves per cluster.
Leaf - Short (Make 6 per cluster) :
Ch8, sc in 2nd ch, hdc in next, dc in next, dc in next, hdc in next, sc in last, turn and finish back along chain with sl st. Fasten off. Make 6 short leaves per cluster.
Info :
Arrange leaves in layered fan shapes (long leaves toward outer edges, short leaves filling center) to create full foliage behind pinecones. Pin placement before sewing: typically 3 long + 3 short on each side of candle base forming a full oval cluster.
Pinecone - Small (Make 6 per cluster) :
Using brown and 3.5mm hook: mr, ch1, 8 sc in mr (8). Round 2: (1 sc, puff in next st) x4 (alternating sc and puff) = 12 textured elements around. Round 3: sc around (12). Fasten off leaving tail. Pinecone texture is achieved by sewing several small puff/bobble bits clustered and offset. For deeper texture make a second round of smaller puffs and stack them when sewing.
Pinecone - Layered (Make 3 per cluster) :
Using a darker brown, create a slightly larger base: mr, 10 sc (10), Round2: (1 sc, puff) x5 (15), Round3: sc around (15). Fasten off leaving tail. When attaching, place small cones on top of larger to mimic natural overlap.
Berry (Make 8-10 per cluster) :
Using garnet yarn: mr, 6 sc in mr (6). Pull tight, leaving tail for sewing. These small berry knots are sewn in groups of 3-5 to the center of each cluster.
Info :
Sew pinecones to the center front of the leaf fan, then add clusters of berries and a few accent stitches in gold to represent tiny highlights. Avoid over-bulking; clusters should lay flat enough to sew to the runner but appear dimensional.
— Tiny Decorative Bow (Make 3) :
Round 1 :
Using gold/tan and 3.5mm hook: ch6, sl st to form loop, ch1, 6 sc in loop, sl st to join (6)
Round 2 :
Fold loop in half, pinch center and wrap with a small scrap yarn tail several times to form bow knots. Fasten off and weave in tail to secure. Make 3 bows. Leave long tails for sewing to candle housing tops.
Info :
Alternatively, crochet a small flat bow: ch8, sc across, ch1 turn 3 rows, then fold and stitch center. Use gold yarn for a subtle glittery look.
— Assembly of Candle Areas :
Info :
Pin each candle cylinder centered on the previously marked positions on the panel. The base of candle should align so candle height sits visually centered within the vertical frame created by gold trims. Allow about 2.5-3 in of candle visible above the pinecone cluster region depending on runner scale.
Step 1 :
Sew candle base to the runner with blind stitch using the long tail, stitching through the bottom round of the candle and into the burgundy fabric several times to secure. Keep small, even stitches to hide threads.
Step 2 :
Sew candle housing just above each candle base. Center the small arch so it forms a peak above the candle; secure with small, discrete stitches using gold yarn.
Step 3 :
Position foliage and pinecone clusters beneath and around each candle base. Start by arranging the long leaves, then place pinecones overlapping, then add berry clusters centered and finally tiny gold bow above the housing peak. Sew each element down with small stitches through stems of leaves and the backs of pinecones.
Info :
Use a few anchoring stitches through cluster centers into the runner to ensure they do not shift. For a more three-dimensional look you can tack only at the cluster centers letting leaf tips float slightly above the surface.
— Small Accent Beads & Tiny Gold Dots :
Info :
Optional: add small gold seed beads or French knots in gold yarn near cluster centers to catch light. Sew beads on with matching thread and secure knot ends beneath the fabric.
— Side Lace Border (Cream) :
Info :
Border is worked after appliques are attached. Use cream yarn and 4.0mm hook. Begin by single crocheting evenly around the entire runner edge to create an even base for the lace. Space 1 sc in each st along sides and 3 sc in each corner cluster. Aim to maintain the 142-142 plus slight changes depending on tension; the even sc round will typically be approx 142 + small add for base (approx 148).
Border Round 1 :
With cream, sc in each st around, placing 3 sc in each corner cluster and 2 sc every 10 sts along long sides to ease curvature — maintain approximate count 150
Border Round 2 :
Ch4 (counts as tr+ch1), *sk1, (tr, ch1, tr) in next st (shell), ch2, sk2* rep along long sides, in corner work (tr, ch2, tr, ch2, tr) to hold corner. This begins the lace motif. Count will vary; keep shells evenly spaced.
Border Round 3 :
Work shells into ch-1 spaces: (3 dc) in each shell space, chain 1 between shells. Along corners work 5 dc to round out corner. This round creates visible shell clusters that echo the runner image.
Border Round 4 :
Ch1, sc in each dc and shell stitch space to tidy edge (approx 150). Place markers every 12-14 sts to help maintain lace repeat symmetry.
Border Round 5 :
Ch5, *skip 2, sc in next, ch3, (5 dc in next sc), ch3, sc in next* rep around. This creates the scalloped floral points seen in the photo. Make sure points align with candle and cluster centers visually. Approx count: 25 scallops per long side depending on spacing.
Info :
Work carefully around corners adding an extra ch loop to avoid puckering. If the border pulls the body in too tight, add an extra round of sc in burgundy to widen the base before restarting cream border rounds.
Border Round 6 :
Into each scallop point work: sl st, ch3, 6 dc, ch3, sl st to form open flower-like points. Fasten off and weave ends. This round forms the ornate cream lacy edge visible.
Border Round 7 :
Optional: Work a final picot edge in burgundy over cream points for color contrast: join burgundy, *sl st in edge, ch3, sl st in same st* around tips only. Fasten off and weave ends.
— Narrow Inner Trim (Gold) :
Round 1 :
Using gold yarn and 3.5mm hook: 1 sc in each running stitch around the burgundy panel just inside the cream border. This forms the thin gold frame visible in the photo. Work 2 rounds for a subtle raised frame. Fasten off and weave tails neatly behind the cream border.
Info :
The gold trim can be made more decorative by using a chain picot every 6 sts to create tiny dotted highlights along the runner sides.
— Attaching Bows & Final Embellishments :
Step 1 :
Sew the small gold bows above each candle housing peak using a few stitches through center knot. Trim any long tails and weave under the housing for a neat finish.
Step 2 :
Sew any remaining beads or French knots onto clusters. Add a few gold accent stitches along the central field to mimic tiny highlights in the photo.
Info :
Step back and view runner in natural light before final weaving. Small adjustments to leaf positions and slight steam-blocking of appliques will improve the final presentation.
— Finishing & Blocking :
Info :
Lightly steam-block the finished runner on a flat surface: pin edges to desired dimensions and gently steam to relax stitches and even out edges. Do not press too hard on appliques; use steam from a distance. Let dry completely before removing pins.
Final Step :
Weave in all ends securely, trim excess yarn. If desired, add a lightweight interfacing or low-tack fabric to underside in areas under heavy appliques for stability when displayed on fine polished tables.
— Alternative Scale & Length Notes :
Info :
To lengthen the runner add additional rows to the center panel before starting the ornate border and candle placement. Maintain symmetry by adding equal numbers of rounds at the top and bottom positions between appliques. To shorten, remove even numbers of inner sc rounds and adjust candle spacing proportionally.
— Stitch Variations & Texture Tips :
Info :
Use BLO sc for some rounds of the center panel to create subtle ridges and added texture that echoes the pine needles. Use small puff stitches for berries and pinecone tips; alternate shades of brown for pinecones for a lifelike look. For a more subtle runner, skip bobbles and work flat appliques instead.
You've just finished a beautiful, heirloom-quality table runner that will warm holiday tables for years to come. The layered candles and pinecone clusters make a dramatic seasonal centerpiece full of texture and handcrafted charm. I love how the cream lace edge frames the deep burgundy field — it gives the runner a vintage, timeless feel. Display proudly and enjoy the sparkle of small details you added by hand. 🎄🧶