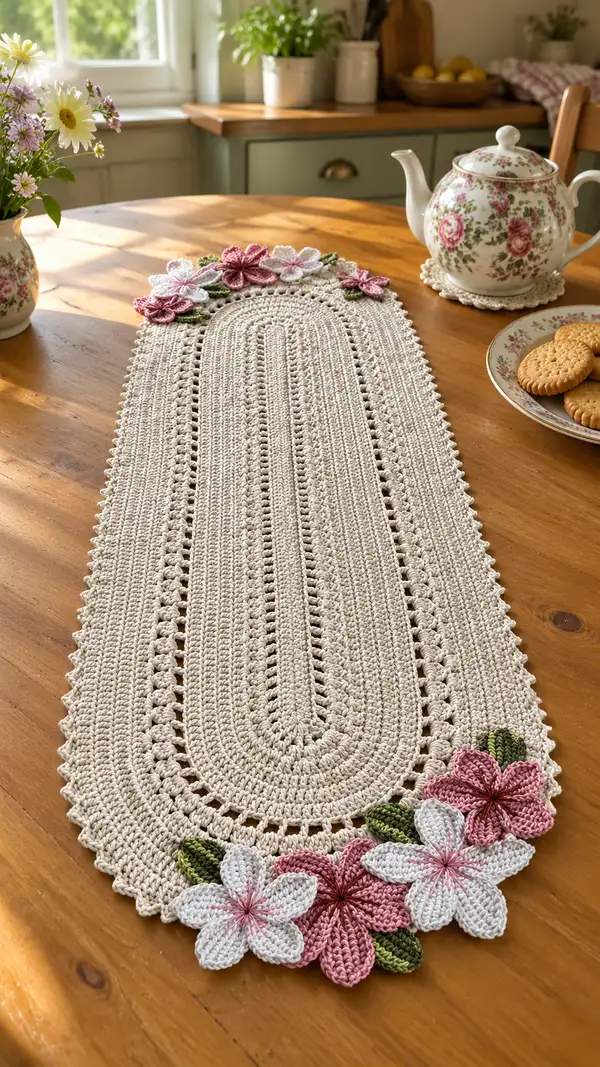
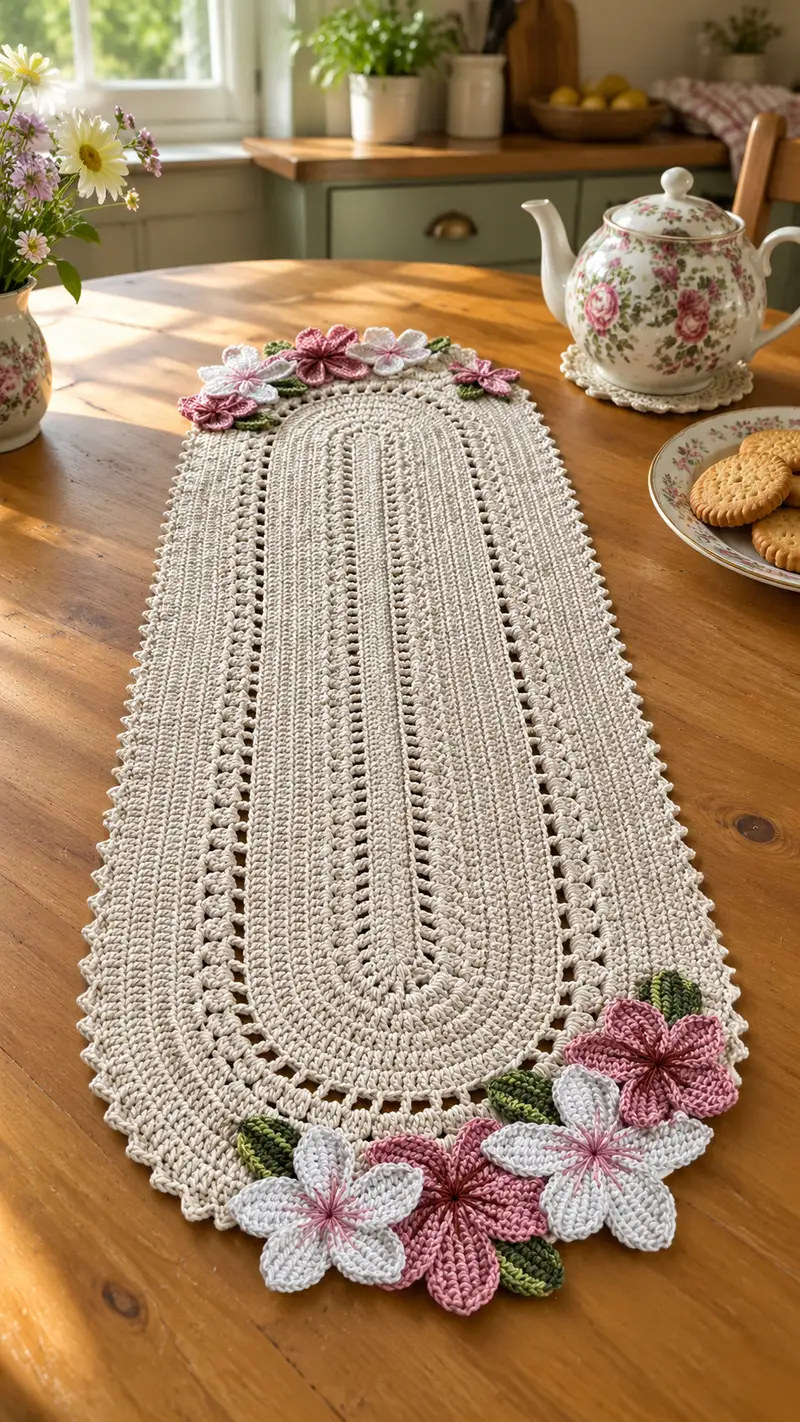
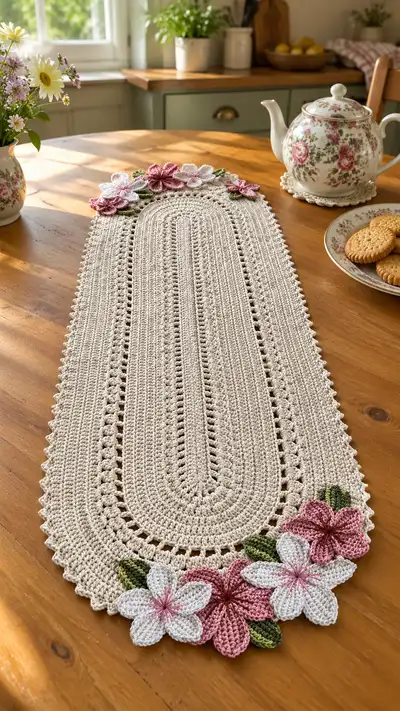
Create a charming, vintage-inspired oval table runner with a delicate scalloped edge and hand-sewn layered floral appliques. This pattern uses sturdy cotton yarn in a warm cream for the runner and soft pinks, white and green for the flowers and leaves. The design features textured ribs and openwork columns for a refined look that sits beautifully under a teapot or as a centerpiece. Intermediate-level instructions with plenty of tips make this a satisfying, homey project.
Progress Tracker
0% Complete
— Runner Base :
Round 1 :
Ch 36. 1 sc in 2nd ch from hook and in each ch across to last ch (35 sc). 3 sc in last ch; continue working on the opposite side of chain, 1 sc in each ch back along the chain (35 sc). 3 sc in the remaining loop of the starting chain to close (76)
Info :
We are working in continuous rounds (do not join with sl st) to create a neat, slightly raised spiral. Place a stitch marker in the first sc of each round to track round starts. This foundation gives an oval with 4 built-in curve points - we will increase at four evenly spaced points to maintain an even oval.
Round 2 :
(19 sc, inc) x 4 around the oval — work 19 sc, then 1 inc (2 sc in next st), repeat 3 more times (80)
Round 3 :
(20 sc, inc) x 4 (84)
Round 4 :
(21 sc, inc) x 4 (88)
Info :
Increase rounds are used to gently widen the oval. Keep your increases aligned at the same four points each time. Use your stitch marker to help realign if needed.
Round 5 :
(22 sc, inc) x 4 (92)
Round 6 :
(23 sc, inc) x 4 (96)
Round 7 :
(24 sc, inc) x 4 (100)
Round 8 :
(25 sc, inc) x 4 (104)
Info :
At this stage the runner is beginning to broaden. If you want a slightly wider runner, add one more increase round here by following the next increase formula once.
Round 9 :
(26 sc, inc) x 4 (108)
Round 10 :
(27 sc, inc) x 4 (112)
Round 11 :
(28 sc, inc) x 4 (116)
Round 12 :
(29 sc, inc) x 4 (120)
Info :
Round 12 is the last increase round in this version; total circumference is now 120 stitches. From here onward the stitch count remains constant and the oval length will grow as you work even rounds. Measure across to check width — this pattern yields a narrow oval; add more increases if you prefer a wider runner.
Round 13 :
1 sc in each st around (120)
Round 14 :
1 hdc in each st around (120)
Round 15 :
1 sc in each st BLO around (120)
Round 16 :
1 sc in each st around (120)
Info :
These rounds establish a firm, flat base. Working BLO on round 15 creates a shallow ridge that adds visual interest for the central rib. Keep the same stitch count to maintain an even, flat oval.
Round 17 :
1 sc in each st around (120)
Round 18 :
1 dc in each st around (120)
Round 19 :
1 sc in each st around (120)
Round 20 :
1 hdc in each st around (120)
Info :
Alternate sc/hdc/dc rounds to create subtle banding that reads like ribs in the long direction. These rounds are what lengthen the runner—work as many as needed for your desired runner length. In this version we continue for a steady length, repeating simple textures.
Round 21-28 :
Repeat Rounds 17-20 twice (sc, dc, sc, hdc) — each round remains (120)
Round 29 :
Eyelet column round: *2 sc, ch 3, sk 2* repeat around (120)
Info :
This eyelet round forms the vertical open columns seen in the photo. The repeat is designed to give consistent spacing—we are still working around 120 stitch positions; the chain spaces are formed while you still place a sc roughly every 3rd position to maintain the stitch map.
Round 30 :
1 sc in each st and into each ch-sp around (120)
Round 31 :
FPdc rib round: *fpdc around next st, 1 sc* repeat around (120)
Round 32 :
1 sc in each st around (120)
Round 33 :
Shell accents: *6 sc, shell (5 dc in next st) * repeat around. End placement: work shells over the same 10 evenly spaced stitches so that total remains 120 (120)
Info :
Shell rounds are decorative; the count shown assumes shells are worked in single base stitches while the other sc fill the gaps. To keep an even 120 total please place shells in one-stitch anchors spaced evenly around the oval. If your stitch math differs slightly, adjust by moving shells a stitch or two laterally.
Round 34-40 :
Alternate rounds: R34: 1 sc in each st (120). R35: 1 hdc in each st (120). R36: 1 sc in each st BLO (120). R37: 1 sc in each st (120). R38: *2 sc, ch 3, sk 2* around (120). R39: 1 sc in each st (120). R40: 1 sc in each st (120)
Info :
Work these texture bands until the runner reaches the desired length. Measure periodically—this pattern's row gauge with worsted cotton and a 3.5mm hook will add roughly 1cm per 1–2 rounds depending on stitch height. On the photographed runner, the maker worked to approximately 28-30 rounds of the central rhythm to reach the long, narrow profile.
Round 41-48 :
Continue pattern rhythm: include two eyelet rounds (as Round 29) spaced evenly apart and a few fpdc ribband rounds (as Round 31). Keep all rounds working 1 sc/hdc/dc in each st when required so stitch count remains (120) for each even round.
Round 49 :
Preparing for edge: 1 sc in each st (120)
Round 50 :
Edge setup: *sc 1, ch 2, sk 1* repeat around (120)
Info :
The ch-2 spaces will create a small decorative notch at the border and also give the scalloped edging anchors. Keep tension relaxed for the ch-2 to avoid pulling the edges in.
Round 51 :
1 sc in each st and in each ch2 space around (120)
Round 52 :
Picot scallop round: *sc in next 2 sts, (ch 3, sl st in 3rd ch from hook to make picot), sc in next 2 sts, sl st in next st* repeat around — adjust spacing to end neatly (120)
Info :
This creates the small scallop seen. If you prefer a larger picot, change ch3 to ch4. If the repeat does not land evenly, shift the first picot by one stitch in the following round for symmetry.
Round 53 :
Fasten off the main runner body leaving a 30cm tail for sewing appliques and weaving; block the runner flat by pinning to a towel and misting lightly, shaping the scallops as you pin.
Info :
Blocking is essential to make the runner sit flat. Pin out the scallops and the oval curve. Allow to dry fully before attaching appliques. Make sure to label the two ends (A and B) so appliques match both ends identically.
— Large Flower (Make 4 in dusty rose) :
Round 1 :
Using dusty rose, mr, ch 1, 8 sc into magic ring, pull tight and sl st to first sc (8)
Round 2 :
(1 sc, inc) x 8 — work 1 sc in next st, 2 sc in next, repeat (24)
Round 3 :
Ch 1, *sc in next 2 sts, ch 6, sl st into same st to form petal base* repeat around 8 times. Do not fasten off (24 anchor points)
Info :
Each ch-6 loop becomes a petal. We will build broader petals by working into the chain space and connecting to the sc base. Keep loops even by counting chain stitches carefully.
Round 4 :
Working into each ch-6: sl st, ch 1, (1 sc, 1 hdc, 3 dc, 1 hdc, 1 sc) into the ch6 space, sl st to base to secure. Repeat for all 8 petals. Finish with sl st and weave in ends (petals: 8 petals)
Round 5 :
Petal edge shaping: With same color, join at the tip of a petal, ch 1, *sc in next 2 sts along petal, picot (ch 3, sl st in 3rd ch), sc back along petal to the base, sl st into next petal base* repeat for all petals. Fasten off and leave long tail for sewing.
Info :
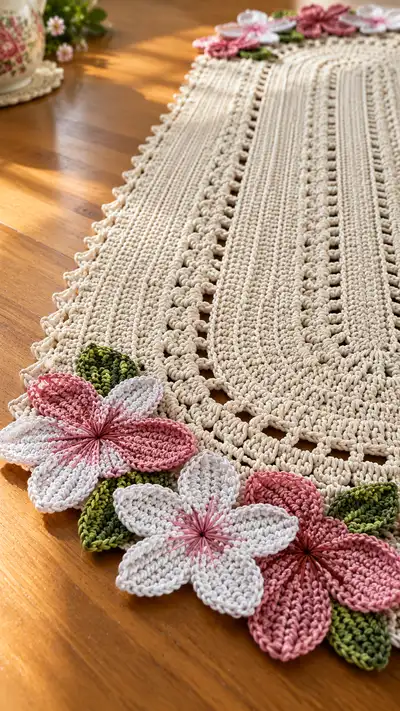
Large flower uses an 8-petal star to give fullness. You can reduce to 6 petals by using only six ch loops at Round 3 and spacing the anchors accordingly — the math above is for 8-petal flowers as seen in the photo.
— Medium Flower (Make 4 in soft white) :
Round 1 :
Using soft white, mr, ch 2 (counts as base), 10 hdc into ring, sl st to join (10)
Round 2 :
(1 hdc, inc) x 10 (15)
Round 3 :
*ch 5, sl st into base forming 5 loops; repeat 5 times (5 loops)* Do not join
Round 4 :
Working into each 5-loop: ch 1, (sc, hdc, 3 dc, hdc, sc) into loop, sl st to base; repeat for 5 petals. Fasten off leaving long tail for sewing.
Info :
These medium flowers provide contrast with a flatter profile. Use contrasting embroidery thread for the starburst centre later to match the photographed detail.
— Small Blossom (Make 4 in dusty rose) :
Round 1 :
Using dusty rose, mr, ch 1, 6 sc into ring, sl st to join (6)
Round 2 :
Ch 1, *sc in next st, ch 4, sl st into next st* repeat around to make 6 loops. Fasten off (6)
Round 3 :
Rejoin dusty rose at each loop, work (sc, hdc, 3 dc, hdc, sc) in each ch4 loop to form 6 small petals. Fasten off leaving long tail for sewing.
Info :
Small blossoms are perfect for filling gaps in the cluster. They sit on top of the larger flowers when layered.
— Leaf (Make 10 in leaf green) :
Round 1 :
Using leaf green, ch 8, sc in 2nd ch from hook, sc in next 2 ch (3 sc), 2 sc in next ch, 3 sc back across the other side of foundation chain, sl st in base (10)
Round 2 :
Ch 1, *sc along leaf edge working 2 sc in tip to turn, continue back working sc evenly to base; sl st to close* Fasten off leaving long tail for sewing (10)
Round 3 :
Optional vein: Using a contrasting darker green thread, embroider a central vein with straight stitches from base to tip. Secure ends on the back of the leaf.
Info :
Make leaves slightly different sizes by starting with ch 7 for smaller leaves or ch 9 for larger ones. The pattern above is a medium leaf to match the scale of the flowers in the photo.
— Flower Center Embroidery :
Round 1 :
Using deep pink or brown embroidery thread, pass needle through the centre of each flower and make many short straight stitches radiating to the petal bases; secure on the back and knot. Add a French knot or small bead if desired.
Info :
This starburst stitching adds a refined, handmade touch that echoes the photo. Keep your stitches neat and symmetrical — rotate the flower as you stitch to maintain even spacing.
— Small Accent Flower (Make 6 in white with pink centre) :
Round 1 :
Using white, mr, ch 1, 6 sc into ring, sl st to join (6)
Round 2 :
*ch 4, sl st into next st* repeat 6 times to create 6 loops. Fasten off
Round 3 :
Work into each ch4: (sc, 2 dc, sc) to create small rounded petals. Fasten off leaving long tail for sewing. Embroider centre with pink thread in radiating straight stitches and a little knot in the middle.
Info :
These small accents are used to add brightness to the cluster edges and echo the white petals seen in the photo.
— Assembly Preparation :
Info :
Press all appliques lightly with steam and pin flat if needed. Arrange flowers in small clusters: in the photo there is a cluster of mixed large, medium, and small flowers with leaves tucked behind. Plan the cluster so the largest flower anchors the center and smaller ones overlap slightly. Use pins to hold each piece in place on the runner before sewing.
— Attaching Appliques :
Round 1 :
Using the long yarn tail left on each applique, position the largest flower at one end (End A) of the runner centered on the scallop, then whip stitch around the base into the runner through backbone stitches only so the seam is neat. Use small, even stitches and avoid pulling tight.
Round 2 :
Sew the medium flowers overlapping one side, anchoring with a few stitches at the base and then secure tip points with single stitches. Place small blossoms and leaves to fill gaps, sewing each with a hidden ladder stitch or whip stitch.
Round 3 :
Repeat cluster assembly at End B to mirror End A. Trim and weave in all tails securely on the reverse side of the runner.
Info :
For a secure attachment that will take gentle washing, use the same yarn used to crochet the applique and stitch through both applique and runner fabric in several passes. If the runner will be used on a heavily used table, consider a small dab of fabric glue under each applique center for added strength, then stitch over it once dry.
— Final Finishing :
Round 1 :
Check all seams and weave in remaining ends using a yarn needle; trim close to work. Steam-block the runner again, pinning each scallop and smoothing the applique placement. Allow to dry completely.
Info :
Gentle hand wash or wipe clean recommended for cotton runners. Avoid tumble-drying to preserve shape; re-block if necessary after washing.
Round 2 :
Optional: If you want an especially crisp edge, use a smaller hook (3.25mm) and work a final sc round around the scallops to tighten them after blocking. Fasten off and hide ends.
Info :
This completes the runner. The pattern components (base, edging, flowers, leaves) are modular—if you would like a longer runner simply add more even textured rounds to the center before beginning edge setup. For a shorter runner, stop earlier and proceed to edging.
This floral table runner brings classic charm and handcrafted warmth to any table setting — perfect for afternoon tea, family gatherings, or as a thoughtful handmade gift. The neutral base and soft floral accents let it blend with many decor styles, while the textured stitches and scalloped edge show off your crochet skill. Enjoy the meditative rhythm of the central rounds and the fun of constructing layered appliques. 🧶🌸 Your finished runner will be a keepsake that brightens your home for years — happy stitching!