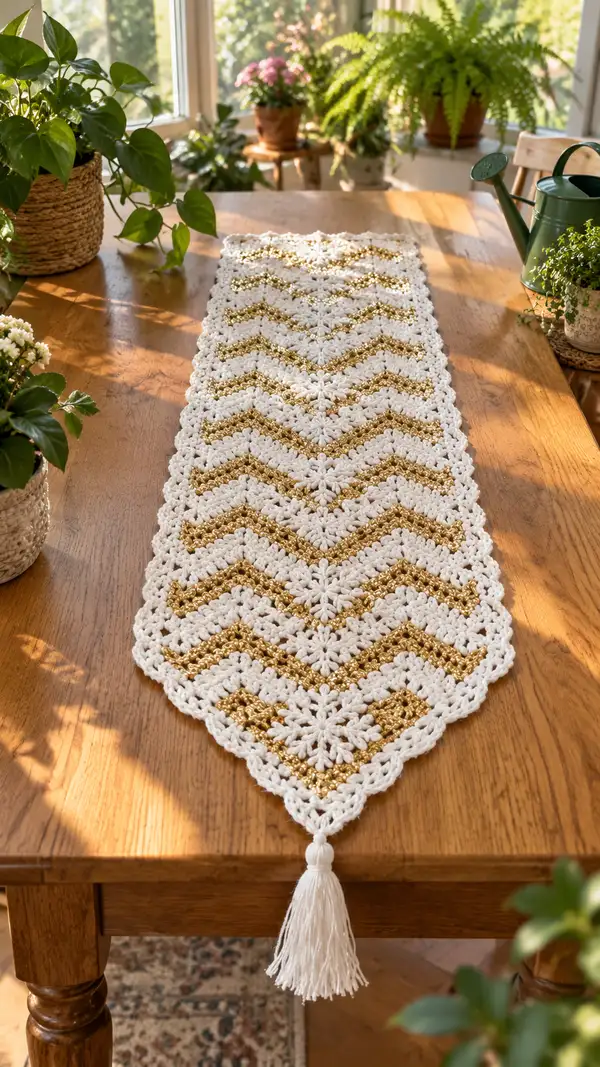
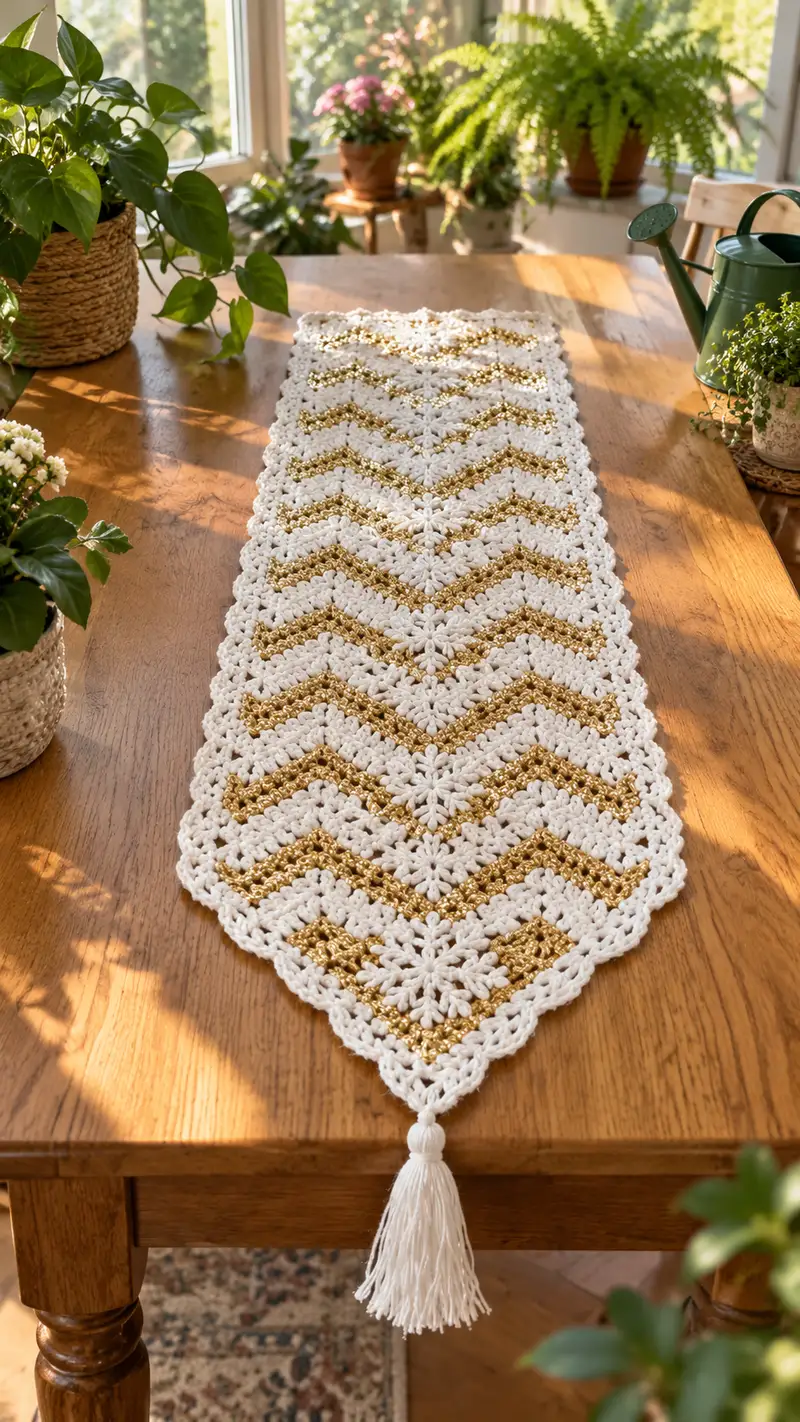
A elegant chevron table runner featuring alternating star-cluster motifs and shimmering gold stripes. This runner pairs creamy white cotton with a metallic gold accent to create a refined, textured centerpiece. The pattern uses a repeating chevron lace motif and scalloped edging to give a handmade heirloom look. Finished with a tassel on each end, it makes a beautiful dining table accent for everyday or special occasions.
Progress Tracker
0% Complete
— Notes & Gauge :
Info :
Runner is worked flat in rows, alternating textured star-cluster rows and metallic chevron rows. Gauge is not critical for fit but affects final size: 14 sts and 8 rows in pattern = 10 cm (4 in) using 4.5mm hook. This sample measures approximately 14" (36 cm) wide at the widest point and 60" (152 cm) long including tassels with the specified yarn and hook. Adjust hook or yarn weight to change size.
Info :
Pattern uses chevron repeat unit of 14 sts across each V (7 sts each side of center). Each motif repeat is 14 sts wide plus 2 edge sts. When chaining foundation, chain a multiple of 14 + 6 extra chains for turning and border.
— Foundation Chain and Setup Rows :
Row 1 :
With Cream, ch 86 (this makes 5 chevron repeats across: (14x5)=70 + 16 edge/turn chains giving a 14" width). If you want wider runner, ch (14 x repeats) + 16.
Row 2 :
RS: Work 1 sc in 2nd ch from hook and in each ch across to end. Turn. (85 sc)
Info :
Work Row 2 to establish a neat, even base edge. Keep tension relaxed; sc row will reduce curling later.
Row 3 :
WS: Ch 3 (counts as dc), dc in next st and in each st across. Turn. (85 dc)
Row 4 :
RS: Ch 1, sc in each st across. Turn. (85 sc)
Info :
These first four rows are a base to anchor the lace motif. If you prefer a firmer base, add an extra sc row before beginning motif repeats.
— Chevron Motif Row Set (Repeat Unit) :
Info :
Each motif set consists of a textured star-cluster row, a shell-row for stabilization, a metallic chevron stripe row, and a V-stitch lace row. Repeat these 4 rows across to form the body. We present the sequence as Rows A–D and then give a numbered run to produce many repeats.
Row A (Star-Cluster Row) :
RS: Ch 3 (counts as dc). *Skip next 2 sts, in next st work: (dc, ch 2, dc) cluster anchored in skipped space forming a 'star' cluster—see cluster note below; sk next 2 sts, dc in next 3 sts; rep from * across to last 4 sts, finish with sk2, (dc, ch2, dc) cluster, dc in last stitch. Turn.
Info :
Star cluster: Insert hook into designated st, yarn over, pull up loop, yarn over pull through 2 (twice) to make partial dc loops, repeat to create 3 partial dc loops (or work 3 dc together as cluster), finish by pulling through all loops and ch 2 to form open star eye. Practice one cluster before beginning the row to familiarize yourself with the motion.
Row B (Shell Stabilizing Row) :
WS: Ch 1, sc in each dc and ch-space across, but where star clusters sit, work (sc, ch1, sc) in the ch2 space to stabilize opening. Turn.
Row C (Metallic Chevron Stripe Row) :
Info :
Change to Gold yarn at the end of Row B. Carry Cream behind work if you prefer fewer ends; secure metallic yarn with a loose knot to avoid splitting. Use a hook one size smaller if metallic feels loose.
Row C Continued :
RS: Ch 3 (counts as dc). Work chevron shaping across: (dc in next 3 sts, dc2tog, dc2tog) to form the valley; on each peak, (dc, ch1, dc) in same st to create raised V; continue pattern of decreases over valley and increases over peaks so chevron alignment matches the star clusters beneath. Turn. Maintain even tension with metallic yarn.
Info :
Chevron math: Each chevron point occupies 14 stitches across the repeat. To create the valley, perform 2 consecutive dc2tog at center of repeat (counts reduce then are rebuilt by adjacent increases). This maintains the stitch count across the row to match subsequent rows.
Row D (V-Stitch Lace Row) :
WS: Change back to Cream. Ch 3 (counts as dc), *sk next st, (dc,ch1,dc) in next st (V-st), sk next st, dc in next 3 sts; rep from * across. Turn.
Info :
V-st insertions should line up directly over the metallic V-peaks to give the chevron rhythm visual continuity. Keep tension consistent when reintroducing Cream yarn to avoid tight joins.
— Repeat Panel: Work Rows A–D Repeatedly Across Length :
Info :
Repeat the four-row motif set (Rows A–D) until runner reaches desired length. The sample photographed repeats the motif set 26 times to create a 60" runner. For length adjust, add or subtract full 4-row sets only to preserve pattern alignment.
Row Set Repeat 1-4 :
Rows 1–4 = A–D (work as explained above). (After each 4-row set you will have returned to the same stitch count as foundation.)
Row Set Repeat 5-8 :
Repeat A–D. Info : After 8 rows, weave in the metallic gold tails where possible to prevent long floats. If carrying, catch gold yarn once every 6–8 stitches behind work to secure.
Row Set Repeat 9-12 :
Repeat A–D. Info : Place stitch markers at the first stitch of each chevron repeat every 12 inches to keep track of center points during blocking.
Row Set Repeat 13-16 :
Repeat A–D. Info : If you notice the gold row pulling in, switch to a half-size larger hook for the gold row only to relax the fabric before switching back to Cream.
Row Set Repeat 17-20 :
Repeat A–D. Info : Keep metallic yarn ends on the WS and tuck under next row of stitches to minimize weaving at the end.
Row Set Repeat 21-24 :
Repeat A–D. Info : After 24 rows, measure runner and adjust final number of repeats to achieve desired finished length before proceeding to border.
Row Set Repeat 25-28 :
Repeat A–D. Info : The sample used 26 motif repeats total (104 rows of motif work) producing a long, elegant runner. Your runner can be shorter with 12–16 repeats for a table center small runner.
Row Set Repeat 29-32 :
Repeat A–D. Info : If you choose to place metallic stripes more frequently (for a tighter metallic presence), work Row C every 3rd set instead of every 2nd; ensure symmetry by keeping a balanced count from center to end.
Row Set Repeat 33-36 :
Repeat A–D. Info : Use stitch markers at each edge stitch every 8 rows to keep edges straight; if scallop tension varies, ease or tighten by adjusting the number of turning chains in shell rows on the next set to compensate slightly.
Row Set Repeat 37-40 :
Repeat A–D. Info : Continue until you reach your intended length. The following rows will move into a final stabilization band and border.
— Stabilizing Band and Final Motif Rows :
Row S1 :
RS: After completing last Row D of your final set, work 1 RS row of dc in each st across using Cream to build a stable band. Ch 3, dc in each st across. Turn.
Row S2 :
WS: Ch 1, sc across in each st, working (sc,ch1,sc) in each ch1 space beneath the V-sts to close them slightly for a neat edge. Turn.
Info :
These two stabilizing rows even the top of the runner, reducing flaring and preparing for the scalloped border. If runner edges ripple, add an extra sc row to tension-adjust before border.
Row S3 :
RS: Ch 3, *work (dc,ch2,dc) in every 7th st across to create anchor points for scallops, dc in remaining sts; rep across; turn.
Info :
The (dc,ch2,dc) anchor points will align with chevron peaks; they help the scalloped border sit evenly. If your stitch count differs slightly, space anchors evenly by eye keeping symmetry from center outward.
— Scalloped Border (Edging) :
Edging Row 1 :
With Cream, RS facing, join with sl st to the first st at a corner. Ch 1, sc evenly along long edge placing 1 sc in each st; at each anchor (dc,ch2,dc) work 5 dc shell into ch2 space to create scallop; continue sc to end; work 3 sc in end st to turn corner. Work sc evenly along point end tip across the short diagonal rows (see tassel placement note) and continue to other side repeat scallops and sc to finish; join with sl st to first sc. (Work evenly to ensure even shells.)
Info :
Keep shell counts consistent: each scallop = 5 dc in the same space. If scallops are too tight, use dc shells of 4 dc instead. Edge may require slight stretching during blocking to lay flat.
Edging Row 2 :
Ch 1, sc in each sc around, working (sc, ch1, sc) in the center of each shell from previous row to emphasize scallops. Join with sl st. Fasten off and weave in ends. This row neatening ensures a tidy, finished look.
Info :
For an alternative lacy border, substitute 7 dc shells with picots between shells: (dc, ch3, sl st) to create eyelet touches. Keep symmetry in mind.
— Tassels :
Info :
Tassels finish each pointed end. Cut cardboard to desired tassel length (sample uses 4.5" long). Wrap Cream yarn around cardboard 60–80 times depending on desired fullness. Remove wrap, tie top tightly with a short tail, fold yarn in half and secure to point tip with the tail by pulling through and knotting. Trim ends even and optionally dip in light starch to stiffen slightly.
Tassel Attachment :
Attach tassel to the very point created by chevron by pulling tie tail through center point and knotting on WS. For security, sew through tassel head back into point two or three times, then weave ends into runner body.
Info :
Make tassels in same length for both ends. If you prefer more subtle finish, make smaller tassels or replace with a single button or bead accent at each tip.
— Finishing & Blocking :
Info :
Wet block your runner: pin to blocking mats stretching gently to open the lace chevrons and even shell scallops. Use rust-proof pins and allow to dry fully. Light steam block if necessary but avoid over-heating metallic yarn; test on scrap first.
Info :
Weave in all ends on the WS using a tapestry needle. For metallic yarn ends, weave them into adjacent metallic stripes to minimize rubbing and shine-through.
Care :
Hand wash in cool water with mild detergent. Lay flat to dry. Avoid machine washing to preserve metallic yarn shine. Spot clean gently where necessary.
— Full Row-by-Row Expanded Version (for advanced tracking):
Row 1 :
Foundation: ch 86, sc in 2nd ch from hook and across. (85 sc)
Row 2 :
Ch3, dc in each st across. (85 dc)
Row 3 :
Ch1, sc in each st across. (85 sc)
Row 4 :
Ch3, dc in each st across. (85 dc)
Row 5 :
Star-Cluster Row: Ch3, *sk2, star cluster in next st (see cluster note), sk2, dc in next 3 sts; rep across, finish with cluster then last dc. Turn. (85 sts preserved)
Info :
Maintaining stitch count: each star cluster occupies same horizontal width as the 3 dc sequence so total count remains equal to foundation. If your cluster pulls wider, adjust tension by working cluster more compactly.
Row 6 :
Ch1, sc across, (sc,ch1,sc) in each cluster ch2 space. Turn. (85 sc)
Row 7 :
Change to Gold. Ch3, dc across forming chevron shaping: (dc in next 3, dc2tog, dc2tog, dc in next 3, V-st in peak st) repeating. Turn. (85 st equivalents)
Info :
If metallic yarn splits, hold two strands of metallic together loosely or use a softer metallic blend. Avoid pulling too tightly on the gold to maintain luster and prevent strand breakage.
Row 8 :
Change to Cream. Ch3, V-st row: *(sk1, V-st in next st, sk1, dc in next 3); rep across. Turn. (85 st equivalents)
Row 9 :
Repeat Row 5 (Star-Cluster). Ensure clusters line up vertically with those in previous star rows to create continuous floral columns within chevrons.
Row 10 :
Repeat Row 6 (Shell stabilizing sc row). Check edges for evenness and add or remove a sc at either edge in this row if necessary to preserve symmetry.
Row 11 :
Change to Gold. Repeat Row 7. Info : When joining Gold, leave a 6–8" tail on WS to weave in later. Do not knot into Cream to avoid lumps.
Row 12 :
Change to Cream. Repeat Row 8. Continue repeating Rows 5–8 for a total of 26 motif sets or until desired length reached. Keep a notebook tally of motif repeats to maintain symmetry at both ends.
Info :
Tally each completed 4-row set on a notebook. If you want tassels centered on points, ensure you finish with a full motif so end point forms neatly.
Row 13 :
Repeat Star-Cluster (Row 5) with careful placement of clusters. If a cluster appears too high, adjust the preceding dc placement by shifting one stitch on WS to re-center.
Row 14 :
Repeat Shell Row (Row 6). Info : Weave in any accessible tails behind this row to keep WS tidy as you progress; weaving later across many repeats is more time-consuming.
Row 15 :
Repeat Gold Chevron Row (Row 7). Check that gold stripes visually align; a misaligned gold stripe is most noticeable, so correct now if needed.
Row 16 :
Repeat V-st Row (Row 8). Continue alternating until you have completed 52 motif rows (13 complete sets) then check length and symmetry.
Row 17 :
Repeat Star-Cluster. Info : If you need to adjust width mid-project, you can increase by adding a full 14-st repeat across foundation and then continue pattern; doing so at an early stage is easiest.
Row 18 :
Repeat Shell Row. Be certain ch1 turning chains are consistent to avoid stacking irregularities on V-st rows.
Row 19 :
Repeat Gold Chevron. Info : Metallic yarn will show tension variations; to mitigate, hold metallic yarn with a finger loosely guiding it, and keep even spacing between chevrons by referencing previous gold lines.
Row 20 :
Repeat V-st Row. Continue this exact alternating rhythm until you reach your desired length. The next block outlines additional repeats explicitly through Row 104 for those who prefer to track each individual row.
Row 21 :
Repeat Row 5 (Star-Cluster).
Row 22 :
Repeat Row 6 (Shell Row).
Row 23 :
Repeat Row 7 (Gold Chevron).
Row 24 :
Repeat Row 8 (V-st Row).
Row 25 :
Repeat Row 5 (Star-Cluster).
Row 26 :
Repeat Row 6 (Shell Row).
Row 27 :
Repeat Row 7 (Gold Chevron).
Row 28 :
Repeat Row 8 (V-st Row).
Row 29 :
Repeat Row 5 (Star-Cluster).
Row 30 :
Repeat Row 6 (Shell Row).
Row 31 :
Repeat Row 7 (Gold Chevron).
Row 32 :
Repeat Row 8 (V-st Row).
Row 33 :
Repeat Row 5 (Star-Cluster).
Row 34 :
Repeat Row 6 (Shell Row).
Row 35 :
Repeat Row 7 (Gold Chevron).
Row 36 :
Repeat Row 8 (V-st Row).
Info :
At halfway point, pause and check both ends of the runner to ensure chevrons mirror each other; this is key for a balanced visual layout when placed on a table.
Row 37 :
Repeat Row 5 (Star-Cluster).
Row 38 :
Repeat Row 6 (Shell Row).
Row 39 :
Repeat Row 7 (Gold Chevron).
Row 40 :
Repeat Row 8 (V-st Row).
Row 41 :
Repeat Row 5 (Star-Cluster).
Row 42 :
Repeat Row 6 (Shell Row).
Row 43 :
Repeat Row 7 (Gold Chevron).
Row 44 :
Repeat Row 8 (V-st Row).
Row 45 :
Repeat Row 5 (Star-Cluster).
Row 46 :
Repeat Row 6 (Shell Row).
Row 47 :
Repeat Row 7 (Gold Chevron).
Row 48 :
Repeat Row 8 (V-st Row).
Row 49 :
Repeat Row 5 (Star-Cluster).
Row 50 :
Repeat Row 6 (Shell Row).
Row 51 :
Repeat Row 7 (Gold Chevron).
Row 52 :
Repeat Row 8 (V-st Row).
Row 53 :
Repeat Row 5 (Star-Cluster).
Row 54 :
Repeat Row 6 (Shell Row).
Row 55 :
Repeat Row 7 (Gold Chevron).
Row 56 :
Repeat Row 8 (V-st Row).
Row 57 :
Repeat Row 5 (Star-Cluster).
Row 58 :
Repeat Row 6 (Shell Row).
Row 59 :
Repeat Row 7 (Gold Chevron).
Row 60 :
Repeat Row 8 (V-st Row).
Row 61 :
Repeat Row 5 (Star-Cluster).
Row 62 :
Repeat Row 6 (Shell Row).
Row 63 :
Repeat Row 7 (Gold Chevron).
Row 64 :
Repeat Row 8 (V-st Row).
Row 65 :
Repeat Row 5 (Star-Cluster).
Row 66 :
Repeat Row 6 (Shell Row).
Row 67 :
Repeat Row 7 (Gold Chevron).
Row 68 :
Repeat Row 8 (V-st Row).
Row 69 :
Repeat Row 5 (Star-Cluster).
Row 70 :
Repeat Row 6 (Shell Row).
Row 71 :
Repeat Row 7 (Gold Chevron).
Row 72 :
Repeat Row 8 (V-st Row).
Row 73 :
Repeat Row 5 (Star-Cluster).
Row 74 :
Repeat Row 6 (Shell Row).
Row 75 :
Repeat Row 7 (Gold Chevron).
Row 76 :
Repeat Row 8 (V-st Row).
Row 77 :
Repeat Row 5 (Star-Cluster).
Row 78 :
Repeat Row 6 (Shell Row).
Row 79 :
Repeat Row 7 (Gold Chevron).
Row 80 :
Repeat Row 8 (V-st Row).
Row 81 :
Repeat Row 5 (Star-Cluster).
Row 82 :
Repeat Row 6 (Shell Row).
Row 83 :
Repeat Row 7 (Gold Chevron).
Row 84 :
Repeat Row 8 (V-st Row).
Row 85 :
Repeat Row 5 (Star-Cluster).
Row 86 :
Repeat Row 6 (Shell Row).
Row 87 :
Repeat Row 7 (Gold Chevron).
Row 88 :
Repeat Row 8 (V-st Row).
Row 89 :
Repeat Row 5 (Star-Cluster).
Row 90 :
Repeat Row 6 (Shell Row).
Row 91 :
Repeat Row 7 (Gold Chevron).
Row 92 :
Repeat Row 8 (V-st Row).
Row 93 :
Repeat Row 5 (Star-Cluster).
Row 94 :
Repeat Row 6 (Shell Row).
Row 95 :
Repeat Row 7 (Gold Chevron).
Row 96 :
Repeat Row 8 (V-st Row).
Row 97 :
Repeat Row 5 (Star-Cluster).
Row 98 :
Repeat Row 6 (Shell Row).
Row 99 :
Repeat Row 7 (Gold Chevron).
Row 100 :
Repeat Row 8 (V-st Row).
Row 101 :
Stabilizing Band Row 1: Ch3, dc across in Cream. Turn.
Row 102 :
Stabilizing Band Row 2: Ch1, sc across, (sc,ch1,sc) in V-spaces. Turn.
Row 103 :
Anchor Row: Ch3, work (dc,ch2,dc) into anchor positions every 7th stitch to create scallop anchors; dc in remaining stitches. Turn.
Row 104 :
Edging Prep Row: Ch1, sc in each st and around anchors to prepare for scallop edging; do not fasten off. Proceed to scalloped edging next.
Info :
If you stopped before 104 rows, return to previous 'Edging' section and work the scalloped border as described. The numbering above maps to a long sample runner; your count may differ when customizing length.
This chevron star table runner is a beautiful mix of texture and shimmer that brings warmth to any table. The star-cluster motifs and gold stripes create a timeless look that is both handmade and elegant. Blocking and finishing with neat tassels transforms the piece into a polished centerpiece you'll be proud to display. Enjoy the meditative rhythm of repeating chevrons and the sparkle of the metallic accents as you stitch. 🧶✨