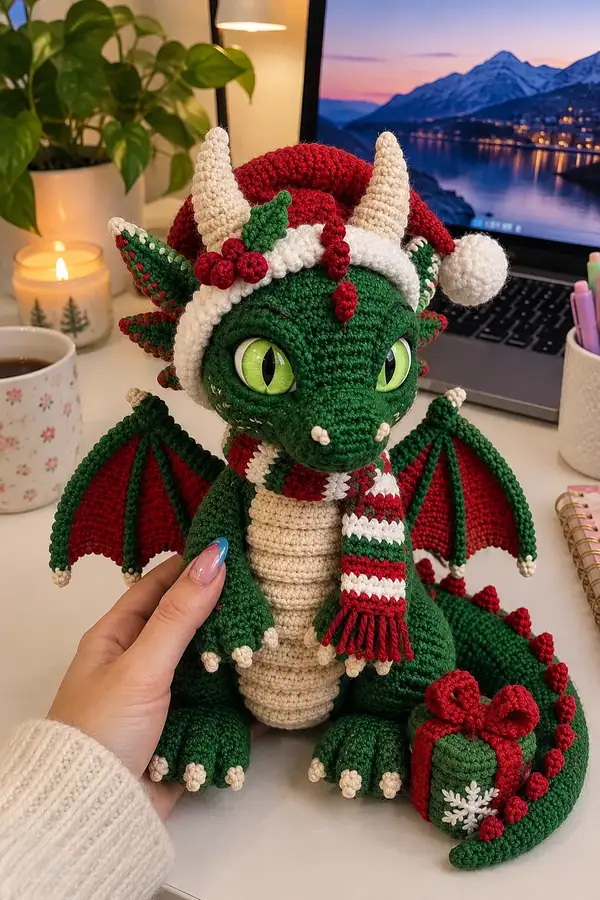
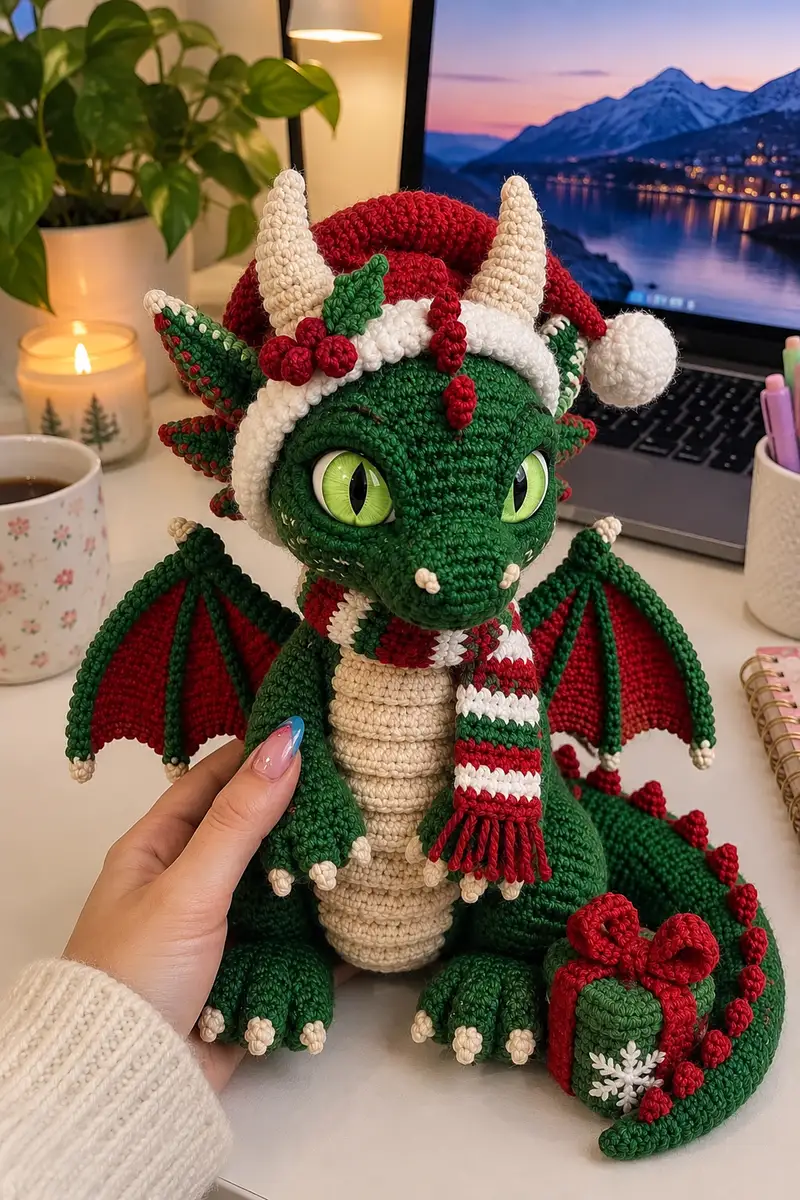
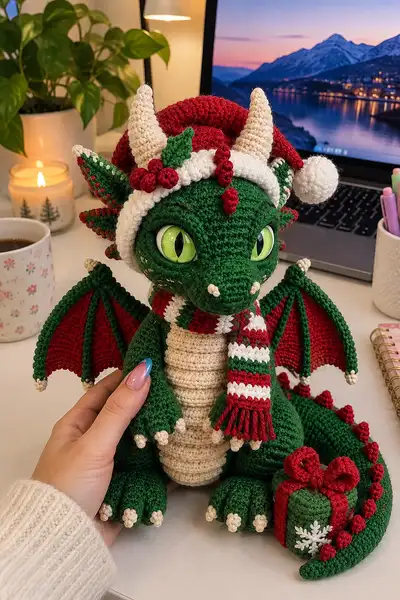
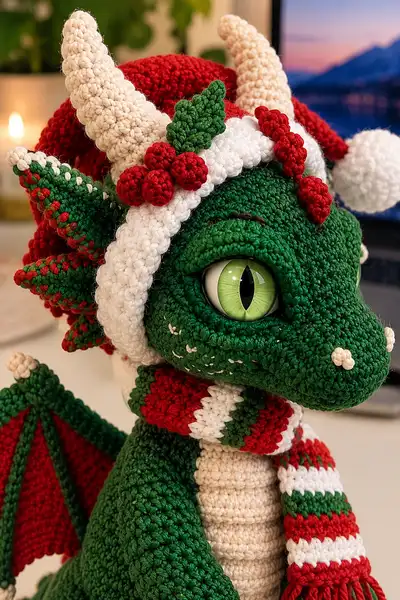
A festive, highly detailed Christmas dragon dressed in a Santa hat and striped scarf. This plush dragon features large glass-like green eyes, cream horns and claws, red-and-green spines, articulated wings with contrasting membranes, and a tiny wrapped gift by its tail. The design uses traditional amigurumi construction with holiday colors and lots of decorative pieces for a charming seasonal display.
Progress Tracker
0% Complete
— Notes :
Info :
This pattern is worked in continuous rounds unless otherwise noted. Use a stitch marker to mark the first stitch of each round. Gauge is not critical but aim for a dense fabric so stuffing does not show. I recommend cotton or cotton-blend worsted weight yarn for crisp stitch definition and structure.
Info :
Color codes used: G = deep green (main body), C = cream/ivory (belly, horns, claws), R = red (hat, membranes, accents), W = white (hat brim, scarf stripe). When a round switches color, an Info section precedes the round to explain the change.
— Head :
Round 1 :
6 sc in magic ring (6) G
Round 3 :
(1 sc, inc) x 6 (18) G
Round 4 :
(2 sc, inc) x 6 (24) G
Round 5 :
(3 sc, inc) x 6 (30) G
Round 6 :
(4 sc, inc) x 6 (36) G
Round 7 :
(5 sc, inc) x 6 (42) G
Round 8 :
(6 sc, inc) x 6 (48) G
Round 9-12 :
1 sc in each st (48) G
Info :
Place safety eyes between rounds 13-14 approximately 10-12 sts apart (adjust for expression). On this pattern we place them centered on rounds 13 and 14 area; mark position with locking stitch markers and test placement before securing.
Round 13-20 :
1 sc in each st (48) G
Info :
If you are adding eyelids or shaping around the eyes, embroider a small ridge above each eye now using 2-3 surface slip stitches in dark brown or deep green. Add small white stitches for highlights later.
Round 21 :
(6 sc, dec) x 6 (42) G
Round 22 :
(5 sc, dec) x 6 (36) G
Info :
Begin stuffing the head firmly but leave room to shape the snout; use small amounts of fiberfill pushed into the nose area first to keep shape. Add more fiberfill as rounds continue to maintain a smooth round cheek profile.
Round 23 :
(4 sc, dec) x 6 (30) G
Round 24 :
(3 sc, dec) x 6 (24) G
Round 25 :
(2 sc, dec) x 6 (18) G
Round 26 :
(1 sc, dec) x 6 (12) G
Info :
At this point the head transitions to a neck tube. Continue stuffing firmly around the eye area and cheeks so the eyes sit flush and the snout has structure. If using safety eyes, ensure washers are secured now.
Round 27-30 :
1 sc in each st (12) G — work 4 rounds for neck tube length (adjust if you want a longer neck)
Round 31 :
1 sc in first 6 sts, stop (6) — leave remaining 6 sts open to sew to body later (Optional: you may crochet through-body join instead)
Info :
Finish stuffing the head completely now. Fasten off leaving a 20-30 cm (8-12 in) tail for sewing to body. If you prefer to join head to body seamlessly, do not fasten off — see assembly section for joining tips.
— Eyelids and Facial Details :
Round 1 :
Using G, ch 2, 4 sc in second ch from hook, sl st to join (4) — make 2 for eyelid bases
Round 2 :
(1 sc, inc) x 2 (6) — shape outer edge
Info :
Sew eyelid bases above each eye and use embroidery thread to create a half-closed sleepy expression. Embroider small freckles/white highlights by stitching 3-5 small cream crosses along each cheek.
— Horn (Make 2) :
Round 1 :
6 sc in magic ring (6) C
Round 3 :
(1 sc, inc) x 6 (18) C
Round 4 :
1 sc in each st (18) C
Round 5 :
(2 sc, inc) x 6 (24) C
Round 6-9 :
1 sc in each st (24) C — work 4 rounds to elongate horn
Round 10 :
(2 sc, dec) x 6 (18) C
Round 11 :
(1 sc, dec) x 6 (12) C
Info :
Stuff each horn lightly and shape to a slight curve by adding a small amount of stuffing toward the base. Fasten off leaving a long tail for sewing. Position horns near top-back of head, about 6-8 sts from crown center, and sew firmly in place.
— Head Spikes (Make 6-8) :
Round 1 :
5 sc in magic ring (5) R or G depending on spike color
Round 3 :
1 sc in each st (10)
Round 4 :
(2 sc, dec) x 2, 2 sc (8)
Info :
Make 6-8 spikes, alternating red and green for a festive look. Sew along head-to-neck seam in a centered row forming the crest. For a layered effect, slightly stagger sizes (some made 3 rounds longer).
— Body :
Round 1 :
6 sc in magic ring (6) G
Round 3 :
(1 sc, inc) x 6 (18) G
Round 4 :
(2 sc, inc) x 6 (24) G
Round 5 :
(3 sc, inc) x 6 (30) G
Round 6 :
(4 sc, inc) x 6 (36) G
Round 7-9 :
1 sc in each st (36) G
Info :
If adding a belly panel (C), change color now. The belly will be worked as a separate strip in C and sewn or crocheted into place. For a neat edge, work the next row in BLO to mark clothing edge if desired.
Round 10 :
Change to C. Work 1 sc in each st BLO (36) C — this creates a ridge where belly meets body
Round 11-14 :
1 sc in each st (36) C — continue belly section for 4 rounds to build cream panel
Info :
Switch back to G at end of round 14. If you prefer a sewn belly, stop here and make a separate rectangular belly panel (instructions below). Otherwise continue around to shape the body.
Round 15-20 :
1 sc in each st (36) G
Round 21 :
(3 sc, dec) x 6 (30) G
Round 22 :
(2 sc, dec) x 6 (24) G
Info :
Begin stuffing the body moderately now. The body should be firm enough to support the head but not rock-hard. Check placement for legs — legs will sit on the bottom edge formed around round 23-24.
Round 23 :
(1 sc, dec) x 6 (18) G
Round 24 :
1 sc in each st (18) G — work two rounds to create a stable base for leg attachment
Round 25 :
(1 sc, inc) x 6 (24) G — flare slightly where legs attach
Info :
Fasten off leaving a long tail for sewing if you did not close the bottom. Stuff body firmly and shape bottom so the amigurumi will sit upright. Neck opening should align with head neck tube (12 sts). If you left neck opening earlier, sew head into this opening with an invisible seam.
— Belly Panel (Alternative method) :
Round 1 :
Ch 6, sc in 2nd ch from hook and across (5), ch 1, turn
Round 2-10 :
1 sc in each st (5) C — work 9 rows or until you have a rectangular strip approx same height as body belly section
Info :
Sew this panel to the front of the body between rounds 10-14, using slip stitch or whip stitch for a clean edge. A slight stretch will help the panel lay flat along the rounded torso.
— Arm (Make 2) :
Round 1 :
6 sc in magic ring (6) G
Round 3 :
(1 sc, inc) x 6 (18) G
Round 4-6 :
1 sc in each st (18) G — shape hand base
Round 7 :
Change to C for claws: (3 sc, inc) x 4, sc in remaining 2 sts (22) C — this widens for claw base
Round 8 :
1 sc in each st (22) C
Round 9 :
Switch back to G. 1 sc in each st (22) G
Info :
Create small claw tips by crocheting tiny spheres (see Claw Tip below) and sew three small claws to the front of each hand. Stuff hand/arm lightly — fingers and claws should be stuffed firmer for weight-bearing when sitting.
Round 10-14 :
1 sc in each st (22) G — work 5 rounds for lower arm
Round 15 :
(3 sc, dec) x 4, dec twice across center (18) G
Round 16-18 :
1 sc in each st (18) G — taper toward shoulder
Info :
Before closing, insert a little stuffing into the hand area and shape. Leave the top open to sew into body — position arms at body rounds 17-20 for a natural seated pose. Optionally insert wire into arm for poseability before finishing the seam.
— Claw Tip (Make 12) :
Round 1 :
5 sc in magic ring (5) C
Round 2 :
(1 sc, inc) x 2, sc in last st (7) C
Round 3 :
1 sc in each st (7) C — fasten off leaving long tail to sew onto hand tips
Info :
Sew three claw tips onto each hand and three on each foot. Use small stitches so claws sit firmly and evenly centered on each digit.
— Leg (Make 2) :
Round 1 :
6 sc in magic ring (6) G
Round 3 :
(1 sc, inc) x 6 (18) G
Round 4 :
(2 sc, inc) x 6 (24) G
Round 5-7 :
1 sc in each st (24) G — shape foot base
Round 8 :
(3 sc, inc) x 6 (30) G — make a broader foot ready for claws
Round 9-12 :
1 sc in each st (30) G
Round 13 :
Change to C: 1 sc in each st (30) C — make claws section contrast
Round 14 :
(3 sc, dec) x 6 (24) C
Round 15 :
(2 sc, dec) x 6 (18) G — switch back to G for leg shaft
Round 16-20 :
1 sc in each st (18) G — work 5 rounds for lower leg and calf
Round 21 :
(1 sc, dec) x 6 (12) G — taper towards hip attachment
Round 22 :
1 sc in each st (12) G — leave top open for sewing
Info :
Stuff feet firmly, legs moderately. Pin legs to body bottom symmetrically spaced about 8-10 sts apart measured across the lower rounds (position legs so the dragon sits upright and balanced). Sew using strong yarn and an invisible ladder stitch.
— Tail :
Round 1 :
6 sc in magic ring (6) G
Round 3 :
(1 sc, inc) x 6 (18) G
Round 4-6 :
1 sc in each st (18) G — extend base of tail
Round 7 :
(2 sc, inc) x 6 (24) G
Round 8-12 :
1 sc in each st (24) G — work to desired tail thickness
Info :
Create a long tapered tail by decreasing gradually — you will also attach spikes along the top center. Leave length long: around 18-24 rounds total depending on desired tail length.
Round 13 :
(3 sc, dec) x 6 (18) G
Round 14-16 :
1 sc in each st (18) G
Round 17 :
(2 sc, dec) x 6 (12) G
Round 18-20 :
1 sc in each st (12) G
Round 21 :
(1 sc, dec) x 4, sc in remaining 4 sts (8) G
Round 22-24 :
1 sc in each st (8) G — finish tapered tip and fasten off leaving long tail for sewing
Info :
Sew tail to the back-bottom center of body and curve it around to the side where the small gift will rest. Add stuffing gradually as you shape the tail curve to keep it stable but flexible.
— Tail Spines (Make 12) :
Round 1 :
5 sc in magic ring (5) R
Round 2 :
(1 sc, inc) x 2, 1 sc (7)
Round 3 :
1 sc in each st (7)
Info :
Alternate red and green spines along the tail. Make 12-14 depending on tail length. Sew along the top center with the larger at the base and smaller toward the tip for a tapered row.
— Wing (Make 2) :
Wing Base Round 1 :
Ch 12, sc in 2nd ch from hook and across (11), turn (11) G
Wing Base Round 2 :
Ch1, sc across (11) G
Wing Base Round 3 :
Ch1, (sc, inc) across to end (16) G — flare at inner edge
Info :
These first rounds form the wing arm that attaches to the body. Keep the inner row sturdy; you can insert thin wire inside this base for poseable wings.
Wing Membrane Round 4 :
Change to R. Work along outer edge: 1 sc in each st and 3 sc in last st to turn and work down opposite side forming a rounded membrane edge. Aim for approx 30 sts around (adjust to match size)
Wing Membrane Round 5-8 :
1 sc in each st (30) R — build membrane height
Round 9 :
Change to G. Working in FLO on membrane base, 1 sc in each st BLO (30) G — this creates a ridge and inner wing bones
Round 10-14 :
1 sc in each st shaping the wing curve (30) G
Info :
To create the visual 'bones' across the membrane, crochet narrow ribs: ch a length equal to rib spacing, slip stitch back along wing profile and attach with sc to membrane at intervals. Make 4 ribs per wing spaced evenly, using G for ribs to contrast against red membrane. Secure ribs to membrane with whip stitch.
Round 15 :
Decrease evenly around if you need to reduce wing edge: (4 sc, dec) x 5 (25) G — adjust counts to desired curve
Info :
Leave a long tail at the wing base for sewing; position wings symmetrically on the back where rounds 10-14 of body meet the top curve. Sew firmly with extra passes to hold weight and any inserted wire.
— Santa Hat :
Round 1 :
With R, 6 sc in magic ring (6)
Round 3 :
(1 sc, inc) x 6 (18) R
Round 4 :
(2 sc, inc) x 6 (24) R
Round 5-12 :
1 sc in each st (24) R — increase length of hat cone by working even rounds to desired slouch
Info :
Create a slouch by folding top of hat at mid-point and sewing a few stitches to anchor. If you want the hat to sit similarly to the photo, work 8-10 rounds even after increases to make a deep, soft cone.
Round 13 :
Change to W. (3 sc, inc) x 6 (30) W — this makes a thick brim
Round 14-16 :
1 sc in each st (30) W — work 3 rounds of brim for plush look
Round 17 :
Fasten off leaving long tail; make pompom: 16 sc in magic ring with W, fasten off leaving tail and stuff lightly before closing. Sew the pompom to hat tip.
Info :
Decorate hat brim with tiny holly and berries: make three small berry spheres (see Holly Berry) and one leaf (see Holly Leaf). Sew them asymmetrically to the brim for the festive accent shown in the photo.
— Holly Berry (Make 3) :
Round 1 :
5 sc in magic ring (5) R
Round 2 :
(1 sc, inc) x 2, sc in remaining (7) R
Round 3 :
1 sc in each st (7) R — fasten off leaving long tail for sewing
Info :
Make three berries; cluster them together on the brim. Add whipped stitches of green for small calyx if desired. Position so berries sit near the front of the hat above the eye line.
— Holly Leaf (Make 2) :
Round 1 :
Ch 6, sc in 2nd ch from hook and across (5), ch1, turn G
Round 2 :
1 sc in each st (5) G
Round 3 :
(1 sc, inc) across to end (8) G
Round 4 :
1 sc in each st (8) G — leave tail and press leaf lightly with finger and starch if you want it to hold shape
Info :
Sew leaves behind berry cluster on hat brim. Add surface slip-stitch veins if desired for realism.
— Scarf (Striped) :
Round 1 :
With R, ch 6, sc in 2nd ch from hook and across (5), ch 1, turn
Round 2-80 :
Work rows of sc across the 5 stitches using stripes: rows 2-3 R, rows 4-5 W, row 6 G; repeat this 3-color stripe pattern until scarf length reaches approx 60-80 rows (adjust to wrap twice around neck as in photo). Fasten off leaving long tail.
Info :
To create fringe, cut 6 pieces of yarn ~10 cm long, fold in half, and attach by knotting across each short edge of the scarf every 3-4 sts. Alternate colors for festive effect.
— Present Box :
Bottom Round 1 :
With G, 6 sc in magic ring (6)
Round 3 :
(1 sc, inc) x 6 (18) G
Round 4-6 :
1 sc in each st (18) G — form base height
Round 7 :
Change to R. 1 sc in each st (18) R — top of box or bow base
Bow :
Ch 10, hdc in 3rd ch from hook to last, fasten off. Fold and sew ends in center to make two mirrored loops, secure with small wrapped yarn for bow center. Make two loops and sew to top of box. Add embroidered snowflake on one side with W using surface slip stitch.
Info :
This small plush present sits next to the tail in the photo and acts as a decorative prop. Stuff lightly and sew to tail or position with a few hidden stitches so it stays in place.
— Assembly and Final Details :
Info :
Before assembly, block pieces lightly if needed and weave in all loose ends so that nothing unravels while sewing. Use pins to position every major piece before sewing to ensure symmetry.
Info :
Use mattress stitch or ladder stitch for invisible seams when attaching head and legs. Double-thread a yarn needle with matching yarn color and make small, neat stitches to hide join lines. Reinforce high-stress areas (hips and base of neck) with a second pass of stitches.
Info :
Embroider nostrils and mouth with dark brown or black floss using small back stitches. Add little cream freckles using tiny french knots or straight stitches spaced under the eyes. Apply a few surface white stitches on the cheeks for highlights.
This Christmas dragon is a joyful blend of classic amigurumi shaping and delightful holiday details — from the curled tail and row of spikes to the pom-pom Santa hat and striped scarf. Each small piece adds personality and charm, making it a perfect handmade gift or seasonal decoration. I hope you enjoy every stitch and love the playful personality that emerges as you assemble the parts. 🎄🧶