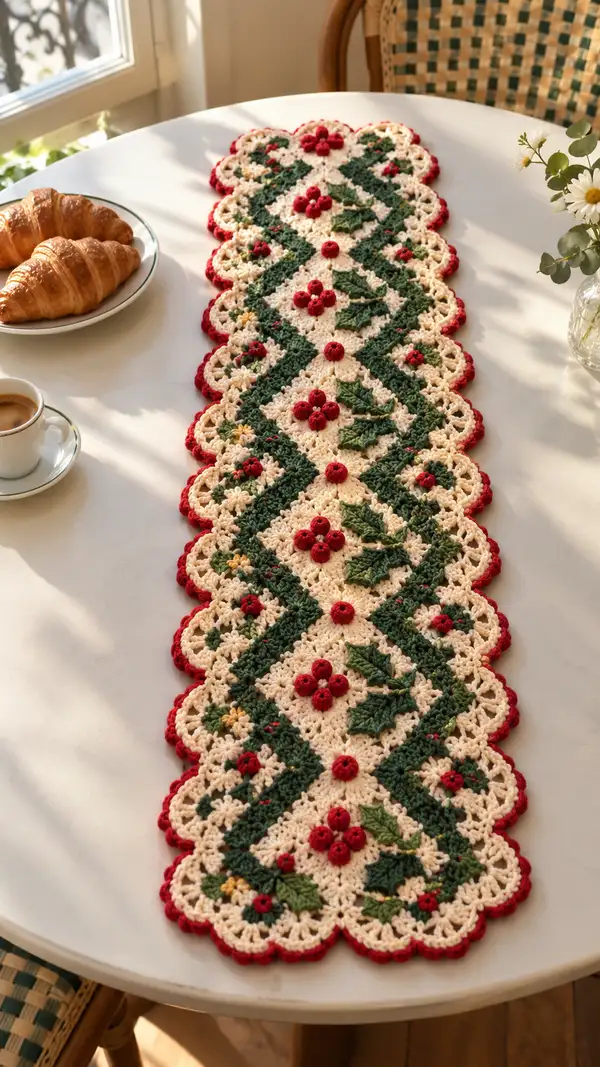
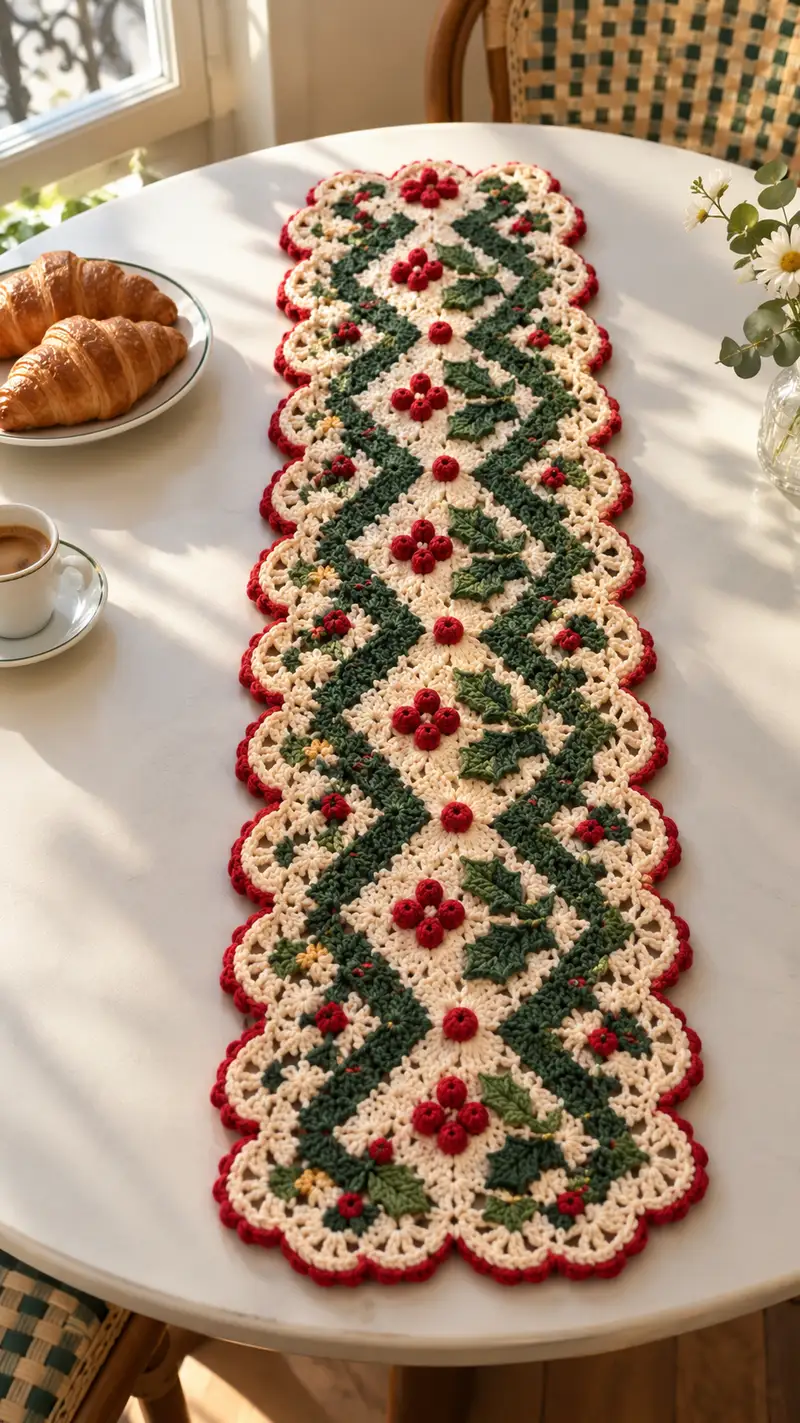
A festive cream and red holly berry crochet runner perfect for holiday tables and cozy winter decor. This lacy, scalloped runner features diamond-shaped green bands, raised holly leaves and clusters of red bobble berries that add dimensional charm. The runner pictured uses cream as a background with deep green chevrons and rich red accents for a classic Christmas look. Follow the detailed motif, applique and joining instructions below to recreate a long, elegant table runner.
Progress Tracker
0% Complete
— Notes & Gauge :
Info :
This pattern is modular: you will make repeating square-style lace motifs and join them into a runner. The sample runner is made from 8 motifs joined end-to-end to create an approximately 36" long runner (exact length will vary by gauge). Gauge: 14 sc x 16 rows = 4" in single crochet (use gauge as guideline to control final size).
Info :
Recommended yarn: worsted weight (#4). Hook used in sample: 4.0mm (G). Work tightly enough for defined lace edges, but not so tight that border scallops distort.
— Main Motif (Make 8) :
Round 1 :
6 sc in magic ring (6)
Round 3 :
(1 sc, 1 inc) x 6 (18)
Round 4 :
(2 sc, 1 inc) x 6 (24)
Round 5 :
(3 sc, 1 inc) x 6 (30)
Round 6 :
(4 sc, 1 inc) x 6 (36)
Info :
These initial rounds form a small circular base that will be transformed into a lace square. Keep counts exact to allow symmetric shaping when corners are introduced.
Round 7 :
(5 sc, 1 inc) x 6 (42)
Round 8 :
(6 sc, 1 inc) x 6 (48)
Round 9-12 :
1 sc in each st around (48)
Info :
At this stage the motif is a stable circle of 48 sc. We will begin to add lacy chain loops and turning corners to form a decorative square/diamond. Use stitch markers to mark quarter points (every 12th stitch) - these will mark corners.
Round 13 :
*Sc in next 4 sts, ch 3, sk 2; rep from * around, ending with sc in remaining sts (48 with ch-3 loops counted as decorative spaces)
Round 14 :
Work into ch-3 loops: *(dc, ch1, dc) into each ch-3 loop, then 1 sc in each of the next 4 sc; rep from * around (48 dc clusters + 48 sc positions, visually 48 repeat units)
Round 15 :
Change to cream yarn (if not already). 1 sc in each st and each ch-1 space around, keeping 48 working units (48)
Info :
Change color by finishing the last yarn over of the prior st with the new color. Carry unused yarn neatly inside the motif where possible or fasten off and re-join if tension/appearance is an issue.
Round 16 :
*Ch4, sk next dc cluster, sc in next sc; rep from * around to create airy mesh (48 mesh loops)
Round 17 :
Into each ch-4 loop: (sc, ch3, sc) to form a petite shell, 1 sc in the sc between loops (48 shells, 48 sc)
Round 18 :
1 sc in each st around to maintain shape (48)
Round 19 :
Introduce corner shaping: place markers at four points evenly spaced (every 12 sts). At each marker work: (sc, ch3, sc, ch3, sc) into the same stitch to create a roomy corner chain-spaced cluster; between corners work 1 sc in each stitch (total 48, with corner ch-spaces)
Info :
These corner clusters will allow the motif to lay as a wide diamond shape when motifs are joined on the diagonal. Pin motif flat to check corner symmetry before proceeding.
Round 20 :
Working into corner clusters: *(sc, ch5, sc) in corner ch-spaces to deepen corners, then 1 sc into each sc around between corners (48, corners now larger)
Round 21 :
Switch to evergreen green yarn. Work 1 sc in each st BLO around to create a subtle ridge that becomes the inner chevron band (48)
Round 22 :
Work a modified chevron: *In the segment between corner clusters work (sc in next 5 sts, 3 dc shell in next st, sc in next 5 sts); at corner clusters work (sc, ch3, sc); rep around (48 counted as 4 corner clusters + 44 sc/dc grouped counts)
Info :
When you see 'shell' above, a 3 dc shell is 3 dc worked into the same stitch or space. Shells placed carefully will create the bold diagonal/diamond impression in green. Keep stitch counts consistent by working shells inside the pre-marked repeat units.
Round 23 :
Continue green band: 1 sc in each st and ch-space around maintaining 48 totals and accentuating the green band (48)
Round 24 :
Reverse color to cream. 1 sc in each st around, preparing to build the open lace surrounding the chevron (48)
Round 25 :
*(ch4, sk 2, sc in next 2 sts) x around forming open lacy chain fans between solid bands (48)
Info :
Work the fans neatly and block motifs flat after finishing motifs to set lace openings. Blocking ensures consistent motif size for joining.
Round 26 :
Switch to cream if necessary and work 1 sc in each st and ch-space to reinforce the fan rounds (48)
Round 27 :
Decorative round: in each fan space work (sc, ch3, sc), then 1 sc through top of next shell/space; maintains 48 units
Round 28 :
Change to evergreen green and work a narrow 1-row band: 1 sc in each st (48) to stabilize the green chevron before attaching appliques
Round 29 :
Prepare spots for berry clusters: Mark the central unit of each motif (one in the diamond center and the four quadrant centers). Work 1 sc in each st around (48)
Round 30 :
Fasten off leaving long tails for joining and applique placement. Block motif to square/diamond shape keeping corners open and even (48)
Info :
Make 8 of these motifs for a runner approximately the same length as the sample. If you prefer a shorter or longer runner, add or subtract motif repeats. Block all motifs before joining for neat joins and straight edges.
— Motif Variation B (Alternate center diamond fill) :
Round 1 :
6 sc in magic ring (6)
Round 3 :
(1 sc, 1 inc) x 6 (18)
Round 4 :
(2 sc, 1 inc) x 6 (24)
Round 5 :
1 sc around (24)
Round 6 :
Switch to evergreen green. (ch3, sk1, dc cluster) in alternating spaces to create a filled diamond impression (24 clusters/spaces)
Round 7 :
1 sc in each st around to stabilize (24)
Round 8 :
Change to cream. Work decorative ch-spaces: *(ch4, sc) x around (24 loops)
Round 9 :
Shell round: into each ch-4 loop work (dc3, ch2, dc3), sc between loops (24 shells + 24 sc)
Round 10 :
1 sc around to regularize count (48) - note: although earlier rounds counted 24 major units, this shell round naturally expands to 48 working points; continue with 48 as working total from here
Round 11-16 :
Follow the same corner shaping, chevron band and fan rounds as Motif main Rounds 19-27 to bring Variation B in line with Motif main (48)
Round 17 :
Fasten off and block. Use Variation B to alternate motifs along the runner for visual interest. Make at least 2 Variation B motifs and combine with main motifs as desired.
Info :
Alternate motif types along the runner (example: main, variation, main, variation...) to create a repeating diamond pattern with subtle variation in the center fill.
— Holly Leaf Applique (Make 12 or pairs per motif) :
Round 1 :
With evergreen green yarn, ch 6, join with sl st to form small ring or begin with mr and 6 sc (6)
Round 2 :
Work 2 sc in each stitch around (12)
Round 3 :
(1 sc, inc) x 6 (18)
Round 4 :
Switch to 3.5mm hook if desired for crisp shaping. *Ch 3, sl st in next st, tr in next, sl st, ch 2; repeat around to create little pointed lobes (18 base units)
Round 5 :
Form leaf points: In alternating rounds work: (sk 1, 3 dc in next st, 1 tr in next st, 3 dc in next st, sl st) creating a serrated leaf edge (18 pointed lobes - counts vary by lobe but leaf overall remains compact)
Info :
Holly leaves are worked small and shaped by strategic increases (dc clusters) and pointed stitches (tr). Make pairs of leaves and press lightly while still damp for crisp points before attaching.
Round 6 :
Return to sc around the base to tidy the attachment point and fasten off leaving a long tail for sewing (approx 18 base sts)
Round 7 :
Optional embroidery: With darker green yarn use a running stitch along the center of the leaf to indicate veins, or use sl st veins worked into surface.
Round 8 :
Lightly stuff the center of leaves with a tiny pinch of fiberfill to lift points (very little stuffing) and tack with a few stitches to close if needed. Fasten off.
Info :
Make 2 leaves per berry cluster for the design in the photo; alternate orientation for natural look. Leaf size can be reduced by using a smaller hook or working fewer lobe rounds.
— Berry Bobble (Make multiple) :
Round 1 :
With red yarn, mr, 6 sc in ring (6)
Round 3 :
*(1 sc, 1 inc) x 6 (18)
Round 4 :
Form bobble surface: Using 3.5mm hook and red yarn, create 5 small bobble stitches around the surface: (Yarn over twice, insert, pull up loop, yarn over, pull through 2, yarn over, pull through 2) finishing each bobble with a final sl st to lock; space bobbles evenly to create a clustered sphere (counts vary - make 5-7 bobbles per berry cluster)
Round 5 :
Fasten off leaving a 6" tail for sewing. Add a dot of white embroidery to suggest light reflection if desired.
Info :
Make bobbles in groups of 3 or 5 for the clusters seen in the photo: some clusters have 3 tight berries, some isolated single berries used decoratively in corner motifs. Use very light stuffing if desired before closing the last round.
— Small Accent Bud (Make multiple) :
Round 1 :
With red yarn, ch 2, 5 sc into second ch from hook; sl st to join (5)
Round 2 :
1 sc in each st around (5)
Round 3 :
Pull tail to close slightly to form a small bud and fasten off, leave long tail for sewing. (5)
Info :
These tiny buds fill small lace spaces on the motif edges. Make several to populate each motif corner and inner diamond edge.
— Joining Motifs (Join 8 motifs into runner) :
Info :
Arrange motifs: lay motifs flat in the order you want (sample used 8 motifs alternating main and variation). Place motifs on a blocking board and pin edges flat with consistent spacing. We will join motifs along their long diagonal edges using whip stitch or single crochet join depending on your preference.
Round 1 :
Align first two motifs right sides up. Using cream yarn and tapestry needle, whip stitch through corresponding loops around the entire joining edge working through back loops only so surface remains neat. Use approximately 20 evenly spaced stitches along each joining edge (actual stitch count depends on motif size).
Round 2 :
After each join, tie a secure knot and weave tails through 6-8 stitches to hide ends. Continue joining motifs sequentially until you have a long strip of motifs (8 motifs wide = runner length)
Info :
If you prefer a visible join, use reverse single crochet (crab stitch) along the seam using red yarn to create a continuous decorative ridge; this will add a thin red line along joins visible on the runner surface.
Round 3 :
Once motif strip is joined and all seams secured, lay the runner flat and adjust alignment by adding 1-2 pick-up stitches where gaps appear. Blocking the entire assembled runner again will help seams relax and blend.
Info :
When joining, sew holly leaf pairs and berry clusters into position after every second join - refer to placement notes below. Use pins to test placement before sewing.
— Placement & Applique Attachment :
Info :
Placement guide for each motif: a) Central diamond: attach a cluster of 3 berries with 2 leaves angled beneath. b) Quadrant corners: attach one small bud or single berry. c) Inner chevrons: leave some chevrons plain and place embroidered yellow accents in alternate motifs for variety. See photo for reference and pin before sewing.
Round 1 :
Sew leaves first using long tail and mattress or whip stitch. Tuck leaf base under lace cluster and sew through base of motif (approx 6-8 stitches) to secure. Then sew each small bobble berry over leaf overlap so berry covers the join and hides stitches (5-7 stitches each).
Info :
Place the largest three-berry clusters in alternate motif centers to create a repeating rhythm down the runner. For single berries, sew through base and knot securely on the back. Weave all ends at least 2" into runner to prevent loosening.
— Inner Stabilizing Border (around the entire assembled strip) :
Round 1 :
With cream yarn, join at one long edge and work 1 sc evenly around the entire perimeter of the assembled motifs, working 3 sc in each corner chain-space to keep edge flat (total stitch count will vary depending on runner length; aim for even distribution)
Round 2 :
1 sc in each st around (even spacing); at joins pick up a stitch in both motifs to keep seam flat and invisible (stitch count matches Round 1)
Round 3 :
Change to evergreen green. Work 1 row of sc around to create an inner green frame highlighting chevrons (same number of sts as previous round)
Info :
Working in rows around a multi-motif piece requires careful counting at corners and joins. Use extra sc in corners to prevent cup up. This inner border readies the edge for decorative scallops.
Round 4 :
Optional: Work a row of reverse single crochet (crab stitch) in red for a subtle ridge between inner border and outer scallop; this creates a crisp visual separation. Use a smaller hook for crab stitch if needed.
— Outer Scalloped Border (Red) :
Round 1 :
Join red yarn to any outermost sc. *Ch1, sl st into same st, sc in next 2 sts, ch3, 5 dc shell into next st, ch3, sc in next 3 sts; rep from * around making scallops. At corners make an extra shell to maintain rounded shape. Shells should be spaced roughly every 6-8 sts (stitch count per scallop varies).
Round 2 :
Work into each shell: sl st into top of shell, ch3, (3 dc) twice in shell top to increase puff, sl st into center between shells; this adds dimension to scallops and creates pronounced red edging.
Info :
Make outer scallops consistent by counting shell stitches and checking symmetry along both long edges. Blocking after scallops will help achieve even arcs.
Round 3 :
Finish scallops with a single row of sc around the outer edge, working 3 sc in the points between shells to keep the border rounded. Fasten off and weave in ends.
Round 4 :
Optional picot edge: with red yarn and smaller hook, *sc in next st, picot (ch3, sl st into top of ch3), sc in next 2 sts; rep to create small decorative picots along scallop peaks.
Info :
The red outer edging creates the finished look in the photo. If you prefer a more subtle edge, use cream or green instead and reduce picots.
— Finishing Touches & Embroidery :
Round 1 :
Using mustard/yellow embroidery yarn, add 1-2 tiny star stitches in select cream lace fans inside some motifs to echo the tiny yellow stitches seen in the photo. Use a fine embroidery needle and some light satin or French knots for texture.
Round 2 :
Go over entire runner and securely weave in all tails using a tapestry needle. Trim ends close. Use a small amount of fabric glue on the back of particularly loose bobbles if used on frequently handled surfaces.
Round 3 :
Final blocking: lay runner flat and pin scallops to even arcs. Lightly steam or mist and allow to dry completely. This sets lace and scallops evenly and gives the inspired delicate finish.
Info :
Store runner flat or rolled; avoid folding scallops to prevent creases. Handwash gently in cool water if needed; reshape while damp and allow to dry flat.
Finishing this runner is such a rewarding moment — watching the motifs come together into a long, festive centerpiece is pure holiday joy. The dimensional holly leaves and ruby bobbles create a handcrafted accent that instantly elevates your table. Whether gifting it or keeping it at home, this runner will bring cozy, vintage-inspired charm to your holiday setting. Enjoy the blocking and the final flourish of the scalloped red border — it truly makes the whole piece sing. 🧶🎄