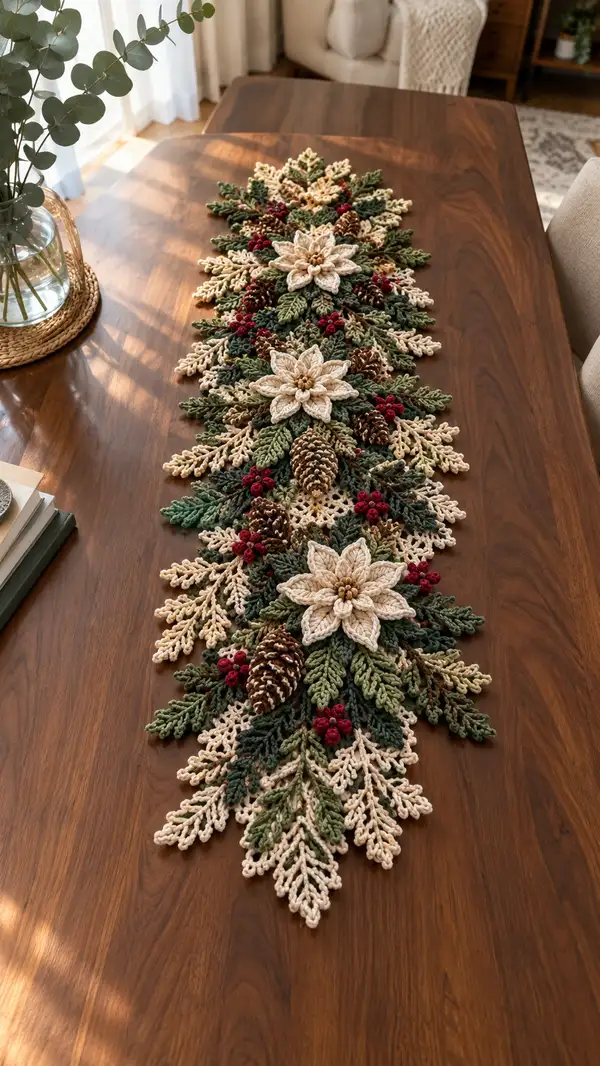
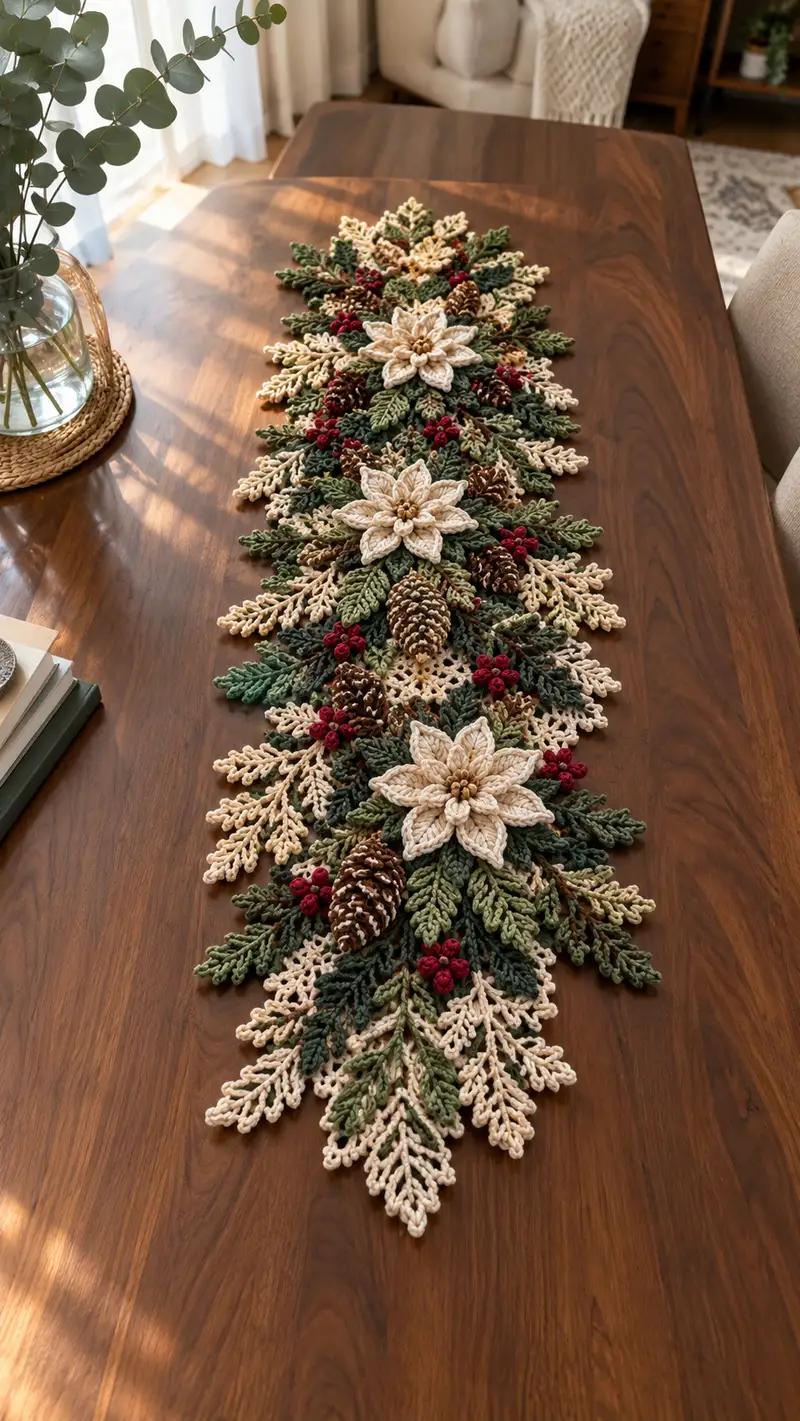
A luxurious, layered holiday table runner featuring cream poinsettias, textured green pine foliage, brown pinecones and deep red berry clusters. This runner uses several modular motifs—flowers, leaves, cones—and joined medallions to create a long, organic centerpiece that sits beautifully down the center of a dining table.
Progress Tracker
0% Complete
— Overview :
Info :
This pattern is modular: you will make three cream poinsettias, dozens of leaves in three sizes/colors, 6-8 pinecones, multiple burgundy berry clusters, and three cream medallion bases. Each element is made separately and sewn together. Blocking recommended for flat elements. Use a 4.0mm hook for most pieces and 3.5mm for small, dense leaves if you prefer firmer definition.
Finished Size :
Approximately 60" (150 cm) long by 12-14" (30-35 cm) at widest points with the composition shown. Actual size will vary by yarn/hook/gauge.
— Notes & Special Techniques :
Info :
Puff stitch: yarn over, insert hook, pull up a loop (repeat 3 or 4 times per stitch depending on puff size), yarn over, pull through all loops, ch1 to secure. Bobble stitch: (dc in same st x4, remove loop, insert hook in top of first dc of group, pull loop through to close bobble) — practice on a small swatch first.
Info :
Front/back loop only (FLO/BLO) is used frequently to create ridges on leaves and petals. When joining motifs, use whip stitch with a yarn needle and hide tails inside motifs.
— Cream Medallion Base (Make 3) :
Round 1 :
6 sc in magic ring (6)
Round 3 :
(1 sc, 1 inc) x 6 (18)
Round 4 :
(2 sc, 1 inc) x 6 (24)
Round 5 :
(3 sc, 1 inc) x 6 (30)
Round 6 :
(4 sc, 1 inc) x 6 (36)
Round 7 :
1 sc in each st (36)
Info :
Switch to BLO for Round 8 to create a subtle ridge that will sit beneath poinsettia petals. Carry working yarn behind if you prefer no extra tails.
Round 8 :
1 sc in each st BLO (36)
Round 9 :
(3 sc, 1 inc) x 9 (45)
Round 10 :
1 sc in each st (45)
Round 11 :
*Ch3, skip 1, sl st in next st* around to create a decorative lacy spacer (15 ch-spaces). Join and fasten off leaving long tail for sewing (approx 18"/45 cm).
Info :
Block medallions flat while damp to form firm bases for poinsettias; pin into a circular flat shape, allow to dry completely before assembly.
— Large Poinsettia Petal (Make 8 per large flower; 3 flowers total) :
Round 1 :
6 sc in magic ring (6)
Round 3 :
(1 sc, 1 inc) x 6 (18)
Round 4 :
1 sc in each st (18)
Round 5 :
Change to BLO. Work 1 sc in each st BLO (18)
Info :
Working BLO creates a defined central ridge for petal sculpting. Keep tension moderate for a smooth curve.
Round 6 :
(2 sc, 1 inc) x 6 (24)
Round 7 :
1 sc in each st (24)
Round 8 :
(3 sc, 1 inc) x 6 (30)
Round 9 :
Slip stitch into FLO and chain 1 for a picot-style ridge: 1 sc in next 3 sts, *ch2, sl st in next st* across the top edge to create slight scallops (30)
Round 10 :
Working around the outer edge: *(hdc, dc, hdc) in next stitch, sl st in next 2 sts* repeat to shape a pointed petal (approx 10 petals sections around edge; stitch count will remain approx 30)
Round 11 :
Edging: sl st evenly around petal edge to neaten, finish off and leave long tail for sewing.
Info :
Sew petals onto medallion base starting with a bottom layer of 8 large petals evenly spaced. Use tails to sew from petal base into medallion and reinforce with a second pass for security.
— Medium Poinsettia Petal (Make 8 per flower) :
Round 1 :
6 sc in magic ring (6)
Round 3 :
(1 sc, 1 inc) x 6 (18)
Round 4 :
1 sc in each st (18)
Round 5 :
(2 sc, 1 inc) x 6 (24)
Round 6 :
1 sc in each st (24)
Round 7 :
Working FLO: 1 sc in each st FLO (24)
Round 8 :
Edge shaping: *(hdc, dc, hdc) in next st, sl st in next st* repeat around to form gentle pointy petal tops (24)
Round 9 :
Finish with single crochet around outer edge, fasten off leaving a 12" tail for sewing.
Info :
Sew the medium petals on top of the large layer, staggered so points sit between large petal points to create a full flower look.
— Small Poinsettia Petal (Make 8 per flower) :
Round 1 :
6 sc in magic ring (6)
Round 3 :
1 sc in each st (12)
Round 4 :
(1 sc, 1 inc) x 4 then 1 sc in next 4 (16)
Round 5 :
Edge shaping: *(hdc, dc, hdc) in next stitch* around to create small rounded points (16)
Round 6 :
1 sc around, finish off leaving long tail for sewing to center of flower.
Info :
Small petals form the top-most layer and help the flower appear dimensional. Arrange them to create a compact, raised center.
— Poinsettia Center (Make 3 centers) :
Round 1 :
6 sc in magic ring (6)
Round 3 :
Work puff stitch cluster around: *puff in next st, ch1* around to create textured center (12 puffs). Join and fasten off leaving long tail.
Info :
Sew a small bead or three into the very center for a realistic flower eye; secure with thread or glue if desired. Use a gold/tan yarn for a warm center color.
— Leaf - Large Fern Style (Make 12) :
Round 1 :
ch 24, sc in 2nd ch from hook and across (23)
Round 2 :
ch1, turn, sc in first 2 sts, *hdc in next, dc in next, hdc in next, sc in next 4* repeat across finishing with 3 sc (23)
Round 3 :
Change to BLO. ch1, turn, sc in BLO across to create central ridge (23)
Round 4 :
Working along one long side: *ch3, sl st into the side of next stitch to form little leaflets* repeat along side to create lobed edge. Repeat for other side symmetrically. Finish and fasten off leaving long tail for sewing.
Info :
For a more three-dimensional leaf, lightly steam-block and pinch at the base to create a gentle cupped shape. Use darker green for these larger leaves for depth.
— Leaf - Medium (Make 18) :
Round 1 :
ch 18, sc in 2nd ch from hook and across (17)
Round 2 :
ch1, turn, sc in first 2 sts, *hdc, dc, hdc, sc* repeat across, ending with sc2 (17)
Round 3 :
ch1, turn, sc in each st BLO (17)
Round 4 :
Create picot edging on both sides: *ch3, sl st into side of next stitch* down length, finish and fasten off leaving long tail for placement.
Info :
Alternate medium leaves in sage and olive greens to create tonal variance across the runner.
— Leaf - Small (Make 30) :
Round 1 :
ch 12, sc in 2nd ch from hook and across (11)
Round 2 :
ch1, turn, sc in each st (11)
Round 3 :
ch1, turn, 1 sc in first 2 sts, *hdc, dc, hdc* across center, finish with sc2 (11)
Round 4 :
Edge with sl st picots on each side, fasten off with long tail for sewing.
Info :
These small leaves are used to fill gaps and provide delicate texture. Use a smaller hook if you want firmer, crisper edges.
— Pinecone (Make 6-8) :
Round 1 :
6 sc in magic ring (6)
Round 3 :
(1 sc, 1 inc) x 6 (18)
Round 4 :
1 sc in each st (18)
Round 5 :
Change to brown; 1 sc in each st (18)
Round 6 :
Pinecone scale row: *(sl st, ch2, puff into next st, sl st)* around to form scale-like ridges (18 puff clusters).
Round 7 :
Repeat scale row to create overlap and depth; fasten off leaving tail. Optionally stuff very lightly at base to shape tapered cone.
Info :
To make a more realistic cone, block gently and add a touch of cream or tan to tips of puffs with a spare strand of light yarn worked as surface slip stitches.
— Berry Cluster (Make 20 small clusters) :
Round 1 :
Make 3-5 small bobbles: ch 2, into 2nd ch from hook work a small bobble (see abbreviations). Slip stitch to secure. Make 3-5 bobbles on a length of stem (ch 6) with stems separated by sl st.
Round 2 :
Fasten off leaving 6-8" tail for sewing. Group 3-5 bobbles close together to form a tight berry cluster.
Info :
Sew clusters into nooks between leaves and near medallion edges. Use deep cranberry yarn for striking contrast.
— Sprig / Small Branch (Make 10) :
Round 1 :
ch 20, sc in 2nd ch from hook and across (19)
Round 2 :
ch1, turn, sc in first 3, *(ch3, sl st into side of next st) repeat across, sc to finish* (19)
Round 3 :
fasten off leaving long tail for sewing. Sprigs are used as fine filler to create lacy edges.
Info :
Work sprigs in alternating colors for a natural, variegated garland effect. Pin before sewing to achieve layered look.
— Joining & Runner Formation :
Info :
Layout: Arrange three cream medallions along runner center with ~10-12" spacing. Surround each medallion with 8 large leaves, 10 medium leaves, and clusters of small leaves. Position pinecones and berry clusters between medallions to create continuous flow.
Round 1 :
Begin joining by placing two medallions adjacent at desired overlap and use long tails to whip stitch medallion borders together through the ch-spaces from Round 11. Use loose whip stitch to allow slight movement during composition adjustments.
Round 2 :
Sew large petals first to medallion centers, then attach medium and small petals which sit on top. Reinforce with a second pass of small stitches along the base of each petal (no count).
Info :
Attach leaves around each medallion working from largest to smallest and tucking edges under petals when desired. Use mattress stitch for nearly invisible joins when attaching flat leaves to medallions.
Round 3 :
Sew pinecones into place at intervals of two between medallions. Sew through the base of the pinecone into the runner backing or into surrounding leaves for extra stability.
Round 4 :
Place berry clusters in groupings of 2-3 near medallion edges and beside pinecones. Stitch securely, bury seams into the leaf network.
Info :
Use pins to lock composition as you work; adjust angles of leaves and petals to create a natural, asymmetric look. Keep the runner's center line visually connected by aligning major pinecones and medallion centers along an imaginary central axis.
— Final Edge & Border (Worked after assembly) :
Round 1 :
With cream yarn and 4.0mm hook, join at one tip of runner and work 1 round sc evenly around entire outer edge of assembled runner, working around leaves and petals—estimate 2-3 stitches per leaf edge section to create even coverage (no fixed count).
Round 2 :
Work picot fringe: *ch3, sl st into 3rd ch from hook to make small picot, sl st into next sc around* Repeat around edge for a delicate finished look. Fasten off and weave in ends.
Info :
If the assembled runner feels uneven, add a supporting backing of light felt cut to the runner shape and whip stitch in place behind motifs before edge finishing to stabilize for use on table tops.
— Alternate Pinecone Construction (Denser) :
Round 3 :
(1 sc, 1 inc) x 6 (18)
Round 4 :
1 sc in each st (18)
Round 5 :
Make layered scales by working: *(ch2, sl st in base of next st), dc cluster into same st* around to build dense overlapping scales (18 clusters)
Round 6 :
Repeat Round 5 for a second overlapping row; fasten off and shape with a small amount of fiberfill at base if needed. Sew in place as instructed above.
Info :
Adding a touch of cream to the tips with surface sl st will mimic snow-dusted cones as seen in the image.
— Embellishments & Finishing Touches :
Info :
Add faux snow by lightly brushing white acrylic paint onto raised puff stitches on pinecones and petals. Allow to dry before final blocking. Glue small beads into poinsettia centers if desired. Trim stray fibers and weave in all tails securely.
Info :
Final blocking: pin the assembled runner onto blocking board in final shape, steam lightly or wet block, ensuring petals and leaves lie as desired. Let dry completely before placing on table.
Completing this runner is such a rewarding experience — the layered textures and holiday colors come alive as each motif is added. The finished centerpiece reads like a floral arrangement frozen in yarn, perfect for seasonal tables or giving as a heartfelt gift. Enjoy the peaceful rhythm of making petals, leaves, and tiny pinecones; this project is both meditative and beautiful. 🧶✨