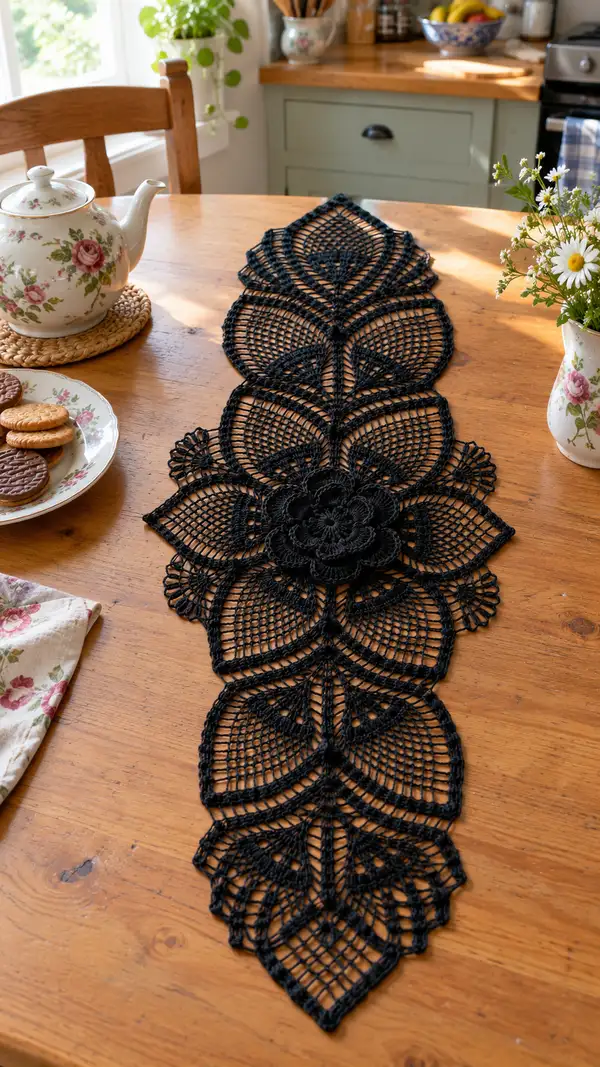
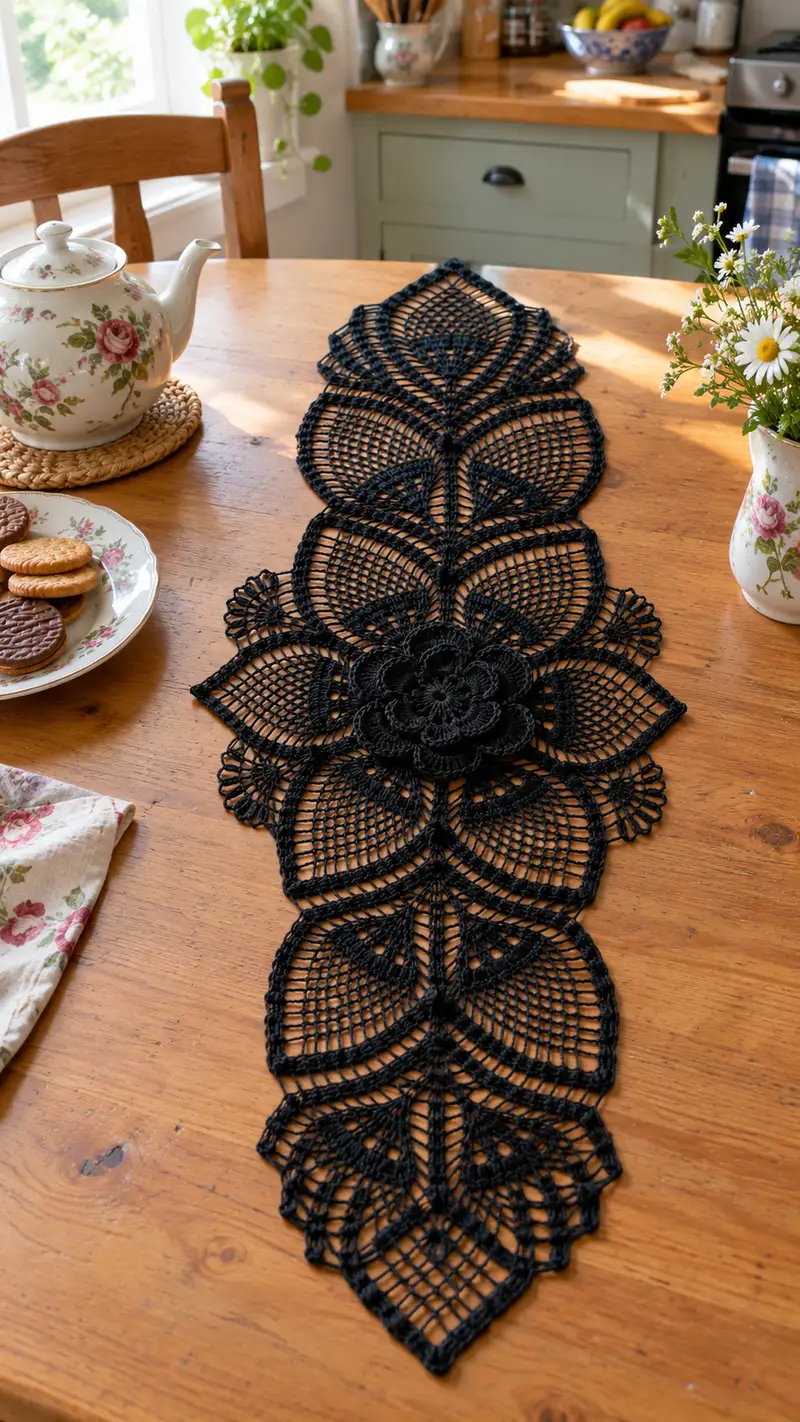
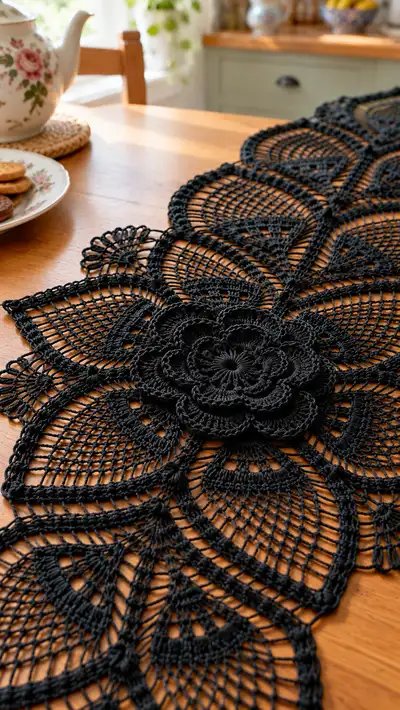
This elegant black lace table runner features repeated leaf-shaped motifs linked by delicate mesh and finished with a layered central rosette. Worked in fine cotton thread, the runner lays flat with an open, airy texture and dramatic silhouette—perfect for a dressed table or layered over a tablecloth. The design uses shells, picots, chain-mesh and joined motifs to create a vintage-inspired modern statement piece.
Progress Tracker
0% Complete
— Notes & Gauge :
Info :
Worked in size 10 cotton thread on a 1.75mm hook. Gauge is not critical for motif symmetry but affects overall runner length; one petal motif (finished, unblocked) measures approximately 9.5cm wide by 13.5cm tall. Blocking will increase width and length significantly. Maintain tight enough tension to prevent stuffing or showing through of table surface below.
Info :
Pattern is module-based. You will make: 1 central rosette, 6 large leaf motifs, 2 half-leaf end sections (or 7 full leaves depending on desired length), mesh connector strips and final edging. Adjust number of repeats for your desired length.
— Central Rosette :
Round 1 :
Make a magic ring. Ch1, 8 sc into ring. Tighten ring and join with sl st to first sc (8)
Round 2 :
Ch1, 8 inc (16) (inc = 2 sc in same st)
Round 3 :
Ch1, (1 sc, inc) x8 (24)
Round 4 :
Ch1, (2 sc, inc) x8 (32)
Info :
Keep stitches low and tight here to provide a firm center that will later anchor layered petals. Place a marker at round start to track your join each round.
Round 5 :
Ch1, (3 sc, inc) x8 (40)
Round 6 :
Ch1, (4 sc, inc) x8 (48)
Round 7 :
Ch1, 1 sc in each st around (48)
Round 8 :
Ch1, 1 sc in each st around (48)
Info :
Rounds 7-8 create a round, flat base to work petals from. Keep even tension and check the circle remains flat; if cupping, loosen tension; if ruffling, tighten slightly.
Round 9 :
Ch3 (counts as dc), *sk 1, dc in next 3 sts, ch2, sk 1, dc in next st* repeat total 8 times to create 8 small fan anchors. Join with sl st to top of starting ch3. (48 base sts remain anchored)
Round 10 :
Work 8 fans: sl st to first fan space, [(ch3, 6 dc, ch3) all into space], sl st to next anchor point. Repeat for each fan (8 fans). This creates the first petal layer.
Info :
When working fans, keep the same number of stitches in each fan so the rosette stays balanced. Use your marker to ensure you make 8 fans evenly spaced.
Round 11 :
Ch1, sc into middle dc of each fan (8 sc), then ch7 over top of fan to next sc; sc in next fan center. Repeat around to form long chain loops (8 chain loops).
Round 12 :
Into each ch7 loop work: (sc, hdc, 9 dc, hdc, sc) to form fuller petal. Fasten off and weave ends. (8 large petals)
Round 13 :
Rejoin at any gap between petals. Ch1, work 1 sc in each base st between petals (approx 48 sc) to re-establish base and join petal crowns.
Round 14 :
Ch3, *work 5 dc cluster into space formed between petals, ch3, sl st into top of petal* x8. This creates little arches that will anchor the second petal layer.
Round 15 :
Ch1, into each arch work (sc, ch3, 7 dc, ch3, sc). Fasten off. (8 secondary petals)
Info :
Layering petals: the second layer sits slightly on top of the first. Gently shape each petal with your fingers as you go — now is a good time to consider stiffening later with light starch during blocking.
Round 16 :
Rejoin at the base and sc around the entire rosette base through the backs of petals (approx 64 sc) to create a stable hem for joining to leaf motifs later.
Round 17 :
Ch1, 1 sc in each st around (64). Count and verify evenness; correct by adding evenly spaced sc where needed.
Round 18 :
Ch1, *sc in next 6, picot (ch3 sl st into base of ch3)* repeat around to add gentle scallop (64 base points)
Round 19 :
Sl st to next sc and fasten off leaving a long tail for sewing. Weave in ends or leave tail for later secure join to motif core.
Info :
Blocking: pin rosette centered and shape petals as you like when wet-blocking. Use a small amount of stiffener if you want the rosette raised and stable. Allow to dry fully before joining to the runner.
— Large Leaf Motif (Make 7; repeat for each) :
Round 1 :
Start with magic ring. Ch2 (counts as hdc), work 10 hdc into ring. Join with sl st to top of ch2. (10)
Round 2 :
Ch2, inc in each st around (20)
Round 3 :
Ch2, (1 hdc, inc) x10 (30)
Round 4 :
Ch2, (2 hdc, inc) x10 (40)
Info :
These increases shape the rounded base of the leaf. Keep the work flat; if ruffling occurs, check your stitches for accidental extra increases.
Round 5 :
Ch1, 1 sc in each st around (40)
Round 6 :
Ch3, *sk 1 st, dc in next 3 sts, ch5, sl st in base to form loop* repeat across top to make 8 loops spaced along the top edge. Stay mindful to maintain 40 base anchors.
Round 7 :
Into each ch5 loop work (sc, ch3, 7 dc, ch3, sc) forming small petals along the top edge (8 small decorative petals). Fasten off and rejoin at the widest point to begin leaf shaping.
Round 8 :
Rejoin at bottom center. Ch1, 1 sc in each st for 10 sts, then begin leaf 'spine' shaping: work [sc, ch5, sc] as a picot arch in middle to form the central vein base. Continue 1 sc across remaining sts (40 total anchors remain).
Round 9 :
Ch3, in the next 10 sts work (dc in each), then to shape tip of leaf begin decreases: (dc2tog, dc in next 6) across the tip-area, mirrored on returning side. Aim for tip that narrows by 6 dc across two decrease sequences. Count carefully to keep symmetry.
Round 10 :
Ch2, work filet mesh on each side of the spine: *ch4, sk 2, sc in next* across the left side; at tip work (3 dc tog over top 3 sts), then repeat mesh on right side mirrored. This creates the open lace that reads as leaf ribs.
Info :
Filet mesh repeats are created by chaining and sc anchors. Keep your counts consistent — count chain spaces and sc anchors. Each leaf should feel symmetrical when folded in half.
Round 11 :
Ch1, 1 sc around the entire leaf edge to stabilize (approx 60 sc including anchors into mesh). This will also provide evenly spaced points for the next decorative arches.
Round 12 :
Ch3, *in next sc make 5 dc cluster, ch5, sl st to sc two sts ahead* repeat 12 times to produce deep arches that form the bold leaf outline.
Round 13 :
Into each ch5 arch work (sc, ch3, 9 dc, ch3, sc) to form crisp lobed edges (12 lobes). Fasten off if you prefer and weave ends.
Round 14 :
Rejoin at the leaf base and work 1 sc into back of petal bases (approx 72 sc) to create a neat joining ridge used later to sew motifs together.
Info :
Blocking tip: pin each leaf so the tip points out and the lobes are evenly spread. Lightly spray with water and shape; let dry fully. Consistent steam-blocking helps each motif match width and arch.
Round 15 :
Ch1, 1 sc in each st around (72) to finalize base. Fasten off leaving long tail for sewing (approx 20-30cm) and weave into the back to prevent showing through the mesh.
Round 16 :
Info :
Make 7 full leaf motifs for the runner body (or 6 plus two half-leaves for a shorter runner). To make a half-leaf for the ends, work Rounds 1-12 then stop after Round 12 and finish with a raked sc hem to present a straight end.
— Mesh Connector Panel (Make 6 thin strips) :
Round 1 :
Start with ch30 (or chain length to match gap between adjacent leaves when pinned). Turn, sc in 2nd ch from hook and in each across (29)
Round 2 :
Ch3, turn. Dc in each st across (29)
Round 3 :
Ch5 (counts as tr+ch2), turn. *Sk next st, dc in next st, ch2* repeat across to create stable mesh base. End with dc in last st.
Round 4 :
Ch3, turn. In each ch2 space work (dc, ch2, dc) forming lattice arches across the strip. End ch2 spaces remain consistent so the strip width remains even.
Info :
Mesh panels are worked to match the spacing between leaves. Make a sample and pin motifs together to determine the exact chain length required. Adjust chain count in Round 1 to expand or shorten the panel.
Round 5 :
Repeat Round 4 for a total of 14 rows of mesh (or until mesh height equals leaf between-lobe height). Maintain last row with 1 sc in each top of dc to produce neat joining anchors.
Round 6 :
Fasten off leaving long tails for sewing. Make 6 identical mesh connector strips or more depending on length desired.
— Joining Motifs (Sequential Join Instructions) :
Info :
Lay your central rosette in the center of your blocking board. Arrange leaf motifs on both sides in a mirrored fashion: three on each side for a 7-leaf runner, with the rosette over the central join. Pin motifs in place with about 2-3mm spacing. The joins are made by sewing the sc hem created in Round 14 of leaves to the rosette base and to adjacent leaf hem points.
Join Step 1 :
Using the long tails left from the leaf motif hem, whip stitch the hem of the leaf to the rosette base at evenly spaced points: sew through the back loop of sc on the rosette (Round 16 hem) and through the back loop of the leaf hem sc (Round 14). Make 6-8 small stitches along each contact area to secure.
Info :
For each join, pin before you sew. Ensure petals face the same direction and the leaf tips align along a central pipeline. Loose joins can be reinforced with additional mattress stitches worked invisibly from the back.
Join Step 2 :
Connect adjacent leaves by overlapping their hem sc and sewing through both hems and the mesh panel anchor points if desired. When joining using the mesh strip, place the strip behind the gap and sew through corresponding sc anchors on the leaf hem into the strip sc anchors. Use a whip or ladder stitch for an invisible seam.
Join Step 3 :
At the runner ends, if you made full leaves, finish by sewing one half-leaf or a straight hem to create a tapered or squared end. Ensure symmetry by measuring the distance from center to ends and adjusting earlier joins as necessary.
Info :
Joining sequencing: attach the central rosette first, then attach the two leaves immediately adjacent to the rosette, working outwards alternating left and right to keep tension even.
— Decorative Filigree Between Leaves (Optional Small Motifs) :
Round 1 :
Ch6, sl st to form ring. Ch3, 12 dc into ring, join (12)
Round 2 :
Ch1, 1 sc in each dc around (12)
Round 3 :
Ch8, sl st into every 2nd st to create small fan rays, repeat 6 times around creating 6 rays for a decorative join point. Fasten off and tack into gaps between leaves if you like additional filigree detail.
Info :
These small motifs are optional but useful to fill gaps or strengthen joins. Tuck them into spaces and sew through several threads for secure attachment.
— Outer Edging & Final Border :
Round 1 :
With the fully joined runner on your lap, rejoin at any outer-most hem sc. Ch1, sc evenly around entire outer perimeter to create a base for the edging. Keep stitch counts even by spacing increases across corners or points (approx 360 sc depending on size).
Info :
Work slowly around the entire runner, counting sc and placing a stitch marker every 50 sc to help keep track. At pronounced points (leaf tips) add 3 sc in that sc to maintain a gentle rounded spike.
Round 2 :
Ch3, *sk 1 sc, dc in next 4 sc, ch3, sl st into base* repeat around to form decorative arches along the edge. Make sure each arch straddles a mesh open space rather than the middle of a dc block to keep shape even.
Round 3 :
Into each ch3 arch work (sc, ch3, 11 dc, ch3, sc) to make pronounced scalloped shells. At corners or tips, work smaller shells of (sc, ch3, 7 dc, ch3, sc) to avoid bulk. Fasten off and weave ends.
Round 4 :
Optional picot row: Rejoin and work 1 sc between shell peaks, adding picot on every other sc for a delicate lacy edge. Fasten off fully and hide all tails into backs of shells with tapestry needle.
Info :
Edge tension controls final lay. If the runner curls inward, steam-block with pins wider apart. If ruffly, reduce chain lengths on edge shells. Always pin while damp to let lace set into its final flat shape.
— Blocking & Finishing :
Info :
Wet-block or steam-block the entire piece pinned to shape. Use rust-proof T-pins across every arch and lobe ensuring symmetric spacing. Gently shape petals and rosette layers so the runner lies flat. For a stiffer finish, apply a light spray of diluted fabric stiffener or starch and allow to dry fully. Unpin and check for loose tails; weave in remaining ends securely.
Info :
Final check: lay the runner on a table and ensure the rosette sits flat and the leaves form even mirrored pairs. If any join puckers, re-pin and tack additional invisible stitches from the back to flatten.
Info :
Storage tip: store flat or gently rolled. Avoid folding sharply which can crease the lace permanently.
This elegant lace table runner is a beautiful mix of vintage lacework and contemporary styling — a statement piece that dresses any table instantly. The layered rosette center and sculptural leaf motifs give it a handmade charm that's both bold and delicate. With careful blocking and small finishing touches, your runner will become a treasured household accent. 🧶 Pin, stitch, and enjoy the meditative joy of repeating motifs while watching the runner grow. Happy crocheting and styling! ✨