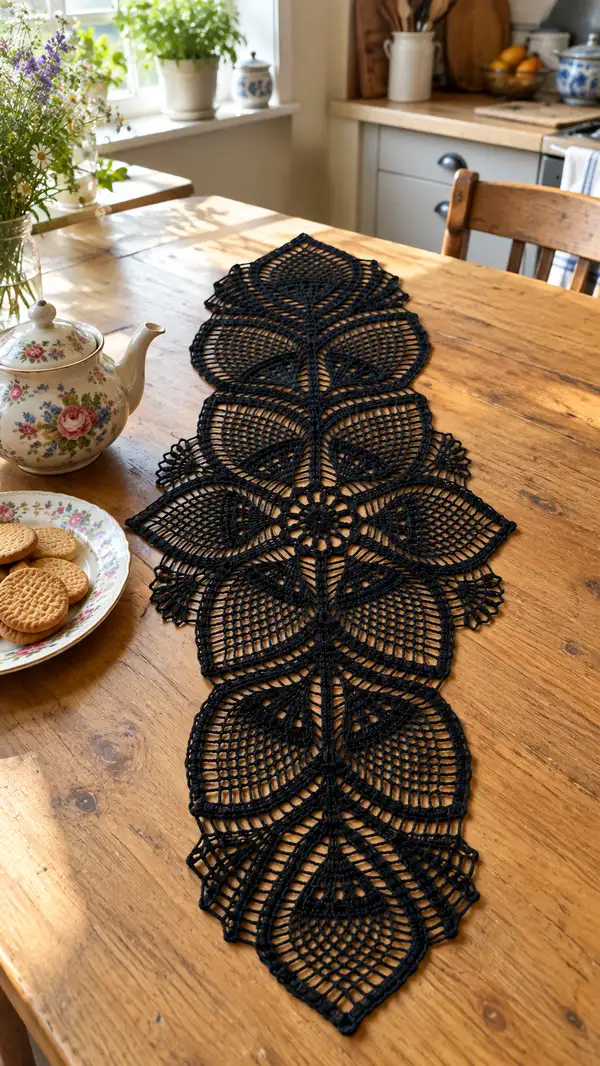
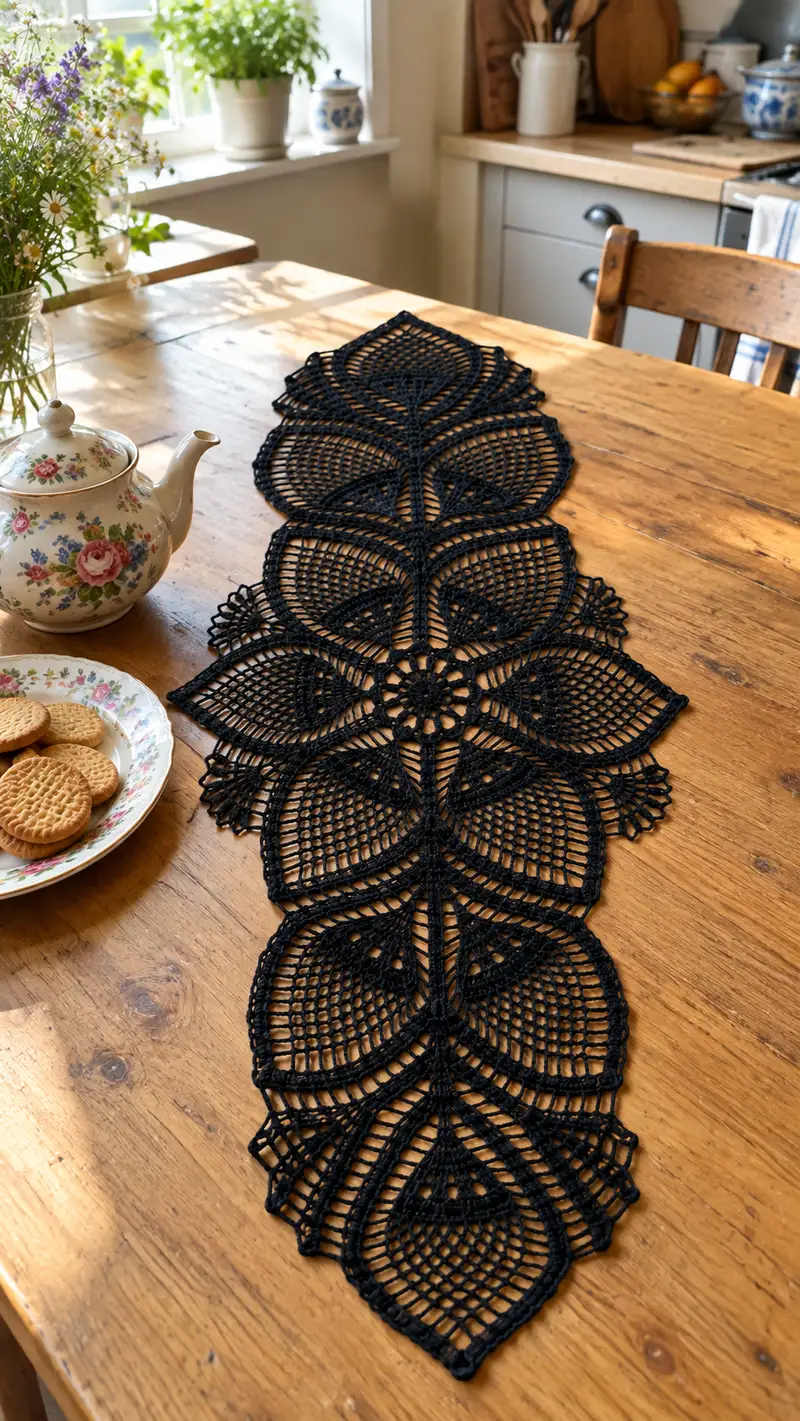
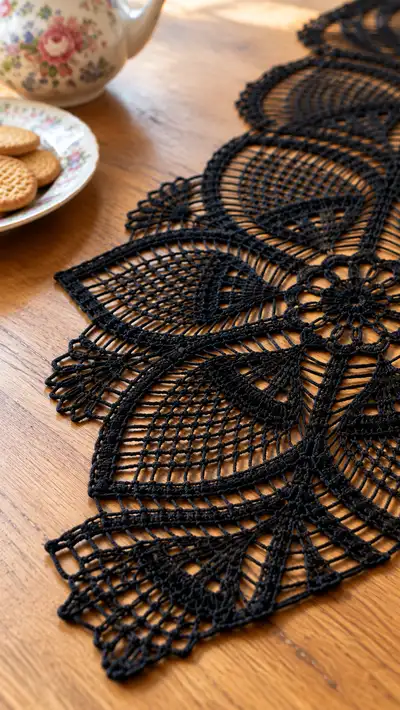
Create an elegant, long black lace table runner built from joined leaf-shaped motifs and a central medallion. This pattern uses fine crochet thread and open mesh lace to form petals, spokes and picot edges for a dramatic, vintage-inspired accent. Perfect for dressing a wooden table or as a striking centerpiece under a teapot and small plates. Detailed joining, edging and blocking instructions included so the finished runner lies flat and looks professional.
Progress Tracker
0% Complete
— Materials and Gauge :
Info :
Use size 10 crochet cotton and a 1.75mm steel hook for the sample runner. Gauge is not a typical sc gauge; instead make a motif swatch (one leaf motif) and block it to measure finished width. The sample motifs were blocked to approx 20cm (8") across the widest point of each leaf using the yarn and hook specified.
— Center Medallion :
Round 1 :
Make a magic ring. Ch1 (does not count as st), 12 sc into ring (12)
Round 2 :
2 sc in each st around (24)
Round 3 :
(1 sc, 1 inc) x12 (36)
Info :
Place a stitch marker at the first st of this round and move it each round. The medallion forms the floral center seen in the photos and will have 12 spokes created in later rounds.
Round 4 :
(2 sc, 1 inc) x12 (48)
Round 5 :
(3 sc, 1 inc) x12 (60)
Round 6 :
Ch5 (counts as dc+ch2), *sk 3 sts, dc in next st, ch2* rep around to create 12 dc spokes, sl st to top of beginning ch5 (12 spokes)
Info :
Spokes are formed by chains and tall dc; these provide the radial structure for attaching adjacent motifs later. Keep chains even and not twisted.
Round 7 :
In each dc-spoke: sl st into dc, ch1, (sc, ch3, sc) into ch2 space at top of spoke to form small petal picots; sl st into next dc. Repeat around (12 small petal clusters)
Round 8 :
*Ch7, sl st into base between spokes, ch7, sl st in next base;* rep around forming 12 arch loops; sl st to join (12 arch loops)
Info :
These arch loops become anchor points for the leaf bases. Make sure each arch sits directly between two spokes; if necessary ease loops with fingers before the next round to create symmetry.
Round 9 :
Working into each arch loop: sl st, ch3 (counts as dc), 3 dc in same arch loop, ch3, sl st into same arch loop to make a shell; sl st to next arch loop. Rep around (12 shells)
Round 10 :
*Ch9, sc into middle of shell to anchor, ch9, sl st between shells* rep around to create taller connecting chains; sl st to join
Info :
At the end of Round 10 you will have 12 locations for leaf bases arranged as petals around the medallion. Keep tension consistent so the medallion remains flat.
Round 11 :
Sl st into first chain-9, ch3, (2 dc, ch2, 3 dc) in same ch9 (small petal cluster), *sk to next ch9, (3 dc, ch2, 3 dc) in next ch9* rep around (12 petal clusters)
Round 12 :
Ch5, sc into center of next petal cluster to form small picot arches between petals; rep around and sl st to start (12 picot arches)
Round 13 :
*Ch11, sl st into center base between petal clusters,* rep around to extend connecting chains for motif joins; sl st to join
Info :
Fasten off leaving a long tail (approx 50cm/20") for sewing the medallion to the first leaf motif if you prefer sewing rather than joining-as-you-go. If you will join motifs by slip-stitching later, leave tail for decorative sewing only.
— Leaf Motif (Make 6) :
Info :
Make 6 identical leaf motifs. Each leaf is worked in rounds from the tip, building through mesh and raised outlines to the base. Each motif has 8 principal ribs (spine lines) and is symmetrical. Use a stitch marker at the start of each round.
Round 1 :
Ch6, join with sl st to form a ring (or magic ring if preferred), ch3 (counts as dc), 2 dc into ring, ch2, 3 dc into ring, sl st to top of beginning ch3 forming a small triangular base (6 dc cluster with ch2 center)
Round 2 :
Ch1, sc in same st, ch5, sc into top of next dc group to make first arch, rep around to make 3 small arches, sl st to first sc (3 arches)
Round 3 :
Into each arch: (sc, ch3, sc) to form picot arches across triangular base, sl st to join (3 picot arches)
Round 4 :
Ch1, sc in first picot, ch7, sc in center picot, ch7, sc in last picot; turn work to begin building spine lines (3 long chain arches)
Round 5 :
Working along first chain-7 arch: sl st, ch3, dc in every 2 chains (4 dc), across arch; repeat for second and third arches creating three raised dc ridges. End with sl st to base (approx 12 dc across three ridges)
Info :
These initial ridges establish the leaf's interior ribs. Keep even spacing and do not pull too tight — these will be expanded into the mesh in later rounds.
Round 6 :
Ch1, sc in first ridge st, *ch5, sk 2, sc in next ridge st* rep to end to create the first row of mesh across the leaf interior (approx 6 ch-5 mesh spaces)
Round 7 :
Ch4 (counts as tr), tr into next sc, ch3, *tr into next sc, ch3* rep across forming tall vertical bars; sl st to join (keeping symmetry) (approx 7 tr bars)
Round 8 :
Ch1, sc across top of bars, making (sc,ch4) mesh arches between bars to expand filet mesh; sl st to join (mesh width increased)
Info :
At this stage you'll start to get the signature wide open mesh seen in photo. Work loosely but consistently so the mesh retains shape after blocking.
Round 9 :
Ch1, sc in each sc and 1 sc into top of each ch4 arch across (this anchors the mesh), sl st to join (st count will equal number of anchors, approx 24)
Round 10 :
Turn to outer edge: ch3, (2 dc, ch2, 3 dc) in first anchor to form a small outer shell; *ch7, sl st into next anchor, ch7, shell into anchor* rep around creating perimeter shells spaced by chain loops. (approx 8 shells, 8 ch7 loops)
Round 11 :
Work into each ch7 loop: sl st, ch3, 12 dc evenly spaced into loop to create a fuller expanded arch; sl st to join (approx 12 dc per loop)
Round 12 :
Ch5, sc into next shell center to make small connecting picots around the shell points; rep around and sl st to first sc
Info :
Now the leaf has a clear outline and open interior. The number of dc per arch can be adjusted slightly to maintain symmetry; count to keep both sides equal.
Round 13 :
Begin building central spine: Ch1, sc at tip, then ch9 and sc into center of each outer shell to form spokes toward the base (4 large chain spokes), sl st to join
Round 14 :
Work back along each chain-spoke: into ch9 make (sc, ch3, sc) at mid, then 5 dc evenly spaced across remaining chains to create raised rib; repeat for each spoke to form 4 ribs (approx 20 dc total across ribs)
Round 15 :
Ch1, sc around entire leaf edge into top of each dc and into shell points; this creates a tidy edge foundation (st count approx 60)
Round 16 :
*Ch5, sl st into next sc to create lacy scallop* rep around entire perimeter; sl st to join (approx 12-16 scallops depending on perimeter)
Info :
At the leaf base you will create the triangular detail that anchors into the medallion. Leave a longer tail here if you will sew the motif to the medallion rather than slip-stitch joining later.
Round 17 :
Work a triangular base: at base sts make a small triangle of (sc, ch3, 3 dc, ch3, sc) to mimic the triangular decoration visible in the photos; repeat for the three base points (3 small triangles)
Round 18 :
Reinforce outer ribs: *sc into each scallop, ch4, sc into next scallop* rep around to make raised cords framing the leaf (approx equals scallop count)
Round 19 :
Picot finishing round: sc across edge placing picot (ch3, sl st into top of ch3) every 6th sc to create tiny points; sl st to join (edge tidy with picots)
Round 20 :
Fasten off leaving a 40-50cm tail for joining. Weave in the end partially; keep for final sewn reinforcement after joining.
Info :
Make six motifs in total. Block each motif individually on foam board to the specified width, pinning all points evenly. Blocking opens the mesh and clarifies shape for easier joining.
— Joining Motifs (As-You-Go Method Recommended) :
Info :
Join motifs along their base chains to form the central spine. The runner in the photo is symmetrical with leaves joined tip-to-tip along a single central seam that runs lengthwise. Join by slip-stitching chain-to-chain or by ladder stitch if sewing.
Round 1 :
Pick two finished, blocked leaves. With right sides up, align bases so base triangles meet. Using the long tail from leaf round 20, whip stitch through the base triangles evenly with mattress or ladder stitch. Sew 12 evenly spaced stitches to join the two base triangles (approx 12 sewn points)
Round 2 :
To join additional motifs by slip-stitch: fold two motif edges with loops overlapping; using the working thread, sl st through both loops at corresponding anchors (ch9 anchor to ch9 anchor) every 8-10 chains to evenly spread tension; continue joining each motif along one side forming a row of three paired leaves, then mirror on the opposite side where design uses mirrored leaf sets.
Info :
When joining, aim to maintain the slight open spine seen in the image so that a subtle central line is formed. Do not pull joins tight; leave a small natural gap to maintain lace openness.
Round 3 :
After primary joins are made to form the runner length, reinforce joins with small heddle stitches: from back, insert needle through both motifs and make 4-6 close invisible stitches at each major join for stability across the runner.
Round 4 :
For a decorative visible join: use surface slip-stitch in contrast thread to outline the central seam—work sl st along both sides of the seam to create a raised piping effect. This is optional but pictured runner uses deep black so contrast is subtle.
Info :
As-you-go joining: when finishing Round 19 of motif N, rather than fasten off, align motif N+1 and sl st into corresponding anchors of motif N+1 during round construction to create an invisible integrated join. This speeds construction and prevents misalignment.
— Mesh Fillers and Inner Lace (Central Spines and Openings) :
Round 1 :
With runner assembled, examine open interior mesh spaces. To recreate the triangular mesh motifs inside each leaf (as seen in photos), pick up thread at the inner triangular opening and ch1, sc into first mesh anchor, ch5, sc into next anchor forming the filet triangle base (approx 10 ch5 spaces per inner triangle)
Round 2 :
Work filet rows: ch3, dc into next sc, ch2, sk ch5 spaces as needed, create rows of dc separated by ch3 to expand triangle mesh; repeat until triangle mesh reaches desired height (5-7 mesh rows)
Round 3 :
Finish triangle interior with small shell borders: in the top anchor of triangle work (sc,ch3,sc) to create a tiny cornice. Repeat for each inner triangle across all motifs (do each motif systematically).
Info :
These interior details add the three small triangular shapes visible toward the base of each leaf. Doing them after joining ensures they are consistent and aligned across every motif.
Round 4 :
To echo the vertical ribs you see on the runner, add surface slip-stitch ridges: with contrast or same black thread, run surface sl st across the top of ribs from tip to base, securing at both ends with small hidden stitches. Space these symmetrically (4 per leaf) to mirror the image.
Round 5 :
Check and tidy all ends from inner filler work. Weave ends into adjacent mesh spaces and clip close after weaving at least 3cm/1" into the fabric to prevent unraveling.
Info :
Perform filler work before outer edging so the border sits consistently around the final silhouette. Blocking after filler makes the mesh open and even.
— Outer Edging and Picot Finish :
Round 1 :
With runner fully assembled and inner detailing complete, join thread at one outermost point. Ch1, sc into the base st, *ch7, sc into base st* around the entire outer perimeter to create consistent chain loops. Keep loop counts even across edges and corners (approx 120-160 loops depending on runner length)
Round 2 :
Work lace shells into each ch7 loop: sl st into loop, ch3, 9 dc evenly spaced in loop, ch3, sl st to join creating bold scallops that echo the inner shells (9 dc per loop)
Round 3 :
Between scallops work small spider lace units to form the decorative points visible at the runner end: in each space sl st, ch6, 5 tr into same point with a sl st to anchor creating fan spikes; repeat to form clustered spikes at ends (5 spikes per end cluster)
Round 4 :
Edge reinforcement: sc around entire edge placing 2 sc into the top of each outer shell and 1 sc into the midpoint of each spider leg to create a strong finished edge (st count approx 200-260)
Round 5 :
Final picot round: *sc 3, pic*, rep around placing a picot (ch3, sl st into top ch3) every 4th sc to create the tiny fringe dots seen in the photo. Sl st to join and fasten off.
Info :
The photo shows a crisp, tight outer cord defining each leaf edge. If you prefer, instead of single sc edging you can work 1 round of FPdc (front post dc) to create a raised cord. Test on a scrap motif.
— Optional Wide Border Extension :
Round 1 :
If you want a broader border like some variations, from the outer sc round: ch10, sc into every 4th outer sc to form long arches; work 12 dc in each long arch to create an extended lace of large scallops. Repeat around runner length and ends to create a dramatic frame.
Info :
This adds visual weight and increases runner width by approx 6-9cm (2.5-3.5") per side depending on arch size. Adjust arch ch counts to maintain proportion with leaf size.
— Blocking and Final Finishing :
Round 1 :
Wet block each motif and the assembled runner. Pin to foam board using measurements for symmetry, stretching gently until each point is uniform. Use rust-proof pins and allow to dry fully (24 hours).
Round 2 :
Optional starching: apply light starch spray and re-pin to achieve the crispness seen in the photos and for a longer-lasting flat finish. Allow to dry fully then unpin carefully.
Info :
Block motifs individually before joining for easiest results. After joining, do a light final blocking to ensure seams relax and every leaf sits perfectly flat. Blocks drastically improve the look of filet lace.
— Troubleshooting and Tips (Throughout) :
Info :
If mesh starts to cave inward: ease tension, pick up a smaller hook for mesh rounds only and rework. If edges pucker after joining: re-pin and steam lightly to relax the joins then re-block. Always check symmetry by folding runner lengthwise to compare both halves during work and after blocking.
Completing this black leaf lace runner is such a satisfying project — each motif joins together like petals forming a dramatic floral spine. The combination of mesh, raised ribs and picot edges gives a refined vintage look. After careful blocking and finishing you will have a stunning table accent that elevates any tea setting. 🖤🧶