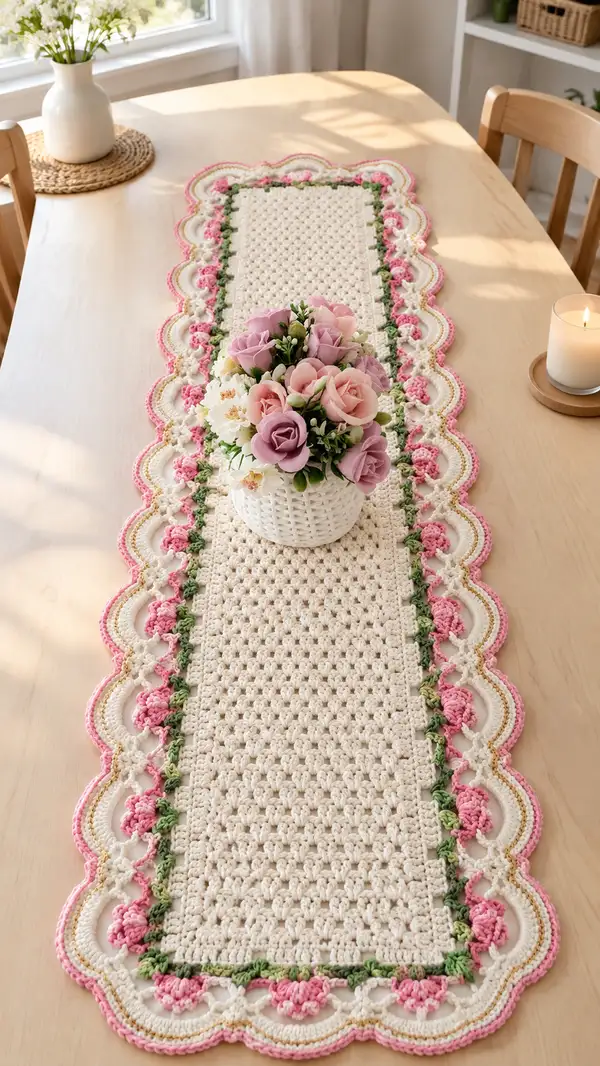
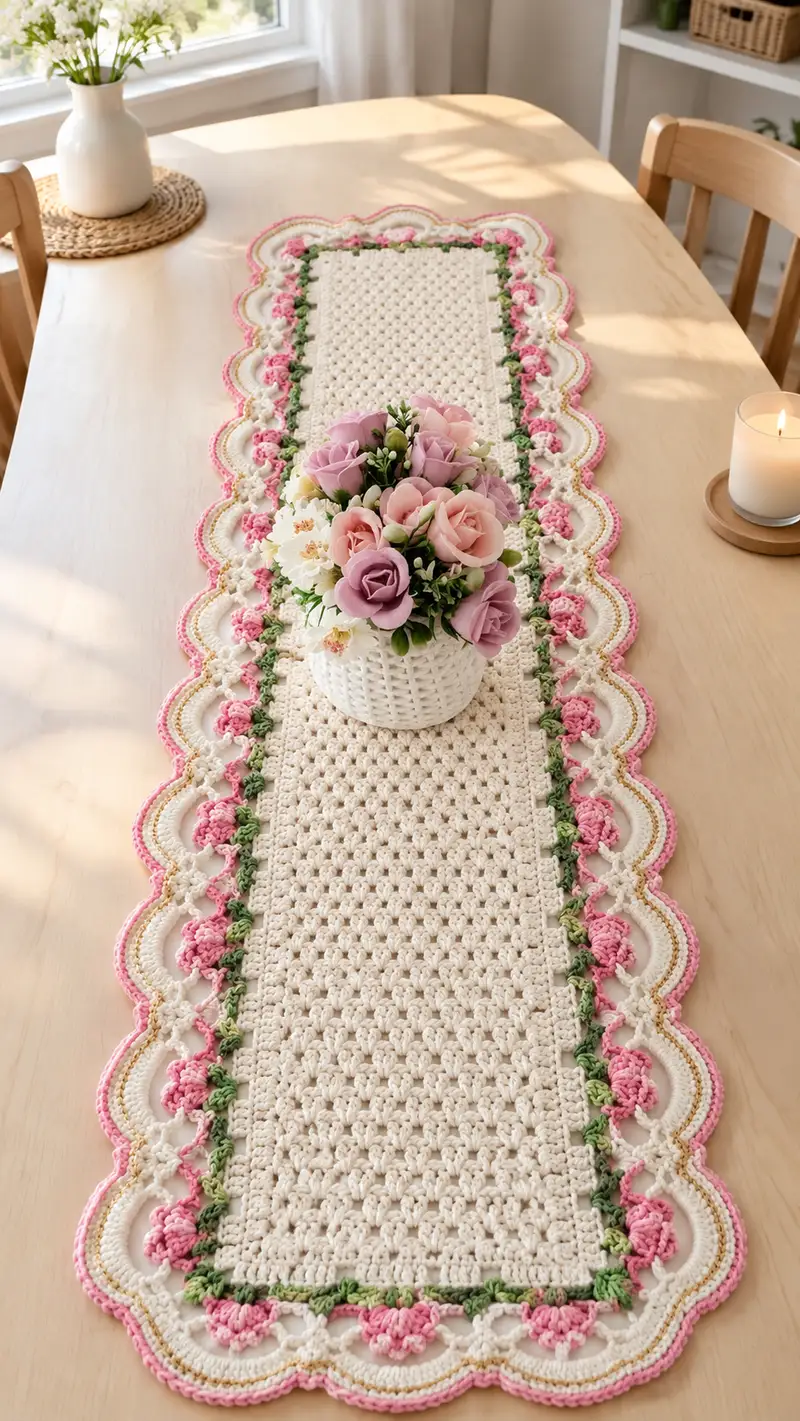
A delicate, vintage-inspired rectangular table runner worked in a soft cream with leafy green accents and pink roselet scallops. The center uses a textured cluster stitch for a plush, fabric-like feel while the multi-layered scalloped border frames it with feminine roses and gold highlights. Perfect for dining tables, sideboards, or as a tray runner — this pattern gives clear, repeatable row-by-row instructions to recreate the look exactly.
Progress Tracker
0% Complete
— Materials and Notes :
Info :
Gauge is not strict for this decorative runner, but working with a consistent tension will ensure that scallops and roselets align. Sample stitch gauge: 14 dc x 8 rows = 4 inches. The runner in the photograph measures approximately 12" (30 cm) wide by 60" (152 cm) long; this pattern is written to produce a runner about 12" wide and you will repeat the center panel rows to reach your desired length.
Info :
Terminology: In this pattern we use the term 'Round' to indicate a working row when working in the rectangular center, and to preserve consistent formatting with the step-by-step section structure. For the sides and border we will work in rounds around the rectangle; where the instruction is really a row worked back and forth it is still called 'Round' for clarity of step numbering.
— Center Panel (work flat in rows) :
Round 1 :
Foundation chain: Ch 93 + 1 turning ch (counts as turning ch). You should have 93 base chains across the width. (93)
Round 2 :
Row 1 (establish base): Dc in 4th ch from hook (counts as dc3), dc in each ch across to the last ch, dc in last ch. Turn. (93)
Round 3 :
Row 2 (begin cluster pattern): Ch 1, sc in first st, *ch 1, skip next st, sc in next st; rep from * across to last st, sc in last st. Turn. (93)
Round 4 :
Row 3: Ch 3 (counts as dc), *dc in ch-1 space, ch1, dc in next sc; rep from * across; dc in top of turning ch. Turn. (93)
Round 5 :
Row 4: Ch1, sc in first st, *ch1, sc in ch-1 space; rep from * across; sc in last st. Turn. (93)
Info :
The three-row repeat above (sc row, dc-row with ch spaces, sc row) forms a neat textured cluster that resembles small puffed units without using puff stitch. This repeat creates a plush center with small voids for a subtle lace effect. Maintain a consistent tension; if your clusters look too large, drop down a hook size for the entire runner for a tighter fabric.
Round 6-60 :
Repeat Rounds 3-5 for a total of 58 additional rows (continuing the sc / dc-ch1 / sc repeat) until your center panel reaches approximately 58" (or desired length minus approx. 2.5" for border). Keep counts the same each row. (93)
Info :
Measure your runner at this point. If you want a longer runner, continue the 3-row repeat in multiples of 3 rows until the center is the desired length. For the photo, the center panel length is approximately 56-58" before adding the border. Keep the final number of rows even to help the scallops align.
Round 61 :
Last center stabilizing row: Ch1, sc in each st across, working into each top of dc and each sc from the pattern. This creates a firm edge for the border join. (93)
Info :
Fasten off cream yarn after this round. We will begin working around the rectangle in continuous rounds to create the border. Place stitch markers at each corner chain space (first and last stitch of the row) to identify corner anchor points for the first border round.
— Join for Border and First Round Around (working continuous rounds around rectangle) :
Round 1 :
Join cream yarn with sl st to any outer edge stitch at a corner (pick up at short edge corner), ch1, sc evenly around entire perimeter placing 3 sc in each corner to maintain smooth corners. Approximate stitch count around perimeter after sc round: 2 long sides x 93 + 2 short sides x 14 + corners adjustment = approx. 214 sc (exact counts vary slightly by finishing tension). Work 3 sc in each corner space. Join with sl st to first sc. (approx. 214)
Info :
When making the first round around the rectangle make sure to space stitches evenly; you may need to add or reduce 1-3 sc along the long edges so the next decorative rounds lie flat. The count above is approximate; adjust to make the border sit flat and square.
Round 2 :
Ch3 (counts as dc), dc in each sc around working 3 dc in each corner sc from previous round. Join with sl st to top of ch3. (same stitch count as previous round, approx. 214)
Round 3 :
Ch1, sc in each st around, working 3 sc in each corner (approx. 214). Join with sl st. This provides a neat ledge for the leaf row to pick up side spaces. Fasten off cream temporarily. (approx. 214)
Info :
We will now work a narrow green vine/leaf row along both long sides only. To locate the long side rows, place the runner with the long sides facing you and identify the long edge sc rows. Work leaf row along both long edges by working into the side loops of the sc round made in Round 3.
— Leaf/Vine Row (work along both long sides; join and continue around corners) :
Round 1 :
Join Leaf Green at a long-side corner with a sl st to the side loop of the first sc on the long edge. Ch1, *skip 1 side loop, sc in next side loop, ch3, sc in same side loop (creates small arc); rep along the long edge across to the next corner. Work the same arc sequence into the other long side when you come around the short edge so vines mirror. At short sides place 3 sc in each corner side loop to keep the edge square. Join with sl st. (Number of arcs = approx. 30-34 per long side, depending on your initial sc count)
Info :
These ch3 arcs are anchor points for roselets — they form a little space that the roselet petals will sit on. If your runner is longer or shorter, increase or decrease the number of arcs so they are spaced evenly along the long side. Use stitch markers to mark each arc placement if helpful.
Round 2 :
Ch1, working into each arc: (sc, ch2, sc) into each ch3 space across the long edge. This reinforces the small arc and makes a shallow cup for the roselet. Join with sl st. Fasten off leaf green leaving a 6" tail for concealment. (approx. 60-68 small cups total across both sides)
Info :
Keep this row neat and even; the roselets are three-dimensional and will be sewn or crocheted into these cups. If you prefer, you may work the roselets directly onto these cups as you make them — instructions below show how to make roselets separately and then tack them on, which helps preserve more control over placement and fullness.
— Roselet Motifs (make many; adult size pictured has approx. 18-20 roselets per long side) :
Round 1 :
Roselet Base (make 36-40 total for both sides): With Accent Pink, mr, ch1, work 6 sc in mr. Pull ring tight and join with sl st to first sc. (6)
Round 2 :
Ch2 (counts as hdc), hdc in same st, 2 hdc in each st around (12). Join with sl st to first hdc. (12)
Round 3 :
Ch3 (counts as dc), dc in same st, *skip next st, 3 dc in next st; rep from * around to create small petal clusters. If you land on the last stitch and need to adjust, work 2 dc in last space instead of 3 to keep the round reasonably flat. Join with sl st to top of ch3. (approx. 18-20 petals depending on adjustment)
Round 4 :
Optional fullness: If you want a fuller 3D rose, with a smaller hook (3.5 or 3.0 mm) using the same Accent Pink, work a round of mini puff stitches in the back loops of the petal round: *ch1, insert hook in back loop of petal base, yarn over, pull up loop (3 loops on hook), yarn over, pull through all 3 loops to form a puff; sl st in next space to anchor; rep around. This creates a textured outer surface. Fasten off leaving long tail for sewing. (approx. 18-20)
Info :
Alternatively, you can make the roselet as a spiral (Row A): ch 25, sc in 2nd ch from hook and across, turn and work a row of sc, then roll the strip into a rose and sew through the base. Both methods produce similar results; the small motif mr base with 2 rounds is more compact and aligns nicely in the little cups on the vine row.
Round 5 :
Sewing/tacking: Position each roselet over a leaf cup on the runner; the cups created in the Leaf Row make a perfect seat. Using the long tail, tack the roselet into the cup at 3 equidistant points around its base with a yarn needle, then weave the tail into the runner to secure. If you used puff round, only tack where needed to preserve puff dimension. Repeat for each cup along both sides. (Do not attach yet if you prefer to place and pin all roselets first.)
Info :
Spacing: In the photo the roselets are placed approximately every 4-5 sc spaces along the long side; for a 93-ch base there are about 18 roselets per side. If your runner is longer adjust the number and space them evenly. Pin each roselet before tacking to ensure symmetry between both sides.
— Decorative Raised Scallop Base (worked in cream around perimeter, creates scallop arcs that will be highlighted subsequently) :
Round 1 :
Join Cream at any corner with sl st to the edge sc. Ch1, *skip 2 sts, 7 dc in next st (creates large scallop shell), skip 2 sts, sl st in next st; rep along entire perimeter working shells along the long sides and placing 3 shells across each short side to preserve shape. Place 3 dc clusters in corner spaces for a smooth turn. Join with sl st to first st. Approximate scallop shells per long side: 10-12 depending on your adjustment. (approx. 30-36 shells total)
Info :
Space the shells evenly. If the scallops seem to pull the runner in, reduce shell size to 5 dc instead of 7 dc for a gentler curve. Conversely, increase to 9 dc for a more dramatic scallop. The pattern photo shows moderate large scallops; we use 7 dc to match the look.
Round 2 :
Working into the tops of each scallop shell: Join and Ch3 (counts as dc), work 2 dc into each shell top, ch2, 3 dc into top again (this creates a layered shell shape). In short side shells reduce to 3 dc, ch2, 3 dc. Join with sl st. (same shell count as previous round)
Round 3 :
Ch1, sc around each scallop top and in spaces between shells to create a neat ridge. At the scallop peak work (sc, ch3, sc) to form loops that will later be accented. Join with sl st. This row sets the foundation for the pink outer scallop and gold highlight. (same counts)
Info :
If you prefer sharper scallops like in the photograph, work this sc row in BLO to create a defined ridge at the shell peaks. That will help the next rounds produce a clean layered scallop edge.
— Gold Accent & Inner Pink Row (gold highlight stripe then small roselet bobbles on top) :
Round 1 :
Join Metallic Gold yarn (or tan) with sl st to the last sc of the ridge row. Ch1, sc in each st across the ridge row, working 1 sc in each sc and (sc, ch1, sc) at scallop peaks. The gold stripe sits just inside the outer scallop; work a neat sc round keeping stitches even. Join with sl st and fasten off metallic yarn. (approx. 214)
Info :
Using a metallic or contrasting yarn for one narrow row highlights the layered scallop. If you use metallic yarn, keep tension slightly looser to avoid pulling the scallop inwards.
Round 2 :
Join Accent Pink to the sc at the scallop spaces. We will create small 3-d bobble clusters which echo the small pink motifs seen between the big scallops: *Ch3, in same st work 4 dc cluster (dc cluster: yarn over, insert, pull through, yarn over, pull through 2 loops - repeat to make cluster of 4 partials, finish together), ch1, sl st into next space; rep between scallops across long sides and at corners. This creates the small, rounded rose-like bobbles visible along the inner scallop line. Fasten off Accent Pink leaving tails for weaving. (Number of bobbles = approx. 30-36)
Info :
If your bobbles flatten, add a tiny bit of fiberfill into the cluster base and then tack it into the cup created earlier with the leaf row to give it the same directionality as the roselets. The photo shows slightly flattened rosettes that sit in each scallop space.
— Outer Pink Scallop Round (define outermost scallop with pink trim) :
Round 1 :
Join Accent Pink to the outermost peaks of the shell row using a sl st. Ch3 (counts as dc), work 11 dc into each shell peak across the perimeter (this forms the visible pink scallop ridge). In corners work 7 dc to maintain shape. Join with sl st. (shell count same as first scallop round)
Round 2 :
Ch1, sc in each dc around the scallop, and at the bottom of each scallop peak work (sc, picot, sc) to create a tiny point — picot = ch3, sl st in 3rd ch from hook. Join with sl st and fasten off. (approx. same stitch count)
Info :
Picots make a crisp edge; if you prefer a softer scallop, skip picots and simply work sc around. Alternately, you can make a shallow shell of 3 sc, ch2, 3 sc in each peak for a different look.
Round 3 :
Finishing round: With Cream yarn and a smaller hook if you'd like a tight final edge, join and work a tidy border of sc around the entire runner, placing 3 sc in each picot point and working evenly in between. This final sc defines the runner outline and hides any small joins. Fasten off and weave in ends. (final approximate count similar to previous)
Info :
Weave in all tails with a tapestry needle. If you left roselets unsewn earlier, place them now and tack through the base into the leaf cup positions. After sewing, block the runner by pinning to a board and dampening or steaming to shape the scallops and flatten the center panel evenly. Allow to dry fully before use.
— Optional Extra Texture Variations and Advanced Finishing :
Info :
If you want the center to be denser, work the center pattern using hdc instead of sc in the filler rows (i.e., swap sc rows for hdc rows). For more pronounced roses, make larger roselets (ch 35 spiral) and sew lightly to the cups so they pop above the scallop line. For a vintage look, use a lighter hook for the scallop rounds to tighten the edge relative to the body of the runner.
Info :
Blocking tip: Place the runner on a flat blocking board, pin scallops to perfect semicircles, and use a light steam or spray. Be careful with metallic yarn — some metallics are heat-sensitive; test on a swatch first.
This floral scallop table runner transforms a simple table into a charming display of handmade warmth. Each textured center stitch and delicate roselet adds an inviting, vintage-inspired touch to your dining space. The layered scallop border frames the runner beautifully, and blocking brings everything into crisp, gentle curves. I hope you enjoy creating this piece as much as I enjoyed writing the pattern — it’s a satisfying project that makes a lovely gift or centerpiece. 🧶🌷