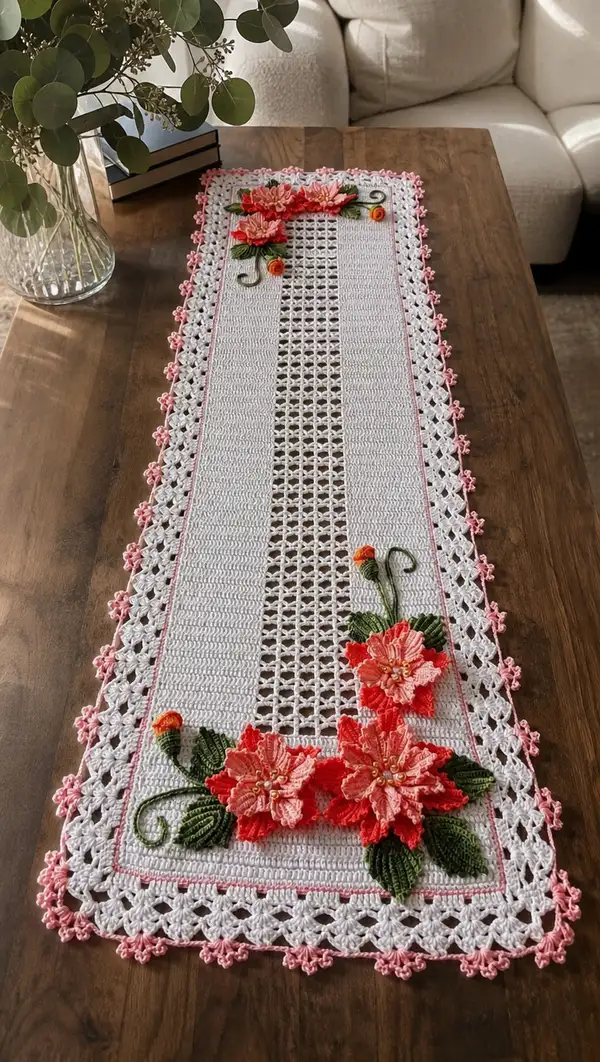
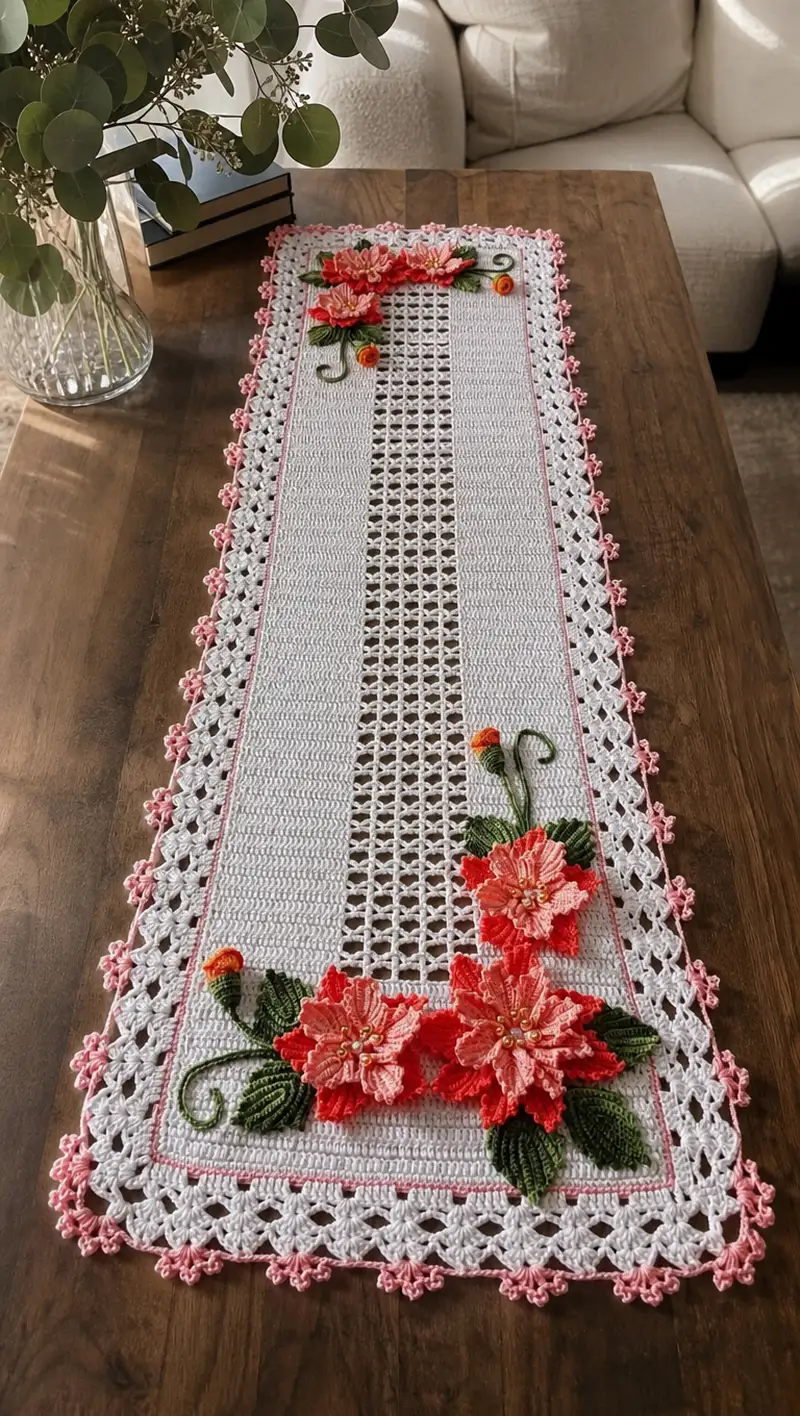
A delicate rectangular table runner featuring a solid cotton body, an openwork central mesh panel and a scalloped lacy border. Finished with layered 3D coral-peach flowers, lush green leaves and tiny pink picot blossoms around the edge. This pattern recreates the warm, vintage-inspired look with modern construction and thoughtful assembly notes.
Progress Tracker
0% Complete
— Notes & Gauge :
Info :
This pattern is written in US terms. Work tightly enough that stuffing (for flowers) does not show through stitches. Gauge is not critical for overall look, but try to match hook/yarn for similar drape: 4 sc = 1 inch in single crochet for main solid panel. The finished sample measures approximately 14 inches wide by 48-52 inches long depending on blocking. Use blocking to achieve final length and to flatten mesh panel.
— Construction Overview :
Info :
The runner is made in three panels worked flat: Left Solid Panel (40 sts wide), Center Mesh Panel (36 sts wide), Right Solid Panel (40 sts wide). After panels are completed, they are joined by whipstitch or slip-stitch join and then edged with several rounds of border stitches: foundation round, scalloped shell rounds and final picot flower edging. Appliques (3D flowers and leaves) are crocheted separately and sewn on. Refer to the assembly section for exact placement.
— Left Solid Panel (Make 1) :
Round 1 :
Chain 40. Turn. 1 sc in each chain across (40)
Round 2-10 :
1 sc in each st across, turn (40)
Info :
Keep tension even. Place a stitch marker every 10 stitches on Row 2 to help with counting on long sets of rows. These initial rows create a stable base for the runner sides.
Round 11-20 :
1 sc in each st across (40)
Round 21 :
Change to BLO for a small ridge: 1 sc BLO in each st across (40)
Round 22-30 :
1 sc in each st across (40)
Info :
If you want a subtle banding, switch to a very light pink at Row 25 for two rows and then return to white. Carry color up the inside of the panel or fasten off and weave in ends neatly.
Round 31-40 :
1 sc in each st across (40)
Round 41-50 :
1 sc in each st across (40)
Round 51-60 :
1 sc in each stitch across (40)
Round 61-70 :
1 sc in each stitch across. Fasten off and weave in ends (40)
Info :
Stop at Row 70 or continue additional rows to adjust final runner length. Make sure the left panel length matches the right panel and the center mesh length.
— Right Solid Panel (Make 1) :
Round 1 :
Work identical to Left Panel. Chain 40. 1 sc in each chain across (40)
Round 2-70 :
Repeat Rounds 2-70 of Left Panel so the two solid side panels are the same length (40)
Info :
When working the second solid panel, place a safety pin or removable stitch marker in Row 1 at both ends so you can align panels exactly when joining later.
— Center Mesh Panel (Make 1) :
Round 1 :
Chain 36. Turn. 1 dc in each chain across (36)
Round 2 :
Ch 3 (counts as dc), *ch 1, sk 1, dc in next st* across to end, turn (this creates evenly spaced ch-1 mesh, keep base count 36 dc positions)
Round 3 :
Ch 1, sc in first dc, *ch 2, sk next ch-1 space, sc in next dc* repeat to end, turn. Maintain count of 36 structural dcs/scs and approx equal openness
Round 4-6 :
Repeat Round 2-3, alternating dc row (with ch-1 mesh) and sc row with ch-2 accents. This builds a balanced openwork effect (36)
Info :
The mesh is created by alternating double crochet rows with spaced chain openings and sc rows that anchor the pattern. Keep your turning chains tall enough to match stitch height for an even edge. Place small stitch markers at each end to align with the side panels later.
Round 7-12 :
Repeat Rounds 2-3 alternating for 6 more rows to reach a stable mesh width and visual openwork (36)
Round 13-20 :
Work two rows dc across (1 dc in each st across) followed by two rows of the ch-1 mesh sequence to keep the openwork regular and visually consistent (36)
Info :
Adjust the number of mesh repeats to match the length of your side panels. The sample uses 70 rows total in all panels; aim for equal lengths before joining. Blocking helps the mesh open evenly.
Round 21-40 :
Continue the established mesh pattern (alternating dc rows and mesh rows) until the mesh reaches the same row count as the side panels (36)
Round 41-70 :
Work remaining mesh rows to match side panels. Fasten off and weave in ends when length aligns with both side panels (36)
Info :
When panels are complete and blocked, the combined width will be approximately 116 stitches wide (40 + 36 + 40). The exact measured width depends on yarn/hook and blocking tension.
— Joining Panels :
Round 1 :
Align Left Panel (wrong side up), Center Mesh (wrong side up) and Right Panel (wrong side up). Using white yarn and tapestry needle or hook, whipstitch or slip-stitch join along the long edges between Left and Mesh, then Mesh and Right, working through corresponding rows so edges match. Work a neat join, 1 stitch per row, across full length. (joined width 116)
Info :
Pin panels together on a blocking mat first to ensure both ends align. Use baste stitches to hold in place before final whipstitch. A mattress stitch-style join gives a flatter finish; a slip-stitch join creates a slightly raised seam used in some vintage looks.
— Border: Foundation Round Around Full Piece :
Round 1 :
With right side facing, join white yarn at any corner. Round 1: Work 1 sc evenly around entire perimeter placing (3 sc) in each corner to keep corners flat. Continue around and sl st to first sc to join. Count total sc across long edges to ensure uniformity. (perimeter sc count varies with size)
Info :
Use markers at corners to help keep consistent stitch counts. Try to space sc evenly along solid panels and mesh — if necessary, add an extra sc every 10 sts on very long sides to prevent puckering.
— Border Round 2: Shell Row for Scallops :
Round 2 :
*Skip 2 sc, 5 dc in next sc (shell made), skip 2 sc, sl st in next sc* across long sides. Work (5 dc, ch1, 5 dc) in corner sc to turn corner smoothly. Sl st to join at end. This forms scalloped shells all around.
Info :
If shells look too dense, reduce to 3 dc shells; if too loose, use 7 dc shells. Keep shell counts symmetrical on both long sides so runner looks balanced.
— Border Round 3: Shell Stabilization :
Round 3 :
Working behind shells, sl st into the center of each shell, ch 3, (2 dc, ch 1, 3 dc) in center of same shell to create a raised scallop, sl st to next shell center and repeat to end. Join with sl st.
Info :
This round reinforces the scallop and creates a nice base for the picot flowers. Be careful at corners — use a larger cluster like (3 dc, ch1, 3 dc) and a sl st to keep the corner rounded.
— Border Round 4: Picot Flower Base :
Round 4 :
With light pink yarn, join at a shell center with sl st. *Ch 3, sl st back into 3rd ch (picot), ch 3, sl st into next space between shells, sl st into base sc* repeat around placing a small picot every second shell center. At corners, work two picots spaced evenly. Sl st to join and fasten off the pink yarn leaving tail to weave in (picot clusters)
Info :
Adjust picot spacing for visual effect. The sample uses small three-chain picots to create tiny flower buds around the edge. Weave in ends on the wrong side carefully so they do not show on the right side.
— Border Round 5: Final Edge (Optional tiny petals) :
Round 1 :
Using same pink or a darker pink, work small 3-chain loops and 3 sc clusters into the spaces between shells to create tiny petal clusters: *(3 sc in sp, picot, sl st to next sp)* around. Fasten off and weave in ends. This final round completes the lacy trim.
Info :
If you prefer a subtler edge, skip Round 5 and leave the picot base alone. The two-row scallop with picot base already looks delicate and finished.
— 3D Flower Appliques (Large Flower - Make 3) :
Info :
Each large layered flower is worked in the round with multiple petal layers to achieve depth. Use coral for outer petals and peach for inner layers. Work with 2.75mm or 3.0mm hook for crisp petals.
Round 1 :
With coral, make a magic ring, ch 1, work 6 sc into ring. Pull tight and sl st to first sc (6)
Round 2 :
(Inc) x 6 — 12 sc (work 2 sc in each st) (12)
Round 3 :
(1 sc, inc) x 6 — 18 sc
Round 4 :
Ch 1, *skip 1 st, in next st work: (sc, hdc, dc, hdc, sc) forming a petal shell; skip 1 st, sl st in next st* repeat around to create 6 large petals. Fasten off coral, leaving tail for sewing. Each petal sits over two base sts.
Info :
Place petals so they are evenly spaced. The sequence sc-hdc-dc-hdc-sc shapes a rounded petal; you can add an extra hdc for fuller petals if desired.
Round 5 (Inner Layer) :
Join peach color behind the coral layer at the base between two petals. Ch 2, (in the space between coral petals) work: ch 1, 5 dc into the space to make a smaller petal. Move to next space and repeat for a total of 6 inner petals. Fasten off leaving tail (6)
Round 6 :
Using a small amount of mustard yarn, stitch 5-7 small seed beads or French knots to the flower center for bead detailing. Use an embroidery needle to secure beads firmly. Knot and weave ends in the back.
Info :
Starch or lightly spray with fabric stiffener for more structured petals. Stack the inner peach layer slightly overlapping the coral petals and tack together through the center with small stitches so layers do not shift.
— 3D Flower Appliques (Medium Flower - Make 2) :
Round 1 :
Magic ring, ch 1, 6 sc in ring, sl st to join (6)
Round 2 :
(Inc) x 6 = 12 sc
Round 3 :
Ch 2, *in next st work (sc, hdc, dc, hdc, sc) as a petal shell*, repeat 6 times. Fasten off and weave tail. Attach small peach inner round with 6 dc clusters as in large flower but with fewer stitches for a compact center.
Info :
Medium flowers are used for secondary accents and should be positioned to support the visual flow of clusters at runner ends.
— Flower Buds (Small Rolls - Make 4) :
Round 1 :
Make a small cone bud: Ch 6, in 2nd ch from hook work: sc, hdc, dc, hdc, sl st to close forming a tight curl. Fasten off leaving long tail for sewing (approx 5 sts formed)
Info :
Buds are formed by curving the short strip and stitching the base; adjust chain length for tighter or looser buds. Add a tiny green calyx base by stitching a small green sc circle to the base of the bud.
— Leaves (Make 6-8) :
Round 1 :
With green, ch 10. Row 1: starting in 2nd ch from hook: sc, hdc, 2 dc, hdc, sc, sl st in last ch to create one side of leaf. Turn to work along opposite side of chain continuing: sc, hdc, 2 dc, hdc, sc. Sl st to join at base and fasten off. (approx 18 sts total)
Round 2 :
Using darker green, work 1 sc around edge of leaf for definition; on the top center run a single ridge: ch 1, work 3 slip stitches down the center top to create vein. Fasten off leaving tail for sewing.
Info :
To make sculpted leaves, work a small amount of starched yarn into leaves and press flat. Slightly curl leaf edges for a natural appearance. Leaves can be worked in BLO on the second round to create textured ridges.
— Stems and Tendrils :
Round 1 :
For stems, use green yarn and a 2.75mm hook. Ch 40 for a medium stem; use sc in back bump of each chain to give a twisted cord effect (40 sc). Fasten off leaving tails to sew and shape.
Info :
Alternatively, use a crochet i-cord technique (working sc in BLO along a chain without turning) or braid several strands for sturdier wired stems. Insert wire into stems only if you plan on shaping them; fold wire ends back and wrap with yarn to hide sharp ends.
— Floral Assembly (Each Cluster) :
Round 1 :
Decide cluster composition: Sample clusters use 2 large + 1 medium flower + 1-2 buds + 3 leaves. Using long tails from flowers, position pieces on the runner to form a triangular cluster at each end. Pin in place through the border shells for stability.
Round 2 :
Sew flowers to runner through the back center with small whip or mattress stitches. Secure leaves under flowers, then sew stems and buds so that stems curve outward from the cluster. Add a few small running stitches to anchor heavy petals.
Info :
Place beads last. Sew beads individually through the flower center from back to front and back, making a second pass to secure each bead tightly. Knot thread on the wrong side and hide ends within the flower center.
— Finishing Touches & Securement :
Round 1 :
Check all attachments by lifting runner carefully and ensuring no long tails or loose threads. Weave all tails at least 1 inch into the wrong side fabric. Clip any visible ends close to the surface but not so close they pull out.
Round 2 :
Lightly block the assembled runner again to ensure shells and picot flowers lay flat. Use a spray starch or fabric stiffener on the appliques if you want them to stand slightly off the surface. Let dry completely before use.
Info :
If your runner will be used frequently, consider adding a few hand-stitched anchor points under the flowers to the base fabric so they remain secure through washing and handling.
— Optional: Extra Decorative Embroidery :
Round 1 :
Use contrasting pink or peach embroidery to add small French knots or satin stitch lines along stems or between flowers. Work with a sharp embroidery needle and separate yarn strands for a finer line if needed.
Info :
Keep embroidery minimal to complement rather than overpower the crochet detailing. Use two or three small knots in each flower center if you choose not to use beads.
— Care Instructions :
Info :
Hand wash cold with mild detergent; reshape and dry flat. Do not wring. If washing machine use is needed, place runner inside a mesh bag on delicate and reshape immediately after. Re-block if necessary.
Info :
Store runner flat in a cool, dry place. Avoid high humidity and direct sunlight to preserve colors and prevent yellowing of cotton over time.
This elegant table runner pattern brings classic lacework together with sculpted floral appliques for a timeless centerpiece. Each section — solid panels, openwork mesh, scalloped border and layered flowers — offers satisfying rhythm and beautiful detail. The final piece makes a thoughtful handmade gift or a cherished addition to your home decor. 🧶🌸 Enjoy every stitch and the gentle satisfaction of sewing each flower into place. Happy crafting! ✨