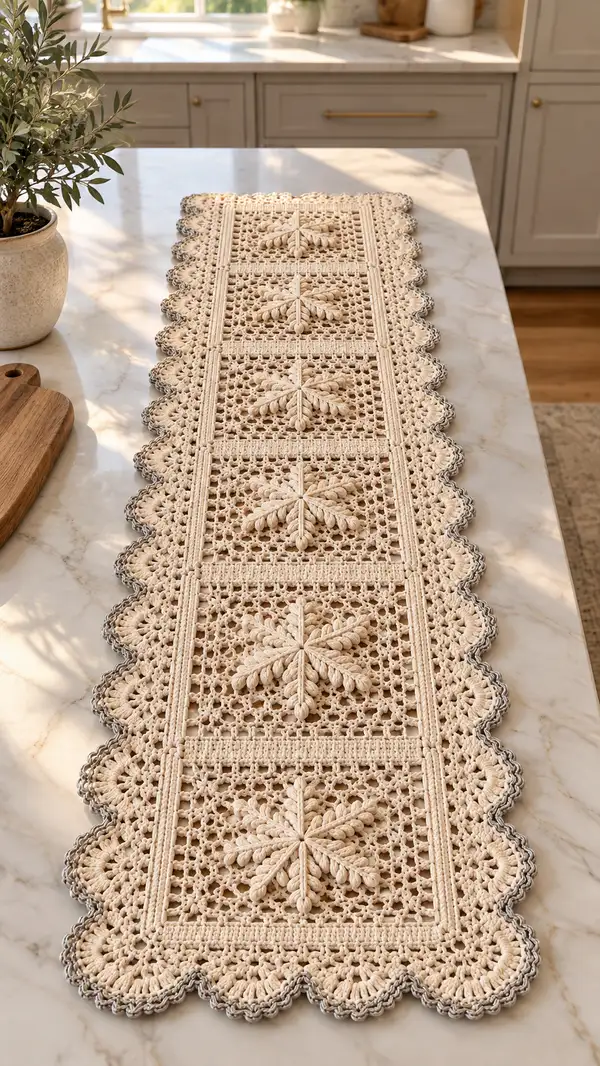
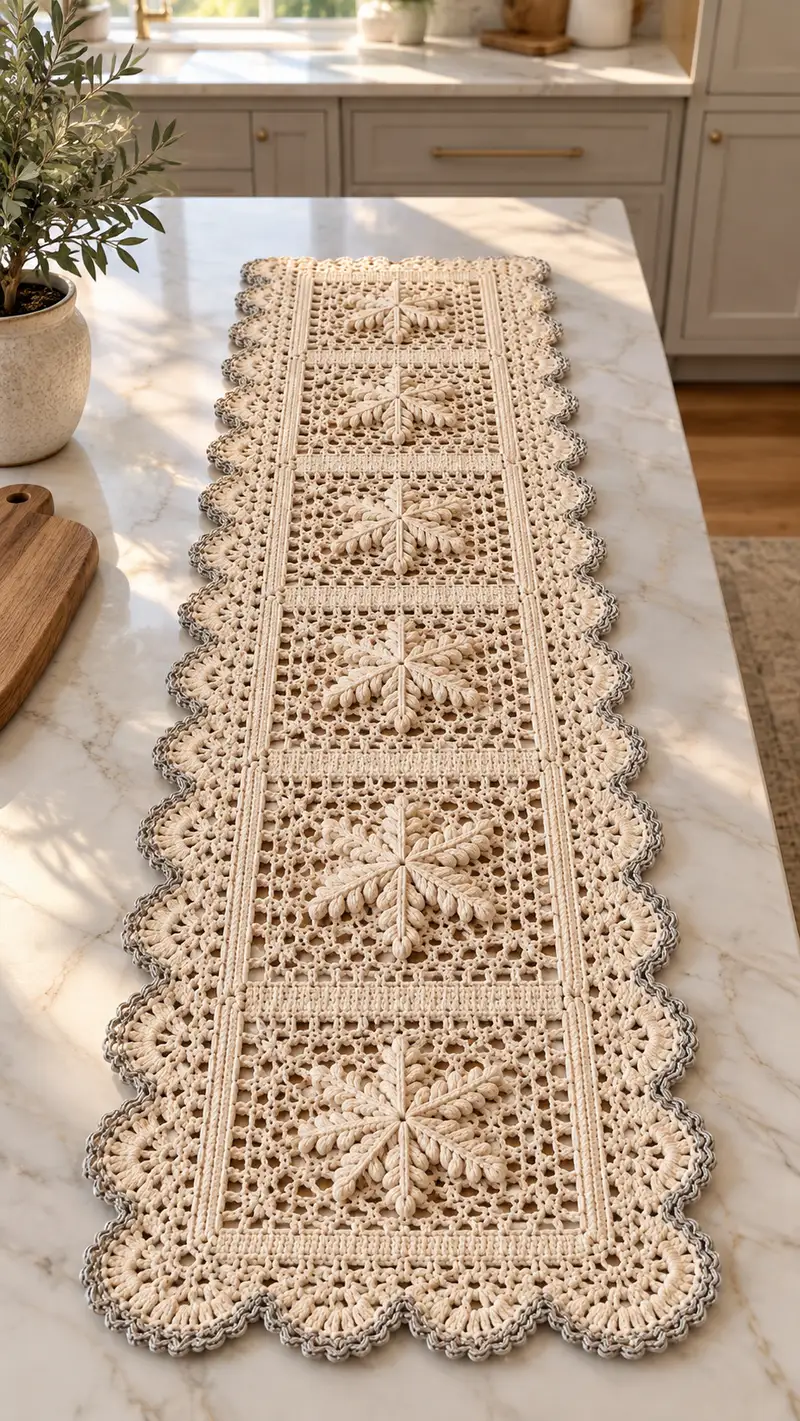
Create a stunning neutral lace table runner composed of repeated square motifs joined with delicate laddered strips and a scalloped border. This pattern shows raised braided leaf motifs at the center of each square and an airy mesh background. Worked in cotton-blend yarn with contrasting edge for a refined finish — perfect for dining tables or a decorative hallway runner.
Progress Tracker
0% Complete
— Notes & Gauge :
Info :
Pattern is modular: runner pictured is five square motifs joined with vertical strips and a scalloped border. Using 3.5mm hook and cotton-blend worsted/light worsted yarn, each finished square measures approximately 10.5cm/4.25in square. Entire runner measures approximately 130-140cm long (51-55in) by 20-22cm wide (8-8.5in) depending on blocking and joining tension. Block each square to gauge before joining for consistent edges.
Info :
Special stitches used: puff clusters (3-5 loops), elongated popcorns and chain meshes. Puff stitch instructions and stitch counts are given in the motif section. Maintain consistent tension on all motif repeats for an even look.
— Central Lace Square Motif (Make 5) :
Round 1 :
Make a magic ring. Ch2 (counts as first dc), 7 dc into ring. Join with sl st to top of ch2. (8 dc)
Round 2 :
Ch3 (counts as dc), dc in same st, 2 dc in each st around. Join with sl st to top of ch3. (16 dc)
Round 3 :
Ch3, (dc, ch1, dc) in next st to form first corner; *sk next st, (dc, ch1, dc) in next st; rep from * around to create 8 corner points; join with sl st to top of ch3. (8 corner spaces)
Info :
Round 3 begins the square shaping. Work corners as (dc, ch1, dc) to make a mild square frame; do not worry about exact stitch count—aim for 8 corner ch-1 spaces corresponding to star points.
Round 4 :
Ch1, sc in same st, sc in each dc across until you reach a corner ch-1 sp, in corner work (sc, ch3, sc), continue sc across next side. Join. This creates a firm base round for the raised motif to sit on.
Info :
We will now form the central raised braided leaf/star using elongated puff clusters worked from the center out into the round 3 corner spaces. Keep hook slightly snug for textured stitches.
Round 5 :
Ch1, insert hook into center of motif (through the central gap), *yarn over, pull up loop 5 times through center, yarn over and pull through all 5 loops, ch1 to close puff (counts as puff cluster), ch2, working into next corner ch-1 sp from Round 3, sl st to anchor; rep from * to create 8 puff spokes evenly around center. Join with sl st to first puff anchor. (8 puff spokes)
Info :
Make 8 spokes (or number matching your earlier corners). Each spoke is a tall puff closed with a ch1 and anchored into the corner space; this creates the sculpted leaf/star effect. Keep each puff consistent—same number of yarn overs and pull-up loops for uniform height.
Round 6 :
Ch2, dc in same st, *ch3, sk next st, dc in next puff anchor (at base of puff), ch3, sk next st, dc in next corner sc; rep around to form radial chain fans. Join. (8 dc anchors and 8 chain fans)
Round 7 :
Ch1, sc in same st, *into each ch3 sp work (sc, ch2, sc) to make mesh clusters between spokes, sc into next dc anchor; rep around. Join. This forms an open lacy mesh near the center.
Round 8 :
Ch3, dc in same st, dc in each sc across until you reach a corner where you work (2 dc, ch2, 2 dc) into the previous corner ch space; continue dc across. Join. This lays the foundation for converting the circular centre into a square grid.
Info :
At this stage the motif is transitioning into a square. Keep counts even on each side so your square remains flat. Use stitch markers at the midpoint of each side to help ensure straight edges in subsequent rounds.
Round 9 :
Ch1, sc in same st, sc next 12 sts (adjust to keep sides even), in corner work (sc, ch3, sc), sc across side; repeat for all four sides. Join. (This round evens out side stitch counts.)
Round 10 :
Ch3, (dc, ch1, dc) into each sc cluster across side to create a delicate latticed rail; in corners work (dc, ch2, dc). Join.
Info :
We are about to expand the mesh to a consistent filet-type lattice. Maintain even tension to ensure the mesh repeats line up with neighboring squares when joined later.
Round 11 :
Ch1, sc in same st, *ch5, sk 3 dc/mesh sts, sc in next st; rep across to form long chain-mesh spaces; in corners work (sc, ch3, sc). Join. (Creates uniform openwork)
Round 12 :
Ch3, dc in same st, *dc in next sc, (ch1, dc) in each chain arch across, end with dc in corner sc; join. This starts tightening the mesh for a balanced openwork pattern.
Round 13 :
Ch1, sc across to stabilize the mesh, placing (sc, ch3, sc) in corners. Join.
Info :
Begin the framed rib section that outlines the square. This will create the visual frame seen in the photograph which separates each lacy square and provides a neat edge for joining.
Round 14 :
Ch1, sc in same st, 1 sc in each st around for two full rounds (Round 14-15) to build a firm base. Join each round. (Maintain stitch count from Round 13)
Round 15 :
1 sc in each st around. Join. (Even round, same count as Round 14)
Info :
Now create vertical ridged panels along the motif sides to mirror the framed strips between squares. Work BLO ridges to add texture that will align with the runner's joining strips.
Round 16 :
Ch2, hdc in same st BLO, hdc in each st BLO around for 4 rounds total to create a narrow raised rib (Rounds 16-19). Join each round. (Same stitch count each round)
Round 17-19 :
1 hdc in each st BLO (stays even). Join each round.
Info :
Finish motif by working a tidy edging of sc along the last round. Fasten off leaving long tail for blocking and joining to adjacent motifs. Block square to 10.5cm/4.25in measured square.
— Joining Strips (Vertical Frames Between Squares) :
Info :
You will make 4 narrow vertical strips (if your runner is five squares) to join the squares. Strips should match the height of your blocked squares and include 3 raised rib rounds to visually align with motif ribs.
Round 1 :
Ch30 (or measure to match side height of blocked square), sc in second ch from hook and across. (29 sc or adjusted length to match square edge)
Round 2 :
Ch2, hdc in same st BLO, hdc in each st BLO across. Join. This creates a standing rib curl when joined to motif edges.
Round 3-8 :
Repeat Round 2 for total of 7 rib rounds (Rounds 2-8). After last round, fasten off leaving long tail for sewing. Make 4 strips (adjust number to number of squares minus 1).
Info :
Keep strips slightly shorter than blocked square height by 1-2mm to allow ease during joining; you will stretch slightly when sewing to match heights exactly.
— Horizontal Joining Bands (Top/Bottom Edges of Each Square Row) :
Round 1 :
Ch width equal to runner width measured across five squares plus the vertical strips (approx ch220 depending on gauge). Sc across to form a firm band that will sit between rows when joining multiple rows (if making multiple rows). For a single-row runner, this band becomes decorative space between motif blocks as seen in photo.
Round 2-6 :
Work 1 sc in each st for 5 rounds to form a firm band. Join and fasten off. Use same technique to create small framed panels that separate motifs lengthwise in the runner.
Info :
These horizontal bands create the rectangular panels that appear between the central motifs in the photo. They also give additional body to the runner; make two for every join location.
— Assembly & Joining Motifs :
Info :
Block all squares flat and pin to identical measurements. Lay out squares in desired order with vertical strips between each pair and horizontal bands between rows. Sew using mattress stitch or whip stitch with long tails from motifs and strips for an invisible join.
Step 1 :
With right sides up, align one square and adjoining vertical strip. Using tapestry needle and long tail from motif, whip stitch through the edge loop and corresponding strip stitch across entire seam. Use evenly spaced stitches approximately every 3-4 mm for flexibility.
Step 2 :
Repeat for each vertical seam. Insert horizontal bands between rows as needed, sewing into the sc foundation of the lower edge of each square. Reinforce corners with 4-6 extra stitches for stability.
Info :
Do not pull seams too tight — the runner should lie flat but remain flexible. Use pins or sewing clips to hold seams while checking for alignment across entire runner length.
— Scalloped Border Edging (Work All Around Runner) :
Info :
Border is worked after joining all motifs and bands. Border includes alternating shells and picot trims and finishes with a contrasting gray edge for a crisp scalloped look as in the photo. Work around the entire perimeter in rounds; corners receive extra shells to form rounded ends.
Round 1 :
Join main color at any edge point. Ch1, sc evenly around entire runner edge placing 3 sc in each corner area to maintain shape. Join with sl st to first sc. (Even count around — count scissors length to ensure same number of sc spaces for shells)
Round 2 :
Ch3 (counts as dc), dc in next 2 sts, *sk 2 sc, 5 dc in next sc (shell), sk 2 sc, dc in next 3 sts; rep from * around, placing shells in middle of side panels and 7-dc shells in corners to slightly round them. Join.
Round 3 :
Ch1, sc in each dc across shell arches, in shell center work (sc, picot, sc) for a delicate tip; in corner 7-dc shell work (sc, ch3, sc) to maintain rounded corner height. Join.
Round 4 :
Ch3, dc in each sc across, working (2 dc, ch2, 2 dc) in corner spaces for added roundness. Join.
Round 5 :
Repeat Round 2 to deepen scallops; place shells directly over previous shells for layered effect. Join.
Info :
At this point shells form the scalloped profile. Count shells along one long side and ensure the same shell count on opposite side for symmetry. Adjust by adding or subtracting dc between shells as needed to match counts.
Round 6 :
Finish main-color scallops with a tidy sc round: ch1, sc in each st around, placing 3 sc in each shell center to keep scallops smooth. Join and fasten off main color. We will add a contrast trim.
Contrast Trim Join :
Join contrast gray yarn in the back loop only of the top of each shell center, ch1 to secure. This will create a fine gray ridge shown in the photo.
Round 7 (Contrast) :
Ch1, sc in same st BLO, *sk 2 sts, (sc, ch3, sc) in shell peak BLO to create picot accent, sk 2 sts, sc in next st; rep around. In corners work (sc, ch5, sc) to accent the larger corner shell. Join and fasten off. Weave in all ends and block the finished runner to final dimensions.
Info :
Use a small hook (3.0mm or 2.75mm) for the contrast round if you want a tighter ridge. This subtle gray accent highlights each scallop and mimics the photo's edging effect.
— Alternative Decorative Row: Raised Rope Trim (Optional) :
Round 1 :
Before working contrast round, join a strand of main color and work 1 sc in back loops around, then slip to next stitch and chain 40 to create a long rope; work rope coils around shell peaks and anchor with single crochet occasionally to create a twisted rope overlay across scallops. This optional step reproduces a thicker border look if desired.
Info :
The rope trim adds weight to the edge and can be decorative or functional depending on placement. Securely anchor the rope every 6-8 stitches to prevent shifting during laundering.
— Finishing Touches & Blocking :
Info :
Carefully block the entire runner on a flat surface. Pin each scallop evenly and measure opposite sides for symmetry. Use a spray bottle with warm water or steam lightly until fibers hold shape. Allow to dry fully before removing pins.
Round 1 :
Weave in all tails using a yarn needle, working tails back through the fabric for at least 3-4 cm to prevent slipping. Trim close to surface. Press lightly if desired using a low-heat setting for cotton blends only.
Info :
For launderability, consider using a mild fabric stiffener or starch spray on the scalloped edges before final drying to keep scallops defined through multiple washes. Always follow yarn manufacturer's care instructions.
— Sizing & Customization :
Info :
To lengthen the runner, add additional motifs in multiples of one square. To widen, create more motifs across the width and add extra vertical strips. Adjust ch counts for bands and strips to maintain proportional joins. Use heavier yarn and larger hook to scale up, or lighter yarn and smaller hook to scale down.
Info :
If you prefer a softer, drapier runner, use a cotton-blend with a higher viscose content. For a traditionally firm lace look, 100% cotton mercerized yarn will hold crisp scallops best.
This elegant lace runner brings a touch of handmade charm and timeless texture to your table — the raised leaf/star motifs and scalloped edge are satisfying to make and lovely to display. Each square works up quickly and the modular construction lets you customize length effortlessly. I hope this pattern inspires cozy mornings and warm gatherings around your table. Happy stitching and enjoy every scallop and puff stitch! 🧶✨