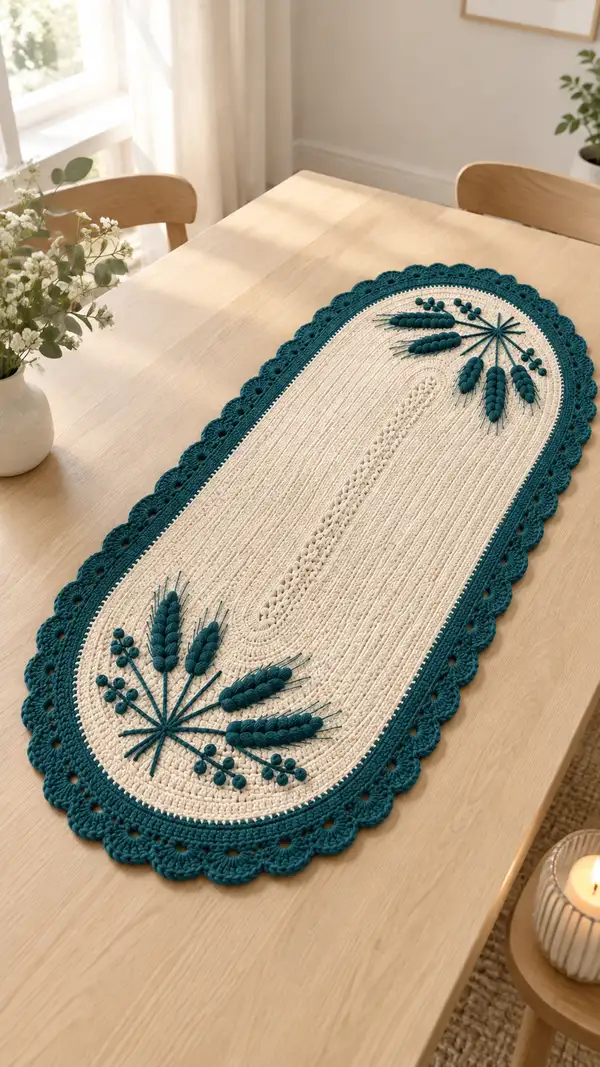
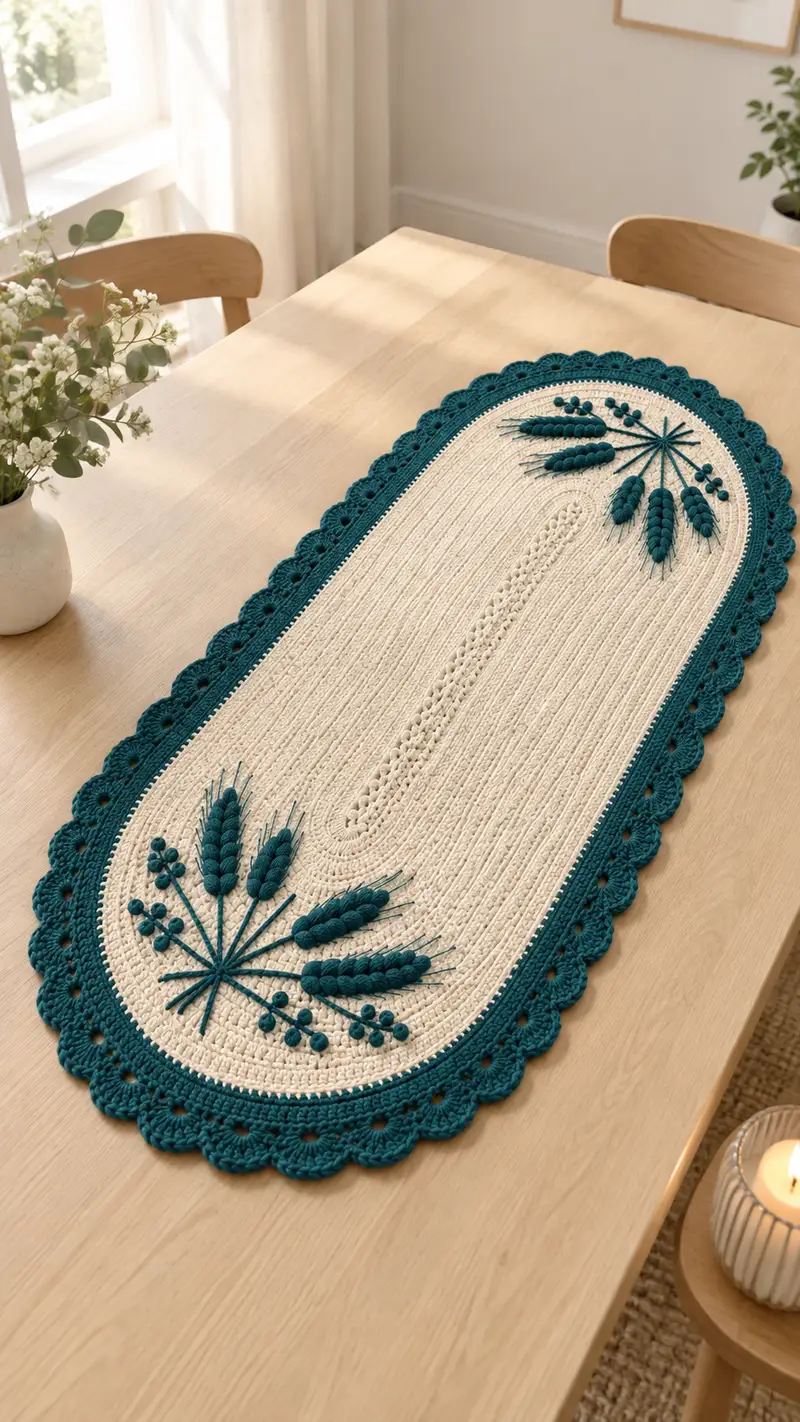
A long oval crochet table runner worked in a warm cream body with a deep teal scalloped border and raised floral-wheat appliques. This pattern recreates the textured ribbed center, central eyelet panel, and decorative 3D wheat sprays seen in the photo. Detailed step-by-step instructions include a flat center panel worked in rows, joined ends to form the oval, layered scallop edging, and separate crocheted wheat and berry motifs for applique.
Progress Tracker
0% Complete
— Materials & Gauge :
Info :
Gauge is not critical for length but affects finished size and yarn usage. Approx gauge: 18 sc and 20 rows = 10 cm (4 in) in single crochet worked flat with 4.0 mm hook. Adjust hook if your tension differs. Finished approximate size: 30 cm (12 in) wide x 110 cm (43 in) long before blocking; scalloped edges add ~2-3 cm (1 in) all around.
— Center Panel (work flat in rows) :
Round 1 :
Foundation: ch 64. Row 1: sc in 2nd ch from hook and in each ch across. You will have 63 sc. Turn. (63)
Round 2 :
Ch 1 (does not count), sc BLO in each st across. Turn. (63)
Round 3 :
Ch 1, sc in each st across (work into both loops). Turn. (63)
Round 4 :
Ch 1, sc BLO in each stitch across. Turn. (63)
Info :
The alternation of sc and sc BLO creates long vertical ridges when worked over many rows. Keep tension consistent to maintain neat ribs. Place a stitch marker in the first st of every 10th row for easier counting later.
Round 5-12 :
Work rows as established: alternate rows of 1 sc in each st (odd rows) and 1 sc BLO in each st (even rows). Repeat for 8 rows (Rounds 5-12). Maintain 63 sts per row. (63)
Info :
If your tension tightens on BLO rows, try switching slightly larger hook for BLO rows only or relax your grip. The difference creates the textured effect without changing width.
Round 13 :
Row with central eyelet setup: ch 1, sc 10, *ch 4, skip 4 sts, sc 10; rep from * across until 10 sts remain; sc last 10. Turn. Note: This establishes a horizontal eyelet ladder across the width to be elongated by repeating these eyelet rows later. Count carefully: sc 10 + (repeats of ch4+skip4+sc10) should total 63 working positions (account ch and skips). (63 equivalents)
Info :
Do not attempt to change ch4 length. These little 4-ch spaces will line up when the pattern repeats every few rows to create a long open vertical strip once you repeat the sequence along the length.
Round 14-18 :
Repeat Rounds 2-5 pattern (alternating BLO rows and regular sc rows) for five rows, keeping the ch-4 eyelet row anchored by sc rows above and below so the openings stack slightly. (63)
Round 19-28 :
Continue repeating alternating sc and sc BLO rows to build length. Work 10 more rows (total rows now ~28). Keep stitch count 63 each row. (63)
Info :
At any point, measure panel length to determine your personal preferred runner length. The pattern assumes a long, rectangular panel of approximately 100-110 cm before shaping the ends. Adjust by adding/removing repeats of the alternating rib rows in multiples of 2 to keep the pattern alignment.
Round 29-40 :
Work 12 rows in established texture (alternating sc and sc BLO). This continues the central linear ribbed surface; preserve the central eyelet ladder by repeating the eyelet row every 10-14 rows if you want the eyelet column to extend the full length. (63)
Info :
Eyelet ladder option: If you want the eyelet column to appear as in the reference, repeat the 'eyelet setup row' (Round 13) every 8-12 rows across the center section so the holes align into a subtle vertical column. Pin and check alignment after 2 repeats and adjust spacing to suit your visual preference.
Round 41-80 :
Continue working alternating sc rows (odd rows sc both loops) and sc BLO rows (even rows) for 40 more rows to reach a long rectangular panel. Keep stitch count 63 in every row. At the end of row 80 your piece should be approximately the desired length for your runner top panel. (63)
Info :
Stop here if you prefer a shorter runner. To make a longer runner, simply continue the alternating rows in blocks of 10-20 until desired length is reached. Mark the last row number—this row count will be used when joining the ends and calculating stitches for the semicircular ends.
— Preparing to Join and Create Oval Ends :
Info :
We will join the short sides of the rectangle to make a continuous loop, then work rounds around the perimeter. Before joining, make sure both short ends are even and the stitch count remains 63 across. Count the number of rows (the short edge length) — for example we used 80 rows here — this will approximate the number of side stitches to work when crocheting around the rectangle.
Round 81 :
Fasten off leaving a 20 cm tail for joining. Fold the rectangle so short sides meet and align the first and last rows. Using the 4.0 mm hook and working into matching side loops, join with slip stitch through both layers at the corner to create a continuous oval loop. Work evenly around the panel joining edges with slip stitch placing 1 sl st per row across the seam (use the tails to adjust tension). The round will have approximately 160 sl st joins (equal to number of rows + width sts), this is used to stabilize edges; tension here matters. Join with sl st to first sl st and proceed to work perimeter rounds. (join seam)
Info :
Pin the short ends with sewing pins before joining and check that the eyelet column sits centered lengthwise. Joining with visible slip stitches is temporary for this step; you will continue working rounds that build the oval ends and cover this seam.
— Rounded Ends & Perimeter Foundation Rounds :
Round 82 :
Working all the way around the joined rectangle (you will now be crocheting in continuous rounds), begin with sc evenly around the entire perimeter: work 1 sc in each side row (row edge), and on the short curved ends work 3 sc in each end-row corner (these are the original corner chains where the rectangle was folded) to help shape the curve. Aim for a consistent and even count. Example count approx: 63 sts across original width + 2 x (number of rows ÷ 2) increases at ends => approximate 200 sc total. (approx. 200)
Info :
Do not worry about being off by a few stitches; subsequent rounds of increases will even out the curve. Use markers at each quarter point (sides and ends) to maintain symmetry.
Round 83 :
Ch 1, 1 sc in same st, 1 sc in next 10 sts, (inc in next 2 sts) at the first end curve, 1 sc in next 30 sts (working along long side), (inc in next 2 sts) at second curve, 1 sc in next 10 sts, (inc in next 2 sts) at third curve, 1 sc in next 30 sts, (inc in next 2 sts) at fourth curve; join if working in joined rounds. The four 'inc in next 2 sts' groupings place extra increases evenly around both semicircular ends. This round increases your perimeter by 8 sts total. Keep track of quarter markers. (approx. perimeter +8)
Info :
Placing increases in clusters rather than single increases creates a smoother semicircular shape. Reposition stitch markers to mark the beginning of each curve region after this round.
Round 84-88 :
Work 5 rounds even: 1 sc in each st around (do not increase). These rounds build up height around the perimeter and stabilize the seams created by the join. Keep stitch count steady across these rounds. (approx constant perimeter)
Info :
These even rounds give you a baseline perimeter to which you will add a decorative border. If you need the oval to be larger, add 1 increase round every 6-8 rounds until the desired diameter of the end curves is reached.
— Adding a Narrow Contrast Round (teal) :
Info :
Change color to teal now to create the contrasting inner border seen in the photo. Attach teal yarn with a sl st on a long side, or at a spot you prefer to hide the join (we attach at a side rather than at a curve for easier placement).
Round 89 :
With teal, ch 1, 1 sc in each st around working evenly. This will create a thin teal line framing the cream center. Join with sl st to first st or continue in continuous rounds. (same st count)
Round 90-92 :
Work 3 rounds even in teal: 1 sc in each st around to reinforce the teal frame. (same st count)
Info :
If you prefer a subtler line, work only 1-2 teal rounds. The three rounds as pictured create a defined but not overpowering separation before the scallop shell edge.
— Scalloped Shell Edging (teal) :
Round 93 :
Switch to 3.5 mm hook if you want tighter scallops. (Optional) Ch 1, *skip 2 sts, (5 dc) in next st, skip 2 sts, sl st in next st; rep from * around. Aim to place shells evenly; depending on your perimeter count you will have between 20–30 shells. If your shells crowd, work shell over 3 sts instead of a single st: (dc, 3 dc in next st, dc) to space shells. Join to first sl st. (shell count variable)
Info :
Measure shells visually as you work; shells should be evenly spaced around both curved ends and sides. If you see an uneven gap, adjust by changing a sl st to sc or add a sl st to even spacing.
Round 94 :
Ch 1, sl st into the center of the first shell, ch 3 (counts as dc), work 2 dc into same center st, *ch 1, work 3 dc into center of next shell; rep from * around. Join with sl st to top of starting ch-3. This rounds over the shell centers to create the layered scallop look. (shells count)
Round 95 :
Ch 1, sl st to center of each shell, work (sc, hdc, sc) into center of each shell to create a neat finished edge. Join and fasten off. Weave in ends. (shells count)
Info :
Blocking: Lightly wet-block the runner to set scallops and smooth the body. Pin scallops into shape and allow to dry completely. Blocking will also make appliques sit neatly.
— Embroidered Stem Lines (teal) :
Info :
These are long embroidered stems radiating from two bouquet centers near each semicircular end. Use 3 strands of teal yarn held together (or a single strand of thicker yarn) and a yarn needle. Embroider long straight stitches as stems radiating outward approximately 6-12 cm in length depending on placement. Refer to photo and pin first to test placement.
Round 96 :
Thread yarn needle with teal and bring yarn up at the bouquet center (mark with pin). Work straight stitches for 6–8 stems by inserting the needle along the path of each stem from center to tip and back, securing with a few small stitches at the base. Use long straight stitch technique and knot on the wrong side. (embroidery)
Info :
Do not pull too tightly when embroidering across the textured ribs; the tension can pucker the panel. Keep stitches smooth and secure ends on the wrong side with multiple small threads woven under several rows.
— 3D Wheat Ear Appliques (work several):
Info :
Each wheat ear is made by stacked puff or cluster stitches to form a tapered ear shape. Using teal yarn and 3.5 mm hook make 6 wheat ears for two sprays (3 per spray) or more depending on your layout in the photo. These are sewn on after blocking.
Wheat Ear - Round 1 :
Make a slip knot. Ch 8, sc in 2nd ch from hook, sc in next 5 chs (total 6 sc). Do not fasten off. This short chain base forms the spine. (6)
Wheat Ear - Round 2 :
Turn to work along one side of the chain: ch 1, sc in first st, *make 1 puff (yo 3 times, insert in same st, pull up loop, yo and pull through all loops on hook), skip next st, sc in next st; rep across to end. Continue along opposite side of chain mirroring puff placement so puffs stack up one each side creating a 3D ear. Finish with sc in last st and sl st to base. Fasten off leaving tail for sewing. Approx puff count per ear: 6-8 depending on coverage.
Info :
Puff stitch guidance: yo 3 times, insert hook, pull loop, yo and pull through all loops (or yo 2 times for smaller puff). Secure each puff by working a sc into the base on the next stitch to anchor. Variation: use bobble stitches or 3-tr cluster instead of puff if desired.
Wheat Ear - Round 3 :
With tail, stack multiple ears close together on a stem (see stem instructions) and sew base firmly into place so puffs point outward like grains. Make 6-10 such ears depending on sample layout. (ear count variable)
Info :
To taper the ear, you may reduce puff size towards tip by making smaller puffs (yo 2) in the final two stitches of the ear. This creates a natural tapered profile.
— Small Berry Bobble Motifs (work several):
Round 1 :
With teal yarn and 3.5 mm hook, ch 2, work 6 sc into 2nd ch from hook, join with sl st to first sc. (6)
Round 2 :
Ch 1, (bobble stitch in next st, sl st in next st) around until you have 3 bobbles adhered to the small round; or simply form 3 tiny puff stitches across the top by working three small puff stitches separated by sl st. Fasten off, leaving tail for sewing. Make 12 small berries for placement. (3 puff top)
Info :
Bobble size: make bobbles small so they read as berries when clustered with wheat ears. Use yo twice for small puff if you want tiny berries, or use single sc clusters for quieter texture.
— Attaching Appliques and Final Embroidery :
Round 97 :
Pin appliques in the positions shown in the photo: two bouquet clusters each sitting near semicircular ends, spaced roughly 8–10 cm in from the curved edge. Place longer stems radiating from a central point and arrange 3 wheat ears per cluster plus 4–6 small berry bobbles each cluster. Adjust spacing to avoid shell scallops. (pinning)
Round 98 :
Sew appliques in place with the long tails left on each motif using a whip stitch or ladder stitch from the wrong side. Secure wheat ear bases first, then sew berry bobbles and weave embroidery stems under the appliques to hide knot tails. Knot and weave ends through several stitches on the wrong side. (sewing)
Info :
For a raised, secure attachment, use short vertical stitches through the base of each puff into the body of the runner. Reinforce each applique with three anchoring stitches so it will not pull away when used.
Round 99 :
Using teal yarn and yarn needle, tack down stray threads and weave in all loose ends. Trim ends close after weaving at least 3–4 cm back into the work. Lightly steam or wet-block again to reshape scallops and to help appliques sit flush. (finishing)
Info :
Optional: add a few tiny seed-stitched embroidery details in teal around each bouquet to mimic small seed pods and accentuate the design. Use single stranded yarn and small whip stitches for a delicate effect.
This elegant runner brings texture, color contrast, and delicate botanical details to your table — a project that's as rewarding to make as it is beautiful to display. The ribbed center and scalloped teal edge create a refined silhouette, while the 3D wheat sprays add character and seasonal charm. Enjoy blocking, arranging, and sewing the appliques — the finishing touches are the most satisfying part. 🧶🌾✨