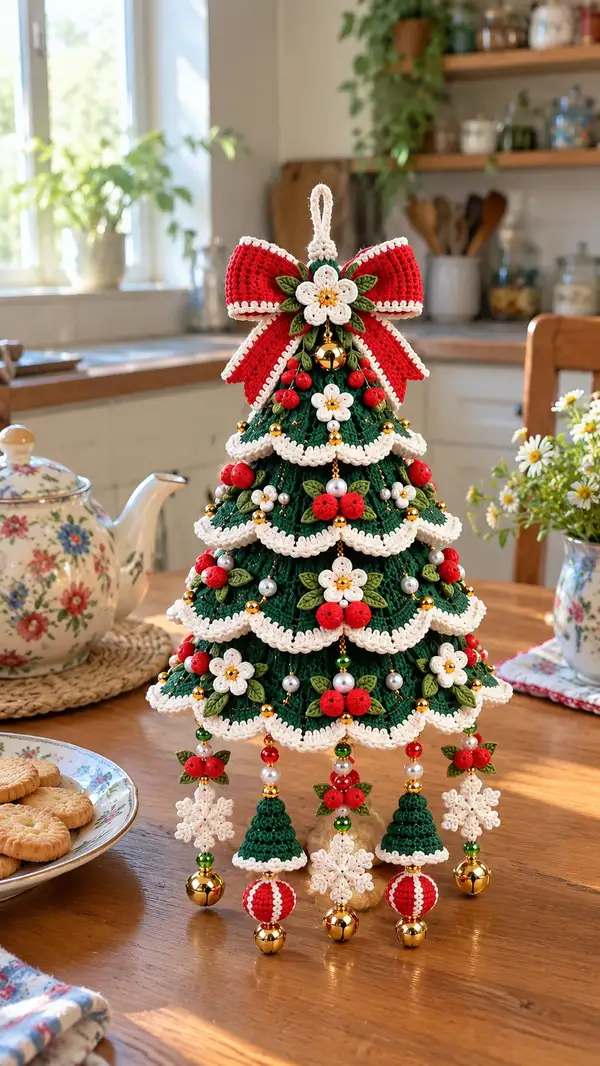
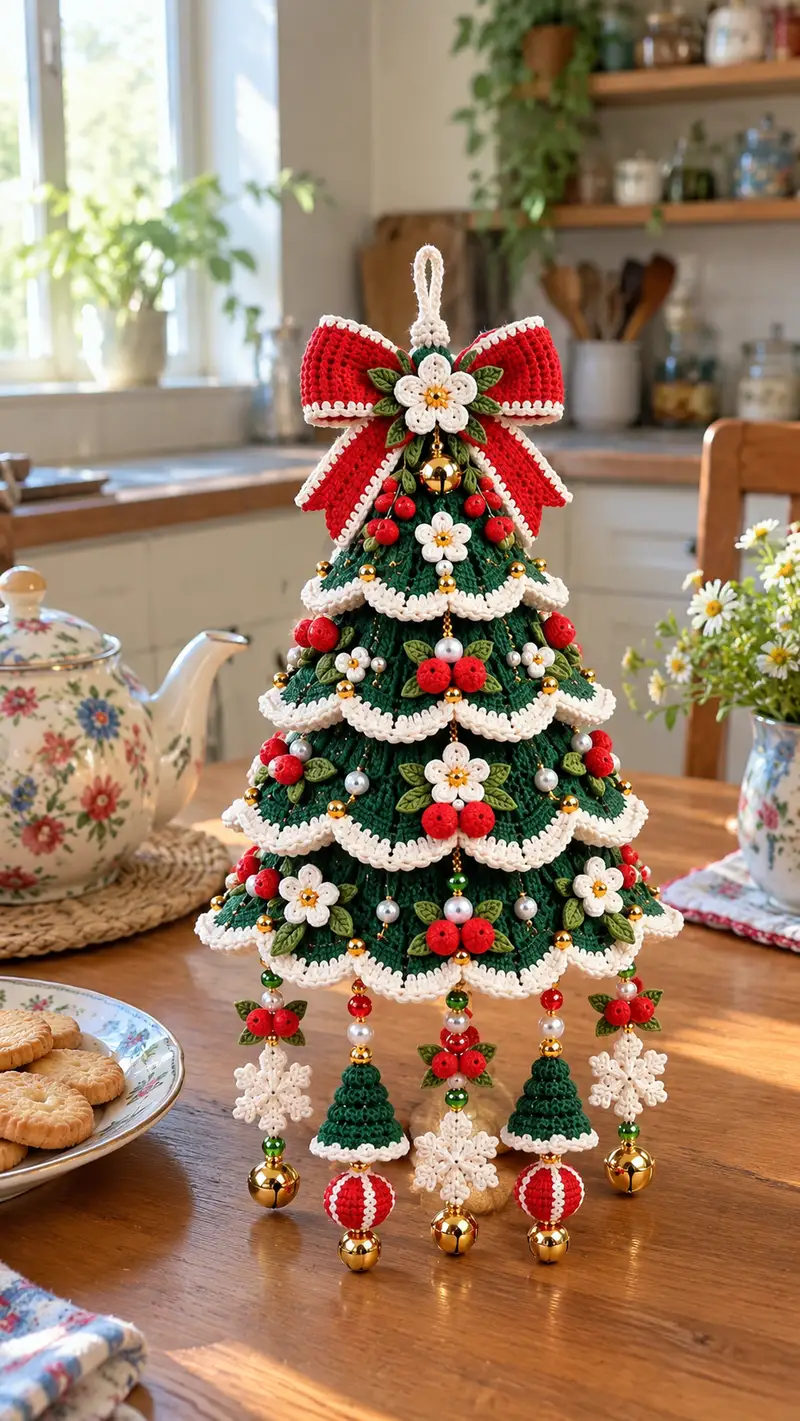
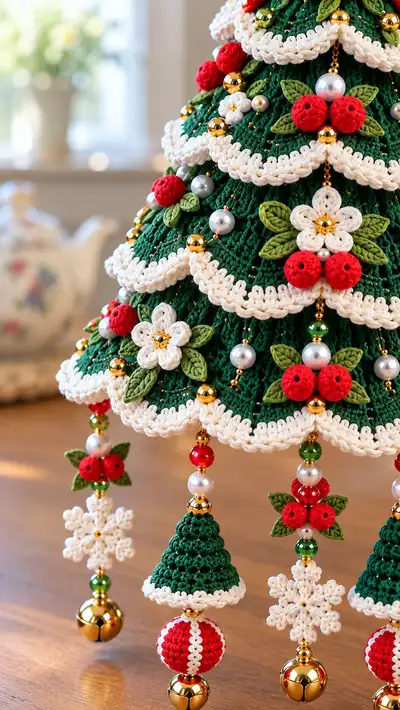
Create a charming, heirloom-style beaded crochet Christmas tree ornament with layered scalloped tiers, delicate white edging, tiny red berries, and dangling bead-and-bell charms. This richly detailed pattern recreates the multi-layered green tree, cream scallops, red bow topper, white flowers and little hanging trees and snowflakes shown in the photo. The project includes clear, step-by-step round-by-round instructions for every motif so you can recreate the look exactly.
Progress Tracker
0% Complete
— Hanging Loop & Top Connector :
Round 1 :
Ch 20, join with sl st to form loop (20)
Round 2 :
Working in rounds around the loop: 1 sc in each ch (20)
Round 3 :
1 sc in each st (20)
Info :
This creates the sturdy hanging loop. Fasten off leaving a 30cm tail to weave through the top of the cone later and reinforce attachment
— Bow Top (works as the top decorative bow behind loop) :
Round 1 :
Using bright red yarn: mr, 6 sc in mr (6)
Round 3 :
(1 sc, inc) x 6 (18)
Round 4 :
(2 sc, inc) x 6 (24)
Info :
We are forming a small circular base that will be flattened into a bow tie center. Keep tension even so circle lays flat
Round 5 :
1 sc in each st (24)
Round 6 :
1 sc in each st (24)
Round 7 :
Fold circle in half and join edges with sl st across 12 sts to make a small semi-oval bow center. Fasten off leaving 25cm tail for sewing
Info :
Set this aside. The large decorative bow loops will be created next as elongated loops and attached behind this center piece
— Large Bow Loops (Make 2 identical loops) :
Round 1 :
Using red yarn, ch 40, join with sl st to form a loop (40)
Round 2 :
Working in rounds: 1 sc in each ch (40)
Round 3 :
1 sc in each st (40)
Round 4 :
1 sc in each st BLO (40)
Info :
Working BLO on the third round creates a crisp folded edge for the bow. Fold the loop in half and pinch center; the BLO row will sit nicely as the top ridge
Round 5 :
Fasten off leaving a long tail to sew loop into bow shape. Make second loop to match.
Info :
Assemble by placing the two loops crossed behind the small bow center. Use long tails to secure through the bow center piece and tie tightly. Weave in ends to the rear
— Bow Trim (Cream Edge) :
Round 1 :
With cream yarn, join at inner edge and sc evenly around visible edges of bow loops and center, approx 60 sc around both loops and center combined (60)
Round 2 :
(1 sc, 1 picot) x repeat around where desired to create scalloped decorative edge (approx 30 picots)
Info :
Picots are made as ch3 sl st into first ch to create small decorative bumps along the bow edge. Set completed bow aside for attaching to the top of the tree
— Main Cone (Tree Body) :
Round 1 :
Using emerald green yarn: mr, 6 sc in mr (6)
Round 3 :
(1 sc, inc) x 6 (18)
Round 4 :
(2 sc, inc) x 6 (24)
Round 5 :
(3 sc, inc) x 6 (30)
Round 6 :
(4 sc, inc) x 6 (36)
Round 7 :
(5 sc, inc) x 6 (42)
Round 8 :
(6 sc, inc) x 6 (48)
Round 9 :
(7 sc, inc) x 6 (54)
Round 10 :
(8 sc, inc) x 6 (60)
Round 11 :
(9 sc, inc) x 6 (66)
Round 12 :
(10 sc, inc) x 6 (72)
Info :
At this point the cone is wide enough for a compact tabletop ornament. If you want a narrower or wider tree, adjust increase rounds by adding or skipping one increase round (mathematical consistency matters)
Round 13-22 :
1 sc in each st (72)
Info :
Even rounds build the tree height. Place stitch markers every 12 sts to help align scalloped tiers later when sewing them on
Round 23 :
(10 sc, dec) x 6 (66)
Round 24 :
(9 sc, dec) x 6 (60)
Round 25 :
(8 sc, dec) x 6 (54)
Round 26 :
(7 sc, dec) x 6 (48)
Info :
Begin subtle tapering for the top where the bow and loop will attach. Stuff very lightly inside the cone if you want it slightly rigid or use a thin paper/foam cone form to keep shape; do not overstuff
Round 27 :
(6 sc, dec) x 6 (42)
Round 28 :
(5 sc, dec) x 6 (36)
Round 29 :
(4 sc, dec) x 6 (30)
Round 30 :
(3 sc, dec) x 6 (24)
Round 31 :
(2 sc, dec) x 6 (18)
Round 32 :
(1 sc, dec) x 6 (12)
Info :
Leave this top opening open; you will insert the hanging loop tail and sew the bow center here. Do not fasten off yet; use the long tail to secure attachments through the cone top
— Scalloped Tier Motifs (Make 6 tiers: Top to Bottom) :
Tier Notes :
Each tier is worked as a semi-circle/half-dozen shell repeats built flat then seamed around cone circumference. Tier 1 is smallest; Tier 6 is largest. Each tier below lists rounds for one scalloped strip; you will make sizes increasing by adding one more shell repeat per tier as noted
Tier 1 - Small (Topmost) Round 1 :
Ch 36, join to work in rounds across the chain foundation to form a loop (36)
Tier 1 - Round 2 :
1 sc in each st (36)
Tier 1 - Round 3 :
*Skip 2, 5 dc in next st (shell), skip 2, sl st into next st* repeat to end - 9 shells (9 shells)
Tier 1 - Round 4 (Edge) :
With cream yarn attach at first shell: sc across shells working 3 sc into center of each shell, then picot edging (approx 27 sc, 9 picots)
Info :
Shell pattern creates scalloped look. Leave long tails at ends to sew tier to cone. When sewing, align tier to cone rounds 14-15 (top area) evenly across marker points
Tier 2 - Small-Mid Round 1 :
Ch 44, 1 sc each (44)
Tier 2 - Round 2 :
*Skip 2, 5 dc in next, skip 2, sl st* repeat - 11 shells (11)
Tier 2 - Round 3 (Edge) :
Attach cream and sc across shells with picot edging leaving tails for sewing (approx 33 sc, 11 picots)
Info :
Sew Tier 2 to cone aligning to cone rounds 16-18; stagger shells so cream scallop shows beneath Tier 1 edge
Tier 3 - Mid Round 1 :
Ch 52, sc around (52)
Tier 3 - Round 2 :
*Skip 2, 5 dc in next, skip 2, sl st* repeat - 13 shells (13)
Tier 3 - Round 3 (Edge) :
Attach cream edge and picots across (approx 39 sc, 13 picots)
Info :
Sew to cone rounds 19-22, ensuring shells are evenly spaced using earlier cone stitch markers
Tier 4 - Mid-Large Round 1 :
Ch 60, sc around (60)
Tier 4 - Round 2 :
*Skip 2, 5 dc in next, skip 2, sl st* repeat - 15 shells (15)
Tier 4 - Round 3 (Edge) :
Attach cream edge and picot edging (approx 45 sc, 15 picots)
Info :
Sew to cone rounds 23-26. For fuller scallops, block strips by lightly steaming (if using cotton) before sewing
Tier 5 - Large Round 1 :
Ch 68, sc around (68)
Tier 5 - Round 2 :
*Skip 2, 5 dc in next, skip 2, sl st* repeat - 17 shells (17)
Tier 5 - Round 3 (Edge) :
Attach cream edge, picot edge (approx 51 sc, 17 picots)
Info :
Sew Tier 5 to cone rounds 27-30. Use small whipstitches and match shell tips to scallop points on the cone to keep a tidy silhouette
Tier 6 - Largest Round 1 :
Ch 76, sc around (76)
Tier 6 - Round 2 :
*Skip 2, 5 dc in next, skip 2, sl st* repeat - 19 shells (19)
Tier 6 - Round 3 (Edge) :
Attach cream edge and picot edging (approx 57 sc, 19 picots)
Info :
Sew the largest tier at cone base rounds 31-36. The finished tree will show 6 scalloped layers with cream edging like the photo. Use mattress stitch or invisible whipstitch for hidden joins
— Small Red Berry Balls (Make 18) :
Round 1 :
Using red yarn: mr, 6 sc in mr (6)
Round 3 :
(1 sc, inc) x 6 (18)
Round 4 :
1 sc in each st (18)
Round 5 :
(1 sc, dec) x 6 (12)
Round 6 :
6 dec (6) - stuff lightly before final dec
Info :
Make 18 identical berries. Leave 15-20cm tail for sewing each berry to tree or bead string. Stuff very firmly but avoid bulging stitches
— Small Leaf (Make 36) :
Round 1 :
Using leaf-green yarn: ch 6, sc in 2nd ch from hook, hdc, dc, hdc, sc across (5 stitches across foundation)
Round 2 :
Turn and sc back across same stitches to thicken leaf, then sl st at base to close. Fasten off leaving long tail for sewing
Info :
Stitch two small leaves together at base if you want fuller clusters; attach leaves behind berry clusters and behind flowers
— Five-Petal Flower (Make 8) :
Round 1 :
With cream yarn: ch 2, 6 sc in second ch from hook, join (6)
Round 2 :
*Ch 4, 3 dc in same st, sl st into next st* repeat 5 times to create 5 loops (5 petals)
Round 3 :
In center use a few sc to secure petals and make a small central cup, then add a gold bead sewn into center for a shimmer
Info :
Make 8 flowers. Attach leaves under each flower cluster and place them evenly around tiers 2-5 as pictured
— Beaded Strings & Vertical Embellishments (Make 6) :
Info :
Each vertical string combines beads, small motifs (berries, tiny leaves, mini cones, snowflakes) and finishes with a gold bell. You can thread beads on jewelry wire or string then stitch or tie to cone base through tier seams
Bead String Pattern :
Start with jewelry cord: gold bead, 4mm green bead, gold spacer, pearl bead (8mm), gold spacer, attach small berry cluster (3 berries with leaves) using yarn tail through bead hole and knot around cord, add pearl, gold bead, then small cream snowflake motif, then final bead and bell
Info :
Leave a 4-5cm yarn tail at top of bead string to sew through underside of tiers. Secure knots with clear glue for longevity
— Mini Hanging Cone Tree (Make 4) :
Round 1 :
mr, 6 sc in mr (6)
Round 3 :
(1 sc, inc) x 6 (18)
Round 4 :
(2 sc, inc) x 6 (24)
Round 5 :
1 sc in each st (24)
Round 6 :
Work shell round: *skip 2, 5 dc in next, skip2, sl st* repeat - 6 shells (6)
Round 7 :
With cream yarn do a single round sc edging around shell tips (approx 18 sc)
Round 8 :
Fasten off leaving tail; stuff base lightly and close with sl st or ladder stitch
Info :
Attach a bead above each mini cone and end with a gold bell at the bottom to match the photo. Make 4 identical mini cones
— Snowflake Motif (Make 4) :
Round 1 :
With cream yarn: ch 6, sl st to form ring, ch 3 (counts as first dc)
Round 2 :
*(dc, ch 2, dc) in ring to form a petal, sl st into ring* repeat 6 times to form 6 spokes
Round 3 :
On each spoke: sl st into next dc, ch 5, sl st into center of spoke to form tiny loops, repeat on all spokes (6 loops)
Round 4 :
Work a decorative picot on each loop: *ch3, sl st into loop* repeat for a star-like delicate snowflake. Fasten off leaving long tail to sew to bead string
Info :
Sew a small gold bead at the center of each snowflake to match photo. The snowflakes hang between beads on the bead strings
— Large Striped Ball (Make 2) :
Round 1 :
With red yarn: mr, 6 sc in mr (6)
Round 3 :
(1 sc, inc) x 6 (18)
Round 4 :
(2 sc, inc) x 6 (24)
Round 5 :
1 sc in each st (24)
Round 6 :
Change to cream yarn: (3 sc, inc) x 6 (30)
Round 7 :
Change to red: 1 sc in each st (30)
Round 8 :
Change to cream: (4 sc, inc) x 6 (36)
Round 9 :
Work even rounds in striped color for 2 rounds, alternating red and cream to build a banded ball height (36)
Round 10 :
Begin decreases mirrored: (4 sc, dec) x 6 (30)
Round 11 :
(3 sc, dec) x 6 (24)
Round 12 :
(2 sc, dec) x 6 (18) - stuff firmly
Round 13 :
(1 sc, dec) x 6 (12)
Round 14 :
6 dec (6) - fasten off and close. Attach a gold bead or bell to bottom for weight
Info :
Make two striped balls to hang from two of the bead strings. Alternate cream and red bands approximately every 1-2 rounds to create the striped look
— Assembly & Placement Prep :
Info :
Lay out cone and all motifs. Use pins to map flower and berry positions by spacing them evenly around tiers 2-5; typical spacing is every 6-8 shells depending on tier circumference. Mark positions with pins or removable clips
Info :
Thread bead strings now if using jewelry wire: slide beads in the order described earlier, attach motifs between bead clusters with thin yarn tails or sew-through bead holes. Leave 3-4cm at top for sewing into cone under-tier seams
— Final Top Closure & Bow Attachment :
Info :
Thread the long tail of the hanging loop through the topmost hook area of the cone (Round 32 opening) and pull through so loop sits on top. Secure the tail around internal stitches and knot tightly with 3 secure knots. Add a small dab of clear glue to anchor knots on the inside of the cone
Round 1 :
Insert long bow center tail through top center and secure bow base with long tail around cone top, sewing through the cone top stitches for stability. Arrange bow loops to sit evenly and tack in place through bow center to cone with hidden stitches
Info :
Weave all remaining tails into the cone interior. Make sure the bow covers the top seam and the hanging loop emerges from center of bow for symmetrical look
— Decorating the Tiers (Sewing Motifs to Tree) :
Info :
Sew flowers and berry clusters to the cone by pinning each motif first then using the long tail to stitch through cone and back into motif base. Pair flowers with 3 small leaves behind them and 2-3 berries in triangular cluster below each flower similar to photo
Info :
Sew bead strings between tiers by sliding the top loop under the seam between two tiers and securing with tight stitches. Adjust lengths so charms hang evenly below the lowest tier
Info :
Glue or knot beads securely where motifs meet cords. For extra security, run a thin bead of glue at the knot's base and let dry before trimming threads
— Final Touches & Balancing :
Info :
Check balance by holding tree from hanging loop; adjust bead string lengths and positions to ensure tree hangs straight. If one side is heavier, move a bead string inward or move a striped ball to a different string
Info :
Add tiny gold seed beads across shell centers for sparkle. Use a few pearl-look beads tucked into leaf clusters to mimic the photo's reflective accents
Info :
Weave in and hide all yarn tails. Trim any excess and press lightly if using cotton to flatten seams; do not over-press as ornament loses texture
This heirloom-style crochet Christmas tree ornament brings together tiny motifs, scalloped tiers, and sparkling beads into one showstopping decoration. Each carefully crocheted piece—from the cream-edged scallops to the clustered red berries—adds a thoughtful, handcrafted touch to any holiday space. The detailed instructions help you recreate the exact layered, textured look while allowing room for your personal color choices and embellishments. 🎄🧶 Handmade gifts like this are treasured keepsakes—enjoy every stitch and the warm feeling it brings when gifted or displayed! ✨