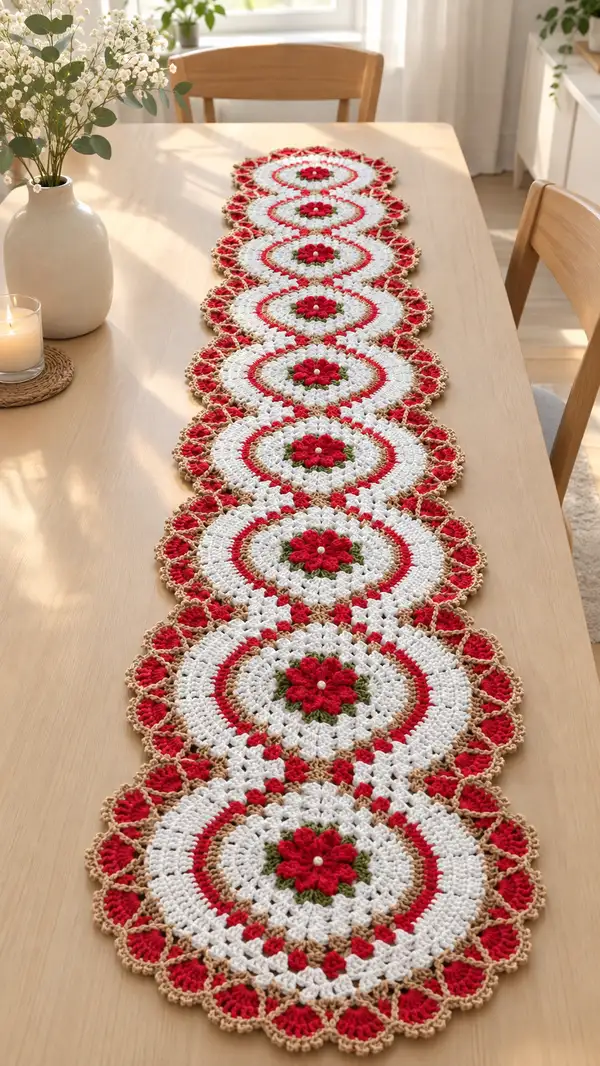
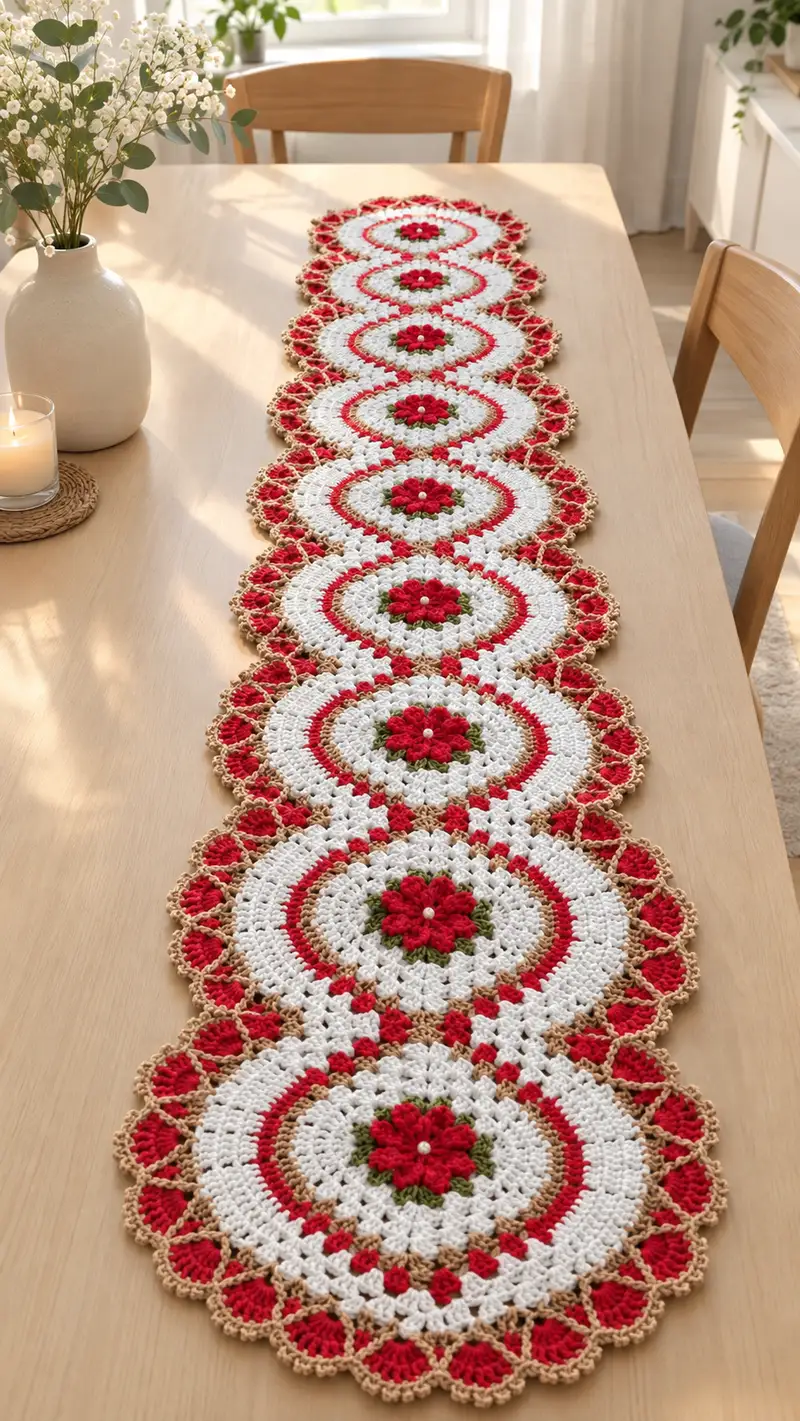
A charming table runner made from linked round floral motifs in festive red, white, green and warm tan tones. Each circular motif features a raised 8-petal flower center, concentric textured rings and a scalloped edging. Motifs are joined into a long runner and finished with a delicate lacy border for an elegant, hand-crafted centerpiece.
Progress Tracker
0% Complete
— Overview :
Info :
This runner is constructed from 8 identical round floral motifs joined together in a single row. Each motif is worked in concentric rounds with multiple color changes and textured rounds to build the raised flower center, leaf clusters, white body, red accent rings, tan accent, and outer scalloped edging. Motifs are joined with a join-as-you-go method on the outer rounds to create a seamless runner. Read through the entire pattern before starting and prepare yarn colors and tools.
Gauge/Finished Size :
One finished motif measures approximately 18 cm (7 inches) in diameter. Full runner with 8 motifs joined measures approximately 140-150 cm (55-59 inches) long and 18-20 cm (7-8 inches) wide before blocking. Blocking will flatten and widen the motifs slightly.
Notes :
Work in US crochet terms. Use stitch markers to keep track of segments. Carry unused yarn inside the work for short floats or fasten off and weave ends as indicated. Block motifs for best results. Each round includes exact stitch counts — check your math as you go.
— Motif (Make 8) :
Round 1 :
Using Green (Accent C): Make a magic ring, ch1, 8 sc in magic ring (8). Pull ring closed. (8)
Round 2 :
Inc in each st around (2 sc in each st) — 8 inc (16)
Round 3 :
(1 sc, inc) x 8 — work 1 sc in next st, 2 sc in next st, repeat — (24)
Info :
This small green round forms a compact base for the little leaf clusters that nestle between the flower petals. Keep stitches tidy and do not tighten too hard or the flower petals will sit awkwardly.
Round 4 :
Change to Red (Accent A). (2 sc, inc) x 8 — (32)
Round 5 :
Ch1, *in next stitch work a 3dc puff cluster for petal: (yo, insert hook, pull up loop) 3 times then yoh and pull through all loops and ch1 to close puff* — repeat in each st around placing the puff cluster into 16 evenly-spaced sts so the round remains (32). If your puff stitch uses 3 loops, work the puff into a single base stitch. After each puff, sl st into next st to stabilize if needed. (32)
Info :
Puff cluster definition: YO, insert hook, pull up loop (repeat 3 times) — you will have 7 loops on hook, YO and draw through all loops, ch1 to close the puff. Puff clusters are worked all into one base stitch so the stitch count does not change.
Round 6 :
Slip to sit between puffs if needed. *Ch2, sc in next st (between puffs), ch2* repeat around to create tiny picot-like spaces between petals. Maintain (32) base stitch count by working the sc between original base stitches. (32)
Round 7 :
Change to a contrasting small amount of green again for leaf tips: *sc in next 2 sts, skip 1, (3 hdc in next st) to create tiny leaves* — repeat around. Because the 3 hdc are worked into one stitch the stitch count remains (32). If you prefer no leaves, work 1 sc in each st instead. (32)
Info :
Place a small pearl bead in the center later: leave long tail of Red to sew bead or attach with fabric glue. If you prefer embroidered center, leave yarn tail to embroider a small eye after joining.
Round 8 :
Change to White (Main). Work (1 sc, inc) x 8 — (40). This begins the broad white ring surrounding the flower center.
Round 9 :
(2 sc, inc) x 8 — (48)
Round 10 :
(3 sc, inc) x 8 — (56)
Info :
Rounds 8-10 expand the motif to create the first large white field. Maintain consistent tension; lay the motif flat frequently to avoid cupping. Use stitch marker to mark start of round.
Round 11 :
1 sc in each st around (56)
Round 12 :
1 sc in each st around (56)
Round 13 :
Change to Tan (Accent B). (5 sc, inc) x 8 — (64)
Info :
The tan round provides a warm ring just outside the white field. Carry white up inside if you prefer not to fasten off, but fasten off tan when complete to keep colors tidy if you have short floats.
Round 14 :
Change back to White. (7 sc, inc) x 8 — (72)
Round 15 :
1 sc in each st around (72)
Round 16 :
Change to Red. Work an open texture round: *ch3, skip 1 st, sc in next st* repeat around to create small ch-3 arches. Because the ch-3 are spaces, work the sc into every other st and do not alter the 72 base sc count — keep 72 base placements for reference by working scs into the same base stitches. (72)
Info :
When working chain-space rounds, keep the base stitch counts in mind and mark the base stitches so the next round can be worked into them correctly. Arch rounds create lacy texture that will be echoed in the outer scalloped edge.
Round 17 :
Change to White. In each chain arch from previous round work: (sc, hdc, 3 dc, hdc, sc) all into the chain-3 space to form a scallop-shell cluster. Continue around — this increases the physical stitchwork but the base stitch count remains functionally 72 because shells are worked into the ch-spaces. (Use 72 shell positions)
Round 18 :
1 sc in each stitch and top of each shell around to smooth (72)
Info :
At this stage each motif is developing the main white surface and lacy interior. Check your motif diameter and compare to the reference; adjust hook size if your motif is significantly smaller or larger.
Round 19 :
Change to Red. Work small raised clusters spaced evenly: *in next top of shell work a 3-double crochet puff (work 3 dc partially into same stitch and draw through at once), sl st into next st* repeat around. Puff clusters are worked into existing tops of shell so base count reflective of 72 remains.
Round 20 :
Change to Tan. 1 sc in each st around to tidy the round and provide a clear color separation (72)
Round 21 :
Change to White. Work (2 sc, skip 1, 5-dc shell in next st, skip 1) around across the previous round so that shell points sit above the red cluster row. Because shells are worked into spaced base placements the count for worked elements corresponds to 72 positions.
Info :
If you prefer a denser motif, instead of skipping, you can work shells into consecutive stitches; the outer shape will become fuller. The pattern as written uses regular spacing to allow flatness and consistent joining later.
Round 22 :
1 sc in each st around, working into both shell tops and scs to even the surface (72)
Round 23 :
Change to Red. Create the inner scalloped accent: (sc in next 3 sts, 7 dc shell in next st) x 12 to create twelve red scallops spaced around. This converts the previously spaced positions into distinct scallop points. Because shells occupy one base position each, treat it as 72 base divisions converted to 12 shell points by grouping; maintain even spacing for flatness.
Info :
Count and pin motif after this round to ensure each motif has identical shell spacing so joins line up when assembled. Use 12 pins to align shell points if needed.
Round 24 :
Change back to Tan. Work ch-4 loops around the outer edge: *sl st into top of next red shell, ch4, sl st into space between shells* repeat around. These loops will form the base for the final lacy tan scallop edging in the next rounds. Keep attention to spacing; you should have 12 loops. (12 loop positions)
Round 25 :
In Tan: Into each ch4 loop work (sc, hdc, 3 dc, hdc, sc) — a larger scallop. This creates 12 large tan scallops around the motif. Count scallops as 12 repeat units, and stitch counts within them are contained in the loop so overall motif circumference increases slightly but each motif will be identical. (12 scallops)
Info :
At this point finish off Tan and weave in ends. If joining-as-you-go, do not fasten off on the outer scallop when you reach a motif that will join to a previous motif - instead follow the join instructions in the Join Rounds section below.
Round 26 :
Change to Red and use it to create small fan shells between the tan scallops to echo the red scalloped inner ring seen in the image: *sl st to center of tan scallop, ch1, (5 dc) in same space, sl st to next scallop center* repeat around. Fasten off and weave in ends if not joining here. (12 fans)
Round 27 :
Optional bead: Sew a single small pearl bead into the center of the red puff petals using the long tail left earlier or with a short length of white sewing thread and a dab of fabric glue for security. Knot inside the backside of the motif. This optional pearl is visible in the image and gives a polished look.
Info :
Make 8 identical motifs. Block each motif gently to flatten and even the edges. Pin scallops in place while wet-blocking; allow to dry completely before joining. Blocking is essential to keep the runner flat and even.
— Join Motifs (Make & Join 8 into Row) :
Info :
You can either join motifs after making all units or use a join-as-you-go (JAYG) approach while working the final scallop round. The pattern below describes a join-as-you-go method on the tan scallop round for a seamless join. If working JAYG, keep the last motif's scallop round live when you reach the edge touching a previously completed motif and join into its scallop spaces with sl st as indicated.
Round 28 :
On the first motif only (no joins yet): Reattach Tan yarn to the back loop of an outer scallop and work 1 sc evenly around the outside of each tan scallop to create a sturdy edge (work approx 10 sc along each scallop surface). This establishes consistent points to join subsequent motifs. Fasten off after completing if not joining yet.
Round 29 :
On the second motif when you reach the final scallop round, perform join-as-you-go: when you reach the scallop that will meet the corresponding scallop on the placed motif, instead of finishing the scallop entirely, align the scallop edges and sl st through the corresponding stitches of the first motif (insert hook through the top of the first motif scallop and through the working scallop loops) to join. Continue working the remainder of the scallop normally. Repeat for each scallop that contacts the adjacent motif (normally 2-3 scallops depending on seam placement). When joining more than one neighbor, always align motifs fully flat and pin before joining.
Info :
As you join each motif, check the alignment of the floral centers so they form a straight spine down the middle of the runner. Use blocking pins to adjust placement before sewing or sl-stitch joining. Insert a stitch marker at the center top of your motif to keep orientation consistent.
Round 30 :
Continue to add motifs one by one, joining into the tan outer scallops of the previously placed motif as you go. For each join, you will typically make 2-3 join points along the touching edge (sl st through both motif scallop edges). When motif number 8 is attached, weave in all tails securely and check join tension to make sure the runner lies flat. Use mattress stitch with a matching yarn tail to reinforce joins if you prefer sewn joins over sl st.
Info :
If you prefer a more decorative join, sew small invisible whip stitches through the back loops only of the tan scallop stitches to hold motifs together with a slightly raised seam that emphasizes the scallops. For a flatter join, use single crochet through both motifs' outer edges as you work the final round.
— Runner Trim & Outer Lacy Border :
Info :
Once all motifs are joined in a row, work a unifying border around the entire runner edge to create the continuous lacy look visible in the photo. This border will be worked in rounds that travel along the long side edges and curve around motif ends. Work the border with the Tan yarn to harmonize outer scallops.
Round 31 :
With Tan, join in any outer stitch on the long edge of the runner and work 1 sc into each outermost stitch around the full runner, working evenly along the straight seams between motifs so you have 1 sc per original outer stitch — this evens the edge and gives a clear edge to work decorative rounds from. Work evenly and count your stitches — you should end this round with a stitch count roughly equal to the sum of outer motif edge stitches (expect a large number; mark start position). Fasten off and weave ends if needed.
Round 32 :
Change to Red. Work *ch3, skip 2, sc in next st* around the entire runner to create small red arches between tan scs. Adjust spacing along straight motif joins so arches are evenly spaced. Do not change the base stitch count dramatically; this is a decorative arching round built on the tan sc base.
Info :
When working along long edges where motifs meet head-to-tail, take care to keep arch spacing consistent. Pin the arches with blocking pins immediately if needed to ensure uniform bonding to the runner edge.
Round 33 :
Change to White. Into each red ch-3 arch work (sc, hdc, 3 dc, hdc, sc) — a shell. These shells will create a rhythmic scallop along the long edges of the runner. Fasten off white and weave ends. The shells do not change the number of arch placements; treat shells as decorative units keyed to each arch.
Round 34 :
Change to Tan. Between each shell on the long edges work a small loop: sl st to center of shell, ch5, sl st back to next shell center to form a chain loop that will receive final picot edge. Around curved ends where single motif ends show, work extra loops spaced to maintain symmetry (typically 3-5 loops around each rounded edge depending on motif size).
Round 35 :
In Tan: Into each ch5 loop work (sc, picot, sc) where picot = ch3, sl st into top of sc. This produces tiny points on each loop. Fasten off and weave ends. Block runner flat and pin scallop points to set shape.
Info :
Blocking after the full border is worked is essential. Pin along a long straightedge and pin each scallop point so they align into a neat, repeating rhythm. Spray lightly with water and allow to dry completely for crisp scallops.
— Optional Decorative Embellishments :
Info :
To match the reference photo exactly, sew a small pearl bead into the center of each red puff flower. If working for a child-safe item, omit beads and embroider a French knot or small embroidered center with yarn. You can also add small embroidered seeds between motifs using metallic thread for a festive sparkle.
Round 36 :
Sewing pearls: Thread a strong short piece of sewing thread through a small narrow needle. Push needle through the center of the motif from the back to the front, thread the pearl bead on, then return needle back to the back center, tie securely with a few tiny knots and hide knots in the back of the motif. Add a dab of fabric glue for added security if the runner will be laundered infrequently.
Info :
For washing: Hand wash gently in cool water. Avoid heavy agitation. Reshape and re-block while damp. Cotton yarns may shrink slightly on first wash; pre-wash yarn if you want to minimize size changes.
— Full Stitch-By-Stitch Reference Summary (Round Numbers Collated) :
Rounds 1-7 :
Build the green base and red puff petal center (R1 8sc, R2 inc to 16, R3 (1sc,inc)x8 to 24, R4 change to red (2sc,inc)x8 to 32, R5 puff petals into 16 sts, R6 small chain spacers, R7 tiny green leafwork) — keep counts as described above.
Rounds 8-12 :
Build the first white field (R8 change white (1sc,inc)x8=40, R9 (2sc,inc)x8=48, R10 (3sc,inc)x8=56, R11-12 1sc in each =56)
Rounds 13-20 :
Tan accent and expanded white ring (R13 tan (5sc,inc)x8=64, R14 white (7sc,inc)x8=72, R15-16 white even rounds and red arch round to create decorative ring, R17 white shell into ch-3 arches, R18 white even, R19 red puffs, R20 tan tidy round)
Rounds 21-27 :
Shells, red scallops and final tan scallops (R21 white shells in ch-spaces, R22 1sc even, R23 red scallops (grouped), R24 tan ch-4 loops = 12 loops, R25 tan scallop shells across loops, R26 red fans in scallop centers, R27 optional pearl)
Rounds 28-30 :
Join-as-you-go tips and join instructions (work on scallop round to sl st into corresponding scallop stitches on adjacent motifs). Follow join pattern carefully to produce flat seams.
Rounds 31-35 :
Runner-unifying border (tan sc base round, red ch-3 arch round, white shells into arches, tan loop round, tan picot edge)
Info :
The pattern contains many decorative cluster and shell techniques; practice each textured stitch on scrap before working into motifs to ensure consistent size and look. Use the Info sections scattered through rounds to advise on stuffing? (not applicable) and finishing tips.
Careful math check :
When increasing in circular motifs with 8 main segments, each increase round adds 8 stitches to the previous total (inc count x8). Keep track of your counts and adjust if you change the number of segments or stitch sizes.
This cozy runner brings classic crochet charm to your table with layered flowers, lacy scallops, and warm tonal accents. Each motif joins to form an elegant continuous centerpiece that brightens mealtimes and gatherings. Take your time, block carefully, and enjoy the rhythmic feel of floral motifs coming together into a lovely long runner. 🧶🌸✨