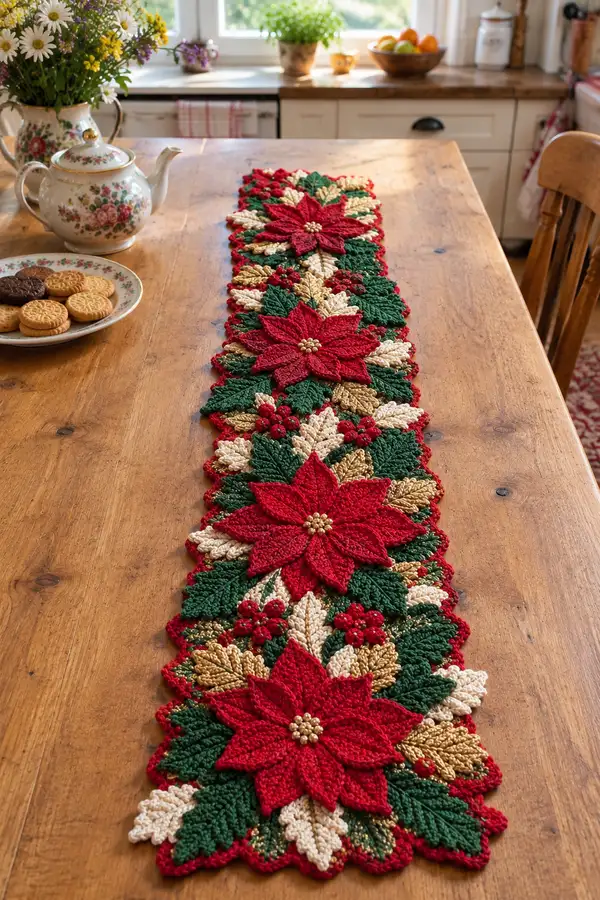
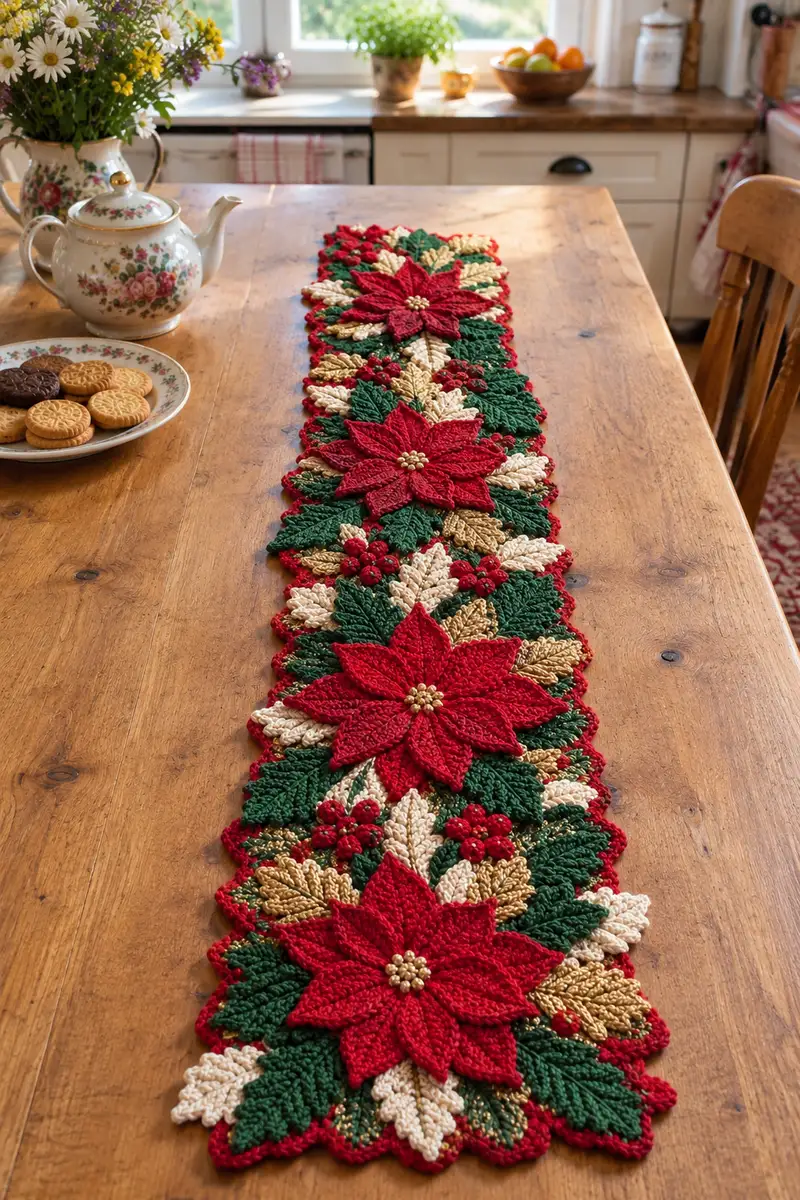
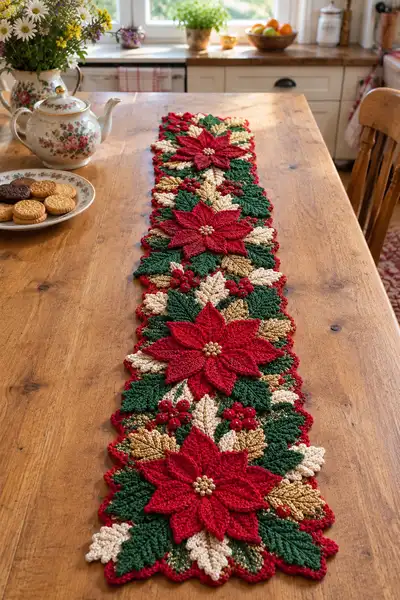
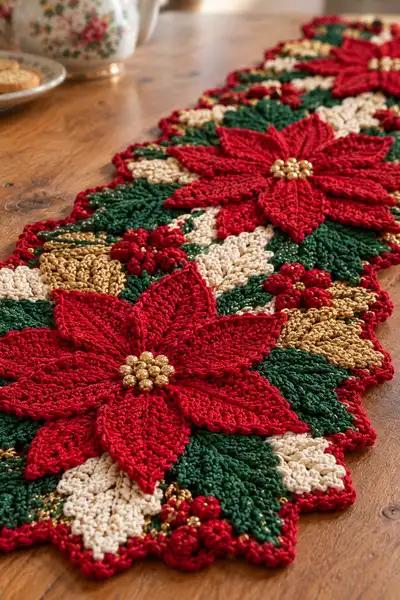
Create a stunning holiday table runner featuring layered poinsettias, textured leaves and berry clusters in classic red, green, cream and gold. This richly detailed design uses motif assembly and raised stitchwork to create a dimensional centerpiece perfect for festive tables. Includes full instructions for petals, leaves, berries, joining motifs and a scalloped border.
Progress Tracker
0% Complete
— Overview :
Info :
This runner is assembled from repeatable motifs: Large petal motif (worked flat), Small petal motif, Leaf motifs (green, cream and gold variants), Berry clusters and a bead center. The complete runner in the sample measures approximately 46-50 inches long and 7-8 inches wide when assembled with three large poinsettias and background foliage. Make motifs and join them into strips, attaching beads and small berry clusters during assembly. Work with a consistent 3.5mm hook for the majority of motifs; use 3.0mm to tighten small motifs if desired.
— Large Poinsettia Petal (Make 8 petals for each large flower) :
Round 1 :
With red yarn, ch 9. Row 1: Starting in 2nd ch from hook, 1 sc in each ch across (8 sc). Turn. (8)
Round 2 :
Ch 1, 1 sc in first st, 1 sc in next 2 sts, 1 hdc in next 2 sts, 1 dc in next 2 sts, 1 sc in last st. Turn. Maintain stitch counts across edge to shape. (8)
Round 3 :
Ch 2 (counts as hdc), hdc in same st, hdc across next 2 sts, 2 dc in each of next 2 sts, hdc across last 2 sts. Turn. (10)
Round 4 :
Ch 1, 1 sc in first st, (1 sc, 1 inc into next st) across to increase on both sides: sc in first, (sc, inc) in each st along edges to create a gentle flare. Work a total of 12 sts at end of row. Turn. (12)
Round 5 :
Ch 2, 1 hdc in first 2 sts, 1 dc in next 4 sts, (2 dc in next) to form center expansion, 1 hdc in last 4 sts. Turn. (14)
Round 6 :
Ch 1, 1 sc in each st across (14). Turn. Maintain neat edges. (14)
Round 7 :
Ch 2, (hdc in next 2 sts), (dc in next 6 sts), (hdc in next 4 sts). Turn. (14)
Round 8 :
Ch 1, sc across but on the next-to-edge stitch create a small picot for texture: sc, pc (ch2, sl st in last sc made), continue sc to end. (14)
Round 9 :
Ch 2, BLO: 1 hdc in each st BLO across to create a raised ridge on the inner petal spine. (14)
Info :
Working in BLO on this pass builds a visible central ridge on the petal. Use this ridge to shape the petal later and to align petals when assembling the flower. Block each petal lightly to flatten and enhance the ridge before assembly.
Round 10 :
Ch 2, work 2 hdc in first and last stitch (edge increases), 1 hdc across remaining sts. (16)
Round 11 :
Ch 1, sc across (16). Turn. Keep edges straight and even. (16)
Round 12 :
Ch 2, 1 hdc in first 4 sts, 2 dc in next 8 sts (forming fan curvature), 1 hdc in last 4 sts. (18)
Round 13 :
Ch 1, sc across (18). Fasten off if desired or continue with decorative edging for each petal tip: sl st into outermost stitch, ch3, (3 dc, ch2, 3 dc) into same stitch to make a scalloped petal point. Sl st to close. (sc base 18)
Info :
For a sharper pointed petal, work the scalloped point in Round 13; for a flatter petal skip the scallop. Make 8 identical large petals per flower. Block and press each petal flat, pinning the ridge center up slightly to hold shape.
Round 14 :
Edge finish: With right side facing, join yarn at base of petal and work 1 sc evenly around entire petal, placing 2 sc in corners to avoid ruffling. Fasten off and weave in ends. (approx 36 sc around)
Round 15 :
Optional raised center ridge: Re-join yarn at base of petal and in the center of petal work 1 sl st, ch1, *1 sc in next 2 sts, 1 hdc in next 2 sts* to create extra texture along central ridge. Fasten off. (repeat modifications on all petals)
Info :
Make 8 large petals for each poinsettia flower. Arrange petals in a radial layout with inner petals overlapping. Petal count and shaping control the fullness of the flower; you can add 8 more smaller petals for a denser look.
— Small Inner Petal (Make 8 per flower) :
Round 1 :
With red yarn and 3.0mm hook, ch 7. Row 1: 1 sc in 2nd ch from hook and across (6 sc). (6)
Round 2 :
Ch 2, hdc in each st across (6). Turn. (6)
Round 3 :
Ch 2, 2 hdc in first and last st, hdc across remaining (8). Turn. (8)
Round 4 :
Ch 1, sc across (8). Turn. (8)
Round 5 :
Ch 2, hdc in first 2 sts, 2 dc in next 4 sts, hdc in last 2 sts. (10)
Round 6 :
Ch 1, sc across. Fasten off leaving tail for sewing. (10)
Info :
These small inner petals are slightly rounded and sit atop the larger petals to provide depth. Work 8 of these per large flower, or 16 if you prefer double layering.
— Poinsettia Center Bead Cluster (Make 1 per flower) :
Round 1 :
With gold-yarn or bead thread, ch 6, join with sl st to form a ring. (6)
Round 2 :
Ch1, 6 sc into ring, do not join; work in continuous rounds to create a small flat disc. (6)
Round 3 :
With tapestry needle and small gold beads, sew beads into a tight cluster on top of this little disc; alternatively string 6 beads and sew them as a circle, then secure through the disc several times. Fasten off, leaving ends to sew onto assembled petals.
Info :
Use high-shine metallic beads for a professional finish. Sew each bead cluster onto the center of the assembled poinsettia and reinforce through the backing motif to prevent bead loss.
— Large Leaf - Deep Green (Make many to fill runner) :
Round 1 :
With green yarn, ch 11. Row 1: sc in 2nd ch from hook across (10 sc). Turn. (10)
Round 2 :
Ch 2, hdc in first 2 sts, (1 dc in next 4 sts), hdc in last 4 sts. Turn. (10)
Round 3 :
Ch 1, sc across (10). Turn. (10)
Round 4 :
Ch 2, BLO: hdc in each st across (10). This creates a raised central vein on the next row. (10)
Round 5 :
Ch 1, 1 sc in first st, (1 sc, dec) across center spine to form a tapered tip: sc 2, sc2tog, sc 2, sc2tog, sc 2, sc2tog, sc 1. (7) This decreases and shapes the tip—do not fasten off; continue to shape outer edging.
Round 6 :
Turn and work along long edge: join yarn at base, ch1, 1 sc along edge, 2 sc in corner, continue around the leaf body adding 1 sc per edge stitch and 2 sc in the tip to keep shape. Fasten off. (approx 20 sc around)
Info :
Leaves vary in size in the sample runner; make a mix of large and medium leaves by adjusting the initial chain length. Use BLO rows to create the central vein and pin the leaf flat when blocking so the vein sits raised and natural.
Round 7 :
Optional serrated edge: Re-join yarn and work *(sc, picot, sc) in every 2nd stitch* along the long edge to create serrated leaf texture. Fasten off. (repeat on opposite side)
— Cream/Ivory Leaf (Make matching numbers) :
Round 1 :
With cream yarn, ch 9. Row 1: sc across (8). Turn. (8)
Round 2 :
Ch 2, hdc in first 2 sts, dc 4 sts, hdc in last 2 sts. Turn. (8)
Round 3 :
Ch 1, sc across (8). Fasten off or proceed to edge as for green leaf. (8)
Info :
The cream leaves are slightly smaller; make more to create highlighted layers beneath the green foliage. Because the cream yarn is lighter in stitch definition, block these flat for a soft contrast.
— Metallic Gold Leaf (Make accent leaves) :
Round 1 :
With gold yarn, ch 7. Row 1: sc 6. Turn. (6)
Round 2 :
Ch 2, hdc in each st (6). Turn. (6)
Round 3 :
Ch 2, 2 hdc in first and last st, hdc across (8). Turn. (8)
Round 4 :
Ch 1, sc across and finish with 1 sc around entire leaf for a neat rim. Fasten off. (approx 16 sc around)
Info :
Gold leaves are primarily decorative accents; use them sparingly around each poinsettia to catch light. Metallic yarns can be slightly stiffer—use a slightly larger hook or relax tension to avoid tight, puckered motifs.
— Berry Cluster (Make several clusters) :
Round 1 :
With dark red yarn, ch 5, join to form ring. Round 1: 8 sc into ring. (8)
Round 2 :
Ch 1, *sl st, ch2, 3 dc in same st, sl st in next st* repeat across to create 4 puff-like berries joined in a small cluster. Fasten off leaving a long tail. (4 puff petals)
Round 3 :
Info : Use yarn needle to sew this cluster to a small backing leaf or directly into the runner layout. Add a single gold bead to the center of each puff or couple together multiple clusters for larger bunches.
Round 4 :
Optional bead finish: Sew small gold beads into the centers of the berry puffs using strong thread, tying off securely on the backside.
— Joining Motif & Background Mesh :
Round 1 :
To create a stable base for joining motifs, work a simple chain mesh strip long enough to hold three flower assemblies. Ch 60 (adjust to desired runner length). Row 1: sc in 2nd ch from hook and across (59). Turn. (59)
Round 2 :
Ch 3 (counts as dc), *sk 1, dc in next; ch1* repeat across, ending dc in last st. This creates open mesh spaces for slipping leaves and petals through during assembly. (approx 59 dc)
Round 3 :
Ch 1, sc across in each st and ch-space to create a tidy base (work 1 sc in each dc and 1 sc in each ch1 space). (approx 118 sc considering both dc and ch spaces)
Info :
Block your mesh strip flat. This strip will act as a skeleton onto which motifs are sewn. You can also use two narrower strips and stagger joins to increase flexibility. For the pictured runner, three identical mesh strips staggered and joined form the long base.
Round 4 :
Arrange motifs: Lay out three large poinsettia arrangements evenly along the mesh, leaving approx 6-8 inches of mesh between flower centers for leaf fill. Pin petals and leaves in place, overlapping slightly so edges just meet for sewing.
Round 5 :
Info : When pinning, allow inner petals to overlap outer petals of the next flower slightly to create a continuous visual flow. Keep symmetry by aligning the petal ridges toward the center of the runner lengthwise.
Round 6 :
Sew petals: Using yarn needle and long tails, whipstitch or mattress stitch the petal bases to the mesh strip through several passes at each base to secure. Sew each petal to adjacent petals at their bases to create a radial hold. Repeat for inner small petals, arranging them to fill gaps.
Round 7 :
Attach bead center: Sew the bead cluster to the center of the petal assembly, anchoring through petals and into the mesh base. Ensure the bead cluster sits slightly proud of the petal surface for dimension.
Info :
Sewing through the mesh base ensures the flower is well-secured. Use small, tight stitches and knot securely. Weave tails at least 2 inches into the mesh to hide and secure them; trim close.
— Filling Leaves & Berry Placement :
Round 1 :
After securing the three main poinsettias, fill gaps with green leaves, cream leaves and gold leaves by sewing only at the leaf base. Overlap leaves by 30-40% to conceal the mesh and create a layered look.
Round 2 :
Place berry clusters interspersed among leaves; small clusters of 2-4 berries look natural. Sew clusters tightly and add a bead to each berry center if desired. Work symmetrically from the center flower outward to maintain balance.
Round 3 :
Info : Alternate colors: place one cream leaf next to one green leaf and one gold accent leaf to keep the runner visually balanced. Vary leaf orientation so veins and points create natural movement along length.
Round 4 :
Secure any loose edges of petals and leaves by sewing through the outer edging into the mesh. This prevents curling and ensures the runner lies flat on the table under light use.
— Border and Scalloped Edge :
Round 1 :
With red yarn, join at one end of the runner and work a round of sc evenly around the entire perimeter, placing 2 sc in corners or any sharp points to keep the edging flat. Work 1 sc per approx every 0.25 inch to create consistent spacing. (estimate 200-260 sc around finished runner)
Round 2 :
Ch 1, *skip 1 sc, 5 dc in next sc, skip 1 sc, sl st in next sc* repeat around to make scallops. End with sl st in join and fasten off. This gives the scalloped red edge seen in the sample.
Info :
If your scallops ripple, adjust by adding or removing one dc from select scallops and re-block. The scalloped edge should sit flat; pin and steam-block after completing the border.
Round 3 :
Optional bead rim: With gold yarn and tapestry needle, weave a line of metallic beads around the scallop bases, sewing each bead through the scallop center to secure. This adds sparkle and references the gold leaf accents inside the runner.
— Finishing Touches and Blocking :
Round 1 :
Weave in all ends neatly on the reverse side by threading ends under several stitches using a yarn needle. Trim close. Re-check bead security—tie off and add a drop of craft glue on knots if desired for extra security.
Round 2 :
Block the entire runner: Pin the runner out flat onto a foam mat, stretching gently to even out motifs. Spray lightly with water or steam with a garment steamer. Allow to dry fully. This flattens joins and enhances stitch definition.
Info :
Blocking is essential for an even, professional finish—especially with mixed fibres and metallic yarn. If you used metallic yarn, allow extra time to fully dry to avoid tarnishing the sheen.
Round 3 :
Final inspection: Check underside for any loose stitches and secure. Place runner on table and, if required, add a thin backing felt or non-slip pad to protect the table surface and keep the runner from shifting.
Completing this festive poinsettia table runner is a truly rewarding project—every petal and leaf adds to the layered, garden-like composition. The layered textures, metallic accents and bead centers create a luxurious holiday look. I hope you enjoy making and displaying it as much as I enjoyed designing it—happy crocheting! 🎄✨🧶