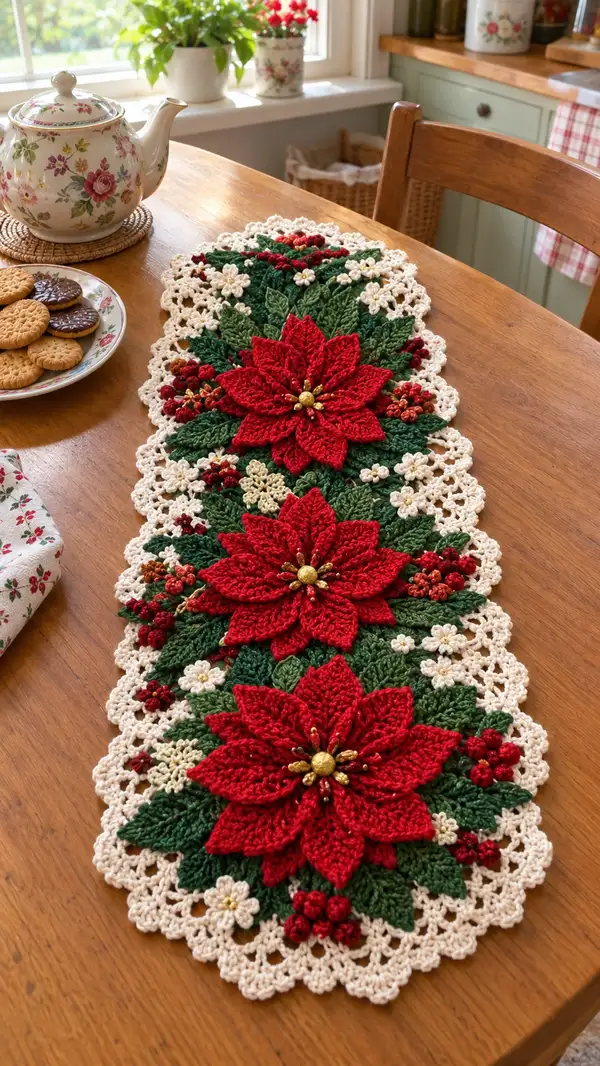
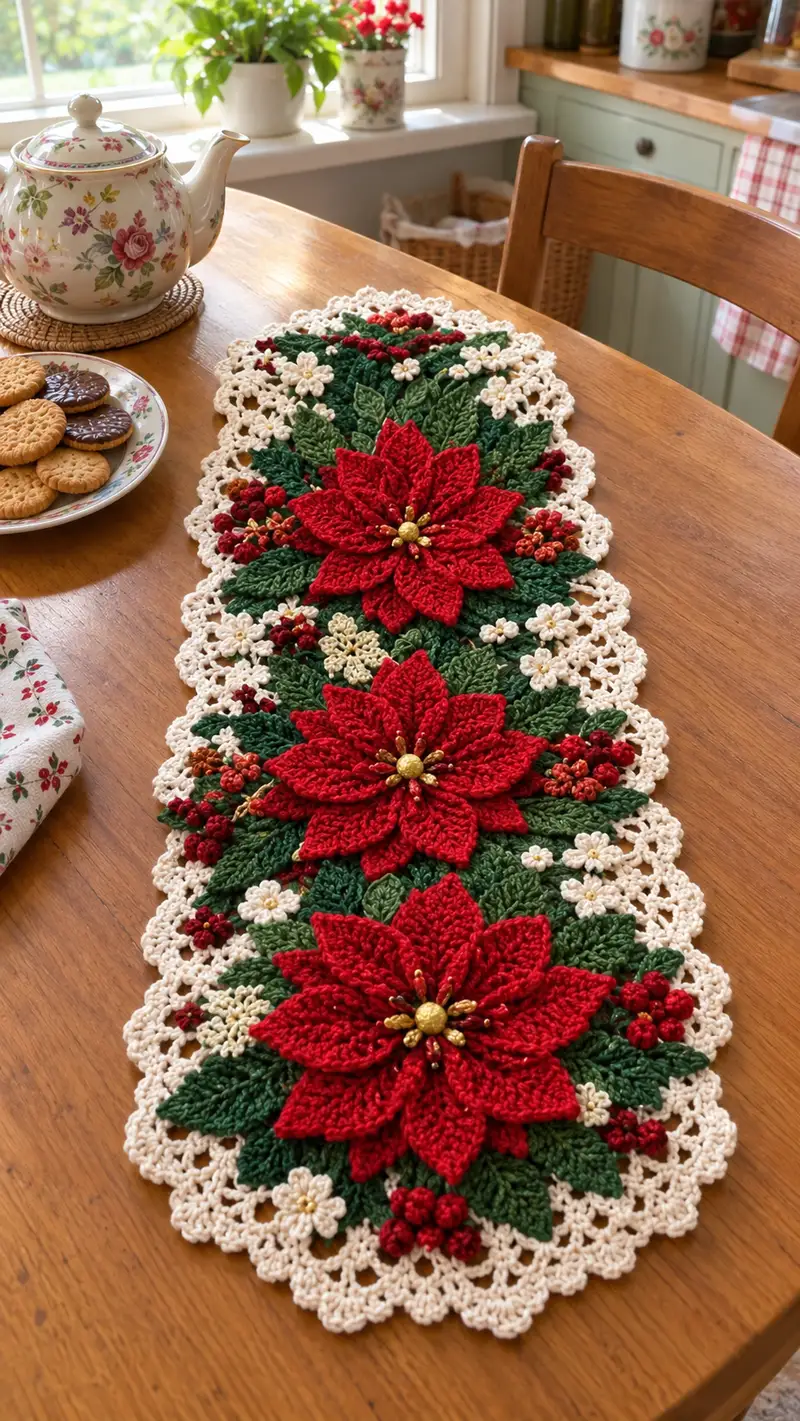
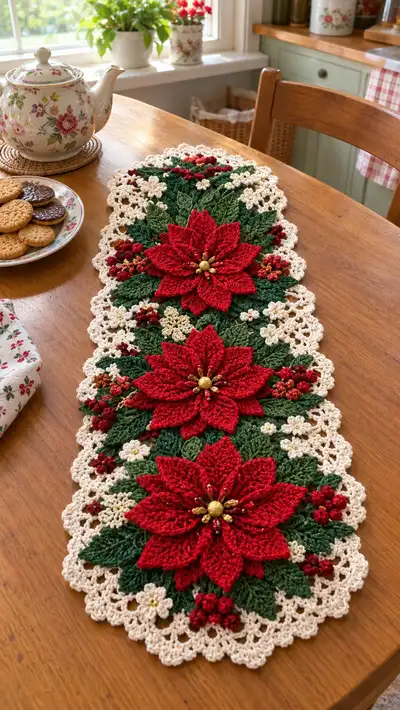
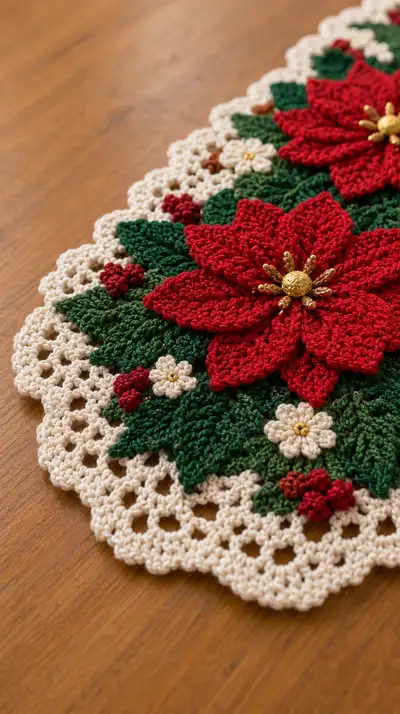
Create an elegant holiday table runner featuring three lush layered poinsettias, sculpted leaves, delicate ivory flowers, clustered berries and a lacy scalloped border. Worked in cotton or mercerized yarns, this runner combines textured petals, raised leaves and bead accents for a heirloom-ready centerpiece. Full step-by-step instructions guide you through each motif, assembly and finishing touch to recreate the cozy, vintage-inspired piece shown.
Progress Tracker
0% Complete
— Overview & Construction Method :
Info :
This runner is constructed from individual motifs: three layered poinsettia motifs (each with a small round center disc and two petal layers), several sizes of leaves, small five-petal ivory blossoms, clustered berries and a background leaf/filler motif. All motifs are arranged and sewn onto a slim base lattice that is later edged with a scalloped lace border. Work motifs separately, block lightly, arrange on a blocking board or table in the layout shown in the photos, then sew in layers from back to front to create depth. Finally add bead centers and edge with the lace border to finish.
Info :
Gauge is not critical for overall aesthetic, but to match sizing given use worsted cotton and 3.5mm hook. Adjust hook if you prefer a denser or looser fabric. Use stitch markers to mark round beginnings whenever you work in the round.
— Poinsettia Center Disc (Make 3) :
Round 3 :
(1 sc, 1 inc) x 6 (18)
Round 4 :
(2 sc, 1 inc) x 6 (24)
Round 5 :
1 sc in each st (24)
Info :
This small disc provides a stable base for mounting the gold bead cluster. Make 3 center discs; you will sew beads through this disc to anchor the center.
Round 6 :
(3 sc, 1 inc) x 6 (30)
Round 7 :
1 sc in each st (30)
Info :
Fasten off leaving a 16-20cm (6-8in) tail to use when sewing this center disc to the first layer of petals. Make sure to weave the tail into the underside during assembly.
— Poinsettia Petal Template (Large Petal) (Make 24 per runner: 8 per flower) :
Info :
Petals are made individually and sewn to a small central disc. Work petals with red yarn. Each poinsettia uses two petal layers: inner smaller petals and outer larger petals; the instructions below make the larger petal. For the inner/smaller petal reduce starting chain and omit a final round as noted later.
Round 1 :
Ch 7, sc in 2nd ch from hook, sc in next 4 ch, 5 sc in last ch (turn to work along opposite side of foundation chain), sc in next 4 ch, sc in last ch (12) — this forms a small oval base
Round 2 :
Ch 1, sc in each st around (12)
Round 3 :
Ch 2, (hdc, dc, tr) in next st (makes the point), hdc in next, sc in next 3, sl st 1 to anchor on opposite side (12)
Round 4 :
Ch 2, 2 dc in the point st, dc in next, hdc in next two, sc in remaining stitches to complete the petal (14)
Round 5 :
Work in FLO across the oval base only: (sc, hdc) in each of the 3 base sts on each side to create a defined ridge; at the tip work (hdc, dc, tr, dc, hdc) to form a pronounced point (18)
Round 6 :
Ch 1, sc in each st around working the tip cluster as (hdc, dc, tr, dc, hdc) again to bulk the petal; maintain even stitch count (18)
Round 7 :
Work 1 sc in BLO for the two stitches adjacent to the base edge to create a slightly cupped base (18)
Round 8 :
Fasten off leaving a long tail for sewing (approx 20cm). Block lightly by pinning to shape: curl tip upward slightly for realistic petal curvature
Info :
For inner/smaller petals: use ch 5 to start, work rounds 2-6 as above but omit the final increase in Round 4 so the inner petal measures about 70% of the large petal. Make 8 inner petals and 8 outer larger petals for each poinsettia (16 petals per flower total), or 24 outer petals across the runner if you prefer a fuller look.
— Poinsettia Assembly (Per Flower) :
Round 1 :
Lay the center disc on table. Arrange 8 inner petals evenly around disc, spacing them 3-4 stitches apart on the disc edge. Pin each petal in place.
Round 2 :
Sew inner petals to disc by ladder stitch from underside using the long tails. Work through both petal base and center disc every 4mm to secure; each petal should be sewn 3-4 times along its base (no stitch count applies).
Round 3 :
Arrange 8 outer petals overlapping inner petals slightly and staggered so that outer petals sit between inner ones. Pin and sew outer petals to the disc and where they overlap inner petals for stability.
Info :
Orient petals so they curve upward slightly to create depth; sew through the very base only to keep the petal tips free and sculptural. If you want a denser center, add an additional small round of shorter petals (repeat inner petal pattern using ch 4 start).
Round 4 :
Thread gold thread or sew 1 large gold bead to the exact center of the disc. Then sew 7-9 gold seed beads or small gold bugle beads radiating outward to form the stamen cluster. Anchor beads securely with the yarn tail passed through the disc several times and knot on the underside.
Info :
Make 3 full poinsettia flowers and set aside. Block lightly once fully assembled for neatness.
— Large Leaves (Make 18) :
Round 1 :
Mr, ch 2, work 8 hdc into ring, sl st to first hdc (8)
Round 2 :
Ch 2, (hdc, 1 inc) x 8 around to widen into an oval shape (12)
Round 3 :
Ch 1, sc in next 3, 3 dc in next (tip cluster), sc in next 6, 3 dc in next (other tip), sc to finish (12)
Round 4 :
Ch 1, sc in each st around working the tip clusters as (hdc, dc, hdc) for a more pointed leaf (12)
Round 5 :
Switch to BLO and work 1 sc in each st BLO to create a raised central vein effect (12)
Round 6 :
Ch 3, turn and work a short ridged row across one half of the leaf: (dc, hdc, sc) across 6 stitches, then work same ridged row back on the opposite side to mirror and create the leaf curve. Fasten off leaving a long tail for sewing.
Info :
Make 18 large leaves in dark green and 12 medium leaves in the slightly lighter green yarn using the same pattern but start with mr ch 2 and only 6 hdc in Round 1 to make the leaf slightly smaller. Block leaves lightly and rub a little starch prior to assembly if you prefer very crisp leaves.
— Secondary Filler Leaves & Small Leaf Sprays (Make 24 small leaves) :
Round 1 :
Ch 6, sc in 2nd ch from hook, sc next 3, 3 sc in last ch, sc next 3 down opposite side (12) — small oval leaf base
Round 2 :
Ch 1, sc in each st around (12)
Round 3 :
Ch 2, (hdc, dc) in tip st, hdc in side stitches to shape, sl st to base, fasten off leaving long tail (12)
Info :
Use these small leaves for filler between petals and to create layered sprays around each poinsettia. Make 24 in medium green across the runner.
— Small Ivory Flower (Make 18) :
Round 1 :
Mr, ch1, 6 sc in mr (6)
Round 2 :
(ch 3, sl st into same st) x 6 — form 6 loops for petals; fasten off leaving tail (6 loops)
Round 3 :
Sew a small gold seed bead into the center of each flower and secure on bottom with yarn tail
Info :
These tiny five- or six-petal blossoms are worked very quickly and are used as highlights along the lace border and between leaves. Make 18-24 depending on your preference and runner spacing.
— Berry Clusters (Make 30 clusters) :
Round 1 :
With burgundy yarn, ch 2, 5 sc in 2nd ch from hook (5) — small round bobble
Round 2 :
Fasten off leaving tail for sewing. Make clusters by grouping 2-5 of these small bobbles and sewing them together close to one another to form a realistic berry cluster.
Info :
Make 30 clusters of varying sizes and mix in a few rust-colored clusters for depth. Sew clusters into the arrangement under leaves and at edges so they peek out naturally.
— Background Filler Motif (Leaf-Halo) (Make 6 long filler motifs to link flowers) :
Round 1 :
Mr, ch 2, 12 hdc in mr, sl st to first (12)
Round 2 :
(1 hdc, inc) x 6 (18)
Round 3 :
Ch 3, dc in same st, dc in next 2 sts, (dc2tog) to shape an undulating edge, continue around until you have 9 small dc arcs, sl st to finish (18)
Round 4 :
Switch to medium green and work elongated leaf points along the edge: into each arc work (hdc, dc, tr, dc, hdc) to form 9 small petals around the motif (approx 45 stitches total)
Info :
These filler motifs are slightly larger and will be used to bridge the spaces between the central poinsettias and help distribute small flowers and berries evenly. Make 6 along the runner length (two between each poinsettia). Block flat after making each one.
— Lace Base Lattice (Runner Foundation) :
Info :
The runner foundation is an elongated oval lattice built with repeating shell motifs. Work the foundation in cream yarn to create open spaces where leaves and flowers will be sewn. The lattice determines final runner width and length; adjust repeat counts to match your desired runner size. The sample runner is approximately 12-14 inches (30-36cm) wide and 36-40 inches (90-100cm) long with three floral groupings.
Round 1 :
Ch 80 (or adjust for desired length), sc in 2nd ch from hook and in each across (79)
Round 2 :
Ch 3 (counts as dc), *skip 2 ch, (5 dc) into next ch, skip 2 ch, dc into next 3 ch; rep from * across to create a row of shells and small spacing columns. End with a dc in last ch. Count will vary slightly depending on starting chain; maintain shell pattern across the row.
Round 3 :
Ch 1, turn, work 1 sc in each dc and shell stitch top: in each 5-dc shell work (sc, ch2, sc) into center dc to maintain lace openings and create anchor points for motifs (this row forms the stable base row)
Round 4 :
Ch 3, work shells into each ch2 space across: (5 dc, ch 2, 5 dc) in each ch2 space, with 1 dc in the single-dc columns to bridge. This builds an open lattice that is strong enough to sew motifs on later (stitch counts will shift as needed based on chain length).
Info :
If you prefer discrete motif placement rather than a single foundation chain, you can instead create three large oval foundation motifs and join them with small connecting chains and filler motifs. The method above is chosen for continuity and to make assembly straightforward.
— Joining Motifs to Foundation & Layering :
Round 1 :
Lay foundation flat on work surface. Position first poinsettia 3-4 shells from one short end of runner; position second in center and third symmetrically toward the other short end. Place filler motifs and leaves to fill gaps; refer to photo for staggered, layered placement. Pin everything in place.
Round 2 :
Sew the largest leaves first onto the foundation using mattress or whip stitch through the foundation and the leaf base; sew only the base edge so leaves lift naturally. Secure with several passes and knot on underside. Use long tails left from motifs to sew to foundation.
Round 3 :
Next sew the medium leaves and small sprays in layers, tucking small leaves under petal tips and anchoring with a few secure stitches. Add small ivory flowers and berry clusters last so they sit on top.
Info :
When placing motifs, stagger the three poinsettias so petals from adjacent flowers overlap slightly; this creates flow along the runner and avoids isolated, floating motifs. Keep the runner symmetrical along its central axis for best aesthetic balance.
— Lace Scalloped Border (Edge) :
Info :
The scalloped border is worked directly onto the foundation edge after all motifs are sewn down, using a continuous crocheted edging technique. Work evenly spaced shells that echo the small blossoms and create a finished antique lace look.
Round 1 :
Join cream yarn at any corner with sl st. Ch 1, sc evenly around the entire edge of the runner to create a neat base; adjust the number of sc per side so shells will space evenly. For a 36in runner this may be around 320 sc total — work the sc evenly (actual count will depend on your foundation chain and added motifs).
Round 2 :
*Ch 4, skip 2 sc, sl st in next sc (creates loop for shell anchoring); rep from * across each side, placing 1 loop per 3-4 sc to get even spacing. At ends, work 3 loops into last sc to create rounded corner shaping.
Round 3 :
In each loop: (sc, hdc, 3 dc, hdc, sc) — a 7-stitch shell to form the scallop. Work shells into each loop across the entire runner edge. Fasten off and weave ends under the shells on the wrong side.
Info :
To achieve crisp scallops, block the edge after finishing and lightly spray with starch if desired; pin scallops into shape while drying. Adjust shell sizes if your stitch gauge differs.
— Decorative Post-Stitch Veins on Leaves :
Round 1 :
Use same green yarn and work a central vein on each large leaf using dc post stitches: from leaf underside, insert hook around the post of the stitch along the central axis and work 6-8 dc-post stitches from base to tip to create raised ribbing. Repeat on 1-2 side ribs using hdc-post stitches for realism.
Info :
Work these post stitches after leaves are sewn to the foundation to ensure veins align with visible face of leaf. Use a slightly smaller hook for neater post stitch definition if desired.
— Tiny Accent Stitching & Bead Placement :
Round 1 :
Sew tiny seed beads in the center of each ivory flower and into the stamen clusters of the poinsettia centers. Use a small sharp needle and pass thread through each bead and through the center disc multiple times; knot securely on underside.
Info :
Add a few scattered gold or brass beads near berry clusters for a touch of sparkle; sew beads so they are flush with surface to avoid catching on table linens.
— Finishing & Blocking :
Round 1 :
Gently steam-block the entire runner or wet-block by pinning it to shape on a blocking board. Ensure scallops are evenly spaced and petals sit naturally. Allow to dry completely before removing pins.
Round 2 :
Weave in all ends through several stitches on the wrong side. For extra durability, on the underside run a few reinforcing stitches with a matching yarn color across seams where motifs join.
Info :
If the runner will be used in high-traffic areas, you can add a thin layer of felt or non-slip matting underneath when displaying to protect the underside and keep it from shifting.
— Troubleshooting & Tips :
Info :
Adjust the number of foundation chains and shell repeats to change overall runner length. If your motifs appear too dense, try slightly thinner yarn (sport weight) and a smaller hook to keep the three-dimensional structure but reduce bulk. For a more vintage look, use mercerized cotton for a slight sheen.
Info :
Test bead and seed bead sizes on a single flower before committing to the whole runner to ensure scale is pleasing and beads do not overwhelm petals.
This festive poinsettia table runner blends sculptural petals, textured foliage and a vintage lace border to make a memorable centerpiece. Each layered flower and leaf adds depth and handmade charm, and tiny gold beads bring a holiday glimmer. Whether displayed for special occasions or as seasonal decor, this runner is sure to become a treasured heirloom. 🧶🌹✨