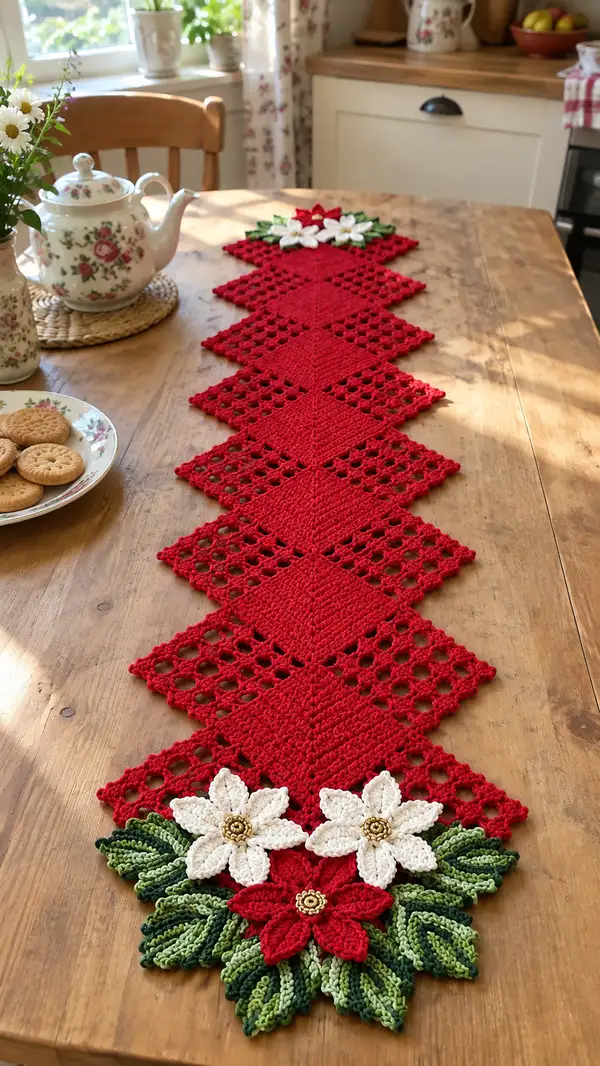
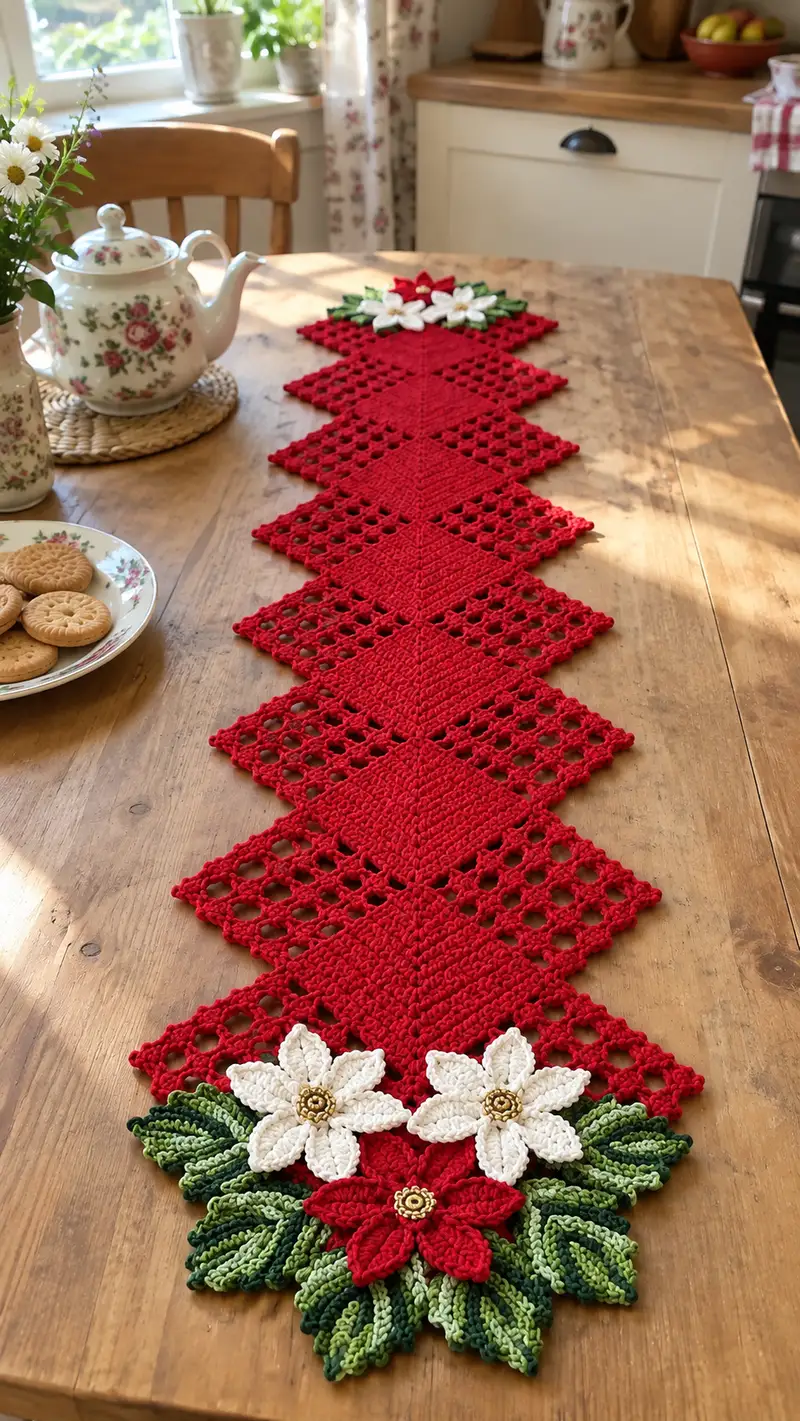
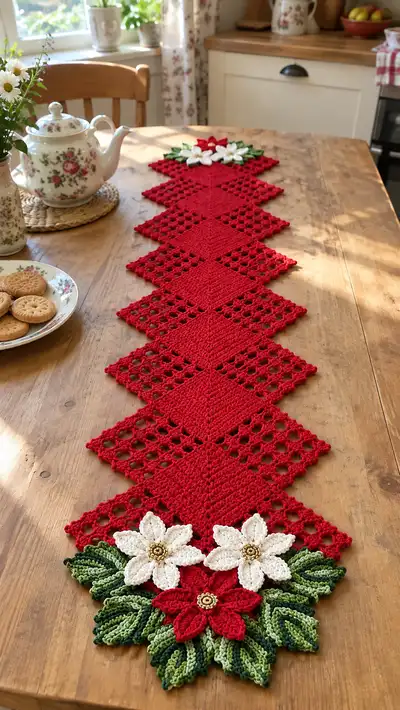
Create a beautiful diamond-style table runner featuring alternating solid and openwork red diamonds, finished with layered poinsettia flowers and sculpted green leaves. This runner uses a cotton-blend worsted yarn for crisp stitch definition and a refined drape. The design is worked as repeatable squares joined as you go, with detailed edging and three-dimensional floral motifs for a festive centerpiece.
Progress Tracker
0% Complete
— Overview :
Info :
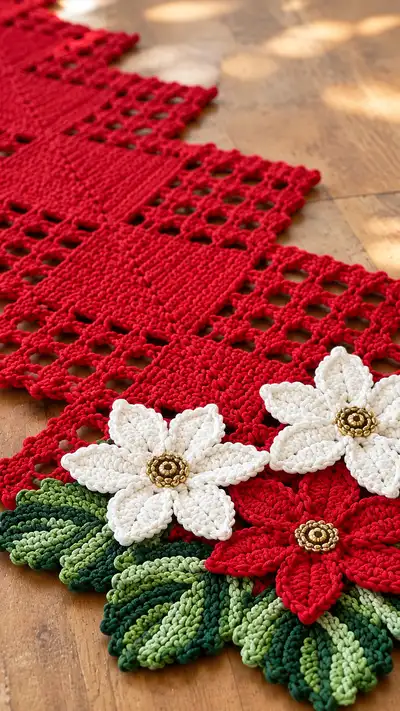
This table runner is constructed from repeating square/diamond motifs arranged on point (diamond orientation). There are two square types: a Solid Diamond (dense texture) and an Openwork Mesh Diamond (lacy grid). Make alternating diamonds and join as you go in a single long runner. At each end, attach layered poinsettia flowers and sculpted leaves to create decorative terminal clusters.
Info :
Recommended gauge: one diamond (solid) measures approximately 10 x 10 cm using 4.00mm hook and worsted weight cotton. Adjust hook/yarn to scale. Make 10 diamonds (5 solid, 5 mesh) for an approximately 100cm runner; adjust repeats as needed for longer/shorter runner.
— Solid Diamond (make 5) :
Round 1 :
Create a small magic ring. 6 sc in magic ring (6)
Round 2 :
6 inc (12) — Place a stitch marker in first stitch to mark rounds if working joined squares later.
Round 3 :
(1 sc, inc) x 6 (18)
Round 4 :
(2 sc, inc) x 6 (24)
Round 5 :
(3 sc, inc) x 6 (30)
Info :
At this point your piece is still circular. To begin giving it a diamond/square-on-point look, we will place increases at four cardinal points and add short straight rounds between them; counts below show symmetrical increases to create corners.
Round 6 :
Work as follows around: (4 sc, inc) x 6 (36). Maintain marker to track round start (36)
Round 7 :
(5 sc, inc) x 6 (42)
Round 8 :
(6 sc, inc) x 6 (48)
Info :
We now have a broad circular disk of 48 sts. To coax sharp points and straight sides (diamond shape), the next rounds will use grouped stitches and short side panels. We will convert to HDC rows worked in the round to form a slightly squarer/diamond silhouette.
Round 9 :
Ch 1, 1 sc in each of next 48 sts (48) — change to HDC in next round if you prefer more height
Round 10 :
1 hdc in each st (48)
Round 11 :
To form slight side straightening, work a front post/ back post sequence: *FLO hdc in next 3, BLO hdc in next 3* rep around (48)
Round 12 :
1 hdc in each st (48)
Info :
If your diamond looks too round, add an extra round of post stitches at the four points: locate top/bottom/left/right points visually and place additional 3 FLO hdc cluster in those areas to push them outward slightly.
Round 13-16 :
Work 4 rounds even: 1 hdc in each st (48) (48) (48) (48)
Info :
These even rounds build the center block height. You can adapt the number of even rounds to change the diamond's height and proportion to your table runner length.
Round 17 :
(6 hdc, dec) x 6 (42)
Round 18 :
(5 hdc, dec) x 6 (36)
Info :
Begin gentle decreases to subtly show an evidence of edging orientation — we prefer shallow decreases so the diamond retains size but gains a defined edge.
Round 19 :
(4 hdc, dec) x 6 (30)
Round 20 :
(3 hdc, dec) x 6 (24)
Round 21 :
(2 hdc, dec) x 6 (18)
Round 22 :
(1 hdc, dec) x 6 (12)
Round 23 :
6 dec (6) — fasten off leaving tail for joining to adjacent squares or weave in if working full square then join later
Info :
Make five Solid Diamonds to alternate down the runner. Block lightly to lay flat and square each motif; pin to diamond shape matching geometric points.
— Mesh Diamond (make 5) :
Info :
The Mesh Diamond is a lacy unit forming the openwork. Work similarly to Solid Diamond's initial rounds through round 8 to establish the base, then switch to chain- and dc-based filet/openwork to create grid holes.
Round 1 :
Create a small magic ring. 6 sc in magic ring (6)
Round 3 :
(1 sc, inc) x 6 (18)
Round 4 :
(2 sc, inc) x 6 (24)
Round 5 :
(3 sc, inc) x 6 (30)
Info :
Establish an expanded base. We will convert to dc-filet for the mesh effect—this uses chains and dc groups to make square holes aligned on the diagonal.
Round 6 :
Ch 3 (counts as dc), dc in same st, *(ch 2, sk 2 sts, 2 dc in next 2 sts)* repeat across to form pairs, ending with 2 dc in last stitch. Maintain 30 principal base dc groups as you adjust placement (count carefully).
Round 7 :
Ch 3, turn your work as if working in rows around the diamond: *2 dc in the top of next pair, ch 2, skip chain space* around to create evenly spaced ch-2 holes. Adjust spacing to keep 15-16 ch-2 holes per side when working on point (approx total visual open cells of 20-24).
Round 8 :
Work even pattern around: in each ch-2 space work: (2 dc, ch 2) and in each 2-dc cluster work 2 dc. This will enlarge holes and maintain 48 main top stitches approximate across the circumference (48)
Round 9 :
Ch 1, 1 sc in each stitch and in each ch-2 space place 1 sc to create a tidy perimeter (approx 48 sc)
Round 10 :
Edge round: *ch 3, sl st in next sc to create picoted mesh rib; repeat around to give decorative mesh effect (48 'picot positions')*
Info :
Make five Mesh Diamonds. Block them to open the mesh and square the points. Mesh diamonds should visually match the solid diamonds' width so the runner alternates neatly.
— Joining Diamonds into Runner (join-as-you-go) :
Info :
We recommend joining squares as you complete each one using a slip-stitch join or single crochet join to form a continuous runner. Join along one diagonal point to next diagonal point. The instructions below describe a repeatable join to connect a new motif to the existing strip.
Round 1 :
Place first Solid Diamond on work surface. Make second diamond. Starting at a corner of the second diamond, insert hook through the corresponding corner stitch of the first diamond and the second, ch 1, sl st to join. Work a sl st every 3-4 stitches across the side to hold evenly. Continue until second diamond is attached along entire adjacent edge.
Round 2 :
After joining the first two diamonds, chain up 3 at the start of next diamond's corner and align corners precisely. Join second to third diamond with sl st through corresponding stitches every 3-4 sts to ensure even tension and alignment.
Round 3 :
For a firmer join option: after slip-joining each stitch, work a single crochet through both motifs along the seam (approx 12-14 sc joins per side depending on motif stitch counts) to provide durability and a decorative raised seam.
Info :
As you join motifs, check alignment by laying row flat and pinning each diamond point. If edges pucker, remove a few joins and re-space stitches. Keep an even tension so the runner lays flat.
Round 4 :
If you prefer a visibly decorative seam, after joining do an additional raised slip-stitch ridge: work 1 sl st in each joining sc, then *ch1, sl st* across to form a dotted ridge along seams.
Info :
Continue alternating Solid and Mesh diamonds until runner reaches desired length (pattern pictured uses ten diamonds: Solid-Mesh-Solid-Mesh-Solid-Mesh-Solid-Mesh-Solid-Mesh or similar). You can adjust repeats as needed.
— Large Poinsettia Flower (Red) (make 1) :
Info :
The large poinsettia is worked flat in rounds then layered. It has 8 petals in the photo; here we'll make 8 large petals worked in joined rounds for sculpted petals with raised centers. Use red yarn and the smaller 3.5-4.0mm hook for crisper petals.
Round 1 :
ch 6, sl st to first ch to form ring, ch 1 (or magic ring option). In ring: 8 sc evenly (8)
Round 2 :
*(ch 3, in next st work 1 sc, 1 hdc, 3 dc, 1 hdc, 1 sc), sl st into next st* repeat around to form 8 petal bases. Fasten off leaving long tail for sewing center if desired.
Info :
Each petal is built as a small fan. To add sculpting, we'll outline each petal with a contrasting slip-stitch ridge then add a final shaping row to deepen the petal toe.
Round 3 :
Rejoin at base of first petal. Ch1, sc around petal edge: in top of each dc work 1 sc, in hdc works 1 sc, around petal to form outline. Repeat for all petals (approx 48 sc total).
Round 4 :
Petal shaping round: In each petal, work (sc, hdc, 3 dc, hdc, sc) into the petal top (mirrors original) but work these stitches into the top loops to create a raised ridge. This deepens each petal profile.
Round 5 :
Edge round: *sl st across petal edges leaving 1 sl st at petal valley, ch 2 to start next* repeat for all petals to create small connecting chain loops (approx 16 ch-2 spaces)
Round 6 :
Final texture round: With hook 3.5mm, work picot edge on each petal tip: sc in each stitch around petal, at tip ch3, sl st into 1st ch to create tiny picot, continue sc back down. Fasten off and weave ends.
Round 7 :
Make a small center disc: with gold or mustard yarn, ch 4, sl st to form ring; 8 sc in ring, sl st, then in next round (1 sc, inc) x4 (12) and finish with decorative bead or button sewn at center. Sew center disc to flower center securely.
Info :
Block petals with pins to give each petal upward curvature; dampen slightly if using cotton to set shape. Sew the large red poinsettia to the terminal diamond at one end of the runner using the long tails, placing the center at the diamond point.
— Medium Poinsettia Flowers (White) (make 2) :
Round 1 :
Ch 4, sl st to join. 6 sc in ring (6)
Round 2 :
*(ch 3, in next st work 1 sc, 1 hdc, 3 dc, 1 hdc, 1 sc) sl st into next st* repeat around to form 6 petals (approx 6 fan petals)
Round 3 :
Outline each petal with 1 sc in each stitch across the petal, sl st between petals to anchor (approx 36 sc)
Round 4 :
Picot tip: in each petal tip 1 sc, ch 3, sl st in 1st ch to form small picot, continue around. Fasten off and sew on gold button or bead center.
Info :
Make two white flowers of similar scale. Stack them slightly overlapping each other when placing around the red poinsettia for layered visual interest. Sew securely with hidden stitches and back the centers with a small felt circle if needed for stability.
— Layered Leaves (variegated greens) (make 14-18 leaves total) :
Info :
Leaves are sculpted using short rows and front-post/ back-post stitches to create deep veins. Use two shades of green to create depth: work base leaf in lighter green then overlay darker green edging or use variegated yarn for one-step color variation.
Round 1 :
Ch 10, sc in 2nd ch from hook, hdc in next, dc in next 2, tr in next 2, dc in next, hdc in next, sc in last (this forms a row-shaped leaf center spine - 9 stitches across)
Round 2 :
Turn, work along other side of foundation chain: sc, hdc, dc, tr, dc, hdc, sc into the same corresponding stitches to form a symmetric leaf (approx 17 sts total)
Round 3 :
Vein shaping: FLO work 1 sc in each st across leaf, at tip work 3 sc in tip st to form pointed tip, continue along other side: 1 sc each (approx 21 sc)
Round 4 :
For raised veins: Using darker green, join at leaf base, ch1, *BLO hdc along one side for three stitches, then FLO tr at center spine, then BLO hdc along second side*, finish with picot edge: *(sc, ch 2, sl st in 1st ch)* repeat at intervals to create scalloped look.
Round 5 :
Repeat surface slip stitch detail: sl st over veins to deepen them and fold leaf lengthwise slightly while working to create profile. Fasten off leaving a long tail to sew onto runner base.
Info :
Make 14-18 leaves of varying sizes; arrange leaves in layered clusters under floral units: place larger leaves at the back and smaller leaves in front. Slight blocking and careful sewing will keep the leaves sculpted and directional.
— Small Accent Leaves (dark green, optional) :
Round 1 :
Ch 8, sc in 2nd ch from hook, hdc, dc, tr, dc, hdc, sc — fasten off (approx 7 stitches across)
Round 2 :
Surface crochet central vein: rejoin at base and do 1 sl st down center, then block to curl slightly for volume.
Info :
Use these small accents to fill gaps and provide shading between larger leaves. Sew under and around flower bases for a neat finish.
— Flower & Leaf Assembly :
Round 1 :
Position large red poinsettia at runner end center, pin in place. Arrange two white flowers to flank slightly above the red center, offset left and right. Arrange leaves underneath forming a fan of layered greens creating a natural, full cluster.
Round 2 :
Sew flowers to runner through base rounds using long tails and yarn needle. Use small backstitches through underlying diamonds (secure through multiple motifs) so cluster is firmly anchored to the runner.
Round 3 :
Sew leaves in layers starting with largest leaves at back. For each leaf, fold slightly lengthwise and sew through base stitches to secure the curve; tack through runner stitches as well so edges do not lift away from fabric.
Info :
For extra security, apply a small dab of fabric glue under leaf tips if your runner will be handled frequently; otherwise careful stitching is usually enough. Add gold buttons or bead centers sewn through all floral layers to finish and mask joining stitches.
— Decorative Edge & Final Border :
Round 1 :
Once all diamonds are joined and floral clusters attached, work a continuous border around the entire runner. With red yarn, join at a corner point and ch 1, sc evenly around edge approx 3 sc per side stitch; maintain neat spacing around points (estimate 200-240 sc along whole perimeter depending on runner length).
Round 2 :
Ch 3 (counts as dc), *skip 1 sc, 5 dc in next sc (shell), skip 1 sc, sl st in next sc* repeat around to create shell border along every other sc giving textured scalloped edge.
Info :
If shells fall differently on sides vs points, adjust by spacing shells so there is always one shell centered on each diamond point for symmetry. Pin and try-on before continuing if unsure.
Round 3 :
To give delicate points along edges, work picot edge: sc in each shell top, at each shell peak work *(ch 3, sl st in 1st ch)* to create tiny picot, then continue sc to next shell. Fasten off and weave in ends.
Round 4 :
Optional decorative highlight: Using contrasting color (gold or white), with a 3.5mm hook, do a surface chain across diagonal seams to emphasize diamond rhythm. Join contrast yarn at top left corner, sl st across seam stitches for approx 3-4 connectors per internal seam and fasten off.
Info :
Final blocking: pin runner to desired shape on blocking board or towels, ensuring diamond points are crisp. Lightly steam or spray with water for cotton yarn then allow to dry fully before use. Blocking is key to an even runner with crisp openwork holes and consistent diamond geometry.
— Finishing Touches & Tips :
Round 1 :
Weave in all tails by threading ends into a yarn needle and passing through multiple internal stitches on the back; avoid visible top-side tails. Clip close to fabric after weaving in 3-4cm of yarn.
Round 2 :
Stitch flower centers to secure: sew through bead and all flower layers and runner base, tie securely on the back and weave ends through to hide knots.
Info :
If you wish to make the runner washable, choose stitch join methods and buttons that can withstand machine wash (cotton) or handwash. Remove decorative beads/buttons before washing if unsure.
Round 3 :
Final press: if using cotton yarn, avoid direct hot iron; instead use steam from a distance or a damp cloth over the fabric while pressing gently to ensure petals retain curvature.
Info :
Enjoy your finished runner! Photograph it on a natural wood table to highlight the lush red and layered greens; the dimensional blooms look striking as a holiday centerpiece.
This festive runner brings classic holiday style to your table with thoughtful construction and layered floral detail. The repeatable diamond motifs make it soothing to work, while the poinsettia clusters add show-stopping dimension and charm. Whether you keep it for your own holiday centerpiece or give it as a handmade gift, every stitch is a little celebration. 🎄🧶