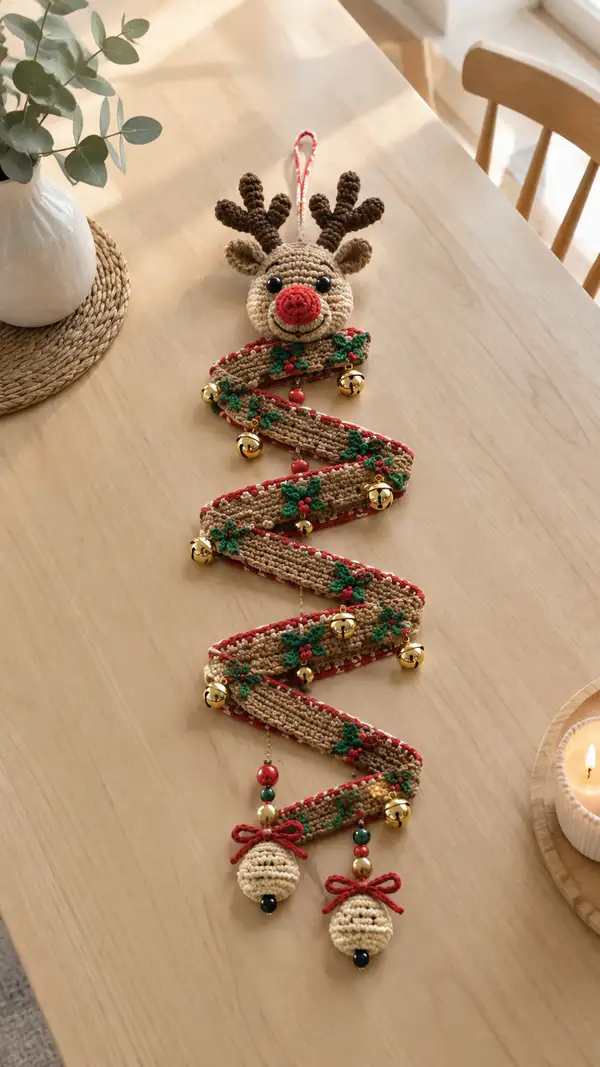
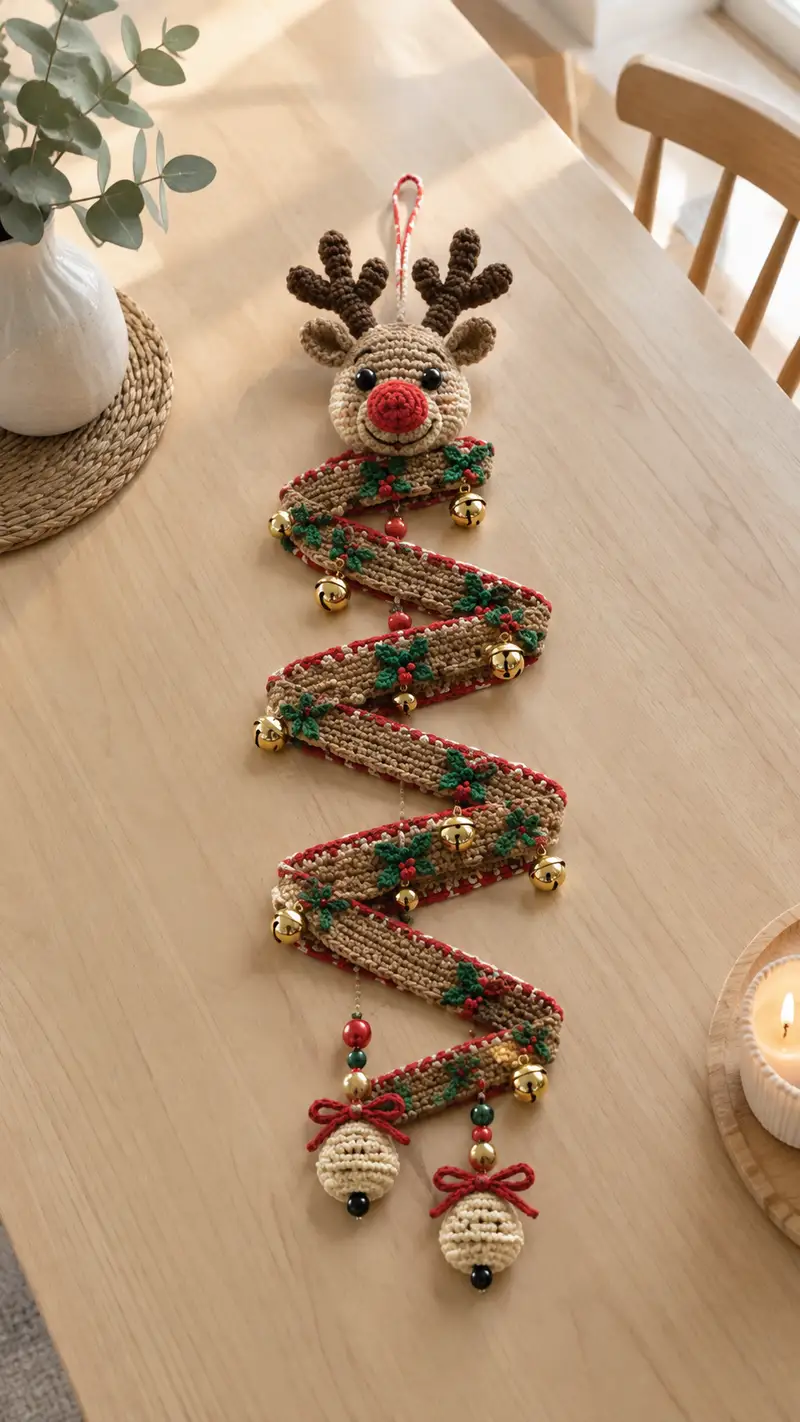
Create a charming reindeer spiral garland perfect for holiday decor. This pattern features a sweet amigurumi reindeer head with expressive safety eyes, a red round nose, dark brown antlers and ears, and a long spiral ribbon garland decorated with green holly leaves, red berries and jingle bells. The garland hangs in a soft zigzag spiral and ends with two bead-adorned bell tassels. Clear, step-by-step instructions include shaping, color changes, and assembly tips to achieve a professional finish.
Progress Tracker
0% Complete
— Head :
Round 1 :
6 sc in magic ring (6)
Round 3 :
(1 sc, inc) x 6 (18)
Round 4 :
(2 sc, inc) x 6 (24)
Round 5 :
(3 sc, inc) x 6 (30)
Round 6 :
(4 sc, inc) x 6 (36)
Round 7 :
(5 sc, inc) x 6 (42)
Round 8 :
(6 sc, inc) x 6 (48)
Round 9 :
1 sc in each st (48)
Round 10 :
1 sc in each st (48)
Info :
Place safety eyes between rounds 12 and 14 at approximately 8-10 stitches apart for the look shown. Use a tape measure across to ensure symmetry before inserting backs. Mark the first stitch of each round with a stitch marker to keep track.
Round 11 :
1 sc in each st (48)
Round 12 :
1 sc in each st (48)
Round 13 :
1 sc in each st (48)
Round 14 :
1 sc in each st (48)
Info :
Embroidery placement: mark the center lower rounds for snout attachment (snout center should sit between rounds 9-11). Add a faint stitch marker where the nose will be sewn on later.
Round 15 :
(6 sc, dec) x 6 (42)
Round 16 :
(5 sc, dec) x 6 (36)
Round 17 :
1 sc in each st (36)
Info :
Begin stuffing head gently until about 50-60% full so you can still shape the snout area. Use small pieces of fiberfill to avoid lumps and achieve an even, rounded shape.
Round 18 :
(4 sc, dec) x 6 (30)
Round 19 :
(3 sc, dec) x 6 (24)
Round 20 :
(2 sc, dec) x 6 (18)
Info :
Stuff the head firmly now, ensuring the cheeks are rounded and the face is full. The head should be firm but still soft to the touch. Add stuffing as you work the decreases for a well-shaped finish.
Round 21 :
(1 sc, dec) x 6 (12)
Info :
Fasten off leaving a long tail for sewing if you will attach the head to another structure; otherwise, close with a threaded needle and weave through remaining stitches to secure. Do not close completely if you will attach snout from the inside.
— Snout / Muzzle :
Round 1 :
6 sc in magic ring with cream (6)
Round 3 :
(1 sc, inc) x 6 (18)
Round 4 :
1 sc in each st (18)
Info :
Sew snout onto front of head centered between rounds 9-12 (head rounds). Use the long tail to whip stitch the snout to the head, stuffing snout very lightly so it protrudes slightly. Ensure the bottom of the snout aligns with the jawline of the head for a natural look.
Round 5 :
(2 sc, dec) x 6 (12)
Round 6 :
6 dec (6) - finish stuffing and close or leave opening to sew onto head depending on preferred method
— Nose (Make 1) :
Round 1 :
6 sc in magic ring with red (6)
Round 3 :
(1 sc, inc) x 6 (18)
Round 4 :
1 sc in each st (18)
Round 5 :
(2 sc, dec) x 6 (12)
Info :
Stuff nose firmly and leave a long tail. Sew the red nose to the center of the snout, anchoring firmly. Embroider a small smile below the nose with dark brown or black yarn using backstitch to create a gentle smile line as seen in the image.
— Eyes :
Info :
Use 10mm safety eyes inserted between rounds 12-14, spaced about 8-10 stitches apart. If you prefer embroidered eyes, embroider black circles with a small white highlight. Secure eyes before final stuffing.
— Ears (Make 2) :
Round 1 :
6 sc in magic ring with darker brown (6)
Round 3 :
(1 sc, inc) x 6 (18)
Round 4 :
1 sc in each st (18)
Round 5 :
(2 sc, dec) x 6 (12)
Round 6 :
1 sc in each st (12)
Round 7 :
(1 sc, dec) x 4 then sl st to close (8) - finish off leaving long tail for sewing
Info :
Sew ears to head at rounds 5-7 on each side, slightly angled forward. If you want the inner ear to be cream, stitch an inner oval (4-sc chain oval) inside the ear before sewing.
— Antlers (Make 2) :
Info :
Antlers are shaped with a central stalk and two branches each. Use darker brown. For extra stability, you can thread in a short length of floral wire into the antler shaft before stuffing; fold wire end and leave ends covered by yarn.
Round 1 :
6 sc in magic ring (6)
Round 3 :
(1 sc, inc) x 6 (18)
Round 4 :
1 sc in each st (18)
Round 5 :
(2 sc, inc) x 6 (24)
Round 6 :
1 sc in each st (24)
Info :
Create the stalk by working 6-8 even rounds then form branch points. You will crochet small branches off the central stalk by leaving a loop and working a short chain and small motif for each branch—see branch instructions below.
Round 7 :
1 sc in each st (24)
Round 8 :
1 sc in each st (24)
Round 9 :
BLO 1 sc in each st (24) - work in BLO to create a defined ridge along the stalk
Round 10 :
1 sc in 1st 6 sts, ch 6, turn and sc back along ch (this creates the first small branch), continue 1 sc across remaining sts (branch added; total sts remain 24 including branch base)
Round 11 :
1 sc across (24)
Round 12 :
At next branch point: 1 sc in next 6 sts, ch 7, turn and sc back along ch to make branch, 1 sc across remainder (24)
Round 13 :
1 sc across (24)
Round 14 :
Work small tip: sc2tog twice across the next 4 sts to narrow, 1 sc in remaining sts (22)
Round 15 :
(3 sc, dec) x 5 then 2 sc (17)
Round 16 :
(2 sc, dec) x 4 then 1 sc (13)
Round 17 :
(1 sc, dec) x 4 then 1 sc (9)
Round 18 :
4 dec then sl st to close (5) - stuff lightly and shape branches
Info :
Repeat the same sequence for the second antler. Pin antlers to top of head between rounds 2-4 of the head, spaced approximately 10-12 stitches apart. Sew securely with multiple passes, hiding any wire ends within the head.
— Garland Ribbon (Flat Strip) :
Info :
The spiral ribbon is crocheted flat in rows as a long strip and later arranged into the spiral shape. Work a foundation chain of 25 (or ch 25 to make 24 sts width). Use tan/light brown as main color and red for edge details. Work in continuous rows; for convenience we label each row as Round. Aim to make approximately 60 rows for the length shown, but you can adjust length to taste.
Round 1 :
ch 25, sc into 2nd ch from hook and across (24)
Round 2 :
ch 1, turn, sc in each st across (24)
Round 3 :
ch 1, turn, sc in each st across (24)
Round 4 :
ch 1, turn, sc in each st across (24)
Info :
Work tightly so the strip lies flat and holds its shape when pinned. If your edges curl slightly, add one extra sc at each row end alternately to even tension. Use stitch markers at the ends of rows to keep count when working many repeats.
Round 5 :
ch 1, turn, sc in each st across (24)
Round 6 :
ch 1, turn, sc in each st across (24)
Round 7 :
ch 1, turn, sc in each st across (24)
Round 8 :
ch 1, turn, sc in each st across (24)
Round 9 :
ch 1, turn, sc in each st BLO across to create a distinct inner ridge (24)
Round 10 :
ch 1, turn, change to red yarn at first st, sc along edge for a red border on one side only (work 1 sc in each stitch along the first 24 sts), finish off red and continue body color next row (24)
Round 11-30 :
Repeat Rows 2-9 pattern (ch1 turn sc24) maintaining occasional BLO rows every 8-10 rows to add texture. Continue until the strip measures approximately 70-80 cm (or desired length). For the pictured look plan for ~60 total rows including edging rows (24)
Info :
To keep the strip from becoming too soft, lightly starch or block it flat: pin down to a straight shape while damp and let dry, or iron on low with a cloth. This helps the spiral hold the zigzag form when assembled with bells.
Round 31 :
Work a red sc border on the opposite long edge: join red yarn along the last stitch and sc evenly to create matching edge (24)
Round 32 :
Fasten off and weave in ends. Repeat entire strip if you want a double-layered thicker ribbon and sew two strips together along edges for stiffness (optional).
— Attaching Ribbon Edging & Decorations :
Info :
After strip is made, add holly motifs and jingle bells along the length at regular intervals. Mark positions with pins before sewing. For the look photographed, place a motif approximately every 6-8 rows.
— Holly Leaves (Make 12) :
Round 1 :
ch 6 with green, sc into 2nd ch from hook 2 sc, hdc, dc, sl st to base to form a simple leaf (6 stitches)
Round 2 :
Turn and work along opposite side of chain: dc, hdc, sc, sl st to join creating a symmetrical leaf (approx 6-8 sts total)
Round 3 :
Fasten off leaving a tail to sew. Use small embroidery stitches to accentuate vein lines with a darker green if desired.
Info :
For a fuller holly motif, crochet three leaves together by placing two leaves under each holly cluster and sewing a small red berry cluster (3 tiny red knots) in the center. Pin before sewing to ensure alignment.
— Berry Clusters (Make 12) :
Round 1 :
Using red, make a small bobble: ch 2, 5 dc into 2nd ch from hook, sl st to join (5 dc bobble)
Round 2 :
Fasten off leaving tail for sewing. Attach three tiny bobbles together with the tails to form a cluster; secure to ribbon and stitch through center.
Info :
Sew holly leaves and berries through the strip at marked points with strong thread. Add a little dab of fabric glue under berries if you want additional security against handling.
— Small Jingle Bell Covers (Make 8) :
Round 1 :
6 sc in magic ring with cream (6)
Round 3 :
1 sc in each st (12)
Round 4 :
(2 sc, dec) x 3 (9)
Round 5 :
1 sc in each st (9)
Round 6 :
(1 sc, dec) x 3 (6)
Round 7 :
Sl st to close leaving a long tail to sew over each small jingle bell; insert bell and stitch cover closed around it - do not stuff
Info :
Sew jingle bell covers to strip at intervals; sew through the bottom of the strip and knot solidly. Reinforce with a few extra stitches so bells do not detach with use.
— Beaded Tassels with Large Bell (Make 2) :
Round 1 :
With cream, 6 sc in magic ring (6)
Round 3 :
(1 sc, inc) x 6 (18)
Round 4 :
1 sc in each st (18)
Round 5 :
(2 sc, dec) x 6 (12)
Round 6 :
6 dec (6) - finish off leaving long tail
Info :
Leave a tail or make a loop of cord at top of tassel to pass through beads. Slide beads onto cord in a pretty arrangement (red-green-gold), knot below beads, and sew a larger decorative bell onto the bottom. Add a small red bow as shown.
— Small Accent Beads and Cord :
Round 1 :
Cut two lengths of strong cord about 20 cm each. Thread bead sequence red, green, gold as desired and knot between beads to keep spacing.
Round 2 :
Sew cord securely to the bottom edge of the ribbon. Attach the crocheted bell cover at the end of the cord and finish with a bow. Repeat for second tassel.
Info :
If you prefer all-yarn tassels, chain a length and make a wrapped pom-pom instead of beads and bells. The photographed design uses beads and bells for a clean, jingling effect.
— Assembly Preparation :
Info :
Lay the strip flat and pin into the zigzag spiral shape on a blocking board or surface. Mark positions for each holly cluster and small jingle bell. Lay the reindeer head at the top with a short cord loop behind for hanging. Position tassels at the bottom corners and check overall balance before sewing permanently.
— Final Assembly :
Round 1 :
Sew reindeer head to the top edge of the ribbon: align the bottom of the head to the first 3 rows of the strip. Use the long tail from the head and mattress or whip stitch through the strip to attach evenly (approx 12-16 stitches all around the neck base).
Round 2 :
Sew antlers and ears in place using the tails left earlier: position antlers at the head top and stitch through head and a couple of stitches of the ribbon if needed for extra support (use extra reinforcement stitches through antler base).
Round 3 :
Sew holly leaves and berry clusters at marked points. Secure jingle bell covers by sewing through both bell loop and ribbon to anchor them. Add beads and tassels to bottom and secure with strong threads and knots.
Info :
Weave in all ends securely. Push any wire ends well into head and secure with extra stitches. If any bells have metal loops, pass a short piece of cord through and knot on the back of the ribbon to prevent pulling through.
— Finishing Touches :
Round 1 :
Add small embroidered blush with a few strands of pink yarn or a tiny dab of fabric-safe blush on both cheeks. Add highlights to eyes with a small dot of white paint (optional) or embroidered French knots.
Round 2 :
Gently steam block the entire piece if desired to help the spiral hold its shape. Hang and enjoy your festive reindeer spiral garland!
Info :
Check all attachments and bells before display. If the garland will be used outdoors or handled frequently, add a small dab of fabric glue under critical knots for extra durability.
This festive reindeer spiral garland brings a playful, handcrafted touch to holiday decorating. Every stitch and tiny holly motif adds personality and charm to your home this season. I hope you enjoy the assembly and the joyful sound of the jingle bells as you hang your creation. 🧶🎁 May it become a quick favorite decoration for many seasons to come. Happy crocheting and merry holidays! 🎄