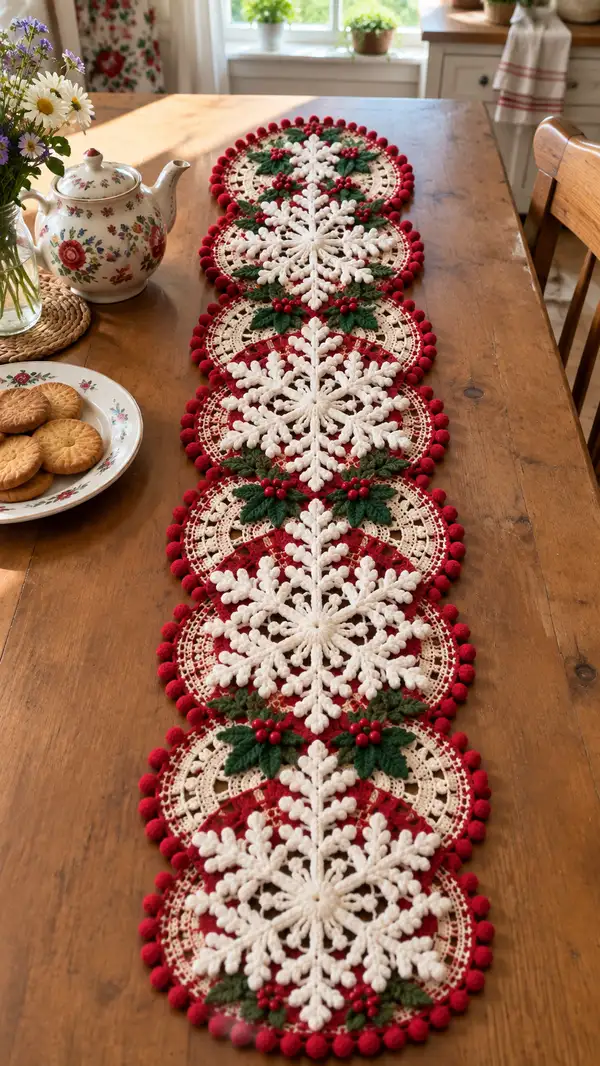
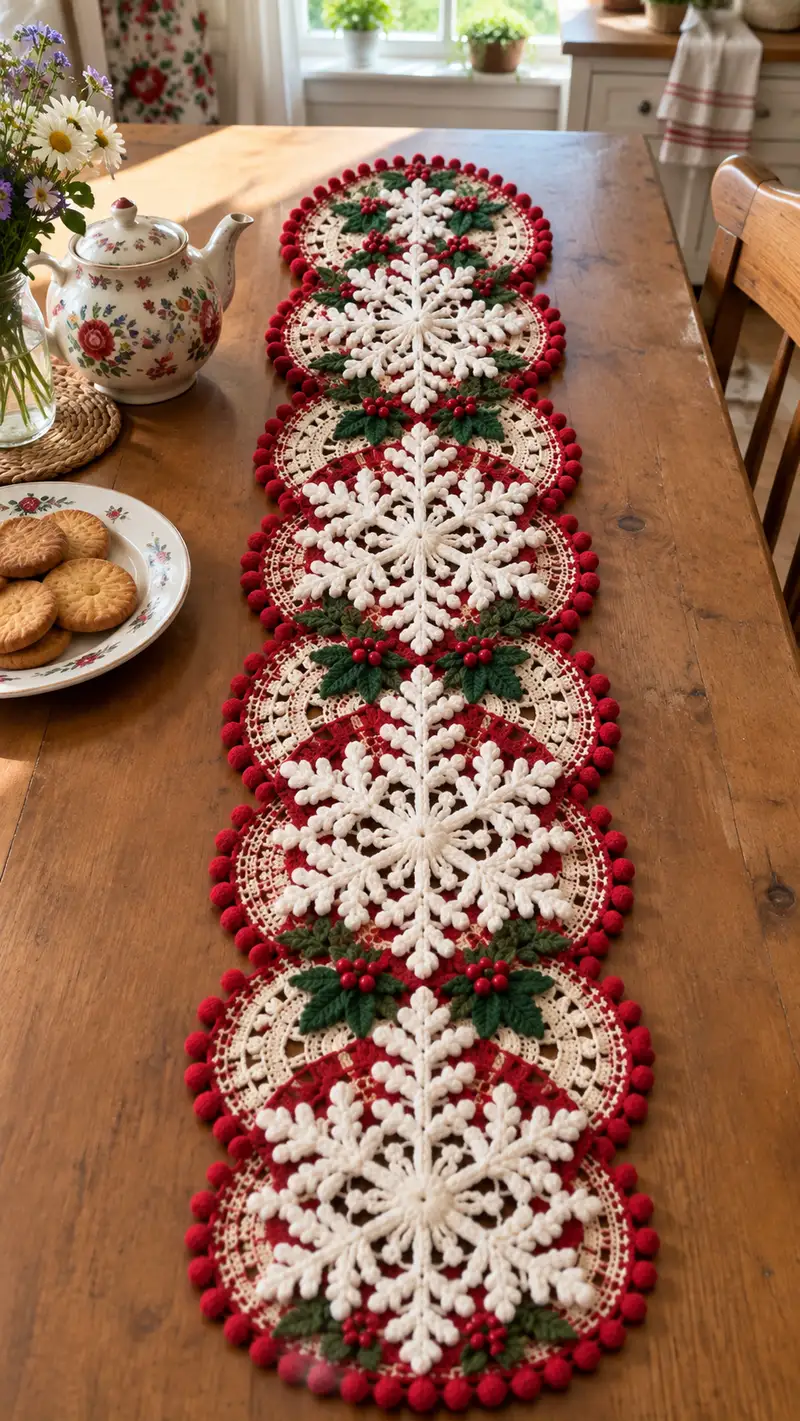
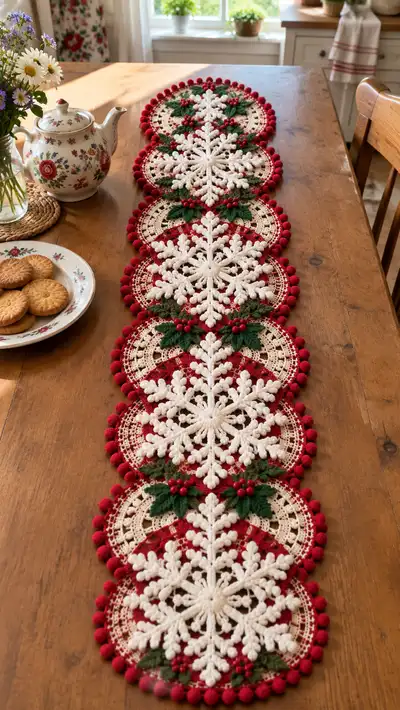
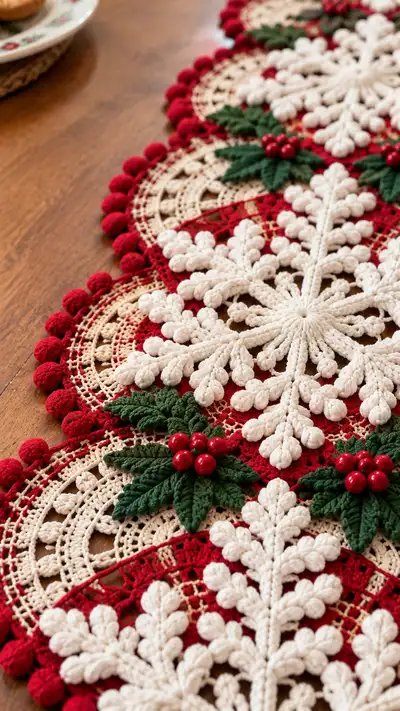
A beautiful, vintage-inspired table runner made of linked circular medallions crowned with raised white snowflakes, deep red scalloped overlays, and textured green leaves with red berry accents. This pattern uses layered motifs, puff/bobble stitches and delicate lacy rounds to create a rich holiday centerpiece. The runner pictured is composed of repeating medallions joined along a central spine with a playful pompom (bobble) border for a finished festive look.
Progress Tracker
0% Complete
— Overview & Gauge :
Info :
This runner is composed of repeating circular medallions linked along a central spine. One medallion (finished) measures approximately 18-20 cm (7-8") in diameter when blocked, depending on yarn and tension. Gauge for the central doily rounds: 10 sc x 10 rows = 4" in worsted cotton with 3.5mm hook; adjust hook to achieve a firm, defined fabric. The runner in the photos uses 6 medallions joined end-to-end.
Info :
Puff and bobble stitches should be worked slightly loose at first (to be able to yarn over and pull through) then tensioned to form the raised petals and pompons. Blocking is essential to open the lacy rounds and flatten the layered snowflake petals.
— Notation & Special Stitches :
Info :
Puff stitch used here: yo, insert hook, yo pull up loop (repeat 3 times to accumulate 7 loops on hook), yo pull through all loops, ch1 to close puff. Bobble (small pom style) used for edge: (yarn over, insert, pull up loop) five times into same st to get 11 loops, yo and pull through all, ch1 to close. Use a smaller hook for tighter bobbles if desired.
Info :
All rounds are worked continuously in the round unless otherwise noted. Use a stitch marker at the first stitch of the round; move the marker after each round. When crocheting chain loops on top of a base round, the base stitch count remains unchanged; I will record base counts in parentheses when relevant.
— Snowflake (White) - Raised Central Motif :
Round 1 :
mr, 6 sc in mr (6)
Round 3 :
(1 sc, inc) x6 (18)
Round 4 :
(2 sc, inc) x6 (24)
Round 5 :
(3 sc, inc) x6 (30)
Round 6 :
(4 sc, inc) x6 (36)
Round 7 :
(5 sc, inc) x6 (42)
Round 8 :
(6 sc, inc) x6 (48)
Info :
These initial rounds create a small, firm disc that will anchor the snowflake. Keep your stitches tight and even so the subsequent puff arms will sit neatly. Leave a 20 cm tail after finishing the snowflake for sewing later.
Round 9 :
1 sc in each st around (48)
Round 10 :
1 sc in each st around (48)
Round 11 :
*Sc in next 3 sts, ch6, skip next 1 st* repeat around 12 times. Work 1 sc in remaining base sts (48 plus 12 ch-loops anchored)
Info :
Round 11 forms twelve ch-6 loops around the disc to later build each snowflake arm. Count your loops as you go to ensure you have 12 evenly spaced arms.
Round 12 :
Working into each ch-6 loop: (sc, puff, sc) into each ch-6 loop; move to next base stitch and sc in next 3 base sts as established. Continue around forming a soft ridge (48 base)
Round 13 :
Into each loop: ch2, (puff) x3 separated by ch2, sl st to base between loops to anchor. Maintain base 48
Info :
Puff clusters here are worked as 3-yo puff stitches (yo, insert hook, pull up loop) repeated 3 times (7 loops on hook) then yo and pull through all and ch1 to close puff. Space for airy, raised petals.
Round 14 :
Work 1 sc into each base st where there is not a puff cluster (48)
Round 15 :
Along each arm: sl st to the center of the ch-loop, ch8, (puff, ch2, puff) anchored back into loop center with sl st (12 arms total) - base remains 48
Round 16 :
Working outward on each arm: sc into the chain-8, then (puff, ch1) x5 across to create 6 puff nodes along each arm. Sl st to base to finish arm. Repeat on all 12 arms.
Info :
Ensure each arm has identical puff counts; this creates the familiar feathered snowflake branches. Use a stitch marker or a scrap thread aligned through the base disc to count arms as you create them.
Round 17 :
Return to the disc: 1 sc in each base st around to tidy (48)
Round 18 :
Between arms: ch4, sl st to the midpoint between arms to create small connecting arches. Continue around (48 base)
Round 19 :
Working along each arm tip: create a small star tip by (sc, puff, sc) into the outermost puff of each arm; secure to the ch4 arch with sl st when necessary. Base 48
Round 20 :
Edging around snowflake center: 1 sc in each base st (48)
Round 21 :
*Ch3, skip 1, sc in next* repeat around to create airy picot-like edges anchored around base (48)
Info :
This completes the raised snowflake units. If you prefer a slightly smaller or larger snowflake, adjust puff counts per arm and the length of ch loops. Block each snowflake flat on blocking board to open the arms evenly before attaching to the doily base.
Round 22 :
Finishing round for snowflake: sc evenly around to tidy edges and secure any loose puff stitches. Fasten off and weave ends, leaving long tail for sewing (48)
— Doily Base (Antique Beige) :
Round 1 :
mr, 6 sc in mr (6)
Round 3 :
(1 sc, inc) x6 (18)
Round 4 :
(2 sc, inc) x6 (24)
Round 5 :
(3 sc, inc) x6 (30)
Round 6 :
(4 sc, inc) x6 (36)
Round 7 :
(5 sc, inc) x6 (42)
Round 8 :
(6 sc, inc) x6 (48)
Round 9 :
1 sc in each st around (48)
Round 10 :
*Sc in next 2, ch5, skip next 1* repeat around (48 base, 12 ch-loops)
Info :
Round 10 creates larger chain-loop spaces that will form the airy lacy body of the doily. Keep loops even by counting chains and spacing them equally around the circle.
Round 11 :
Into each ch-5 loop: (sc, ch3, sc) creating 12 open petals. Sc in base stitches between loops (48)
Round 12 :
1 sc in each st around (48)
Round 13 :
*(sc, ch4, sc) in next ch-space, 3 sc in next 3 base sts* repeat around, opening lace (48 base)
Round 14 :
In each larger arch: work (2 dc, ch2, 2 dc) to create lacy fan arches; sc across base sts between fans (48 base)
Info :
At this point the doily will look lacy and open. Blocking will help to smooth the arches and set the shape. Work the next few rounds slightly loosely to allow lace openness.
Round 15 :
1 sc in each st around (48)
Round 16 :
*(ch6, sl st to create mesh), 4 sc across next base sts* rep around (48 base, 12 mesh loops)
Round 17 :
Work into mesh loops with sc and hdc to close and define the lacy grid: in each mesh: sc, hdc, sc; sc across base sts (48)
Round 18 :
1 sc in each st around (48)
Round 19 :
Work a decorative filet band: *ch5, skip 4 (creating windows), sc in next 4* around to create small square windows (48 base)
Round 20 :
Close windows with sc and a small picot in alternate windows: *sc5, picot (ch3 sl st to base)* rep around, base 48
Info :
The doily base must have even stitches and a flat surface to accept the overlaid red crescent later. If your doily begins to cup, block it while wet and pin out to flatten.
Round 21 :
1 sc in each st around (48)
Round 22 :
Work a wider lace ring: *(2 dc, ch2, 2 dc) in next arch, sc in next 3 base sts* repeat around (48 base)
Round 23 :
1 sc in each base st to tidy (48)
Round 24 :
Edge preparatory round: *sc in next 2, (ch3, sl st into ch to form small loop), sc in next 2* repeat (48 base)
Round 25 :
Final doily round before overlay: 1 sc in each stitch (48)
Round 26 :
Fasten off leaving long tail for sewing snowflake to center. Weave in ends. Block flat and pin to shape. (48)
— Red Crescent Overlay (makes the red half-moon/arc across one side of each medallion) :
Info :
The red overlay is worked separately and sewn onto one side of the doily to create the half-arch seen beneath each snowflake. Work with deep red worsted yarn. You will produce a crescent that fits over approximately half the outermost doily circumference (covering 24 of the 48 base stitches).
Round 1 :
Join red yarn to the outermost round at one start point of the doily (pick a visual midpoint of the half you will cover). Ch1, sc in same st, sc in next 11 sts (12 sc over first half) — only work over 24 base sts total across two sides if needed (12 per side) (12)
Round 2 :
Inc at first and last stitch of the arc to shape: (inc, sc across next 10, inc) (14)
Round 3 :
(1 sc, inc) at beginning and end to feather the crescent: sc across 12, (inc) at ends—work to maintain a gentle outward curve (16)
Round 4 :
Work 1 sc in each st across, then turn to row back along the arc with sc in BLO to create a ridge: 1 sc in each st BLO (16)
Info :
Work the next rounds in BLO to create a raised ridge that will anchor the snowflake stem and give dimensional separation between doily and overlay.
Round 5 :
1 sc in each st BLO across (16)
Round 6 :
*(sc, ch3, sc) in next st along arc to create tiny arches, sc across next st* repeat across arc (16 base)
Round 7 :
Form decorative lacy holes along arc: into each ch3 loop work (sc, picot, sc) then sc across base (16)
Round 8 :
Finish arc by working a tidy sc edging: 1 sc in each st around arc area and sl st at ends to secure to doily bases, leaving base sts unchanged (16)
Round 9 :
Sew arc down: using the long tail, mattress stitch or whipstitch the inner edge of the overlay to the doily outer round evenly, matching base stitches. Fasten off and weave ends.
— Leaf Motifs (Forest Green) - Make 2 per join :
Round 1 :
ch6, sc into 2nd ch from hook, hdc in next, dc in next, tr in next, dc in same st, hdc, sc to shape a leaf foundation (this is worked as a flat leaf on a small chain foundation)
Round 2 :
Turn, work along opposite side of chain: sc, hdc, dc, tr, dc, hdc, sc; sl st to base to finish leaf (no global count)
Round 3 :
For depth: work 1 sc around the entire leaf edge in BLO (making visible vein) to define shape
Round 4 :
Using smaller hook if needed, embroider a central vein by working a row of sc or slip stitches down the center of leaf, pulling gently to shape
Info :
Make two leaves per medallion join — one on each side of the snowflake central spine — and vary the size slightly for a natural look. Pin leaves in place before sewing.
Round 5 :
Optional: for a fuller look add a second smaller leaf made with ch5 foundation and 1 sc, 1 hdc, 1 dc, 1 hdc, sc on opposite side and sew stacked under the larger leaf
— Berry Clusters (Make 2 clusters per medallion) :
Round 1 :
Using red worsted or small glossy bead: make 3 small crocheted balls for berries. Mr, ch1, 6 sc in mr (6)
Round 5 :
Fasten off leaving tail; stuff lightly before closing and sew quickly to form a tight bead shape (6)
Info :
If you prefer to use beads instead of crocheted berries, choose glossy beads of 8-12mm. Sew them into a triangle cluster and secure with strong thread, then hide ends under leaves.
Round 6 :
Make three berries per cluster; sew them together at their bases into a neat triangular cluster using a yarn needle and the long tails. Fasten off and hide ends.
— Central Connecting Spine & Joining Medallions :
Info :
Each medallion will be joined to its neighbor along a central spine formed by a narrow strip worked in white that zig-zags or overlaps the medallions' centers. Alternatively you can join medallions with whipstitch using long tails. The instructions below create a narrow crocheted spine that is both decorative and functional.
Round 1 :
With white yarn and join point at the center top of medallion, ch30 (or length that matches center-to-center distance between medallions). Turn and work sc back across chain into FLO to make a narrow ribbed strip. (30)
Round 2 :
1 sc in each st across (30)
Round 3 :
Work a decorative row: *ch3, skip 1, sc in next* across to create small points along the strip (30 base)
Round 4 :
Join each end of the strip to the centers of two adjacent medallions with mattress stitch, aligning the strip center and sewing evenly through snowflake center points. Repeat for entire runner creating a spine down the middle.
Info :
When joining medallions, pin and check placement before sewing. The spine can be made longer or shorter depending on how snugly you want the medallions joined; you may also make separate short connecting strips between each neighboring pair rather than one continuous long strip.
— Bobble Edge (Red) - Pompom-like Decorative Edge :
Info :
This bobble/pom border is worked around each medallion outer round and provides the charming red pompom look. Each bobble is worked into the outermost round of the beige doily, spaced evenly so that when medallions are joined the bobbles nestle side-by-side along the runner edges.
Round 1 :
Join red yarn to outermost doily edge. Ch1, 1 sc in same st, sc across 48 base sts to prepare (48)
Round 2 :
*Sc in next 2 sts, bobble in next st, sc in next 2 sts* repeat around (48 base, 12 bobbles)
Round 3 :
Work another sc round to secure bobbles: 1 sc in each st around, making sure bobbles stand up (48)
Round 4 :
If you want puffier bobbles: work a second bobble on top of each by creating (bobble, sl st to base) in same stitch to build a taller pompom effect. Sc around to secure (48)
Info :
Space bobbles evenly around each medallion; depending on your tension you may have 10-16 bobbles per medallion. The sample runner shows about 12-14 bobbles, which nestle when medallions are aligned.
Round 5 :
Fasten off and weave in ends. If you prefer big pompoms, you can make small yarn pom poms and sew them evenly instead of crocheting bobbles.
— Final Assembly & Finishing Rounds :
Info :
Block all components flat first: doily base, snowflake motif, red overlay, and leaves. Pin the snowflake centered on the doily, align the red crescent under one side, then position the leaves and berry clusters between medallions as shown in the photo. Use blocking pins to hold positions while sewing.
Round 1 :
Sew the snowflake to the center of the doily using the long tail from the snowflake. Use mattress stitch-like small whipstitches around the disc, catching the doily round and the snowflake base every 3-4 stitches to center securely.
Round 2 :
Sew the red crescent overlay next: attach inner edge with small invisible stitches along the doily's outer round. Ensure alignment so the crescent hugs the outer lacy arches evenly.
Round 3 :
Pin the leaf clusters to the sides where two medallions will join (one cluster per join on each side). Sew leaves down securely with small stitches and then sew berry cluster of three berries on top at the leaf base.
Round 4 :
Attach bobble-edged medallions edge-to-edge along the runner: either sew bobble-to-bobble for a snug seam or sew the central spine strip to medallion centers as described earlier. Use long tails to sew and knot securely, then weave in ends finished behind medallions.
Info :
After joining all medallions, press lightly with steam and re-pin to blocking board if needed to even out any mismatched edges. Trim stray fibers and secure any loose bobbles by adding a few stitches from behind.
Round 5 :
Final inspection: clip all remaining ends, ensure bead berries are secure (consider a small dot of fabric glue hidden under the bead for extra safety). The runner is now ready to display.
Info :
If you plan to wash the runner, hand wash gently in cool water and lay flat to dry; re-block if necessary to restore crispness.
Completing this festive table runner is such a rewarding journey — each medallion is like a little handcrafted treasure that comes together into a stunning holiday statement. The raised snowflakes, lush green leaves and cheerful red bobbles create a warm, nostalgic centerpiece that will brighten any table. I hope you enjoy the slow, satisfying work of crocheting each motif and the delight of arranging them as they become a cohesive runner. 🧶❤️✨