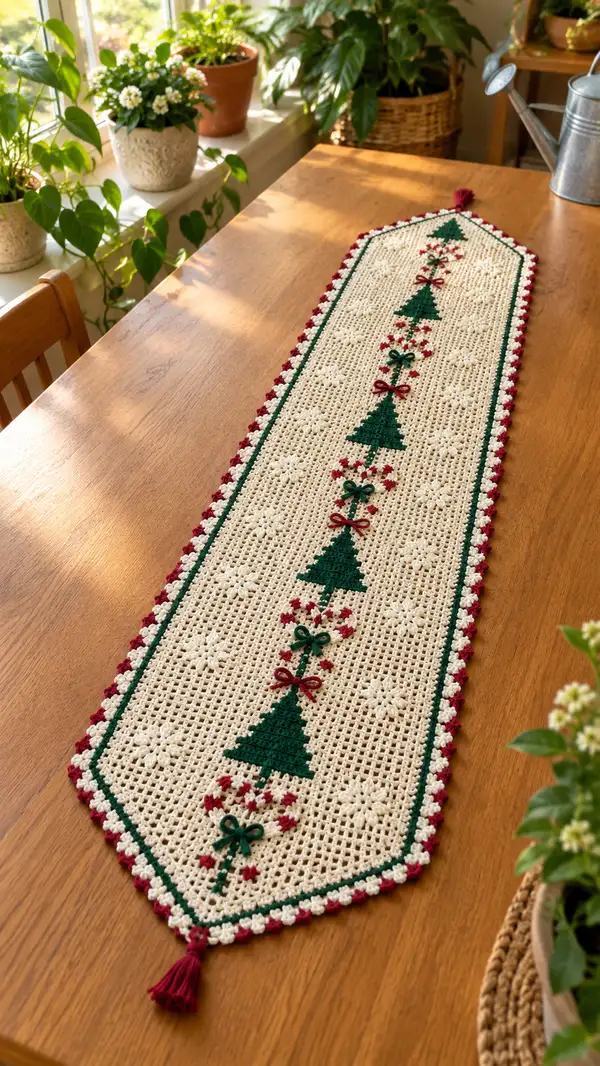
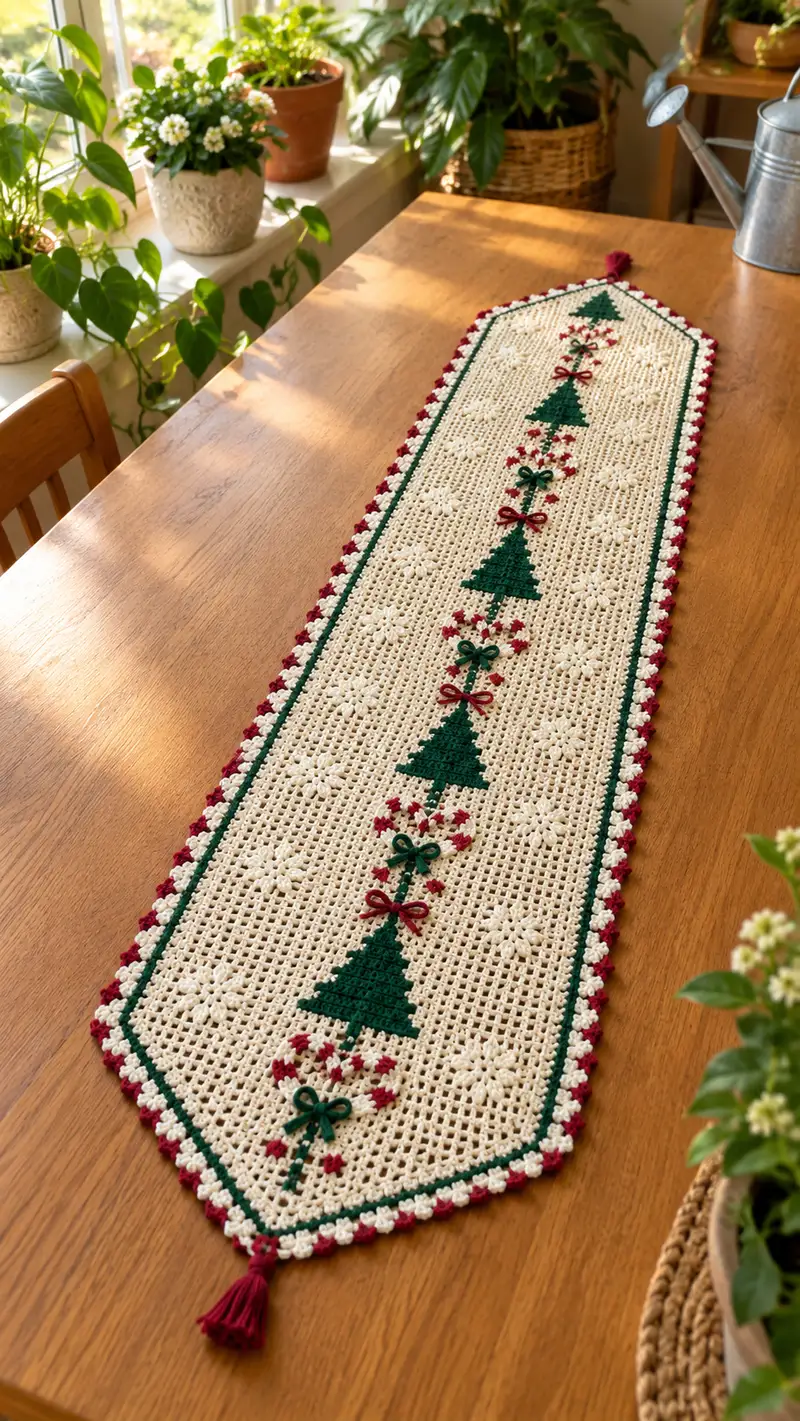
Create a long, elegant holiday table runner worked in an open filet mesh with a central column of evergreen tree motifs, tiny candy-cane style bows, and delicate snowflake clusters. This runner features a rich cream ground, deep forest green trees, and garnet-red accents with a layered scallop border and tassel ends for a finished, vintage-inspired look. Clear step-by-step instructions guide you from foundation chain to finishing tassels.
Progress Tracker
0% Complete
— Notes & Gauge :
Info :
Gauge isn't critical for a decorative runner but for a crisp, lacy filet mesh use a 4.0 mm hook with worsted cotton. With the specified materials, the finished runner will be approximately 10.5" (27 cm) wide and, as written, about 50" (127 cm) long (not including tassels). Adjust the foundation multiple to lengthen or shorten; pattern uses filet grid multiple 3 + 2 chains.
Info :
This pattern uses a foundation chain of 182 chains (3 x 60 + 2) creating 60 mesh blocks across. Each standard filet row will have 61 base dc positions; filled blocks convert one open mesh into 3 dc and therefore add +2 dc per filled block to the row's DC count. Where counts are shown they are exact for the written block placement.
— Foundation & First Rows (set up the mesh) :
Round 1 :
Ch 182 (foundation chain; 3 x 60 + 2). This measures roughly the finished width before blocking.
Round 2 :
Row 1 (RS): Dc in 4th ch from hook (counts as first dc), *ch2, sk 2 ch, dc in next ch* across to last ch, end with dc in last ch. Total dc = 61 (this establishes the open mesh).
Info :
Place a stitch marker in the first dc of this row to mark the RS row start. Work the runner flat in rows; you will turn at the end of each row unless otherwise noted. Keep tension consistent for even mesh holes.
Round 3 :
Row 2 (WS): Ch 3 (counts as dc), turn, dc into first dc below, *ch2, sk next dc, dc into next dc* across until final dc; end with dc in the turning ch base. Total dc = 61.
Round 4-6 :
Row 3-5: Repeat Row 2 (61 dc each). These three even mesh rows create a balanced top field before the first tree motif.
Info :
Keep a tally of rows using a row counter or notebook. The pattern below numbers rows sequentially (Rows 1—120) for clarity and placement of motifs.
— Tree Motif Column — First Tree (rows 7-15) :
Round 7 :
Row 6: Begin first (lower) tree base. Work a standard filet row but replace 17 central open meshes with 17 filled blocks to create the wide base of the tree. Filled block = 3 dc worked into the ch-2 space of that mesh. The 17 filled blocks are centered so there are 21 open meshes (left) + 17 filled + 22 open meshes (right) across the width. Total dc = 61 + (2 x 17) = 95.
Info :
To center the tree, count 21 open mesh repeats from the left edge, then begin the 17 filled blocks sequence; end with the remaining open meshes to the right edge. Mark the center of your foundation to help line up subsequent trees identically.
Round 8 :
Row 7: Filet row with 15 central filled blocks (centered). Filled blocks = 15; open meshes distributed 23 left + 15 filled + 22 right. Total dc = 61 + (2 x 15) = 91.
Round 9 :
Row 8: Filet row with 13 central filled blocks (centered). Total dc = 61 + (2 x 13) = 87.
Round 10 :
Row 9: Filet row with 11 central filled blocks. Total dc = 61 + (2 x 11) = 83.
Round 11 :
Row 10: Filet row with 9 central filled blocks. Total dc = 61 + (2 x 9) = 79.
Round 12 :
Row 11: Filet row with 7 central filled blocks. Total dc = 61 + (2 x 7) = 75.
Round 13 :
Row 12: Filet row with 5 central filled blocks. Total dc = 61 + (2 x 5) = 71.
Round 14 :
Row 13: Filet row with 3 central filled blocks. Total dc = 61 + (2 x 3) = 67.
Round 15 :
Row 14: Filet row with 1 filled block (top of this triangular tree). Total dc = 61 + (2 x 1) = 63.
Info :
All filled blocks for the tree use forest green yarn. When changing to green, join just before you reach the first green filled block; carry the cream yarn loosely or tie on at the WS and weave in ends as you progress. Use neat color joins to keep the WS tidy.
— Mesh Spacer after Tree 1 (rows 16-23) :
Round 16-23 :
Rows 15-22: Work 8 even mesh rows in cream (no filled blocks). Each row = 61 dc. This spacing visually separates the tree motifs and provides room for small snowflake clusters in later repeats.
Info :
These spacer rows may be adjusted in number to increase or decrease distance between trees. Keep them even to maintain recurring motif balance.
— Second Tree Column (rows 24-32) :
Round 24 :
Row 23: Filet row with 17 central filled blocks (forest green) — repeat the same shape as Row 7. Total dc = 95.
Round 25 :
Row 24: 15 filled blocks (91 dc).
Round 26 :
Row 25: 13 filled blocks (87 dc).
Round 27 :
Row 26: 11 filled blocks (83 dc).
Round 28 :
Row 27: 9 filled blocks (79 dc).
Round 29 :
Row 28: 7 filled blocks (75 dc).
Round 30 :
Row 29: 5 filled blocks (71 dc).
Round 31 :
Row 30: 3 filled blocks (67 dc).
Round 32 :
Row 31: 1 filled block (63 dc).
Info :
Repeat the centering method used for Tree 1 so Tree 2 sits exactly on the same centerline; mark both the left and right edges of the filled area with removable stitch markers on the WS if helpful.
— Mesh Spacer after Tree 2 (rows 33-40) :
Round 33-40 :
Rows 32-39: Work 8 even mesh cream rows (61 dc each). These spacers create breathing room for the third tree column.
Info :
When changing back to cream from green, fasten off green or carry it neatly on the WS. We recommend weaving in color ends for a tidy finish instead of carrying over long distances.
— Third Tree Column (rows 41-49) :
Round 41 :
Row 40: Filet row with 17 central filled blocks — 95 dc.
Round 42 :
Row 41: 15 filled blocks — 91 dc.
Round 43 :
Row 42: 13 filled blocks — 87 dc.
Round 44 :
Row 43: 11 filled blocks — 83 dc.
Round 45 :
Row 44: 9 filled blocks — 79 dc.
Round 46 :
Row 45: 7 filled blocks — 75 dc.
Round 47 :
Row 46: 5 filled blocks — 71 dc.
Round 48 :
Row 47: 3 filled blocks — 67 dc.
Round 49 :
Row 48: 1 filled block — 63 dc.
Info :
For each filled block: work 3 dc into the ch-2 space of the mesh directly beneath on the previous row. Keep clusters neat and even by inserting the hook centrally into the ch-2 space for evenly distributed stitches.
— Mesh Spacer after Tree 3 (rows 50-57) :
Round 50-57 :
Rows 49-56: Work 8 even mesh rows in cream (61 dc each). Keep edges straight by counting at the ends and making sure the last dc always falls into the turning chain base.
— Fourth Tree Column (rows 58-66) :
Round 58 :
Row 57: Filet row with 17 central filled blocks — 95 dc.
Round 59 :
Row 58: 15 filled blocks — 91 dc.
Round 60 :
Row 59: 13 filled blocks — 87 dc.
Round 61 :
Row 60: 11 filled blocks — 83 dc.
Round 62 :
Row 61: 9 filled blocks — 79 dc.
Round 63 :
Row 62: 7 filled blocks — 75 dc.
Round 64 :
Row 63: 5 filled blocks — 71 dc.
Round 65 :
Row 64: 3 filled blocks — 67 dc.
Round 66 :
Row 65: 1 filled block — 63 dc.
Info :
After completing the fourth tree, you have established the complete central column of trees repeated down the runner. Verify symmetry by folding along the lengthwise centerline carefully; trees should align visually.
— Central Snowflake/Bow Band (rows 67-84) :
Round 67 :
Row 66: Small decorative row. Use the following repeat across the width: *8 open meshes, 1 filled star cluster (treat as 1 filled block comprised of 5 tightly placed dc across a small 3-block area), 8 open meshes, 1 tiny bow anchor (green or red single filled mesh), repeat*. For math: each star cluster counts as 3 filled-block equivalents (we'll define them as 5 dc in the 3-space area), but to keep counts exact we use a simplified notation: this row contains 5 special filled clusters spaced across and results in DC count = 61 + (2 x 5) = 71.
Round 68 :
Row 67: Standard mesh row in cream (61 dc).
Round 69 :
Row 68: Repeat Row 67 pattern of 5 small filled clusters (71 dc).
Round 70 :
Row 69: Mesh row in cream (61 dc).
Round 71 :
Row 70: Repeat Row 67 pattern (71 dc).
Round 72 :
Row 71: Mesh row in cream (61 dc).
Round 73 :
Row 72: Repeat Row 67 pattern (71 dc).
Round 74 :
Row 73: Mesh row in cream (61 dc).
Round 75 :
Row 74: Final decorative cluster row in this band (71 dc).
Round 76-84 :
Rows 75-83: Work nine mesh rows in cream (61 dc each) to transition toward the top pointed end and prepare for the inner green stripe. These rows create spacing that harmonizes motif rhythm.
Info :
Bow anchors: use a single closed loop or tiny 3-dc cluster in garnet or green to indicate bow base; the small bows themselves will be made separately and sewn on later for a three-dimensional effect.
— Inner Green Stripe (rows 85-94) :
Round 85 :
Row 84: Change to forest green yarn. Ch 3, turn and work 1 dc in each dc across but work in BLO (back loops only) for 2 rows to create a ridge. Total dc = 61.
Round 86 :
Row 85: 1 dc in each st BLO (green) — 61 dc.
Round 87-94 :
Rows 86-93: Continue in cream or maintain the green stripe as two centered rows — for this pattern, work 8 rows keeping the center green stripe as solid contrast using dc in each st (61 dc each row). After last green row change back to cream on the final yarn over.
Info :
Working in BLO for the first two green rows creates a subtle ridge that frames the center column visually. Carry color neatly at the WS and fasten off if you prefer no stranded yarn on the back.
— Final Upper Body of Runner (rows 95-100) :
Round 95-100 :
Rows 94-99: Work 6 even mesh rows in cream (61 dc each) to repeat the lower balance and prepare for the top pointed end. Keep counts uniform and check width periodically against the bottom of the runner to ensure parallel edges.
Info :
At this stage block lightly to check skew. If one side looks off, gently steam or wet-block to square up before beginning the edging; this ensures scallops align correctly.
— Top Point Formation (rows 101-106) :
Round 101 :
Row 100: Begin shaping the pointed octagonal end (mirrors the lower pointed end). Decentralize the mesh by converting outermost 3 mesh repeats on each long edge into gradual decreases, working short rows across the width's center. For clarity: work Row 100 fully across (61 dc) but mark three leftmost and three rightmost mesh sections for the start of shaping on subsequent rows.
Round 102 :
Row 101: Ch 3, turn, dc across until 3 mesh repeats before the edge, then ch2, sk next 2 dc and fasten off or finish the row; turn and work back to create a slightly pointed corner. Repeat short-row shaping on both edges for 6 rows to form the top tapered point. These short-rows are mirror images of the bottom point and should remove approximately 6 open meshes from the outer edge in total (this leaves the center rectangle consistent).
Info :
Short-row shaping in filet is accomplished by ending the row before the edge, turning, and working back; be sure to keep counts symmetrical left and right to produce even angled points. Use pins to hold the angle as you build it.
Round 103-106 :
Rows 102-105: Continue short-row shaping symmetrically until the pointed top matches the bottom point in angle and width. After completing shaping, finish with a full mesh row across the full width (61 dc) to square up before edging.
— Final Edge Prep & Corner Cleanup (rows 107-110) :
Round 107 :
Row 106: With cream yarn, work 1 sc evenly around the entire perimeter of the runner to create a solid anchor for the scalloped edge. To do this, work sc across the top row (one sc in each dc or ch-2 space from the outermost rows), sc evenly down the short angled sides by working 1 sc per mesh/row, and sc along the bottom edge across. Use 3 sc in each corner point to keep them from curling. Count total sc along the length to estimate scallop placements; aim for an even multiple of shell repeats.
Info :
Working a single crochet round around the whole piece gives an even base for the Shell/Cluster edging. Use 3 sc in each pointed corner to round it slightly and prevent curling.
Round 108 :
Round 107: Turn the piece and work a second sc round in cream, placing stitch markers every 8 sc to space out shell clusters evenly in the next round. Keep tension consistent and work tightly on the sc rounds to avoid gaps on the edge.
Info :
Take a moment to count sc around and divide by the number of shell repeats you want—this pattern uses 40 shell placement points per long side as a guide; you may adjust the frequency for deeper or shallower scallops.
— Scalloped Shell Border & Two-Color Picot (rounds 109-114) :
Round 109 :
Round 108 (Red Accent): Join garnet red in one outer sc on the RS. *Ch 1, sc in next sc, ch 2, 5-dc shell into next sc (work 5 dc into same st), ch 2, sc in next sc, skip next sc,* repeat around. For corners: work 5-dc shell cluster centered over corner with ch2 on either side. This creates a bold red scallop ring. Note: stitch count around will vary based on how many shells you place; shells are spaced by 2 sc equivalents.
Round 110 :
Round 109 (Cream Overlay): Switch to cream. Working into the backs of the red shells where possible: *sl st into the top of the 5-dc shell, ch 3, (3 sc in next chain space for a small pebble cluster), sl st back into shell top to anchor,* repeat around to create alternating cream picot-like clusters centered between red shells. Finish with sl st and fasten off color neatly. This adds the two-color bobble effect seen along the border.
Info :
To keep shells even, be consistent with the number of stitches you skip between shells on the sc foundation round. If your shells bulge or flatten, adjust tension in the next shell pass by working one fewer or extra base sc between repeats.
Round 111 :
Round 110 (Green Inner Line): Join forest green and work 1 dc in each sc around inside the scallops to create the inner framed line that runs just inside the scalloped edge. Work evenly and in the tops of sc wherever possible for a neat contrast ridge. Fasten off and weave ends into the WS of the runner.
Round 112-114 :
Round 111-113: Optional reinforcement: Work one more sc round in cream along the inside of the green ridge to tidy the transition to the mesh face. Then, work a final decorative picot round in red (ch3, sl st in base) placed between shells for extra texture. Fasten off securely and weave in all ends.
Info :
If you prefer a subtler border, omit the red shell layer and instead work two cream rounds and one green ridge round to echo the runner's interior stripe.
— Tassels & Bow Embellishments (rows 115-120) :
Round 115 :
Tassel construction (make 2): Wind the chosen yarn (garnet or cream-wrapped green core) around a 3.5" card or small book approximately 20-24 times for a dense tassel. Tie a short length tightly around the top and remove from the card. Cut the bottom loops and wrap the top with a short piece of yarn to create a small neck. Trim to desired length (~2.5" folded = 5" full drop). Attach tassels securely to the two pointed ends through the base of the point using yarn and a darning needle. Reinforce by threading through several stitches at the extreme tip and tying off on the WS.
Round 116 :
Bows (make as many small bows as desired): Using a small length of green or red yarn (about 8-12"), form a simple bow by wrapping yarn into a figure-8 and tying center tightly with a small contrasting length. Secure the center with a few stitches through the mesh and fasten on the WS. Place bows at centerline between trees where indicated by small filled meshes in the central band. Sew in place neatly and hide ends under the bow knot.
Round 117 :
Alternate embroidered berries: Using garnet red and a yarn needle, sew tiny French-knot-style clusters by threading yarn through the mesh and forming small tied knots across select ch-2 spaces to mimic the small red accent dots shown between bows and near snowflakes.
Round 118 :
Final finishing: Weave in all ends at the WS, trimming neatly. Gently wet-block or steam-block the runner to square sides and open mesh. Pin edges to measurement (10.5" width target) and allow to dry thoroughly.
Round 119 :
Quality check: Inspect both sides for loose ends, uneven shells, or crowded tassel attachments. Use a small crochet hook to adjust any misplaced loops in the scallop border. If needed, add a finishing pass of cream single crochet along the inside border for a crisper line.
Round 120 :
Store and presentation: Press lightly and add a light starch if desired for an extra crisp appearance when placed on a holiday table. Your runner is ready to be displayed with centerpieces or holiday decor.
Info :
Pattern modularity: To lengthen the runner, add additional spacer mesh sections (eight rows at a time) between trees or repeat the central snowflake/bow band. Each added repeat of 8 spacer rows changes length by roughly 2.5 - 3 inches depending on blocking tension.
This festive table runner combines lacy filet mesh with bold evergreen silhouettes and tiny seasonal bows to create a handmade focal point for your holiday table. The layered colorwork and scalloped border give each runner an heirloom, vintage-inspired feel. Add tassels and embroidered bows to personalize the piece and make it uniquely yours. 🧶🎄 I hope this pattern sparks delightful, cozy holiday decorating — happy stitching and enjoy the glow of handmade charm! ✨