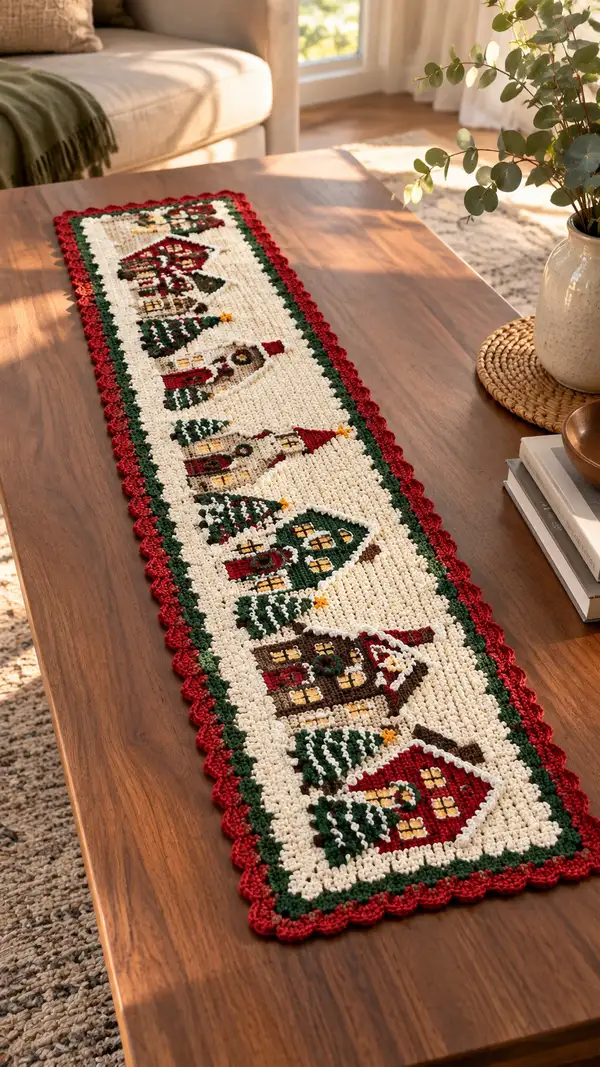
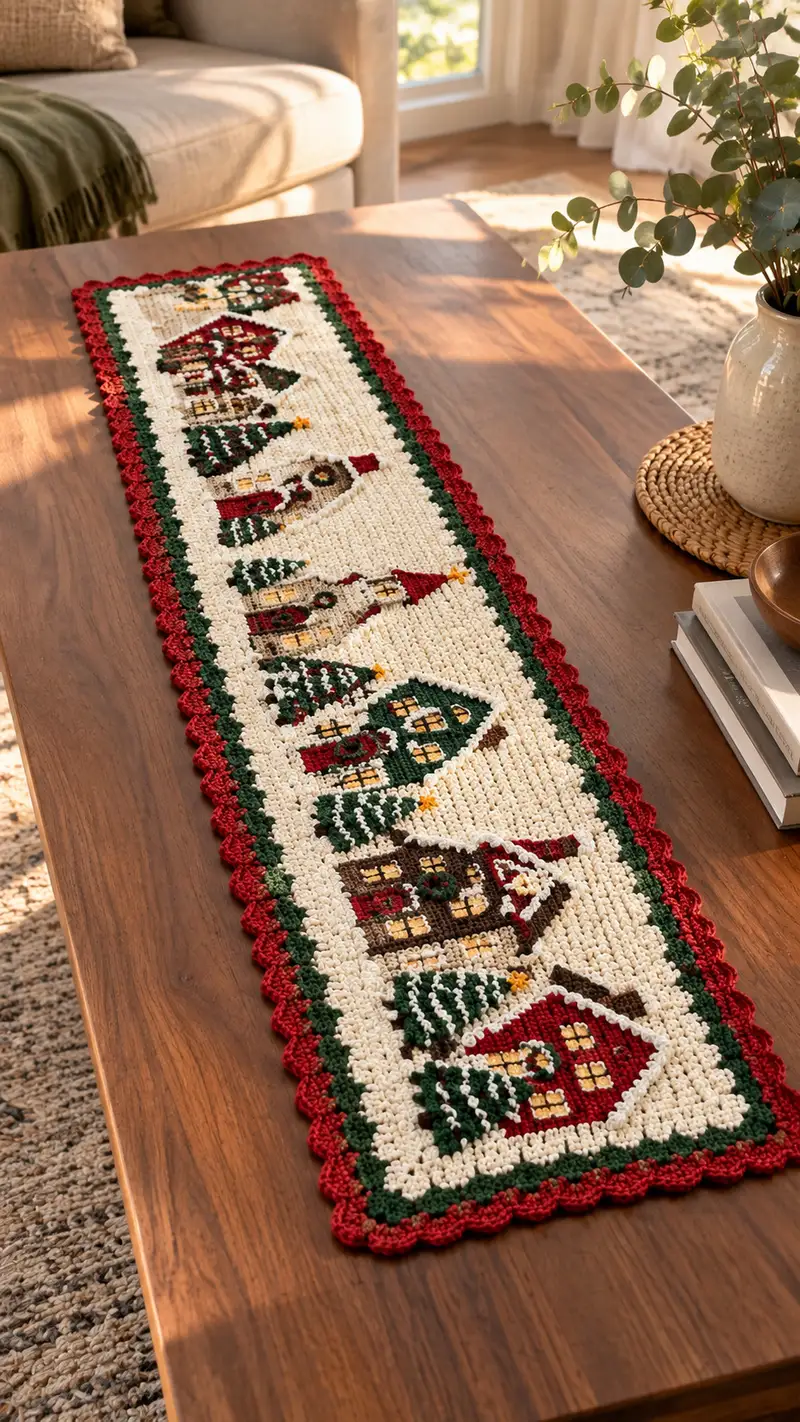
Create a cozy holiday table runner featuring a stitched village of little houses and evergreen trees framed by a deep green inner border and a scalloped red edge. This rectangular tapestry-style runner uses single crochet colorwork and a scalloped shell edging for a classic handmade look. Perfect for a mantel, entry table, or dining table centerpiece to add warm seasonal charm.
Progress Tracker
0% Complete
— Notes and Construction Overview :
Info :
This runner is worked flat in joined rows using tapestry/stranded single crochet colorwork. The finished width is 64 stitches; the length as written is 180 rows (approximately 44-48 inches long depending on tension). You may lengthen by repeating motif groups in the center. Carry unused colors along wrong side with floats no longer than 6 stitches, or catch and twist yarns to secure.
Info :
Use a 4.0mm hook for the main panel to create a dense fabric that hides stuffing and secures colorwork. If your gauge is loose, drop to 3.75mm or 3.5mm. Keep tension consistent and use a stitch marker at the start of each row.
— Foundation and Border Rows (Top edge) :
Row 1 (Foundation) :
Fsc 64 (64)
Row 2 :
Turn, ch1, sc in each foundation stitch across in MC (64)
Row 3-6 :
Turn, ch1, 1 sc in each st in MC (64)
Info :
These initial background rows create a clean top edge. Keep even tension; use these rows as a base before starting motif groups. Place a stitch marker in the first st of Row 3 and move it each row to mark the beginning.
— Motif Structure Overview :
Info :
The central motif section is made of 7 repeating village groups across the length. Each motif group spans 24 rows of colorwork, arranged so small houses and trees appear on the MC background. Width remains 64 stitches throughout. Each motif group is followed by 2 MC spacer rows to separate motifs (except between some motifs for variety).
Info :
For color shorthand in the row instructions: MC = Ivory, R = Red (CC1), G = Green (CC2), DG = Dark Green (alternate green), BR = Brown (CC3), Y = Yellow (CC4). When a sequence lists 'MC 20' it means work 20 sc in that color, then change to the next color listed.
— Motif Group 1 (Rows 7-30) :
Row 7 :
Turn, ch1, 1 sc in each st in MC (64)
Row 8 :
MC 20, G 6, MC 16, R 8, MC 14 (64)
Row 9 :
MC 18, G 8, MC 14, R 10, MC 14 (64)
Row 10 :
MC 16, G 10, MC 12, R 12, MC 14 (64)
Info :
Rows 8–10 begin the leftmost tree and an initial red-roofed house area. Carry MC tightly behind colored stitches to avoid loose floats. When changing to a color and returning to MC within the same row, twist the yarns to trap the ends.
Row 11 :
MC 14, G 12, MC 10, R 14, MC 14 (64)
Row 12 :
MC 12, G 14, MC 8, R 16, MC 14 (64)
Row 13 :
MC 12, G 6, MC 10, BR 6, R 8, MC 22 (64)
Info :
Row 13 introduces BR for a roof or trunk accent near stitch 23–28. Use small lengths of brown and lock in by crocheting the first and last brown stitch tightly to avoid holes.
Row 14 :
MC 10, G 6, MC 8, BR 8, R 10, MC 22 (64)
Row 15 :
MC 10, DG 8, MC 6, BR 10, R 10, MC 20 (64)
Row 16 :
MC 8, DG 10, MC 6, BR 12, R 12, MC 16 (64)
Info :
At Row 16 you may embroider tiny Y stitches into window areas later. For now, focus on color transitions. Keep floats of unused colors behind the work and catch them when possible.
Row 17 :
MC 8, DG 12, MC 6, BR 12, R 14, MC 12 (64)
Row 18 :
MC 10, DG 12, MC 10, BR 8, R 12, MC 12 (64)
Row 19 :
MC 12, G 10, MC 12, BR 6, R 8, MC 16 (64)
Row 20 :
MC 14, G 8, MC 12, R 10, MC 20 (64)
Info :
Rows 19–20 begin closing the motif vertically. Check your color placement: windows (Y) have not yet been placed; we will add small yellow stitches on rows where BR and R create window shapes. You may use duplicate stitch after finishing to add crisp yellow lights rather than carrying CC4.
Row 21 :
MC 16, G 6, MC 14, R 10, MC 18 (64)
Row 22 :
MC 18, G 4, MC 14, R 10, MC 18 (64)
Row 23 :
MC 20, MC 44 (64)
Row 24 :
MC 24, MC 40 (64)
Row 25 (Spacer) :
MC 64 (64)
Row 26 (Spacer) :
MC 64 (64)
Info :
Motif group 1 is complete. The two all-MC spacer rows create breathing space between village motifs. If you wish to shorten the entire runner, omit one spacer between groups every two repeats.
— Motif Group 2 (Rows 31-54) :
Row 32 :
MC 18, R 8, MC 14, G 6, MC 18 (64)
Row 33 :
MC 16, R 10, MC 12, G 8, MC 18 (64)
Row 34 :
MC 14, R 12, MC 10, G 10, MC 18 (64)
Info :
Group 2 shifts emphasis: red-roof house sits closer to left-center of the row. Plan where you'll later add yellow window highlights to keep the motif luminous.
Row 35 :
MC 12, R 14, MC 8, BR 8, G 12, MC 10 (64)
Row 36 :
MC 12, R 16, MC 6, BR 10, G 10, MC 10 (64)
Row 37 :
MC 10, R 18, MC 6, BR 12, G 8, MC 10 (64)
Info :
Rows 35–37 build a house roof and trunk; keep brown stitches bunched so roof edge looks crisp. Use duplicate stitch later for cross-window panes if desired.
Row 38 :
MC 10, G 10, MC 10, R 12, MC 22 (64)
Row 39 :
MC 12, G 12, MC 10, R 8, MC 22 (64)
Row 40 :
MC 14, G 12, MC 10, R 6, MC 22 (64)
Row 41 :
MC 16, G 10, MC 10, R 6, MC 22 (64)
Info :
Check tension on rows with many color switches; ensure you are twisting yarns at each color change to prevent gaps. When working many small sequences, move slowly and keep floats tidy.
Row 42 :
MC 18, MC 46 (64)
Row 43 :
MC 20, MC 44 (64)
Row 44 (Spacer) :
MC 64 (64)
Row 45 (Spacer) :
MC 64 (64)
Info :
Motif group 2 complete. Use a tapestry needle and CC4 (golden yellow) to add small window highlights if the yellow would cause many floats during colorwork—this is faster and neater.
— Motif Group 3 (Rows 55-78) :
Row 56 :
MC 22, G 8, MC 12, R 8, MC 14 (64)
Row 57 :
MC 20, G 10, MC 10, R 8, MC 16 (64)
Row 58 :
MC 18, G 12, MC 8, R 10, MC 16 (64)
Info :
Group 3 creates a wider green tree cluster at left; keep tree stitches in two greens (G and DG) to add depth. Alternate G/DG within the row for natural texture.
Row 59 :
MC 16, G 12, DG 4, MC 8, R 12, MC 12 (64)
Row 60 :
MC 14, G 10, DG 6, MC 8, BR 10, R 16 (64)
Row 61 :
MC 12, G 8, DG 8, MC 6, BR 12, R 18 (64)
Info :
Rows with DG and G next to each other are perfect for using short floats; if you're crocheting tightly, pick up the alternate color frequently to avoid long floats behind the fabric.
Row 62 :
MC 12, DG 10, MC 10, BR 12, R 20 (64)
Row 63 :
MC 14, DG 12, MC 8, R 30 (64)
Row 64 :
MC 16, MC 48 (64)
Row 65 :
MC 18, MC 46 (64)
Row 66 (Spacer) :
MC 64 (64)
Row 67 (Spacer) :
MC 64 (64)
Info :
Group 3 complete. Consider using surface slip stitch in dark brown to outline roofs after assembly for a crisp look if your stitches blurred slightly when using many color switches.
— Motif Group 4 (Rows 79-102) :
Row 80 :
MC 16, R 12, MC 12, G 8, MC 16 (64)
Row 81 :
MC 14, R 14, MC 10, G 10, MC 16 (64)
Row 82 :
MC 12, R 16, MC 8, BR 8, G 12, MC 8 (64)
Info :
This motif emphasizes a red central house with a pointed roof. Keep brown roof stitches toward the center columns to create triangular roof outlines across several rows.
Row 83 :
MC 10, R 18, MC 6, BR 10, G 10, MC 10 (64)
Row 84 :
MC 8, R 20, MC 6, BR 12, G 8, MC 10 (64)
Row 85 :
MC 8, G 12, MC 8, R 10, BR 10, MC 16 (64)
Info :
Rows 85–86 create tree silhouettes and house walls. If adding a wreath or extra decoration, leave a small patch of MC to add embroidered accent later.
Row 86 :
MC 10, G 12, MC 10, R 8, MC 24 (64)
Row 87 :
MC 12, G 10, MC 12, R 10, MC 20 (64)
Row 88 :
MC 14, G 8, MC 12, R 8, MC 22 (64)
Row 89 :
MC 16, MC 48 (64)
Row 90 (Spacer) :
MC 64 (64)
Row 91 (Spacer) :
MC 64 (64)
Info :
Group 4 complete. If you prefer more contrast, swap MC for a softer cream for the background to make the village colors pop even more.
— Motif Group 5 (Rows 103-126) :
Row 104 :
MC 20, G 8, MC 12, R 8, MC 16 (64)
Row 105 :
MC 18, G 10, MC 10, R 10, MC 16 (64)
Row 106 :
MC 16, G 12, MC 8, BR 10, R 18 (64)
Info :
Group 5 makes a cozy cluster with a tall red spire; the brown stitches indicate a tall roof or chimney element. Keep transitions clean at long brown runs.
Row 107 :
MC 14, G 12, MC 8, BR 12, R 18 (64)
Row 108 :
MC 12, G 12, MC 8, BR 14, R 18 (64)
Row 109 :
MC 12, DG 14, MC 8, BR 12, R 18 (64)
Info :
At this section the motif becomes denser with DG for foliage depth. If carrying DG yields long floats, consider working the trees using small separate motifs sewn on later.
Row 110 :
MC 14, DG 12, MC 8, R 16, MC 14 (64)
Row 111 :
MC 16, DG 10, MC 10, R 12, MC 16 (64)
Row 112 :
MC 18, DG 8, MC 12, R 10, MC 16 (64)
Row 113 :
MC 20, MC 44 (64)
Row 114 (Spacer) :
MC 64 (64)
Row 115 (Spacer) :
MC 64 (64)
Info :
Group 5 complete. Use a tapestry needle and CC4 to add small square window highlights (3–4 stitches each) after finishing the panel to avoid many short floats while crocheting.
— Motif Group 6 (Rows 127-150) :
Row 128 :
MC 22, R 8, MC 12, G 6, MC 16 (64)
Row 129 :
MC 20, R 10, MC 10, G 8, MC 16 (64)
Row 130 :
MC 18, R 12, MC 8, G 10, MC 16 (64)
Info :
Group 6 mirrors earlier repeats with small variations in house placement and tree trims to create visual variety along the runner. Keep notes if you want symmetry relative to center.
Row 131 :
MC 16, R 14, MC 8, BR 8, G 12, MC 6 (64)
Row 132 :
MC 14, R 16, MC 6, BR 10, G 10, MC 8 (64)
Row 133 :
MC 12, R 18, MC 6, BR 12, G 8, MC 8 (64)
Info :
Rows with several color switches are opportunities to practice quick color changes. Work the last yarn over with the new color to begin the next sc, keeping tails small and neat.
Row 134 :
MC 12, G 12, MC 10, R 10, MC 20 (64)
Row 135 :
MC 14, G 10, MC 12, R 8, MC 20 (64)
Row 136 :
MC 16, G 8, MC 12, R 8, MC 20 (64)
Row 137 (Spacer) :
MC 64 (64)
Row 138 (Spacer) :
MC 64 (64)
Info :
Group 6 complete. If you notice any color pooling or unintended blocks, swap that repeated grouping in the next motif to balance the runner visually.
— Motif Group 7 (Rows 151-174) :
Row 152 :
MC 18, G 6, MC 16, R 8, MC 16 (64)
Row 153 :
MC 16, G 8, MC 14, R 10, MC 16 (64)
Row 154 :
MC 14, G 10, MC 12, BR 8, R 10, MC 10 (64)
Info :
Group 7 is the final motif cluster. Adjust minor color placements to create balance with Group 1 so the runner reads as a cohesive row of cottages when complete.
Row 155 :
MC 12, G 12, MC 10, BR 10, R 10, MC 10 (64)
Row 156 :
MC 12, DG 12, MC 10, BR 12, R 8, MC 10 (64)
Row 157 :
MC 14, DG 10, MC 12, R 10, MC 18 (64)
Info :
Rows 155–157 close the motif. Take a moment to secure untidy floats and weave them behind the fabric with a fine needle to prevent long trailing ends inside the runner.
Row 158 :
MC 18, DG 8, MC 12, R 10, MC 16 (64)
Row 159 :
MC 20, MC 44 (64)
Row 160 :
MC 22, MC 42 (64)
Row 161 (Spacer) :
MC 64 (64)
Row 162 (Spacer) :
MC 64 (64)
Info :
Row 163 :
MC 64 (64)
Info :
These last few rows create the bottom background border before the outer edging. Finish with even MC rows to mirror the top edge and frame the village nicely.
— Add Window Highlights and Small Details :
Info :
Now that the panel is complete, use CC4 (golden yellow) and a tapestry needle to add small filled squares of 2–4 stitches as window 'lights'. Use duplicate stitch to keep stitches tidy. Add wreaths, door knobs, or small crosses on roofs with CC3 or black thread as desired.
— Single-Round Inner Border (Attach and Work Around) :
Info :
With MC facing, pick up a 4.0mm hook and join CC2 (Forest Green) at any corner stitch with a sl st. We will work in rounds around the rectangle. Work evenly along edges placing 3 sc in each corner stitch to keep corners flat. The exact stitch count along each edge depends on blocking but you will have approximately 64 sc across the top and bottom and 162 sc along each side including corner increases (adjust if necessary).
Round 1 :
Join CC2, ch1, sc evenly around the runner, placing 3 sc in each corner; sl st to join (approximate perimeter sc count; maintain even spacing)
Info :
If your side edges feel too tight, add an extra increase in the side midpoints to keep the border flat. Move the marker after completing the first round to mark the corner increase to ensure symmetry.
— Round 2 (Setup for Scallop Edge) :
Round 2 :
Ch1, sc in each st around in CC2 (forest green), placing sc in each stitch across top and bottom and one sc in each sc along the sides; sl st to join (same count as previous round)
Info :
This second green round sets the base for the red scallop edge. Keep this round snug but not tight. If you want a slightly wider green accent, add an additional round of sc in CC2 before starting red scallops.
— Scalloped Red Edge (Rounds 3–6) :
Round 3 :
Join CC1 (Red) in any st, ch3 (counts as first dc), *skip 2 sts, 5 dc in next st (shell), skip 2 sts, dc in next st; rep from * around until you reach a corner, in corner work (5 dc, ch1, 5 dc) to create a rounded corner; sl st to join.
Info :
The scallop uses dc-based shells to create a decorative exterior. Adjust shell spacing if your perimeter stitch count is not divisible evenly; allow a slightly larger shell in a corner to maintain symmetry.
Round 4 :
Ch1, sc in each dc and between shells around in CC1, placing 3 sc in the center of each shell to anchor; sl st to join.
Round 5 :
Ch2, *5 dc in next sc (over the center of shell), sk 2 sc, dc in next sc; rep from * around, working (5 dc, ch1, 5 dc) in corners; sl st to join.
Round 6 (Finish Scallops) :
Ch1, sc around in CC1 through the top loops of the shells and dc, working neat tidy sl st join; fasten off and weave ends in.
Info :
For a deeper scallop, repeat Rounds 3–5 once more. Press lightly with a steam iron (no direct contact) to open scallops and ensure they curve outward uniformly before final blocking.
— Finishing and Blocking :
Info :
Block the runner to measurements: width = approx 64 sts (about 10.5-12 inches wide depending on yarn), length = approx 180 rows (approx 44-48 inches). Wet block gently or pin and lightly steam. Pin scallops into smooth half-moon shapes for an even edge. Weave in ends on the wrong side, trimming close after securing with a few back-and-forth stitches.
Info :
If any windows need brightening, use CC4 and duplicate stitch now: small 2x2 or 3x2 squares look like lit windows. Add tiny French knot-style embroidered wreaths with dark green and red if desired.
— Optional Embellishments :
Info :
Add gold metallic thread sparsely to represent sparkle on trees, or sew on a few tiny seed beads for window shimmer. Keep embellishments flat to keep the runner usable under dishes and centerpieces.
This Festive Village table runner brings a warm, handmade touch to your holiday décor. The stitched cottages and evergreen trees look charming flanked by the deep green inner border and a playful scalloped red edge. Each color change and tiny embroidered window adds personality and depth—it's a delightful, meditative project to make and to gift. 🧶🏡🎄