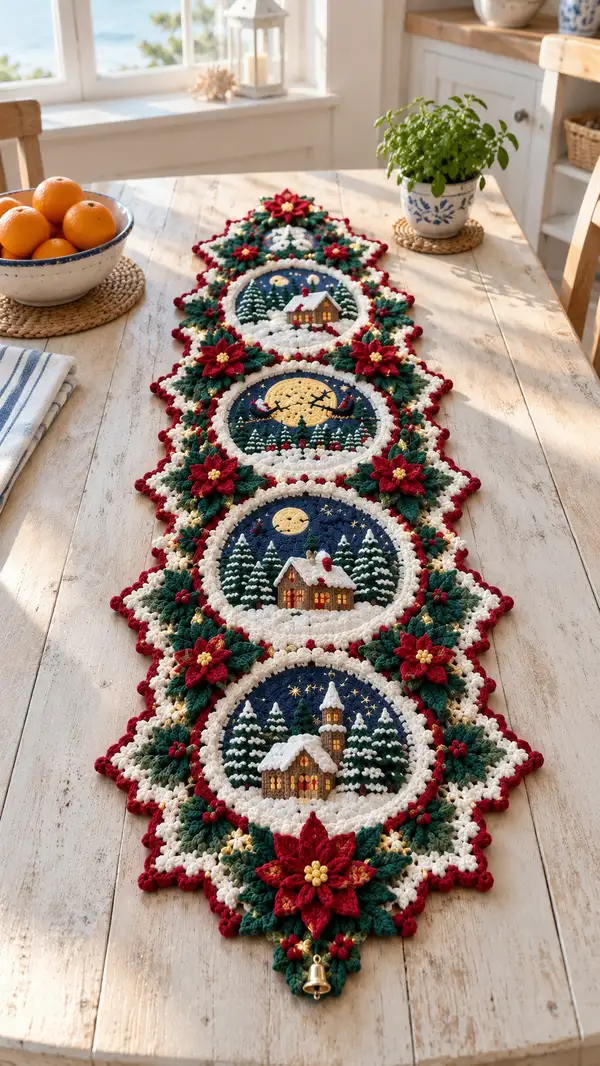
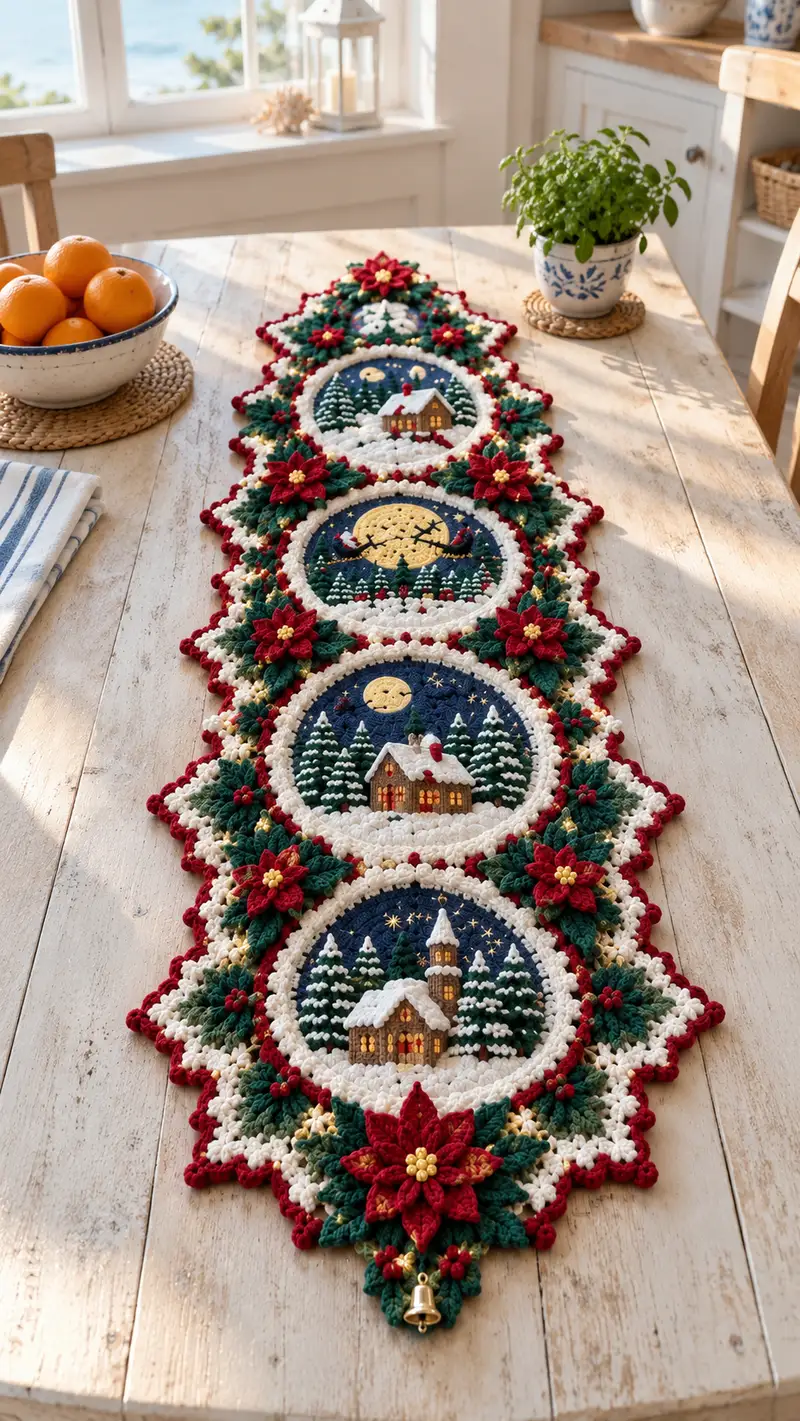
This detailed table runner pattern creates a long, layered holiday centerpiece made from four circular winter-scene medallions joined together with scalloped edges, 3D poinsettias and leafy clusters. The runner features deep navy sky panels, snowy textured borders, tiny house and tree appliques, crimson poinsettias and gold highlights for a classic Christmas look. Designed to be assembled as a unified decorative runner with an optional bell tassel at each end. Step-by-step, richly detailed instructions included.
Progress Tracker
0% Complete
— Materials & General Notes :
Info :
Work in continuous rounds for circular medallions except where indicated 'join' or 'sl st' for finishing. Use stitch markers at the beginning of each round. Carry colors inside when possible and catch floats every 4-6 stitches to avoid long loose strands. Gauge is not critical but maintain consistent tension for consistent diameter across medallions. Block each medallion lightly before joining to make assembly clean.
— Scene Medallion (Make 4 - base circle) :
Round 3 :
(1 sc, inc) x 6 (18)
Round 4 :
(2 sc, inc) x 6 (24)
Round 5 :
(3 sc, inc) x 6 (30)
Round 6 :
(4 sc, inc) x 6 (36)
Round 7 :
(5 sc, inc) x 6 (42)
Round 8 :
(6 sc, inc) x 6 (48)
Round 9-12 :
1 sc in each st (48)
Info :
Change to navy/dark blue now for the sky color. Work rounds 9-12 in navy. Place a stitch marker at the start of Round 9. Keep fabric flat; if it ruffles, reduce tension slightly.
Round 13 :
1 sc in each st BLO (48)
Round 14-16 :
1 sc in each st (48)
Info :
These rounds form the flat sky disk. On Round 15 mark the center front to orient where appliques will go. Plan window placement, moon position and tree layout before stitching additional texture.
Round 17 :
(6 sc, 1 pop) x 6 (48)
Info :
Round 17 adds clustered textured 'stars' and high snow highlights with pop (popcorn) stitches. Popcorn does not change the stitch count—work the pop into the indicated stitch and treat as one stitch.
Round 18 :
1 sc in each st (48)
Round 19 :
(4 sc, inc) x 8 (56)
Round 20 :
(6 sc, inc) x 8 (64)
Info :
Rounds 19-20 build the medallion to a size that will accept appliques. After Round 20 the outer circumference is ready to receive the snow rim and later the framed border.
Round 21 :
1 sc in each st (64)
Round 22 :
1 hdc in each st (64)
Round 23 :
1 sc in each st (64)
Info :
Switch to cream/off-white for the snowy foreground rounds on Round 24. Carry the navy yarn behind or weave in later. These cream rounds will form a thick snow bank encircling the scene.
Round 24 :
Change to cream. (3 sc, pop) x 16 (64)
Info :
Popcorns here simulate piled snow. Work each pop into every 4th stitch. Popcorn grouped every fourth stitch preserves the stitch count at 64.
Round 25 :
1 sc in each st (64)
Round 26 :
(6 sc, dec) x 8 (56)
Round 27 :
(5 sc, dec) x 8 (48)
Info :
Placement :
At this point each medallion should be approximately 16-18 cm across depending on yarn/hook. Position tree and house appliques now: trees are set along the lower semicircle, house centered in the lower third. Use pins to mark exact stitch positions on Round 14-16 area to guide applique placement.
Round 28 :
1 sc in each st (48)
Round 29 :
Slip stitch to finish round. Fasten off leaving long tail for joining the frame (or continue without fastening if adding frame in next rounds).
— Pine Tree Applique (Make 4-5 per medallion; total 16-20 trees) :
Info :
Make small layered triangular trees that stack and are sewn onto the medallion. Each tree consists of three triangular tiers worked in dark green with tiny white surface-converted snow stitches. Make 4-5 trees for each medallion depending on scene.
Round 1 :
With green, ch 2, 3 sc in 2nd ch from hook (3)
Round 2 :
Turn, ch1, inc in first st, 1 sc, inc in last st (5)
Round 3 :
Turn, ch1, (1 sc, inc) x 2, 1 sc (7)
Round 4 :
Turn, ch1, (2 sc, inc) x 2, 1 sc (9)
Info :
First tier complete. Fasten off and attach next tier a couple of stitches above center of the lower tier to create layered silhouette. Each tier is worked slightly larger to create the tapered shape.
Round 5 :
Attach yarn above previous tier, ch1, 5 sc across top edge (5)
Round 6 :
(1 sc, inc) x 2, 1 sc (7)
Round 7 :
Turn, ch1, 3 sc, dec (6)
Round 8 :
Fasten off, leave tail for sewing. Add small white surface sc dots or french knots of embroidery thread to simulate snow on branches.
Info :
Sew each tree onto medallion following the pin placements from Round 14-16. Use small whip stitches around the base only to allow a slightly raised look. Position trees at different heights to create depth.
— House Applique (Make 1 per medallion) :
Info :
The house is worked flat as a small layered applique with a body and separate roof. Use brown/tan for walls and darker brown for roof, with tiny yellow window embroidery.
Round 1 (Body) :
With tan, ch 6, sc in 2nd ch from hook and across (5)
Round 2 :
Ch1, turn, sc across (5)
Round 3 :
Ch1, inc at both ends (7)
Round 4 :
Ch1, sc across (7)
Round 5 (Roof) :
Attach darker brown along top edge of body, ch1, (sc, inc) across to create peaked roof edge; work 3 rows decreasing toward peak to form roof triangle. Fasten off and leave tails for sewing.
Info :
Sew roof to body, then stitch the finished house to the medallion center bottom using invisible whip stitch. Embroider windows with yellow yarn using satin stitches and add small dark crosses for window frames. Add a tiny chimney with red or brown and a white snow cap using white yarn.
— Snow & Surface Embroidery :
Round 1 :
Info: Use white or cream embroidery thread or yarn to add snowline details. Surface crochet small lines and french knots for snowflakes and roof snow. Do not change round counts—these are embroidery embellishments applied to finished medallion surfaces.
Info :
Embroider stars and moon in golden yarn on navy sky. For a stitched moon, create a circular applique or embroider using satin stitch to fill a small disk. Add tiny metallic thread sparkles for extra shimmer.
— Medallion Frame Rounds (per medallion) :
Round 1 :
Re-join cream to outermost stitch of medallion, ch1, sc evenly around (48) - adjust to match outer round count of medallion; if medallion outer st is 48 use 48 sc
Round 2 :
(3 sc, inc) x (st_count/4) (st_count + st_count/4) - example if 48 then (3 sc, inc) x 12 (60)
Round 3 :
1 sc in each st (60)
Info :
Round 2 expands frame to create room for the leafy border and the triangular join points. If your stitch_count differs, calculate increases evenly around to obtain a neat ring—aim for an even multiple to form triangular connectors later.
Round 4 :
Change to green: (2 sc in next st, 4 sc) x 10 (60)
Round 5 :
1 hdc in each st (60)
Round 6 :
(BLO) 1 sc in each st BLO to create a ridge (60)
Info :
Rounds 4-6 create the base for leaves and hold the appliques. Work round 6 in BLO to create a defined ridge that helps the poinsettia petals sit slightly above the frame.
— Triangular Connector Motif (Make 3 between medallions, plus ends) :
Round 1 :
Attach cream at designated connector point, ch3, join to form small triangle: 1 sc in first ch, 1 hdc, 1 sc (3)
Round 2 :
Ch1, turn, (inc, 1 sc) across to widen triangle base (5)
Round 3 :
Ch1, sc around triangle edge to form solid triangular connector (approx 8-10 sts depending on build)
Info :
Connector motifs are used to join medallions with small star shapes and leaf clusters. Make them symmetrical and block flat to ease sewing.
— Poinsettia Flower (Make 5-6 total; 1 between/around each medallion and 1 at each end) :
Round 1 :
With red, mr, 8 sc in mr, do not join (8)
Round 2 :
Inc in each st around (16)
Round 3 :
(1 sc, inc) x 8 (24)
Round 4 :
Switch to BLO: 1 sc in each st BLO (24)
Round 5 :
Form petals: *ch4, sl st in 2nd ch from hook, hdc in next, dc in next, sl st into next st of base* rep around to make 8 petals (24)
Info :
Round 5 builds the first petal layer. Work petals loosely so they can be shaped. After making 8 petals, round 6 adds a second layer for depth.
Round 6 :
Fasten off red. Reattach deeper red or a second red shade behind each petal by slip-stitch chain loops: attach, ch5, sl st back to base to create a raised petal layer; repeat behind each petal.
Round 7 :
Make center: with gold, mr, 6 sc, fasten off leaving tail. Sew gold center onto flower. Add 5-7 small seed beads for bead center and secure firmly.
Info :
Block petals gently to fan them out before attaching to medallion. Use a little spray starch if you want extra stiffness. Poke petals slightly upward when sewing to create dimensionality.
— Leaf (Make 16-24 leaves total) :
Round 1 :
With green, ch 7, sc in 2nd ch from hook, hdc, dc, hdc, sc (6 - the starting chain makes a curved petal)
Round 2 :
Turn, work along other side of foundation ch: sc, hdc, dc, hdc, sc (11 total including base)
Round 3 :
Sl st across to first sc, fasten off leaving tail for sewing. Pinch tip slightly and couch a small stitch along center to form vein.
Info :
Leaves are sewn in clusters of 3-5 around poinsettias and connectors to create foliage. Slightly varying sizes and angles makes the arrangement natural.
— Small Holly Berries / Snow Dots (multiple) :
Round 1 :
With red, mr, 6 sc in mr, close and tie off. Use as small berry and sew in clusters of three near leaves. For snow dots use cream with a single sc bobble or french knot.
Info :
Sew berry clusters using extra-strong thread into the runner, anchoring through several frame rounds so beads do not pull off in use.
— Joining Medallions & Connectors :
Round 1 :
Block all four medallions flat. Lay them in sequence with triangular connector points facing inward. Pin connectors to medallion frames aligning rounds where connectors meet (typically frame rounds 2-4).
Round 2 :
Sew connectors to medallion frames using a tapestry needle and matching cream yarn. Use whip stitch from back to front through the frame ridges to make seam invisible.
Round 3 :
After sewing connectors, position leaf clusters and poinsettias at the intersections. Pin carefully and baste with long running stitches to adjust spacing before final sewing.
Info :
Check overall alignment often; if medallions sit differently due to tension differences, block them again and re-pin until satisfied. Sew firmly but do not pull fabric into puckers.
— Outer Decorative Border & Scallops :
Round 1 :
With cream, join at a corner point, ch1, sc evenly around the entire joined runner perimeter (work across medallion outer rounds and connectors) maintaining even stitch count along curves. Count stitches to get an even multiple to work scallops—aim for multiples of 6 along straight edges and symmetric counts at points.
Round 2 :
(3 sc, picot) around points and straight sides to create small scallop rhythm. Picot: ch3, sl st into first ch to make a small peak. Maintain count.
Round 3 :
Change to red: (BLO) 1 sc in each st BLO to create defined edge ridge (total stitch count unchanged)
Round 4 :
With red, *ch4, sl st in 2nd ch from hook, hdc in next, dc in next, sl st to base* repeat across peaks to create small decorative petals around edge.
Info :
The red scallop gives the runner its festive frame. If your stitch count doesn't divide evenly, adjust starting points at the triangular connector tips so decorative motifs land symmetrically.
— Final Accent Rounds :
Round 1 :
With gold, work tiny star stitches over navy sky using embroidery—tiny cross stitches or french knots to suggest distant stars. Place some stars near the moon and across panels.
Round 2 :
Sew poinsettias and leaf clusters firmly to frame using strong yarn and small stitches through frame rounds 4-6 to anchor. Add small gold beads at centers. Ensure petals are secured at base only so they sit raised.
Info :
Add small bell charm at each runner end—attach through a small loop made from cream ch3 and secure with multiple stitches so bell can be removed for washing if desired.
— Finishing & Blocking :
Round 1 :
Weave in all ends at the back of work using a yarn needle. Work slowly to hide tails through multiple stitches and trim close.
Round 2 :
Lightly wet-block or steam-block the entire runner pinned to desired final shape. Allow to dry completely before removing pins. Check bead security and re-stitch any loose beads.
Info :
For laundering, hand wash gently in cool water and reshape while wet. Remove bells before washing if they are metal and may tarnish.
This festive table runner brings a cozy, hand-crafted storybook charm to holiday tables. Each medallion tells a small winter scene, framed with snowy borders and rich poinsettia accents for a classic holiday look. The layered textures and tiny appliques make every inch delightful to stitch and display. Hang a little bell at the ends for an extra cheerful touch when guests arrive. 🎄🧶