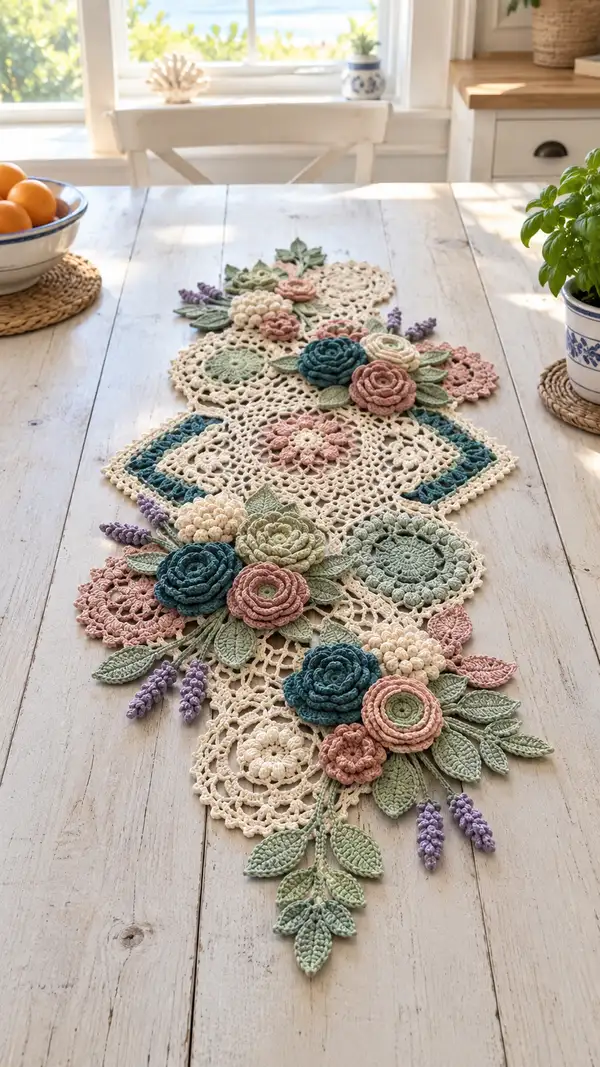
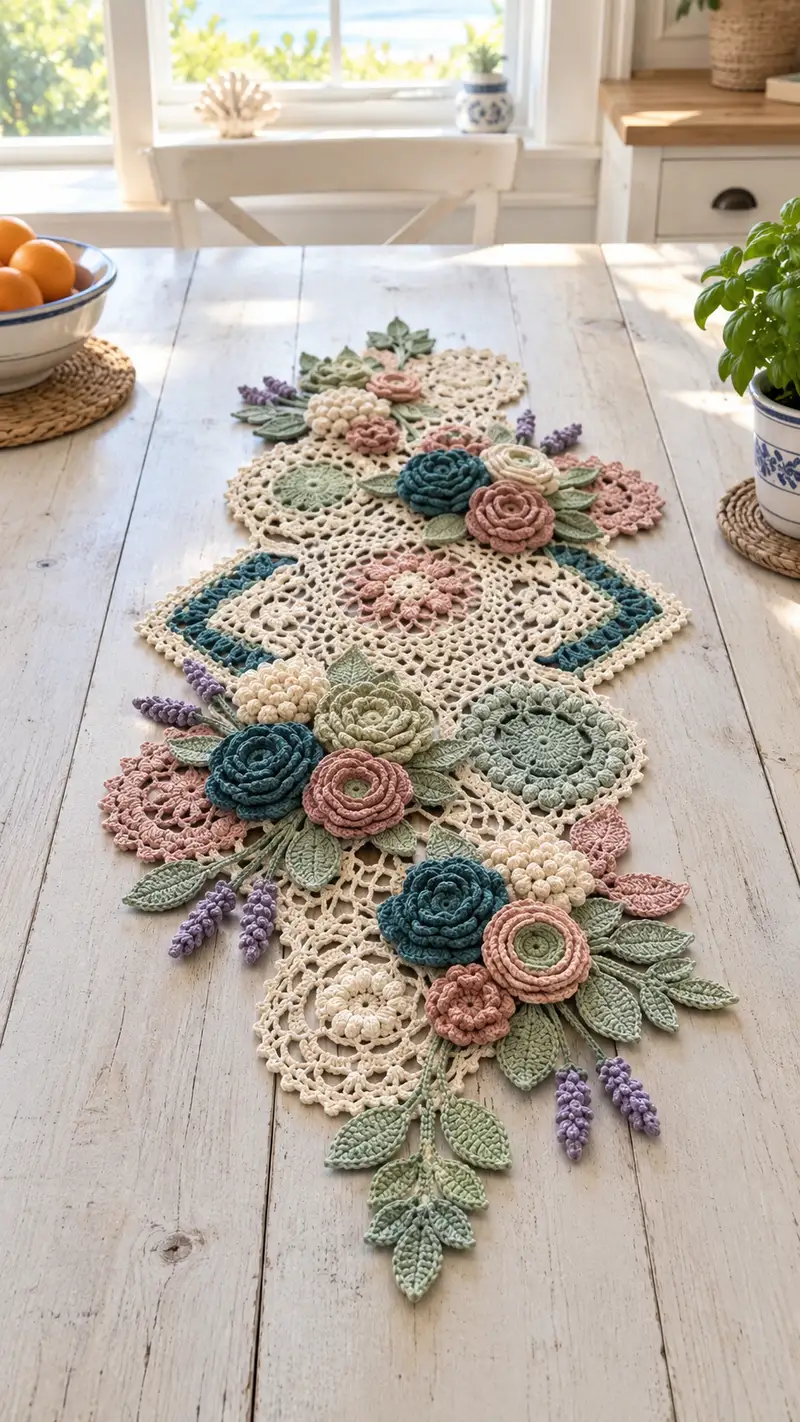
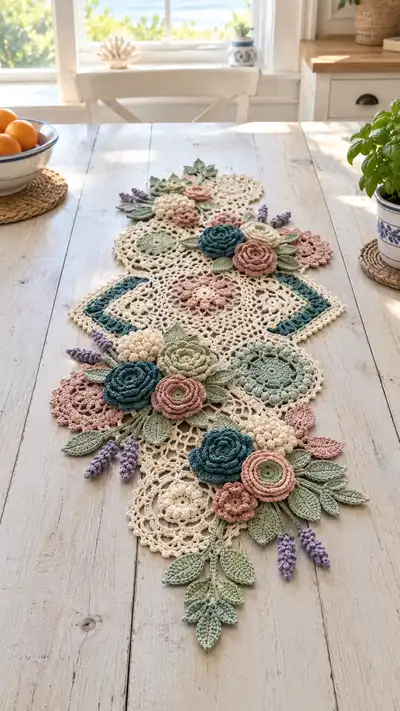
A romantic, vintage-inspired crochet table runner made from delicate lace motifs and sculpted 3D flowers. This long runner features layered roses, bobble clusters, lavender spikes, and leafy vines in soft pastel shades atop a warm cream lace background. The finished piece creates a charming centerpiece for dining tables, sideboards, or window benches and showcases advanced motif-joining and applique9 techniques.
Progress Tracker
0% Complete
— Materials and Gauge :
Info :
Gauge is flexible for a runner; recommended gauge for the lace motifs is approximately 18 dc = 4 inches using 3.5mm hook in worsted yarn worked lightly. Blocking will be used to exact motif size. Measurements of finished runner in photo: approximately 14" wide and 48-54" long depending on motif arrangement.
— Central Round Medallion (Make 1) :
Round 1 :
6 sc in magic ring (6)
Round 3 :
(1 sc, inc) x 6 (18)
Round 4 :
(2 sc, inc) x 6 (24)
Round 5 :
(3 sc, inc) x 6 (30)
Round 6 :
(4 sc, inc) x 6 (36)
Round 7 :
(5 sc, inc) x 6 (42)
Round 8 :
(6 sc, inc) x 6 (48)
Round 9 :
1 sc in each st (48)
Round 10 :
1 sc in each st (48)
Round 11 :
(3 sc, 1 inc) x 12 (60)
Round 12 :
1 sc in each st (60)
Round 13 :
(4 sc, 1 inc) x 12 (72)
Round 14 :
1 sc in each st (72)
Info :
At this stage you can change to a lace-weight or lighter tension to begin openwork rounds. Carry the main cream yarn, or fasten off and rejoin when ready for decorative rounds.
Round 15 :
*ch 5, skip 3 sts, sc in next st* around creating 12 ch-5 loops (72)
Round 16 :
Into each ch-5 loop: sc, ch 3, 3 dc, ch 3, sc (12 shells) (72)
Round 17 :
Between shells: ch 4, sc in center of next shell, ch 4 (72)
Round 18 :
Work 12 small picot-edged fans: in each ch-4 space work (2 dc, ch 2, 2 dc), picot on ch-2 (72)
Round 19 :
*sc 3, ch 7, sc 3 in next fan center* around forming airy lace (72)
Round 20 :
In each ch-7 loop: (sc, ch 3, 3 dc, ch 3, sc) creating 12 larger shells (72)
Info :
Block this medallion flat to a diameter of approximately 9-10 inches. Use pins to open lace loops and shape shells evenly. Let dry completely before joining.
Round 21 :
Join rounds of decorative corners: ch 1, sc evenly around outer edge working 7 sc into each shell peak to create a stable edging (approx 84)
Round 22 :
Work a delicate scallop: *skip 1 st, 5 dc in next st, skip 1 st, sl st in next* around (approx 84)
Round 23 :
Round of single crochet in BLO to create a ridge for applique9 placement: 1 sc in each st BLO (84)
Round 24 :
Decorative chain loops between scallops: *ch 6, sl st in base between scallops* around (84)
Round 25 :
In each ch-6 loop: sc, hdc, 3 dc, hdc, sc (12 decorative fans) (84)
Round 26 :
Work small picot edge along outermost fans: *sc in next, ch 3, sl st in top of last dc* around (84)
Round 27 :
Sl st through both loops evenly to create a subtle chain outline and finish medallion (84)
Info :
Fasten off leaving a long tail for sewing to adjacent square motifs. Keep the medallion centered in layout plan and pin in place on blocking board so joining points match square motif corners.
— Square Lace Motif (Make 4) :
Round 1 :
6 sc in magic ring (6)
Round 3 :
(1 sc, inc) x 6 (18)
Round 4 :
(2 sc, inc) x 6 (24)
Round 5 :
(3 sc, inc) x 6 (30)
Round 6 :
1 sc in each st (30)
Round 7 :
*dc 3 in next st, ch 3, skip 2* around forming four corner ch-3 spaces (30)
Round 8 :
In ch-3 corner spaces work (2 dc, ch 2, 2 dc) to increase corner definition and form square (30 + corner increases = 34)
Round 9 :
Chain-space row across sides: *sc, ch 5, skip 5 sts, sc in next* along each side to create airy edge (approx 34)
Round 10 :
Work shell clusters into ch-5 loops: (sc, ch 3, 3 dc, ch 3, sc) around (34)
Info :
Block square motifs to measure roughly 6" x 6" after blocking; use the same cream yarn to create a coherent background. These squares will sit between medallions and round motifs in the runner composition.
Round 11 :
Round of picot-edge: sc around, adding picot every 6 sts to keep edge consistent (approx 34)
Round 12 :
Final decorative row: *ch 4, sl st in 2nd ch from hook, 2 sc in next space* around creating lacy loops for joining (34)
Info :
Make four identical square motifs. Block them flat and plan placement so their corners meet medallion arcs. Keep tails long for join-as-you-go or sewing method.
— Small Round Motifs (Make 6) :
Round 1 :
6 sc in magic ring (6)
Round 3 :
(1 sc, inc) x 6 (18)
Round 4 :
(2 sc, inc) x 6 (24)
Round 5 :
1 sc in each st (24)
Round 6 :
Work lace ring: *ch 3, skip 1, sc in next* around (24)
Round 7 :
Into each ch-3 loop: (sc, 2 dc, sc) creating small petals (24)
Round 8 :
Finish with small picot edging every petal tip (24)
Info :
These small rounds act as filler motifs and backing for smaller applique flowers; block and set aside until assembly.
— Large Circular Motif (Make 2) :
Round 1 :
8 sc in magic ring (8)
Round 3 :
(1 sc, inc) x 8 (24)
Round 4 :
(2 sc, inc) x 8 (32)
Round 5 :
(3 sc, inc) x 8 (40)
Round 6 :
1 sc in each st (40)
Round 7 :
*ch 5, skip 3 sts, sc in next* around to form 8 ch-5 loops (40)
Round 8 :
In each loop: sc, ch 3, 3 dc, ch 3, sc forming 8 lace fans (40)
Round 9 :
Between fans: ch 6, sc in fan center to create airy lace spaces (40)
Round 10 :
Work a round of decorative shells into ch-6 spaces: 5 dc in each ch-6 (40)
Round 11 :
Finish with a single crochet round in BLO to create seam grip for applique9s (40)
Info :
These motifs will sit at the wide points of the runner. Block so that each measures about 7-8 inches across for proportional balance with medallion and squares.
— Layered Spiral Roses (Make 6 large, 4 small) :
Info :
Two styles: a flat layered rose formed from concentric rounds and a spiral coin-rose made from a long chain worked in continuous spiral. Use 3.0mm hook for tightness.
Layered Rose - Large Round Base Round 1 :
6 sc in magic ring (6)
Round 3 :
(1 sc, inc) x 6 (18)
Round 4 :
1 sc in each st (18)
Round 5 :
Switch color (if making bicolor roses). Work picot edge: *sc, ch 3, sl st in tip* around (18)
Round 6 :
Create petal round: *(ch 5, sl st in next) across outer edge creating 6 loops* (18)
Round 7 :
In each ch-5 loop: (sc, hdc, 3 dc, hdc, sc) to make petals (18)
Round 8 :
Work a second petal row offset from the first by inserting hook behind first petal base: (sc, 4 dc, sc) around forming fuller bloom (18)
Info :
For a raised bloom, work additional short rows of petals and use light stuffing or a tightly wound yarn coil under first petal row to raise the center before sewing on the next petal row.
Spiral Rose - Continuous Spiral :
ch 36, sc in 2nd ch from hook and across (35 sc), ch 1, turn, continue working sc in back bumps or BLO along chain strip for tightness until you have a strip approximately 35 sts long. Fasten off leaving a 20" tail.
Spiral Rose Assembly :
Using tail, start tightly rolling strip from one end forming a spiral. Use whip stitch to tack spiral as you roll, sewing through the base edge only. Continue until strip is rolled into a rose shape. Fasten end and hide tail in the base with needle.
Info :
For small roses use ch 20 and fewer sc rounds; for large roses extend chain to 48 or join two strips for a very full bloom. Make 6 large spiral roses and 4 small ones in coordinating colors.
— Rosette with Raised Center (Make 4) :
Round 1 :
Make a magic ring, ch 3 (counts as dc), 11 dc in ring, sl st to join (12) - fasten off leaving tail (12)
Round 2 :
Rejoin, *ch 3, sl st in next st* around to create small petals (12)
Round 3 :
Make bobble center: in designated center, work 6 dc bobble in same st (popcorn style), sl st to secure (1 bobble)
Info :
These rosettes create a clustered center in some flower groups. Make 4 and lightly stuff bobble centers with a small wad of fiberfill if desired for extra texture.
— Bobble Flower Clusters (Make 6 clusters) :
Round 1 :
Start with magic ring, ch 1, 8 sc in ring (8)
Round 2 :
8 bobbles: *(yo, insert, pull up loop) x 5, yo and pull through 5 loops, ch 1 to close bobble*, sl st to next; repeat for each st to form 8 bobbles (8)
Round 3 :
sc around bobbles to keep cluster compact; fasten off leaving tail for sewing (approx 8)
Info :
Clusters look great grouped in threes and attached with long tails so you can position them slightly off-center on motifs.
— Long Leaves and Short Leaves (Make many) :
Long Leaf Round 1 :
ch 16, sc in 2nd ch from hook, sc across to last ch, 3 sc in last ch, turn to work down other side: sc across using back bumps to create a pointed leaf (30)
Round 2 :
Work decreases toward tip: sc next 2, dec across center, sc to base, sl st to base - shape as you go (approx 28)
Round 3 :
Edge with reversed sc: *sc 1, ch 1, sc 1* along edge to create sewn vein detail (approx 28)
Info :
For fuller leaves, use BLO on round 3 to create a raised center vein. Block leaves over a curved surface for natural curl. Make an assortment of long and short leaves (about 20-30 total) in sage and pale mint.
Short Leaf Round 1 :
ch 10, sc in 2nd ch from hook to last ch, 3 sc in last ch, sc down other side (18)
Short Leaf Round 2 :
Dec toward tip evenly and finish with ch-1 picot every 3 sts along edge for a delicate serrated look (approx 16)
Info :
Stiffen leaves lightly with diluted fabric stiffener if you want them more sculpted. Otherwise block gently to preserve softness.
— Lavender Spike Applique9 (Make 8) :
Round 1 :
ch 8, work 6 sc across (6)
Round 2 :
Make tiny bobbles along a chain: *ch 2, in next ch work mini-bobble (yo insert pull up loop x4, yo pull through 4 loops), sl st to anchor* continue to end creating 6 tiny stacked bobbles (6)
Round 3 :
Fasten off and leave long tail to sew onto runner as dangling lavender stems (6)
Info :
Sew lavender in small groups of three or four with leaves and short stems to add vertical interest and a hint of purple among the larger flowers.
— Assembling Rose Sprigs and Flower Groups :
Info :
Arrange roses, rosettes, clusters and leaves on a blocking board matching the runner photo: larger roses near medallion and large circular motifs, smaller flowers around square corners and edges. Pin in place, then sew pieces securely using long tails and ladder stitch for invisible joins.
Step :
Sew each flower to the underlying lace motif at several secure points: base of rose to center of motif and two or three stitches around its perimeter for stability. Use a yarn needle and color-matched thread.
Info :
When attaching heavy flowers (large spirals), add two or three extra mattress stitches through both flower base and motif to distribute weight. Consider a dab of fabric glue under the base for permanent stability if the runner will be handled often.
— Joining Motifs (Join-As-You-Go or Sew) :
Round 1 :
Arrange motifs in chosen layout: central medallion, two large circular motifs at each end, squares inset between medallion and circles, small rounds filling gaps. Mark join points with pins.
Round 2 :
For join-as-you-go: when making the final round of a motif, align it with neighboring completed motif and sl st/sc through corresponding ch loops to join. Use a consistent method (sl st join or sc join) for a uniform look.
Round 3 :
Alternate method: Block all motifs, then use whip stitch with cream yarn to sew motifs together along outermost picot loops invisibly from the back. Weave tails along the seam for added security.
Info :
Make sure joins are flat and even; if there is slight misalignment, add a small lace filler or tiny leaf to disguise gaps. Keep seam tension even so runner lays flat.
— Joining Mesh and Filling Lace (12 Rounds) :
Round 1 :
With cream yarn, around joined motifs work: sc through each stitch along seam edges creating a continuous base row to stabilize joins (approx total 200-300 sc around runner seams depending on layout)
Round 2 :
*ch 6, sc in seam gap, ch 6, sc* along runner filling negative space to create airy lace mesh (approx 40 chain loops)
Round 3 :
In each ch-6 loop: sc, hdc, 3 dc, hdc, sc creating fan motifs that echo medallion shells (approx 40 fans)
Round 4 :
Work connecting chains between fans: *ch 4, sl st in center of adjacent fan* around to create continuous airy look
Round 5 :
Refine with small picots and sc anchors: sc around adding picot every 8 sts to keep mesh stable
Round 6 :
Optional color: change to pale mint or sage to work a row of 1 dc in each st for subtle contrast (carry yarn inside if preferred) (approx same st count)
Info :
At this point, check the runner overall. Add more filler chains or small round motifs if there are large open holes. Keep edges consistent for final border alignment.
Round 7 :
Begin decorative edging along both long sides: *sc 10, picot, sc 10, ch 8, sc in next seam* repeat to the end creating repeat points for final shell border
Round 8 :
In each ch-8 space work 7 dc cluster shells to create full scallops (approx 30 scallops)
Round 9 :
Work small connecting chains between scallops: *ch 3, sc in top of scallop, ch 3* around (maintain counts)
Round 10 :
Add tiny picot fringe: sc around adding (ch 3, sl st) picots every 4 sts for delicate finish
Round 11 :
Topstitch corner finishes by working 3 sc into corner points and smoothing edges to avoid curling (counts vary by corner)
Round 12 :
Fasten off, weave in ends and block entire runner stretching scallops and pressing floral applique9s into the desired 3D shape.
Info :
Blocking is critical: arrange runner on a flat surface, pin scallops and leaves to create a natural trailing shape like the photo. Steam lightly and let dry overnight.
— Final Picot Edge and Finishing Touches (12 Rounds) :
Round 1 :
With cream yarn, join at one corner and work 1 sc in each st around runner perimeter to even out seam transitions (approx 400-500 sc overall)
Round 2 :
*ch 3, skip 2 sts, sc* repeat around to form small loops for final edging
Round 3 :
In each ch-3 loop: sc, picot (ch 3 sl st in first ch), sc to create consistent picots (approx 120 picots)
Round 4 :
Decorative rope: *sl st 2, ch 6, sl st 2* around to give a subtle rope-like frame (counts vary)
Round 5 :
Work a tiny scallop: *5 dc in next loop, sl st in next chain space* around to finish border (approx 60 scallops)
Round 6 :
Insert small leaves and lavender stems along border gaps by sewing through sc base with yarn needle and secure tightly
Round 7 :
Secure heavier floral applique9s with extra anchoring stitches through multiple layers of lace and motifs to prevent flipping
Round 8 :
Trim and weave in all tails: thread each tail through several stitches and pull snug; clip close but not too close to avoid slipping
Round 9 :
Final steam blocking and shaping: pin roses to desired height and steam from a distance to set shape without flattening petals
Round 10 :
Optional: add tiny beads or pearl pins into flower centers for vintage shimmer (if desired). Sew beads securely with matching thread.
Round 11 :
Inspect underside for loose ends; secure with additional stitches where needed and reinforce any seam that feels weak
Round 12 :
Admire your finished runner and place gently on table; protect with clear felt pads if placing heavy objects on top of applique9s
Info :
Because of the 3D floral elements, avoid placing heavy vases directly onto the applique9s. Use small coasters or clear display plates if needed.
Completing this runner is such a rewarding project — the delicate lace motifs and sculpted floral applique9s come together like a hand-painted centerpiece! Every blocking pin and carefully stitched rose makes the piece feel truly special. Place it on a sunlit table and enjoy the soft pastel blooms you made with your own hands. 🧶🌸✨