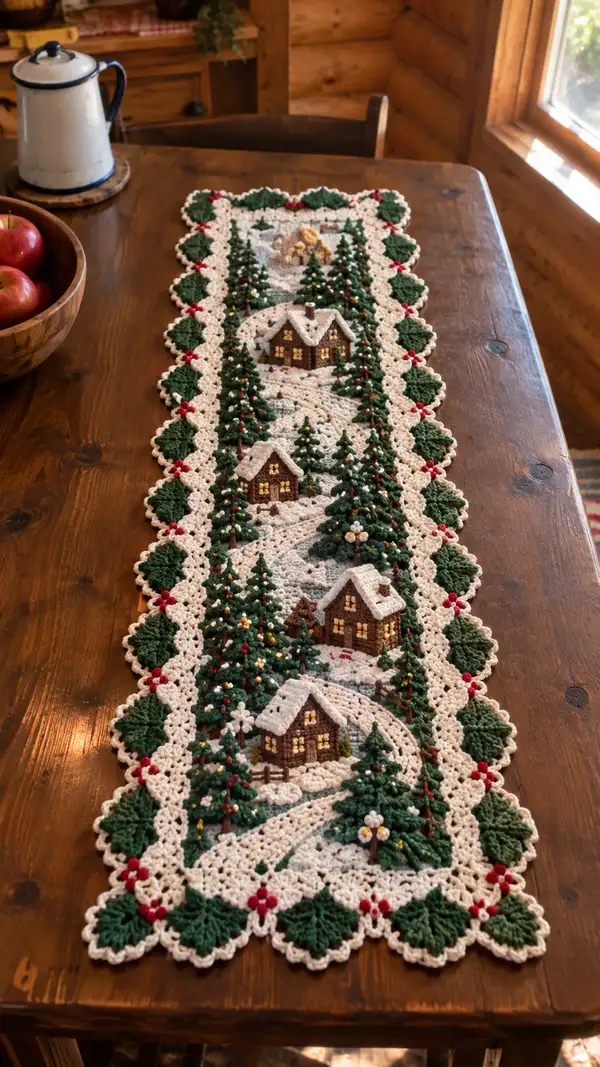
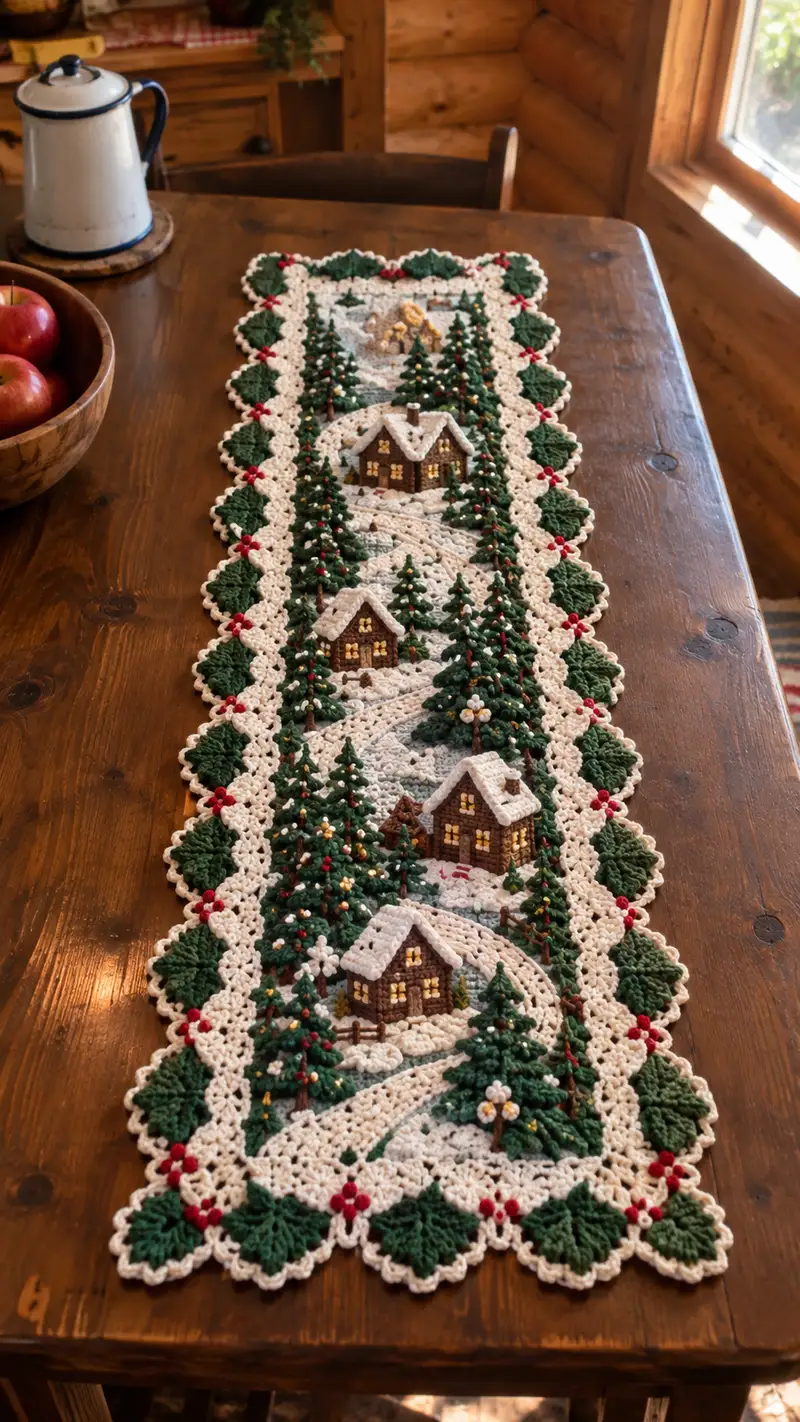
This elegant winter village table runner features tiny 3D cottages, tall pine trees, winding snowy paths and a scalloped holly-edge in forest green and cream. Designed to sit proudly along a dining table, it mixes textured crochet motifs, applique houses and a decorative scalloped border finished with tiny berries and gold accents. The pattern includes full stitch-by-stitch instructions, placement guides, and assembly notes so you can recreate the cozy scene exactly as shown.
Progress Tracker
0% Complete
— Project Overview :
Info :
This pattern is modular: make four rectangular center panels (each representing a repeating section of path, trees and cottages), applique four cottage motifs plus many pine tree motifs, then join panels lengthwise and add the scalloped holly edging. Instructions below give full stitch-by-stitch rounds for each motif and for the joining and edging. Use 3.5mm hook for panels and 3.25mm for small detailed pieces for tighter finish.
Info :
Gauge (for background panel squares): 14 dc x 10 rows = 4 in (10 cm) after blocking. Tension influences final size. The sample runner measures approximately 12 in (30 cm) wide and 52 in (132 cm) long with 4 repeated panels plus borders and motifs; adjust by adding or removing center panels.
— Center Panel (Make 4 identical) :
Round 1 :
Start with cream. ch 31, join with sl st to form a ring being careful not to twist (31)
Round 2 :
ch 3 (counts as dc), dc in same st, dc in next 29 sts, 2 dc in last st, rotate to work along opposite side of chain: dc in next 29 sts, 1 dc in last ch top; join with sl st to top of ch3. (62)
Round 3 :
ch 3, dc in same st, (dc in next 2 sts) x 10, (2 dc in next st, dc in next 3 sts) across the short end to create gentle curve; work symmetric along other side. Aim for even distribution: final count should be 68-70 depending on corner increases (maintain evenness)
Round 4 :
ch 2, hdc in same st, hdc across entire round maintaining stitch count, placing 2 hdc in each corner increase point used previously to keep panel flat. (approx 72)
Round 5 :
ch 1, sc in each st around working evenly. This creates a firm base for applique. (72)
Info :
Work these initial rounds firmly for a stable surface. Block this panel lightly after rounds 5-8 to ensure the panel lays flat before adding texture rounds.
Round 6 :
Switch to a cream slightly lighter for snow texture if desired. ch 3, dc in same st, (ch 1, skip next st, dc in next st) repeat across to create spaced lacy texture which will imitate a snowy field; join. (72)
Round 7 :
ch 2, 1 hdc in each dc and ch1 space around creating a broken shell texture for the snow. (72)
Round 8 :
ch 1, sc around placing an extra sc at both gentle curve points to keep shape (2 sc in those sts). (74)
Info :
Now create the central recessed walking path area using a short-row technique. Mark the long center axis of the panel with pins; you will crochet semi-rows to form winding path shapes as appliques later. Work next rounds with subtle relief to make the path base.
Round 9 :
ch 1, sc in 8 sts, ch 2, turn (do not join) — create short rows along center axis. Continue creating short rows that grow by 2 sts every other row until you reach approx 22 sts width for the path base, then decrease back. This builds a shallow raised path base. Fasten off when path base is complete. (short-row shaping yields approx 22 path sts at widest)
Info :
Leave long tails for sewing appliques; these will be used to anchor houses and trees. Block panel gently. Make four identical panels for the runner center.
— Cottage Motif (Make 4 — size approx 2.25 x 2 in) :
Round 1 :
Using chocolate brown. mr, 6 sc into mr (6)
Round 3 :
(1 sc, inc) x6 (18)
Round 4 :
(2 sc, inc) x6 (24)
Info :
These first rounds form the cottage base (walls). Block flat slightly. This circle will be worked up into squared house walls — we will flatten then build roof and walls by turning into a square applique.
Round 6 :
Fold circle into a square by forming 4 corner clusters: ch 1, sc next 5 sts, (2 sc, ch 1, 2 sc) in next st to create corner, sc next 5 sts, repeat for all four sides to create a squarish appliqued house base — flare slightly to obtain approx 2 in across.
Round 7 :
Switch to brown, sc around working 2 sc in corner ch1 spaces to maintain square shape. (approx 28)
Round 8 :
ch 1, 1 sc in next 2 sts, hdc in next 6 sts for slight vertical texture of walls, sc in remaining sts. (approx 28)
Info :
Begin roof construction. The roof is made separately and sewn on to create a raised effect: it is worked as two symmetric gable panels and one ridge piece.
Round 9 :
Make roof panel A: with dark gray or cream for snow on roof, ch 10, sc in 2nd ch from hook and across (9 sts). Turn, ch 1, sc across 9 sts for 6 rows to create rectangle. Fasten off leaving long tail for sewing. Make second panel identical for other side of roof.
Round 10 :
Make ridge piece: ch 11, 1 sc in each ch back to start (10), fold in half and sc through both layers to create a 1-row ridge (10). Fasten off leaving tail to sew the two roof panels and ridge together.
Round 11 :
Sew roof panels to top edges of square house base leaving a slight overlap; then sew ridge piece across the peak. Add a line of cream sc at roof edges to suggest snow (1 sc per st along roof edge). Embroider windows using warm yellow: embroider small cross or french knots to represent lit panes. Add small chimney with 6 ch, sc back to form tube and sew to roof.
Info :
Stuff the cottage base lightly before closing so the house is slightly raised from the panel. Use a small amount of fiberfill; you want a gentle buffed look, not a puffed pillow.
Round 12 :
Optional door: work a tiny brown rectangle 4 ch, sc across for 3 rows, sew onto house front. Add yellow french knot or bead for a doorknob. Fasten off and weave tails in neatly.
Round 13 :
Final cottage embellishment: secure cottage to panel with whip stitch using matching brown yarn around house perimeter, catching panel lightly so cottage appears attached but slightly raised (gap approx 1-2 mm). Place cottages on panels according to layout photo — each panel shows one cottage centered on the lower half with the path curving by it.
— Pine Tree Motif (Make many; small and large versions) :
Tree - Small (Make 12) Round 1 :
Forest green. mr, 6 sc into mr (6)
Round 3 :
(1 sc, inc) x6 (18)
Round 4 :
(2 sc, inc) x6 (24)
Round 5 :
ch 1, sc around (24)
Round 6 :
Fold triangle formation: with tree laid flat, fold cone shape and sc through back loops to create layers: (sc 3, sk 2, sc 3) across to form layered branches. The small tree will have approx 3 layered tiers.
Round 7 :
Trunk: using brown, ch 6, sc back along chain to make a short trunk tube. Sew trunk to base of green cone and stuff lightly. Sew tree to panel near walkway or cottage, anchoring at the trunk only to create the raised tree silhouette.
Info :
Add tiny red french knots or beads on random layers for ornaments; use yellow beads for lights. Use metallic gold for a few accent beads sparingly.
Tree - Large (Make 8) Round 1 :
mr, 8 sc into mr (8)
Round 3 :
(1 sc, inc) x8 (24)
Round 4 :
(2 sc, inc) x8 (32)
Round 6 :
Work 4 tiers: dec into points to form four scalloped tiers by folding and slip stitching into layer anchor points. Each tier will be formed by (2 dc, ch1, 2 dc) cluster along length to simulate branches and create triangular profile.
Round 7 :
Make trunk same as small tree but slightly longer (ch 8, sc back). Stuff trunk lightly and sew to bottom. Attach tree to panel and secure with invisible stitch around trunk base only for natural stand-up effect.
Info :
Place trees on panels to match photo: clusters of trees adjacent to cottages and along the path edges. Stagger small and large trees for depth. Use beads or tiny knots to create lights randomly placed.
— Snow Path Applique (Each panel) :
Round 1 :
Using cream or soft gray for path contrast. ch 18, sl st to end to create a short curved strip base. Work sc back and forth to create a long narrow strip approx 18-24 sts wide at widest curve: ch 1, sc across, turn; increase by 1 sc at each end every 3 rows to shape curve until you reach approx 22 sts width, then decrease symmetrically to a tapered end.
Round 2 :
Edge path with 1 sc around to firm edges. Stuff lightly along center to create slight puffiness (use a small amount of fiberfill placed along the underside). Fasten off and place on panel following the winding path photo; baste in place with large stitches before final sewing.
Info :
Make the path appear embedded by sewing only along the inner edge for a sunk look, leaving outer edges free slightly to catch light shadows.
Round 3 :
Optional: topstitch a faint dashed line using soft gray embroidery floss along center of path to suggest footsteps or a track.
— Small Fence and Accessories :
Round 1 :
Fence post: brown. ch 4, sc back to make 3-row post, make 2 posts and 1 rail: ch 12, sl st to posts to create a simple fence. Sew near houses. Make tiny stacks of wood or logs by working 4 sc in a tiny tube and sewing on sides.
Round 2 :
Snow mounds: cream. mr, 6 sc into mr, inc x6 (12), sc around two rounds (12) — flatten and sew low on panel to create fluffy snowbanks.
Info :
Accessories are sewn with small hidden stitches so they sit tightly on the panel; use a small amount of glue only if necessary for very tiny beads.
— Holly Leaf Motif for Border (Make 28-32) :
Round 1 :
Forest green. mr, 6 sc into mr (6)
Round 2 :
ch 2, (2 dc, ch 1, 2 dc) in the same st to form first lobed point, sl st to next st, repeat around making 6 lobes of small shell leaves. Fasten off leaving tail for sewing. Each leaf motif sits at border scallop points.
Round 3 :
Optional: add tiny red bead cluster of 3 beads sewn at the junction between leaves to represent berries. Secure beads with metallic gold thread for a festive shimmer.
Info :
Make enough holly motifs to place around the entire runner edge: count 28 for a 4-panel runner as shown. Motifs are later joined with cream scallops between them.
— Scalloped Border Join Motif (Make matching count: 28-32) :
Round 1 :
With cream. ch 8, join into loop. Round 2: into loop work (sc, ch2, 5 dc, ch2, sc) to create large scallop. Fasten off and leave long tail to sew between holly motifs and connect to panels edge.
Round 2 :
Sew each scallop between two holly leaves so the holly creates the pointed corners and cream scallop forms the rounded edge. Use a continuous whip stitch to join scallops to panel perimeter at even intervals (measure to place evenly — for our panels, place scallops every 2.25 in along the long edges and every 2 in along short ends).
Info :
Edge joining can be done by sewing holly motifs first then filling gaps with scallop motifs. Alternatively chain and crochet a continuous scallop edging then tack holly motifs on top — either method yields similar visual effect; sewing individual motifs gives more precise placement.
— Joining Center Panels Lengthwise :
Round 1 :
Lay two panels right sides up, align edges. Using cream yarn and mattress stitch or whip stitch, join along long edge by sewing through back loop of both panel edges to create a flat seam. Work with 2-3 mm spacing between stitches for security. Continue joining all panels in sequence (3 joins for 4 panels).
Round 2 :
After joining all center panels, block entire runner to flatten joins; pin into shape and steam or wet-block per yarn instructions. Allow to dry fully before adding appliques or border motifs to ensure perfect alignment.
Info :
When joining, ensure the walking path continues smoothly from one panel to the next by aligning the path applique edges before sewing. This creates a believable continuous trail through the village.
— Attaching Cottages, Trees, Paths and Accessories :
Round 1 :
Position each cottage on panel using pins according to photograph: cottages are placed approx 1.5-2 in from the short edge and centered laterally. Baste in place with large stitches around base, then whip stitch down more finely, catching the panel only on inner loops to leave a slight raised effect.
Round 2 :
Sew trees in place using the trunk as main anchor point. For larger trees use 2-3 anchor stitches around trunk base to ensure stability. For tiny bead decorations, sew beads on after trees are sewn and secure the thread with an additional knot passed through the underside.
Round 3 :
Sew path appliques by placing matching pins along path edges and using fine ladder stitch to attach underside of path to panel interior, leaving outer edge slightly loose for shadow. Add small snow mounds adjacent to houses for depth.
Info :
Test placement by draping runner on a flat table to ensure motifs fall in balanced groups. Adjust before final sewing as it is difficult to re-position after the final seams are made.
— Final Edge Join and Decorative Top Stitching :
Round 1 :
After holly and scallop motifs have been sewn to the outer edges of the joined panels, work a decorative surface slip-stitch (sl st) round in cream along the perimeter to tidy joins and add a continuous outline. Work 1 sl st in each outermost st across panel edge and into scallops, keeping even tension.
Round 2 :
Optionally, work a contrast surface chain: with forest green, work a small chain stitch (embroidery) along the scallop valleys to emphasize holly placement; secure ends with hidden stitches on the underside.
Info :
Weave in all tails on the underside, making sure ends are not bulky where beads will be placed. Use a thin yarn tail when sewing on tiny beads to minimize bulk and knot visibility.
— Edging: Final Nautical Picot Lace (All Around) :
Round 1 :
Using cream. Join yarn at one corner using sl st, ch 1, *sc in next 3 sts, ch 3, sl st in 1st ch to create a picot, sc in next 3 sts, sl st in next scallop valley* — repeat around whole outer edge ensuring picots align with holly leaf points. This forms a refined sc/picot scallop outline.
Round 2 :
Fasten off and secure ends. Steam-block edges lightly and pin scallops to ensure uniform scallop shape. Check that runner lays flat with no ripple; if needed, adjust picot tension or un-sew a small section to even it out.
Info :
Carefully trim any residual yarn tails on underside and consider adding a small piece of fusible interfacing fabric beneath each holly motif if you anticipate heavy use to protect against snagging.
— Finishing Touches and Small Embroideries :
Round 1 :
Using warm yellow, embroider window panes as tiny 'plus' signs or french knots; add tiny beads or stitches as wreaths on doors. Stitch thin rails across fences with a strand of brown and tack in place with small stitches. Use metallic gold beads sparingly to represent lights in trees or windowsills.
Round 2 :
Brush lightly with a soft toothbrush to even fuzz and lift nap if yarn used is slightly felted. Avoid vigorous brushing to prevent felting of synthetic yarns.
Info :
To launder later, hand wash gently and lay flat to dry; remove beads before washing if possible or cover them with a cloth to protect from snagging in a delicate wash bag.
Completing this Winter Village Table Runner is such a rewarding finish — every tiny cottage and pine tree adds a bit of holiday magic to your table. The scalloped holly edge frames the scene beautifully and creates a handcrafted heirloom centerpiece. I love how the runner looks both delicate and dimensional, with warm window lights and snowy paths that invite closer inspection. 🧶❄️ Display it proudly all winter long and enjoy the cozy, handmade charm. 🎄