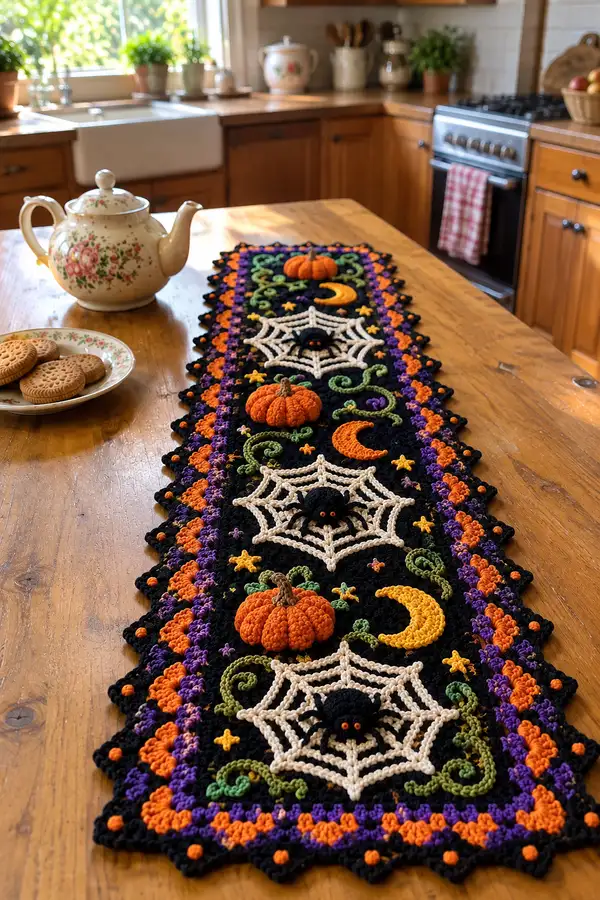
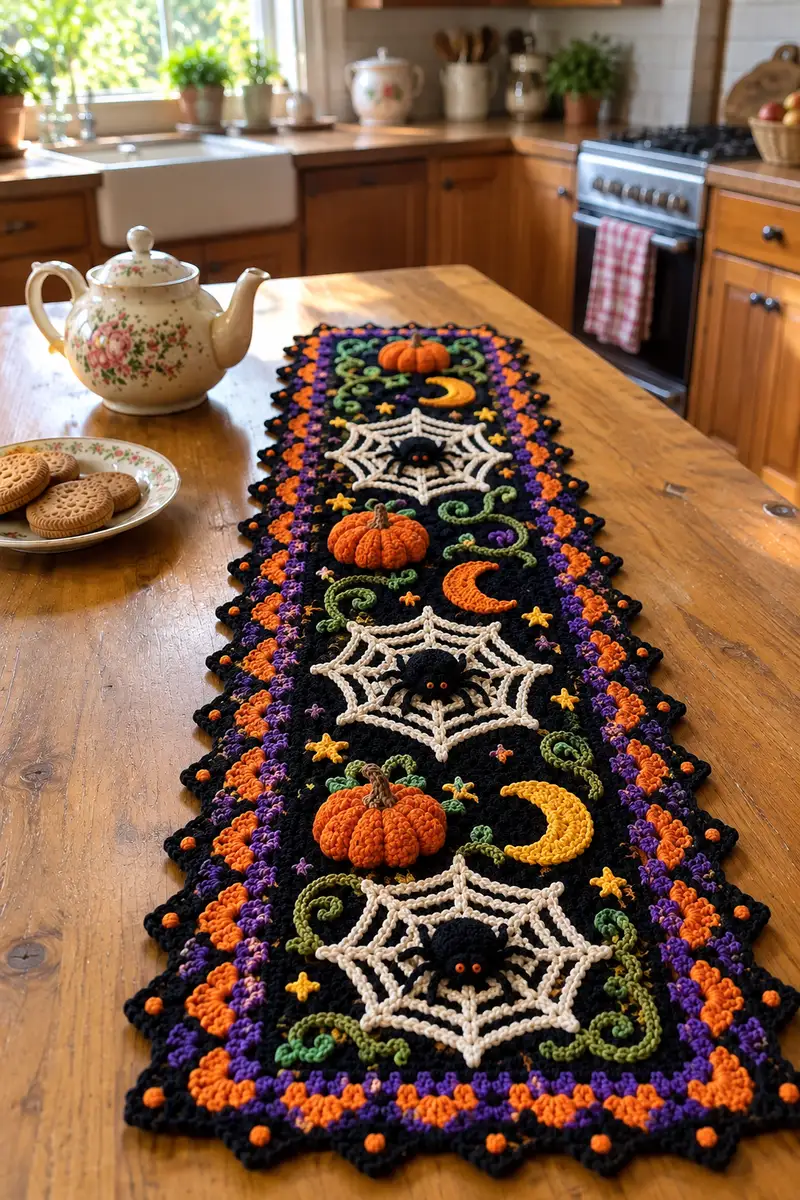
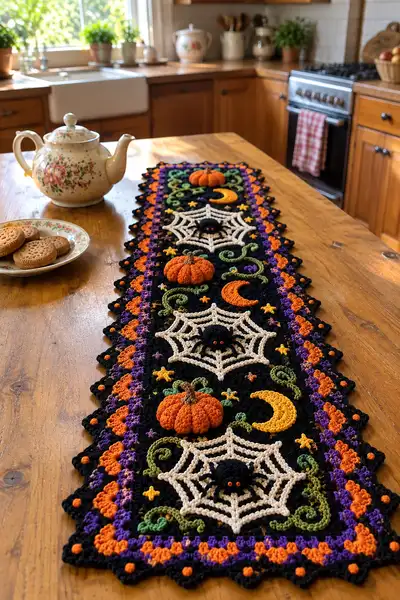
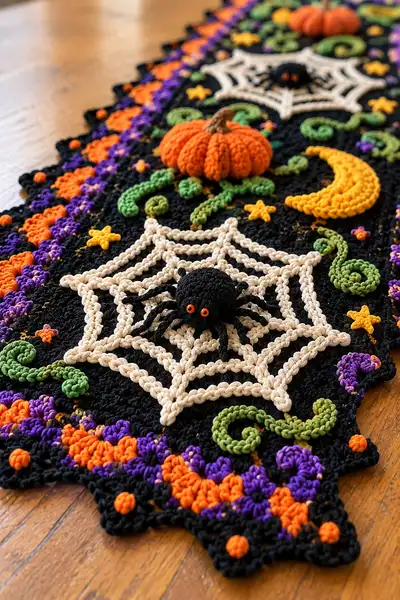
Create a charming Halloween table runner featuring raised spider webs, three-dimensional spiders, plump pumpkins, crescent moons, twinkling stars and curling vines. This richly textured runner uses bright Halloween colors—black background with orange, purple, green, cream and gold accents—to create eye-catching seasonal decor. The pattern includes step-by-step instructions for the base panel, decorative border, 3D spiders and pumpkins, crescent moons, little stars and embroidered tendrils. Perfect for a festive centerpiece or mantel display.
Progress Tracker
0% Complete
— Notes & Gauge :
Info :
Gauge is not critical for this runner, but for reference: 16 sc and 18 rows = 4 inches in single crochet using 3.5mm hook. Adjust hook size to suit your tension. Work tightly on amigurumi pieces (spiders and pumpkins) using the smaller hook for a clean finish. Block the base panel before attaching motifs for best alignment.
— Base Panel (worked in continuous rounds/rows) :
Round 1 :
With Black, ch 61. Join with sl st to form a loop, taking care not to twist. Ch 1 (does not count as st). 61 sc around the chain (61)
Round 2 :
1 sc in each st around working in continuous spiral; place stitch marker at start and move marker each round (61)
Round 3 :
1 sc in each st around (61)
Round 4 :
1 sc in each st around (61)
Info :
These first rounds build a firm base. Work tightly and maintain consistent tension to prevent curling. If you prefer a wider runner, increase starting chain by multiples of 6 + 1.
Round 5 :
Work 1 sc in each st around (61)
Round 6 :
1 sc in next 10 sts, hdc in next 40 sts, 1 sc in remaining 11 sts (61)
Round 7 :
1 sc in each st around (61)
Round 8 :
1 sc in each st around (61)
Info :
From rounds 6-10 we introduce subtle texture using hdc panels in the center of the runner for a denser base under motifs. Adjust counts if you changed starting chain length.
Round 9 :
1 sc in each st around (61)
Round 10 :
1 sc in each st around (61)
Round 11-14 :
1 sc in each st around for 4 rounds to build height (61)
Info :
Mark the middle of the runner lengthwise for motif placement. The photos show three repeated sections down the center; plan equal spacing. Leave at least 8-10 rounds between motif centers for balanced look.
Round 15 :
Start mosaic base pattern: *ch 2, sk 2, 3 dc cluster in next st, ch 1, sk 1, 1 sc* repeat across to end, ending with 1 sc in final stitch to keep edge straight (61)
Round 16 :
1 sc in each st around (61)
Round 17 :
Alternate clusters: *3 dc cluster, ch 2, sk 2, 1 sc* repeat (61)
Round 18 :
1 sc in each st around (61)
Info :
These mosaic rows create a textured rectangle to accept surface appliques. You can change how many mosaic motif repeats you do depending on the look; keep the total stitch count consistent.
Round 19-24 :
Maintain 1 sc in each st around for 6 rounds to build up base between motifs (61)
Round 25 :
Switch to decorative row: *ch 3, sk 2, sc in next st* across to create small picot scaffolding for later border joins. 61 total scaffolds (61)
Round 26-30 :
1 sc in each st around for 5 rounds (61)
Info :
Work the base long enough to place all three main motif groups. For the runner pictured, continue building until you have three wide flat rectangles spaced with ~8-10 rounds between centers. When length is sufficient (approx 36-40 inches in photo), stop and work border; otherwise keep adding even rounds.
— Border & Edge (Granny-inspired scallops) :
Info :
We will work a layered scalloped border in Black, Purple and Orange. Join yarn at any point on the edge and work in rounds along the perimeter. Each scallop is worked over 6 stitches of the edge; counts will remain consistent if you began with multiples that suit your length.
Round 31 :
With Black, attach and work 1 sc evenly around edge, placing 3 sc in corners to turn. Count to ensure even spacing (approx 61 + edges) — maintain continuous sc to create a neat frame.
Round 32 :
Switch to Purple. *Ch 3, 2 dc in same st, sk 2, sc in next st* repeat around to create small shell clusters; adjust last repeat to align (shell sets dependent on perimeter)
Round 33 :
Switch to Orange. *Work picot bobble: (ch 2, 3 sc in same st, ch 2) sl st into next shell spacing* repeat along edge to create orange bobble accents (using ch 2 picots helps spacing)
Round 34 :
With Black, work scallop round: *sk 1, (5 dc, ch 1, 5 dc) all in same point, sk 1, sl st into next* Repeat to create deep scallops. If necessary, add small sl sts between scallops to maintain even count.
Info :
Work the border tightly and arrange bobbles so they sit on the scallop peaks. This layered border is decorative and also secures the edges from stretching.
Round 35 :
With Black, add final picot details: *sl st to peak, ch 3, sl st in 3rd ch to make tight picot* around scallop peaks; fasten off and weave in ends (this creates the little black points seen at edge)
— Spider Web (Make 3 large webs) :
Info :
Each web is a raised cream motif worked almost as a circular frame then worked into radial chains. Webs are worked separately and sewn to the base. Place centers roughly at rounds 16, 28 and 40 along the length, centered widthwise.
Round 1 :
With Cream, mr, 6 sc in ring (6)
Round 2 :
Inc in each st around (12)
Round 3 :
(1 sc, inc) x 6 (18)
Round 4 :
(2 sc, inc) x 6 (24)
Info :
We will now build spokes out of chain loops, then join each spoke with raised chain arcs to make the web pattern. Keep tension even so the web lays flat when sewn down.
Round 5 :
(3 sc, inc) x 6 (30)
Round 6 :
Slip stitch to first sc, ch 14 (counts as long spoke), sl st into next sc to create the first spoke loop. *Sl st to following sc, ch 14, sl st into next sc* repeat until you have 12 spoke loops spaced evenly around the disk. Fasten off leaving long tail for sewing.
Round 7 :
With the long tail, use a tapestry needle to tack down spoke loop bases evenly around disk to secure. Ensure loops lie flat and evenly spaced. Do not trim spoke loops.
Round 8 :
Using cream, join at inner base and work 12 chain arcs that connect spokes: *sl st into spoke loop, ch 8, sl st into next spoke loop* around to create inner ring (12 chains)
Round 9 :
Repeat another chain ring farther out: *sl st into spoke loop, ch 12, sl st into next spoke loop* continue to make an outer ring (12 chains)
Round 10 :
Work additional connecting chains near the perimeter: *sl st, ch 16, sl st* repeat forming 12 arcs for a layered web look. Fasten off and weave ends.
Info :
Sew webs to the base by applying small whip stitches at the disc center and at a few outer spoke join points. Sew only at discrete attachment points so the chain arcs remain raised for texture.
— Spider (Make 3) :
Info :
Each spider is a small amigurumi ball (body) with 8 legs. Use 3.25mm hook for a firm fabric. Eyes can be small safety eyes (4-6mm) or embroidered French knots using red/orange yarn. Work three spiders: small, medium and small as pictured for visual interest.
Round 1 :
With Black and 3.25mm hook, mr, 6 sc in ring (6)
Round 3 :
(1 sc, inc) x 6 (18)
Round 4 :
(2 sc, inc) x 6 (24)
Round 5 :
(3 sc, inc) x 6 (30)
Round 6 :
(4 sc, inc) x 6 (36)
Info :
At this point decide on spider size. For small spiders stop increasing at round 6 (36 sts). For medium continue to round 7 for 42 sts. For large continue to round 8 for 48 sts.
Round 7 :
(5 sc, inc) x 6 (42)
Round 8 :
(6 sc, inc) x 6 (48)
Round 9-11 :
1 sc in each st around for 3 rounds to build body (stay at chosen size) (36/42/48)
Info :
Begin stuffing firmly but leave space around the head-to-abdomen seam. Place safety eyes between rounds 8-9 roughly 6-8 stitches apart for medium; reduce spacing for small spiders. Alternatively, embroider eyes with orange yarn using French knots then add tiny black pupils with embroidery thread.
Round 12 :
(6 sc, dec) x 6 (42) if working down from 48, or adapt decreases appropriate for chosen size to shape a rounded body
Round 13 :
(5 sc, dec) x 6 (36)
Round 14 :
(4 sc, dec) x 6 (30)
Info :
Finish decreases and close top with 6 dec then fasten off leaving a long tail for sewing. Make sure the body is rounded and firmly stuffed to hold legs in place.
Round 15 :
6 dec (6) - close tightly and weave tail through remaining sts; fasten off and secure
Legs (repeat 8 times per spider) :
With Black and 2.75mm hook: ch 8, sc in 2nd ch from hook, hdc in next, dc in next 2, hdc next, sc next; sl st to body where desired and sew securely. For thicker legs, work two strands in parallel and sew together to create sturdier legs. Use slight stuffing inside each leg or slip in a pipe cleaner for poseable legs. Trim and secure ends.
Info :
Arrange legs so 4 legs are on each side. Sew leg bases through the round where the head meets the body to mimic natural leg spacing. For realistic look, bend legs slightly at the joints while sewing to create subtle curves.
— Pumpkin (Make 3 plump pumpkins) :
Info :
Each pumpkin is a squat amigurumi with prominent ribbing created by working post stitches and pulling with yarn to create segments. Use Pumpkin Orange and smaller hook (3.25mm). Make big, medium and small to match photo spacing.
Round 1 :
With Orange, mr, 6 sc in ring (6)
Round 3 :
(1 sc, inc) x 6 (18)
Round 4 :
(2 sc, inc) x 6 (24)
Round 5 :
(3 sc, inc) x 6 (30)
Round 6-8 :
1 sc in each st around for 3 rounds (30)
Info :
To create plump ribs, we will work front post hdc rounds alternating with sc rounds. The number of ribs is determined by how many FPhdc you work; typical pumpkins show 8 ribs. For 8 ribs, you should have stitch multiples that divide evenly by 8 (30 divides into 3.75 — acceptable; we'll use 32 for nicer ribbing if you change round 4 to (3 sc, inc) x 8 to reach 32).
Round 9 :
Switch to 32 stitches if desired by adding 2 sc evenly; otherwise continue. Work *FPhdc around next st, sc next* repeat around to create raised ridges (32)
Round 10 :
1 sc in each st around (32)
Round 11 :
Repeat FPhdc round: *FPhdc around next st, sc next* (32)
Round 12 :
1 sc around (32)
Info :
Begin stuffing fairly firmly here. Use small tufts to push into rib valleys for round, full shape. To create defined segments later, you can thread a length of yarn around the pumpkin and pull gently to form segments before adding the stem.
Round 13-15 :
1 sc in each st for 3 rounds (32). Stuff firmly after round 13 and before final decreases.
Round 16 :
(4 sc, dec) x 6 if at 30 sts OR adjust: (3 sc, dec) x 8 if at 32 sts to bring count down (24)
Round 17 :
(2 sc, dec) x 6 (or (2 sc, dec) x 8) resulting in 18 or 16 depending on start
Round 18 :
(1 sc, dec) x 6 (or x 8) resulting in 12 or 8; finish stuffing and close with 6 dec (6)
Round 19 :
Fasten off leaving long tail. If you use 8 segment method, thread yarn through top loops and pull to create pumpkin sections; knot tightly at base.
Stem :
With Brown, mr, 6 sc in ring, work in spiral: 6 sc for 4 rounds, then tighten and leave a tail to sew stem to top. Alternatively work ch 4 and sc back for a short stem, then sew and bend over for rustic look.
Info :
Sew pumpkin to base using long tail or separate yarn. Position pumpkins so that vines curl toward them. For added depth, use a small amount of brown yarn wrapped and glued inside stem to stabilize it.
— Crescent Moon (Make 3) :
Info :
Crescents are worked flat using Golden Yellow and hooked directly onto the base later. Use 3.25mm hook and create a curved crescent via short rows and decreases.
Round 1 :
Ch 12, sc in 2nd ch from hook and across (11)
Round 2 :
Ch 1, turn. Sc across (11)
Round 3 :
Ch 1, turn. Sc 9, dec, sc 0 (10)
Round 4 :
Ch 1, turn. Sc 8, dec (9)
Round 5 :
Ch 1, turn. Sc 7, dec (8)
Round 6 :
Ch 1, turn. Sc across 8 then fold and sc 4 along curved edge to thicken, sl st to bind. Fasten off leaving tail for sewing. Block curved shape into crescent by pinning and steaming lightly.
Info :
Sew crescents into place pointing alternately to create movement in the runner. Use thin padding behind one side if you want the moon slightly raised.
— Stars (Make many tiny stars) :
Info :
Stars are tiny decorative accents. Use 2.75mm hook. Work small five-point stars with 5 tiny petals using chain loops and sl sts. Make about 12-18 stars in Golden Yellow.
Round 1 :
With Yellow, ch 6, sl st to form ring
Round 2 :
*Ch 3, sl st into ring* repeat 5 times to make 5 loops, pull tight, sl st to close (5 tiny points)
Round 3 :
Work 1 sc in each loop, tighten and fasten off leaving tail for sewing stars down.
Info :
Sew stars around webs and pumpkins as pictured. Use small stitches to hide sewing and keep stars slightly raised by attaching only at center point.
— Vines & Tendrils (Make multiple curls) :
Info :
Vines are made using chain spirals and working sc in each ch to form curling leaves and tendrils. Use Green yarn. Create various lengths for organic flow between pumpkins and webs.
Tendril 1 :
Ch 28, work 1 sc in 2nd ch from hook, hdc next, dc next 6, tr next 6, dc next 4, hdc next 2, sc last 2. Fasten off and curl into spiral, sew base to runner.
Tendril 2 :
Ch 18, sc along chain then roll up tightly to make bud-like curl; anchor with a few whip stitches. Make 6-8 vine bits of varying lengths.
Info :
Sew vines under pumpkins and around webs so they appear to grow around motifs. Use extra anchoring stitches to hold heavier pumpkins in place.
— Embellishments & Surface Embroidery :
Info :
Use contrasting yarn to add tiny dots, French knots and embroidered flourishes—little orange dots, purple puff clusters and green vine veins add handcrafted charm. Use stranded embroidery cotton or yarn tail for small stitches.
Surface Puff Spots :
To make small puff dots: attach yarn, yo 5 times in same st, draw through all loops, ch 1 and sl st to secure. Trim and anchor on WS. Make orange and purple puffs along border as seen in photos.
French Knot Stars :
Use a needle and yellow thread to make tight French knots for tiny star centers and eye glints.
— Final Assembly & Placement :
Info :
Block the base flat first. Pin all motifs in place using reference photo spacing: place a pumpkin, moon and web trio repeated along the center with vines curling between. Allow about 8-10 rows spacing between motif centers. Pin securely prior to sewing.
Step 1 :
Lay runner flat and pin the first web center 8-10 rounds from one end, centered widthwise. Use the long tail from web center to sew with mattress stitch or whip stitch in hidden back loops at disc base and 3 outer spoke join points.
Step 2 :
Place and sew pumpkin near web edge, slightly overlapping vine to appear intertwined. Sew through the bottom rounds into the base using strong whip stitches; ensure stuffing is secure when sewing.
Step 3 :
Attach spider to the web: position body at web interior and sew through center disc then tack a few stitches through some spoke loops only so the spider can sit on top of the web while anchored.
Step 4 :
Sew crescents and stars in spaces between motifs. Use minimal stitches at strategic points so motifs remain slightly raised. Add embroidered swirls in green around pumpkins to deepen the vine effect.
Info :
Weave in all tails on the wrong side, trim flush. Lightly steam-block the whole runner if desired, being careful not to crush 3D elements. Use fabric-safe adhesive on the underside of pumpkins when making a display that will be moved often to prevent dislodging.
— Alternates & Adjustments :
Info :
To make shorter runner use two motif sections instead of three. For placemats create smaller base rectangles with single web/pumpkin sections. For child-safe versions embroider eyes and avoid safety eyes on spiders.
This Halloween runner brings together playful 3D motifs and rich texture to create a festive centerpiece you�ll adore making and displaying. The raised webs, chubby pumpkins and curling vines give the runner a handcrafted, heirloom feel. It�s perfect for tabletops, mantels or as a spooky seasonal gift. 🎃🕸️ Enjoy the slow, satisfying process of stitching each little motif and watch the runner come to life as you sew everything together. Happy crocheting and don�t forget to share your finished creation! ✨