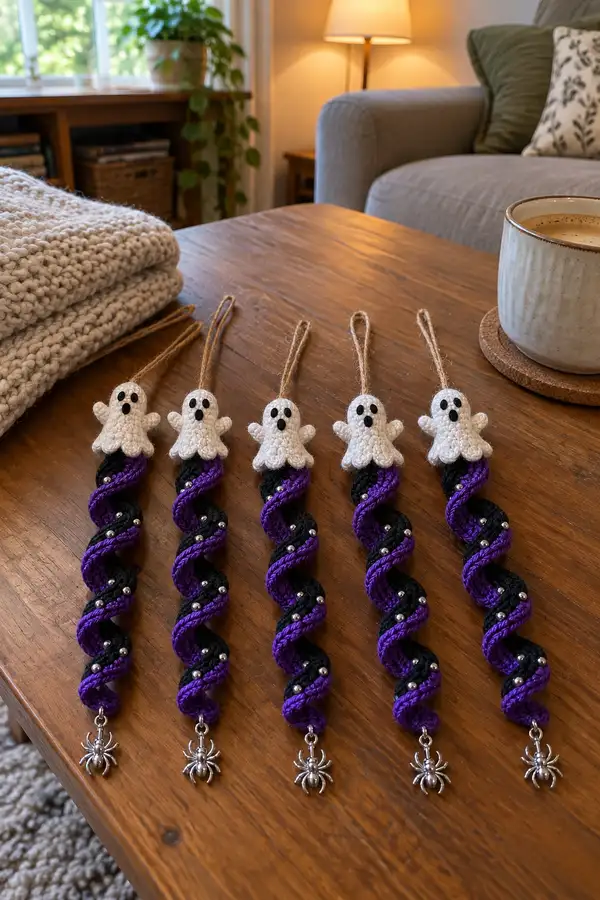
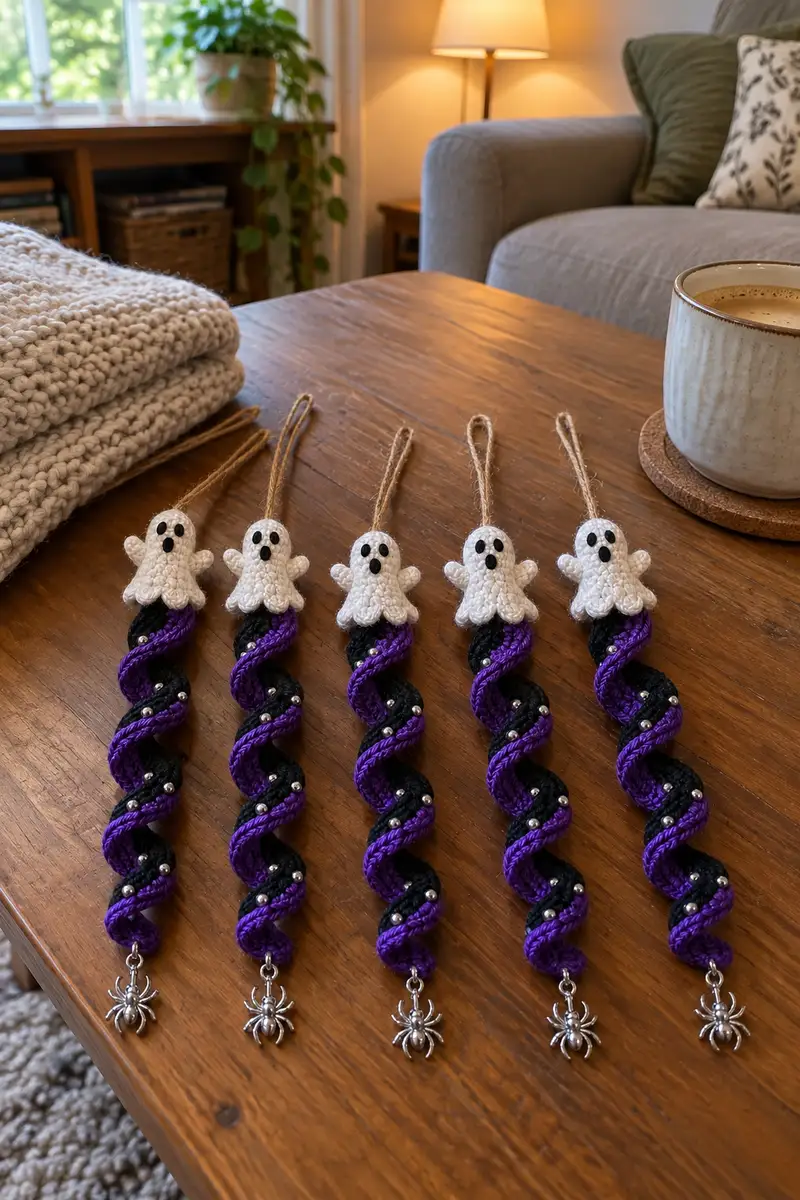
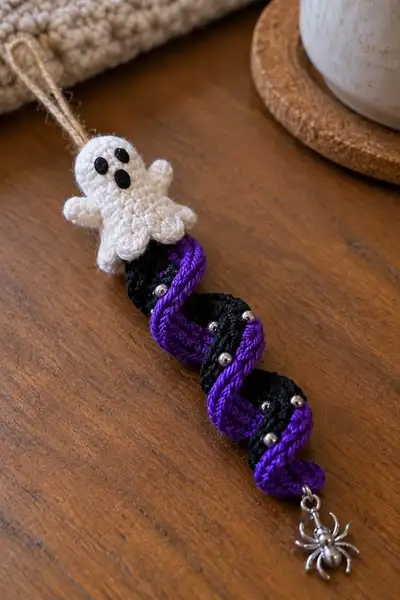
Create a whimsical Halloween hanging ornament featuring a tiny amigurumi ghost perched on a twisted spiral tail. This pattern combines a small stuffed ghost with a long crocheted spiral rope wrapped in contrasting color, embellished with metallic beads and a tiny spider charm. Perfect for seasonal garlands, tree ornaments, or bag charms — soft, lightweight, and full of spooky-cute personality.
Progress Tracker
0% Complete
— Ghost Top (Head & Body Combined) :
Round 1 :
6 sc in magic ring (6)
Round 3 :
(1 sc, inc) x 6 (18)
Round 4 :
(2 sc, inc) x 6 (24)
Round 5 :
(3 sc, inc) x 6 (30)
Round 6 :
(4 sc, inc) x 6 (36)
Round 7 :
(5 sc, inc) x 6 (42)
Round 8 :
(6 sc, inc) x 6 (48)
Round 9-16 :
1 sc in each st (48) — work 8 rounds to build the dome height (Rounds 9,10,11,12,13,14,15,16)
Info :
Eye placement: place safety eyes or mark spots between rounds 12-13. For a small, cute expression position eyes about 6-8 stitches apart (approx. 7 sts between centers) depending on your tension. If using safety eyes, install and secure washers before stuffing further.
Round 17 :
(6 sc, dec) x 6 (42)
Round 18 :
(5 sc, dec) x 6 (36)
Round 19 :
(4 sc, dec) x 6 (30)
Round 20 :
(3 sc, dec) x 6 (24)
Info :
Begin stuffing the ghost lightly now. Use small bits of fiberfill and pack evenly to keep the dome smooth. Add more stuffing as you move toward the next rounds that form the neck — ghost should be softly rounded, not overstuffed.
Round 21 :
1 sc in each st (24) — this creates the neck/top of skirt foundation
Round 22 :
1 sc in each st (24) — keep neck short to allow a nice scalloped skirt
Round 23 :
FoR scalloped skirt work: *sc in next st, 5 dc in next st, sc in next st* x6 (works across 24 base sts; scallops form across the bottom, counts unchanged at 24 base loops)
Info :
Scalloped skirt details: The scallops are made by working a 5-double crochet shell into every fourth base stitch; this creates six evenly spaced scallops for a small ghost. Keep shells loose and not overly tight to allow the skirt to flare slightly.
Round 24 :
Fasten off white yarn or continue with slip stitch to tidy shells. Leave a 20-25 cm tail for sewing the ghost top to the spiral core. If you prefer, finish shells with a row of sl st across the shell tips to give a ruffled look.
Info :
Face: Using small black felt circles, tiny safety eyes, or embroidery thread, create two eyes and an open-round mouth. If embroidering, use a small satin stitch or french knots for eyes (3-4 mm). Place eyes between rounds 12-13, spaced about 6-8 sts apart. The mouth can be a vertical oval or small round sewn onto the shell’s upper edge to match the photos.
— Ghost Arms (Make 2) :
Round 1 :
6 sc in magic ring (6)
Round 3 :
1 sc in each st (12)
Round 4 :
(1 sc, dec) x4 (8)
Info :
Shape: These tiny stubby arms are padded lightly. Stuff the arm tip with a small amount of fiberfill and taper as you decrease.
Round 5 :
1 sc in each st (8)
Round 6 :
(2 sc, dec) x2 (6)
Round 7 :
1 sc in each st (6)
Round 8 :
sl st in next st, fasten off leaving long tail for sewing (approx 20 cm). Make second arm the same.
Info :
Sew arms to body by positioning them at the sides of round 20-22 (neck area) — pin in place and sew through the base of the arm into the ghost body using a ladder stitch for an invisible seam. Blunt ended needle recommended for small work.
— Spiral Core (Black Tube) :
Round 1 :
6 sc in magic ring (6)
Round 3 :
(1 sc, inc) x 6 (18)
Round 4 :
(2 sc, inc) x 6 (24)
Round 5 :
(3 sc, inc) x 6 (30)
Round 6 :
(4 sc, inc) x 6 (36)
Round 7 :
(5 sc, inc) x 6 (42)
Round 8 :
(6 sc, inc) x 6 (48)
Round 9-56 :
1 sc in each st (48) — work 48 rounds even to create the length of the spiral core tube (adjust rounds to reach desired finished tail length; these 48 rounds create a tail about 11–13 cm long in worsted yarn)
Info :
Stuffing & optional wire: The black core is generally unstuffed or very lightly stuffed to keep it flexible. If you desire a stiffer poseable tail, insert a thin floral wire along the length before closing one end; bend ends to create small anchors and wrap wire ends back inside to avoid poking through stitches.
Round 57 :
1 sc in each st (48) — final tidy round; fasten off leaving long tail for sewing to ghost top
Info :
Bead anchors: Prior to assembly, slide metallic beads on a short length of thread or thin fishing line. Plan to sew beads through the black core at even intervals (for example, through the topmost stitch of rounds 14, 18, 22, 26, 30, 34, 38, 42, 46). Mark those rounds with safety pins for later beading. Sew each bead securely into the tube by bringing the needle through the stitch, anchoring the bead, and returning through the opposite side.
— Purple Spiral Wrap (Wrap Tube) :
Round 1 :
6 sc in magic ring (6)
Round 3 :
(1 sc, inc) x 6 (18)
Round 4 :
(2 sc, inc) x 6 (24)
Round 5 :
(3 sc, inc) x 6 (30)
Round 6-54 :
1 sc in each st (30) — work even for 48 rounds to match the length of the black core. The purple tube will be slightly narrower (30 sts) to sit neatly around the black tube when twisted into a helix
Info :
Because the purple wrap sits over the black core, it should be slightly smaller in circumference so that when twisted it nestles into the helix shape. If your tubes are too close in size they will not twist cleanly; if too small the wrap will slide and gap. Adjust number of rounds or final stitch counts to match your gauge.
Round 55 :
Fasten off leaving long tail for sewing (approx 30–40 cm). We will use this tail to sew the wrap to the core along a spiral stitch line to create the twisted effect.
— Optional Reinforced Inner Cord :
Info :
If you want a stiffer spiral, measure a length of thin floral wire or thin craft cord to be slightly shorter than finished tubes. Thread it into the black core before closing the bottom end — this will make the spiral hold shape and be nearly poseable. Keep ends tucked inside the ghost top or curled to anchor.
— Bead Placement & Embellishment :
Info :
Plan bead placement along the black core at evenly spaced intervals (roughly every 3–4 rounds along the length). Use a beading needle or fine thread to sew each bead through one stitch, catching the opposite side stitch and knotting thread securely inside the tube. Leave beads unadorned or use 3–4mm silver beads like the sample photo for subtle sparkle.
— Hanging Loop (Jute) :
Round 1 :
Cut a length of jute or thin hemp about 14–16 cm. Fold in half and tie a simple overhand knot leaving a loop for hanging (approx 4–5 cm loop). Trim ends.
Info :
To attach the jute loop invisibly, thread the two loose ends into the topmost center of the black core before sewing the ghost top — weave ends into the inside through round 1 of the black tube and anchor with a few stitches, then trim inside. Alternatively sew the jute loop onto the back of the ghost after assembly.
— Assembly (Sewing Ghost to Spiral) :
Info :
Arrange your pieces on a flat workspace: the black core (tube) as the main center, purple wrap tube, ghost top (with arms attached), beads pre-placed. Start by laying the black core down and wrapping the purple tube around it in a helical spiral direction (clockwise or counterclockwise depending on preference). Space the purple wrap evenly so gaps between wraps are uniform (in the sample photo wraps twist tightly with about 1 wrap per 6–8 rounds).
Round 1 :
Position the purple wrap at the top of the black core and, using the purple tail and needle, begin sewing the purple wrap to the black core at every 6th stitch on the core. Use small invisible stitches through both tubes catching two or three stitches to secure the wrap, but do not pull too tight — you want the helix to remain rounded (no flattening).
Info :
Sewing technique: Use a yarn needle and the long tail from the purple tube. Insert needle through the inside of the purple wrap into the corresponding stitch of the black core, then back through the purple wrap a few stitches along to create a single anchoring stitch. Repeat along the length every 5–8 rounds to hold the spiral in place. If you added beads, align them so they sit between the purple wraps like in the photos.
Round 2 :
Once the wrap is anchored along the full length, weave the long tails into the inside of the black core or knot and bury them inside the topmost few rounds to keep them hidden. Make sure the bottom of the black core remains open for charm attachment.
Round 3 :
Position the ghost top over the top opening of the black core so the lower neck base fits snugly onto the top of the tube. Use the long tail left from the ghost to sew the bottom of the ghost securely to the topmost round of the black core. Work evenly around the neck, making small whip-stitches through the base of the ghost and the top rounds of the core to avoid puckering. Sew until ghost is seated firmly and can stand upright on the spiral.
Info :
Alternate attachment: If you inserted a jute loop through the core earlier, you can also anchor the ghost by stitching the jute ends to the ghost underside for extra security. Check alignment — ghost should sit centered with its scalloped skirt covering the seam where the two tubes meet.
— Spider Charm Attachment & Final Touches :
Round 1 :
Attach a small jump ring to the spider charm and sew or use a jump ring to clip the charm to the loop of the final purple wrap at the bottom. Alternatively sew the charm to the core bottom using a small stitch through the charm loop and knot securely inside the tube.
Info :
Trim and tuck all tails inside the core; weave ends at least 3–4 cm inside and secure with a knot or a dab of fabric glue if desired. Give a final check that beads are secure and the spiral holds its shape — adjust anchor stitches to tighten or loosen the helix spacing.
Round 2 :
Press and shape scallops lightly with fingers to ensure they sit nicely over the top of the wrap. If scallops are too flared, add a small tidy row of slip stitches along the scallop tips to flatten them slightly.
— Alternate Construction: One-Piece Spiral with Crochet Wrap :
Info :
Another method is to crochet a long black tube as above and make the purple wrap as a flat strip that you curl around and stitch as you go — e.g., chain a length and work back-and-forth rows to create a rope-like tube. For this pattern the two-tube method is recommended for even helix shaping and bead placement.
— Finishing & Care :
Info :
Weave in all ends securely and trim close to work. For ornaments that will be handled, consider using fabric glue to reinforce bead knots and the ghost seam. Spot clean with a damp cloth — avoid soaking. Remove charm or jute if washing is necessary.
This little ghost-on-a-spiral is a delightful seasonal project that combines amigurumi shaping with crafty cord work. Each piece is quick to make, uses small amounts of yarn, and has lots of room for personalization — swap colors, charms, or beads to match your Halloween decor. I adore how the scalloped skirt and twirled tail come together with a tiny spider dangling at the end 🕷️🧶. Cozy, playful, and ready to hang on your porch, tree, or gift package — enjoy every stitch!