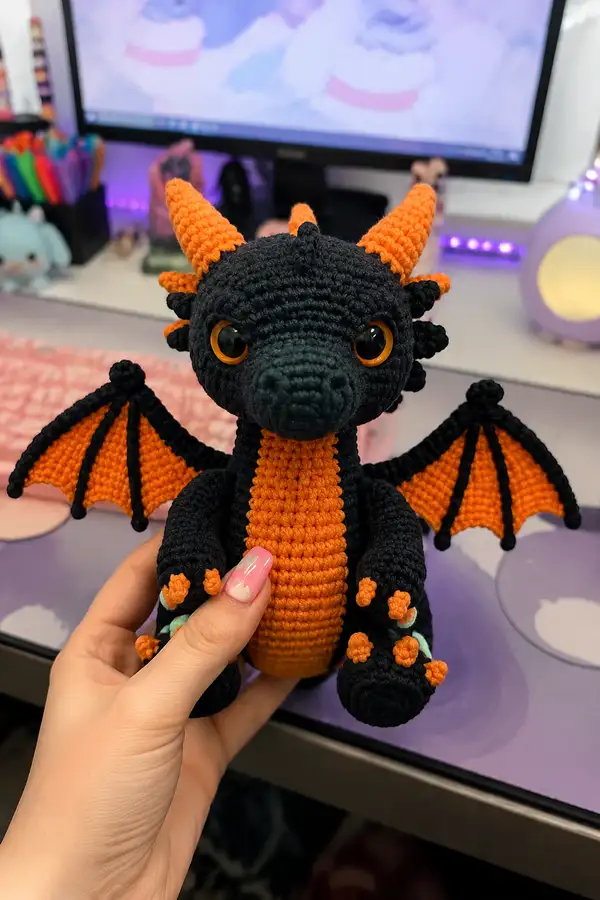
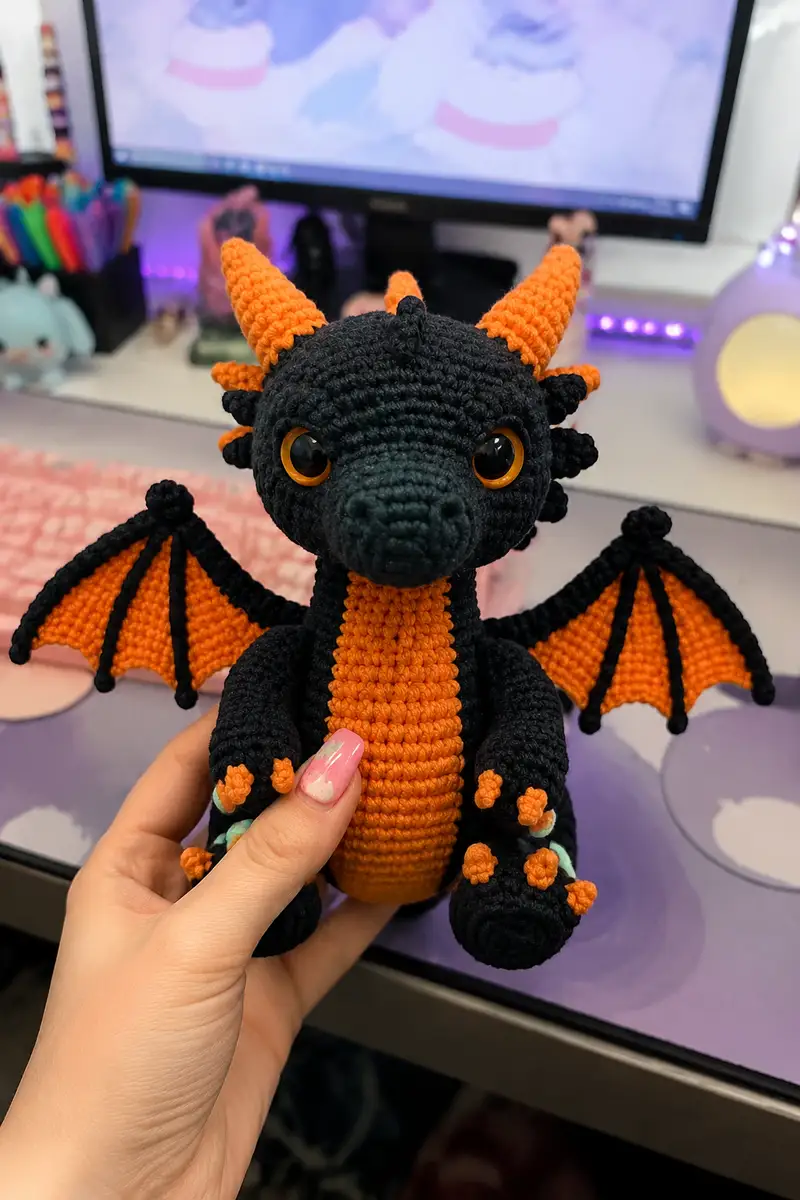
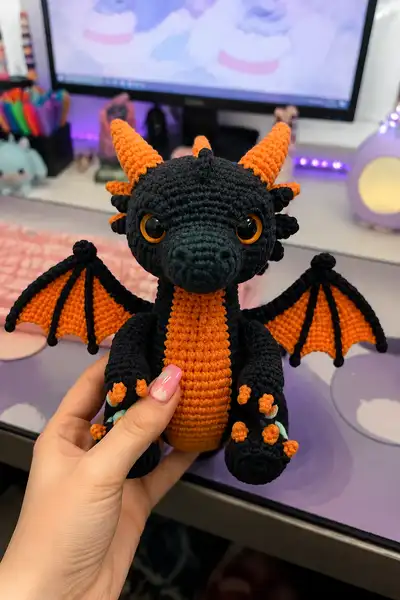
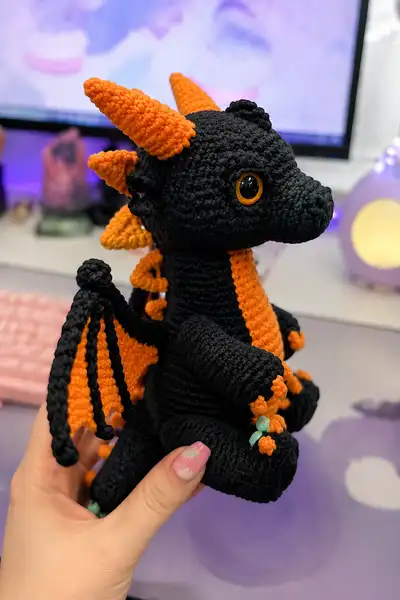
Create a spooky-cute Halloween dragon amigurumi with deep black body and vivid orange accents. This plushie features expressive amber eyes, conical horns, a striped orange belly, scalloped wings with black ribs, and tiny orange claws with mint accents. The pattern includes detailed round-by-round instructions and assembly tips to recreate every scale and spike for a professional finish.
Progress Tracker
0% Complete
— Head :
Round 1 :
6 sc in magic ring (6)
Round 3 :
(1 sc, 1 inc) x 6 (18)
Round 4 :
(2 sc, 1 inc) x 6 (24)
Round 5 :
(3 sc, 1 inc) x 6 (30)
Round 6 :
(4 sc, 1 inc) x 6 (36)
Round 7 :
(5 sc, 1 inc) x 6 (42)
Round 8 :
(6 sc, 1 inc) x 6 (48)
Round 9 :
(7 sc, 1 inc) x 6 (54)
Round 10 :
(8 sc, 1 inc) x 6 (60)
Round 11-14 :
1 sc in each st (60)
Info :
Place safety eyes between rounds 13-14. For this dragon use 12mm amber eyes. Space eyes about 12-14 stitches apart depending on your preference for expression; I place them roughly 10 stitches from either side center line on this head size so they sit forward near the snout.
Round 15-17 :
1 sc in each st (60). Begin observing the front-most stitches for snout shaping placement.
Round 18 :
(8 sc, 1 dec) x 6 (54)
Round 19 :
(7 sc, 1 dec) x 6 (48)
Info :
Begin stuffing head firmly but not overly tight. Focus on stuffing around the eye sockets and top of head to maintain roundness. Leave the front area less stuffed until you add the snout to avoid distorting the face.
Round 20 :
(6 sc, 1 dec) x 6 (42)
Round 21 :
(5 sc, 1 dec) x 6 (36)
Round 22 :
(4 sc, 1 dec) x 6 (30)
Round 23 :
(3 sc, 1 dec) x 6 (24)
Round 24 :
(2 sc, 1 dec) x 6 (18)
Info :
At this point the head is starting to neck in. Keep stuffing and check symmetry. If the eye spacing looks off, slightly adjust by sewing small invisible stitches at inner/outer corners to change expression before continuing.
Round 25 :
(1 sc, 1 dec) x 6 (12)
Info :
Fasten off leaving a long tail for sewing the neck onto body. Stuff remaining head firmly and set aside. The nose/snout will be worked separately then sewn to the front to maintain clean shaping.
— Snout / Muzzle :
Round 1 :
6 sc in magic ring (6)
Round 3 :
(1 sc, 1 inc) x 6 (18)
Round 4 :
(2 sc, 1 inc) x 6 (24)
Round 5 :
1 sc in each st (24)
Round 6 :
(3 sc, 1 dec) x 6 (18)
Round 7 :
(2 sc, 1 dec) x 6 (12)
Round 8 :
(1 sc, 1 dec) x 6 (6)
Round 9 :
6 sc (6) - work an extra 2 rounds of 6 sc to lengthen nose if desired
Info :
Stuff snout lightly but firmly so it keeps a tapered shape. Use a yarn needle to sew the snout to the lower front of the head aligning the center of the snout with the centerline between the eyes. Take care that nostril shaping aligns symmetrically.
Round 11-12 :
Optional rounds to lengthen snout: 6 sc each round (6)
Info :
Embroider nostrils with short black yarn stitches or add tiny French knot-style knots for nostril impression. Secure snout with several passing stitches and weave in tail inside head.
— Neck :
Round 1 :
6 sc in magic ring (6)
Round 3 :
(1 sc, 1 inc) x 6 (18)
Round 4-6 :
1 sc in each st (18)
Info :
Neck is worked to create a short cylinder to attach head to body. Make sure to place neck so the seam sits at the back; you will sew the neck into the body opening later. Stuff lightly to maintain flexibility for head tilt.
Round 7 :
(2 sc, 1 dec) x 6 (12)
Round 8 :
1 sc in each st (12)
Round 9 :
(1 sc, 1 dec) x 4, sc 4 (8)
Round 10 :
1 sc in each st (8). Fasten off leaving long tail for sewing to head and body.
Info :
Leave the neck opening slightly smaller than the head base—this helps with a secure sewn neck. Stuff the neck very lightly; too much stuffing will make sewing difficult and create rigidity.
— Body :
Round 1 :
6 sc in magic ring (6)
Round 3 :
(1 sc, 1 inc) x 6 (18)
Round 4 :
(2 sc, 1 inc) x 6 (24)
Round 5 :
(3 sc, 1 inc) x 6 (30)
Round 6 :
(4 sc, 1 inc) x 6 (36)
Round 7 :
(5 sc, 1 inc) x 6 (42)
Round 8-12 :
1 sc in each st (42)
Info :
If adding a separate belly panel (ribbed orange) attach it after round 12. Otherwise continue with the body and change color to orange on the next round to crochet the belly in situ. The belly in the sample is worked in orange as a central rectangle — both methods are described below.
Round 13 :
Change to orange yarn. 1 sc in each st BLO (42) to make a slight ridge for the belly edge
Round 14-22 :
With orange yarn, 1 sc in each st (42) — this creates a long ribbed belly panel when worked in rows later or repeated rounds for texture
Info :
If you prefer a flat oval belly panel, crochet an oval separately: ch 10, sc along one side, work increases at ends and then decrease on the return to form an oval, finish, and sew centered to the front of the body. For the pictured ribbed effect, continue rounds of orange in BLO to create vertical ridges.
Round 23 :
Change back to black yarn. 1 sc in each st (42)
Round 24-25 :
1 sc in each st (42)
Round 26 :
(5 sc, 1 dec) x 6 (36)
Round 27 :
(4 sc, 1 dec) x 6 (30)
Info :
Begin stuffing the body moderately from the bottom up. The body should be firm enough to support sitting but still soft enough to attach pieces. Use small amounts of fiberfill at a time to avoid lumps.
Round 28 :
(3 sc, 1 dec) x 6 (24)
Round 29 :
(2 sc, 1 dec) x 6 (18)
Round 30 :
1 sc in each st (18). Fasten off leaving long tail for attaching neck and sewing closed if necessary.
Info :
Do not fully close the bottom at this stage if you will attach legs from inside; leave a large enough opening to sew legs into position and then close around the leg attachment points for a clean finish.
— Belly Panel (Optional Separate) :
Round 1 :
Ch 10, sc in 2nd ch from hook and across (9)
Round 2 :
Ch 1, turn, sc across (9). At the ends work 3 sc in last stitch to round the corner, continue across the underside and 3 sc in last stitch to form an oval (use increases at rows ends)
Round 3-10 :
Work even rounds increasing 2-4 stitches at ends to create an oval until panel length matches body front. Fasten off and block if desired. Sew centered to front from neck to lower belly aligning with orange rounds worked in body.
Info :
For the ribbed look work belly panel rows in BLO to create vertical ribs when sewn in place. Use a yarn needle to stitch panel edges invisibly into the orange area of the body.
— Arms (Make 2) :
Round 1 :
6 sc in magic ring (6)
Round 3 :
(1 sc, 1 inc) x 6 (18)
Round 4-6 :
1 sc in each st (18) - these rounds form the hand base
Info :
Create claw bobbles on round 7 by working small bobble clusters in specified stitches; see below for claw details. Stuff the hand portion firmly for stability when sewing to the body.
Round 7 :
(2 sc, 1 dec) x 6 (12)
Round 8 :
1 sc in each st (12)
Round 9 :
Work 3 small bobbles spaced evenly around the last round to form three tiny claws: bobble = (yo, insert, yo pull up x3, finish cluster) or simply work 3 sc in same st then sl st to secure. (12 with claws added)
Info :
Switch to orange for tiny claw tips: sew on small orange bobble pieces made as separate tiny cones (see Claw Tips section) and attach with a few secure stitches for contrast. Leave long tail to sew arm into side of body at rounds 16-18 of body for natural arm placement.
Round 10-15 :
1 sc in each st (12) - work evenly to desired arm length (6 rounds or as desired) (12)
Round 16 :
(1 sc, 1 inc) x 4, sc 4 (16)
Round 17-20 :
1 sc in each st (16). Fasten off leaving long tail for sewing. Stuff arm lightly; hands firm, upper arm softer to allow attachment and slight bend.
Info :
Optional: insert thin wire into arm and secure by wrapping yarn before stuffing to make arms poseable. Ensure wire ends are folded and padded to avoid poking through stitches.
— Legs (Make 2) :
Round 1 :
6 sc in magic ring (6)
Round 3 :
(1 sc, 1 inc) x 6 (18)
Round 4 :
(2 sc, 1 inc) x 6 (24)
Round 5-8 :
1 sc in each st (24) - these rounds form the foot sole and begin the ankle
Info :
Add mint/light aqua pads to the bottom of the feet by sewing on small flat circles made with ch 4, 6 sc in ring, increase round to match foot size and sew in place. The sample uses light mint pads for contrast on the feet.
Round 9 :
(3 sc, 1 inc) x 6 (30)
Round 10-14 :
1 sc in each st (30) - shape the shin and thigh length
Round 15 :
(3 sc, 1 dec) x 6 (24)
Round 16 :
(2 sc, 1 dec) x 6 (18)
Round 17 :
(1 sc, 1 dec) x 6 (12)
Round 18-22 :
1 sc in each st (12). Fasten off leaving long tail for sewing into bottom of body. Stuff feet firmly and legs moderately. For sitting pose bend legs slightly when sewing to body so the dragon sits with feet forward as in photos.
Info :
Sew feet to body so that the soles are slightly angled outward for a stable sitting base. Use extra stitches to secure legs through body stuffing for a stronger joint.
— Horns (Make 2 large and 2 small) :
Round 1 :
6 sc in magic ring (6) with orange yarn (large horns use a slightly larger start if desired)
Round 3 :
(1 sc, 1 inc) x 6 (18)
Round 4 :
(2 sc, 1 inc) x 6 (24)
Round 5 :
1 sc in each st (24)
Round 6 :
(3 sc, 1 dec) x 6 (18)
Round 7 :
(2 sc, 1 dec) x 6 (12)
Round 8 :
(1 sc, 1 dec) x 4, sc 4 (8)
Round 9 :
1 sc in each st (8). For a taller horn, continue 1 sc rounds until desired height then begin decreases.
Round 10 :
6 dec (3) — taper to a very small tip if needed then FO leaving tail for sewing
Info :
Stuff the horn lightly and shape into a tapered cone. Sew large horns to top sides of head and smaller horns along the back crown between spikes. Use matching orange yarn tail to stitch invisibly through head stitches securing firmly.
— Back Spikes (Make 6) :
Round 1 :
4 sc in magic ring (4) with orange yarn
Round 3 :
1 sc in each st (8)
Round 4 :
(1 sc, 1 dec) x 2 (6)
Round 5 :
1 sc in each st (6)
Round 6 :
Fasten off leaving long tail. Sew spikes centered down the back from crown toward tail, spacing evenly between head horns and tail base.
Info :
For extra texture you can make spikes slightly larger or sew them on at a slight angle so they point backward. Reinforce by sewing through the body and spike base for stability.
— Tail :
Round 1 :
6 sc in magic ring (6)
Round 3-6 :
1 sc in each st (12) - lengthen tail by repeating 1 sc rounds until desired length (sample tail uses 10-15 rounds total)
Round 7 :
(3 sc, 1 dec) x 3 (9)
Round 8-10 :
1 sc in each st (9). Stuff tail lightly but firm toward base to help it support slight lift. Add a larger spike or a triangular tip worked separately in orange and sew to tail tip for a finished look.
Info :
Sew small spikes along top of tail matching body spikes. Use tail length to balance the dragon when seated; a slightly longer tail adds stability.
— Claw Tips / Tiny Orange Bobbles (Make 12) :
Round 1 :
4 sc in magic ring (4) in orange yarn
Round 2 :
1 sc in each st (4)
Round 3 :
Change to black to secure base with a sl st in next st, FO leaving long tail. Sew bobble to the tips of fingers and toes as shown in pictures.
Info :
Stitch small mint pads under front claws and on soles using a 6-sc flat circle. Secure with small stitches and hide tails inside the foot stuffing.
— Wings (Make 2) :
Wing Membrane Round 1 :
With orange yarn ch 6, sc in 2nd ch from hook and across (5)
Wing Membrane Round 2 :
Ch 1, turn, sc across, at end ch 2 and continue on underside to work a semi-oval; you will create increases at the ends to form a triangular wing. (5)
Wing Membrane Round 3 :
Ch 1, turn, increase at both ends by 2 sc each end and sc across to widen (9)
Wing Membrane Round 4 :
Ch 1, turn, sc across, increase 2 at both ends (13)
Wing Membrane Round 5-8 :
Repeat widening rounds until you reach approximately 21-25 stitches across depending on desired wing size; keep increases symmetrical (final approx 21)
Info :
This method builds a slightly triangular membrane. Work until wing width matches proportions of dragon; the pictured wings are medium sized and reach out roughly the width of the dragon's torso.
Wing Edge Round 9 :
Change to black. Work 1 sc evenly around the entire membrane edge to create a black piping look. Add 3-4 extra sc at points to create scallops for a bat-like silhouette.
Info :
For the ribbed black 'fingers' crochet three thin tubes separately (finger tubes) and sew them to the orange membrane from base to edge: ch 20 for each tube, sc back along chain to make a firm tube, FO leaving tails. You may insert floral wire into tubes before stuffing lightly for poseability.
Wing Finger Attachment Round 10 :
Sew three finger tubes along the membrane spaced evenly. At the membrane edge add small orange bobbles at each tube tip to emphasize finger joints (small orange bobble pattern described in claw tips).
Wing Edge Finishing Round 11 :
Work a final round of sc in black around the membrane and over the finger tube bases to secure them. Fasten off and weave in ends.
Info :
Attach wings to back of body at rounds 10-14 centered between back spikes. Pin wings in position first to check symmetry: the wing base should align with the lower neck to mid-body seam for natural placement.
— Wing Finger Tubes (Make 6) :
Round 1 :
Ch 18 (or desired length), sc in 2nd ch and across (17)
Round 2-4 :
Sc across each row, FO leaving long tails. Optionally work in continuous rounds to create a tube: sc around chain foundation to create a hollow tube, then insert wire and stuff lightly.
Info :
Sew finger tubes to wing membranes and add small orange bobbles at tips. The black ribs seen in the picture are tight single crochet tubes sewn on the orange membrane to mimic bat wing structure.
— Assembly Instructions :
Step 1 :
Attach head to body by inserting the neck portion into the body opening. Pin in place first, then sew securely using whip stitch all around, ensuring even attachment
Step 2 :
Position arms on sides of body at rounds 18-22 for natural look. Sew through both arm and body using ladder stitch for invisible seam
Step 3 :
Attach legs to bottom of body at rounds 1-4, spacing them evenly. Sew securely, adding extra stitches for stability if character will be posed
Step 4 :
Sew ears/horns to top of head at rounds 5-8, spacing large horns 10-12 stitches apart. Place smaller horns between large horns further down the crown
Step 5 :
Attach wings to back center of body at round 12 area. Pin both and sew through several rounds at the base for secure hold
Step 6 :
Sew spikes down the back center between horns and tail. Reinforce with a few vertical stitches through body if necessary
Step 7 :
Add facial embroidery: mouth line beneath snout using a few short straight stitches. Add nostril stitches on snout tip if desired
Step 8 :
Sew small orange bobbles to fingers and toes. Secure any loose ends by weaving through several stitches and trimming close to work
Step 9 :
Optional: add a small blush on cheeks with fabric-safe pastel or a dab of fabric paint for extra charm
This spooky dragon amigurumi brings together playful detailing and classic amigurumi construction to create a charming Halloween companion! Each carefully crocheted section — from tapered horns to scalloped wings — adds character and personality. The contrasting black and orange palette really pops, and little mint toes make it memorable. 🧶🎃 I hope making this dragon fills your crafting time with joy and satisfaction. Happy stitching and share your finished creature with pride! ✨