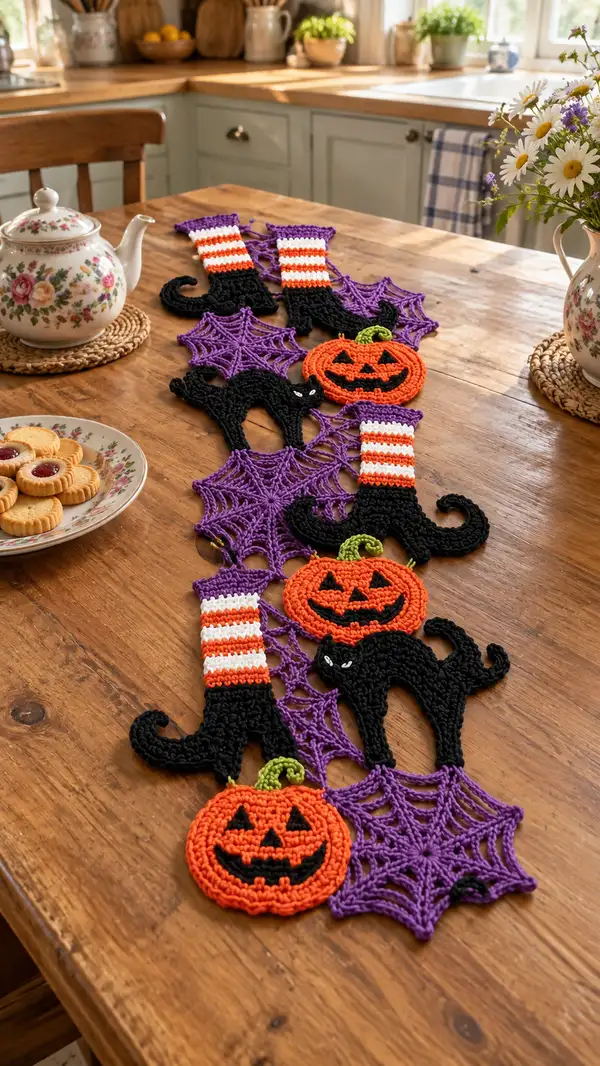
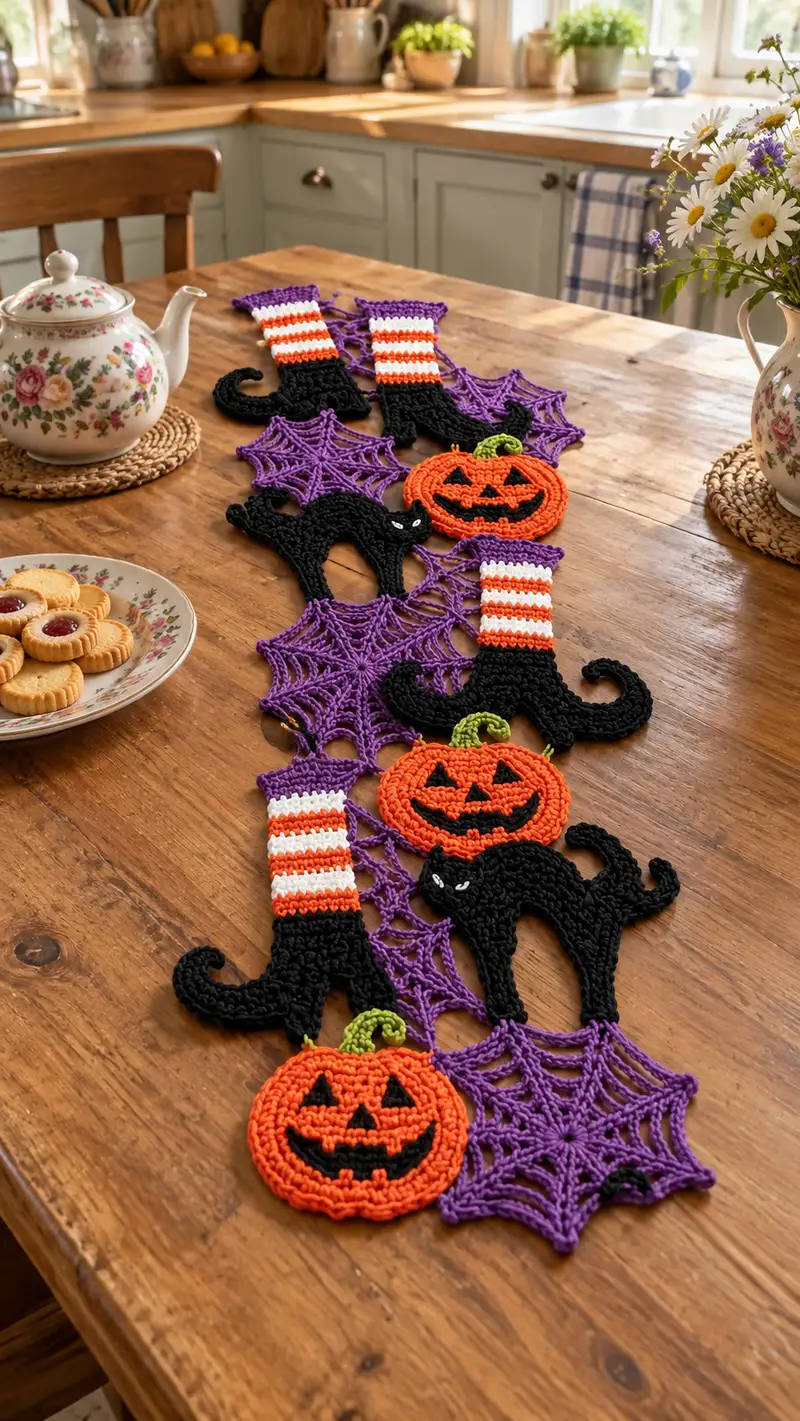
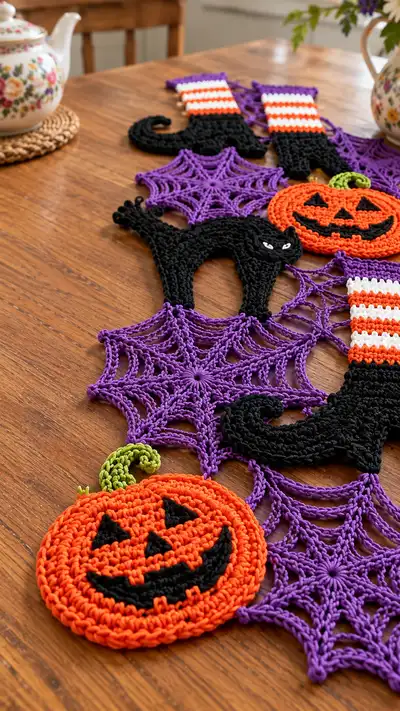
This festive Halloween table runner pattern stitches together spooky motifs — purple spiderwebs, curled witch shoes with striped stockings, black arched cats, and smiling jack-o'-lanterns. Designed as flat motifs joined into a delicate lacy runner, it lies beautifully along a table or dresser. The pattern uses clear round-by-round instructions for each motif and connector rows so you can recreate the exact look in seasonal colors.
Progress Tracker
0% Complete
— Spiderweb Motif (Make 7 or more) :
Round 1 :
Make a magic ring, ch 3 (counts as first tr), work 11 tr into ring, pull ring tight, sl st to top of ch-3 to join. (12 tr)
Round 2 :
Ch 1, *sc in base of next tr, ch 5; rep from * around to make 12 ch-5 loops, sl st to first sc. (12 sc, 12 ch-5 loops)
Info :
Use purple yarn. Keep chains relaxed; these loops become the spokes of the web. Use a stitch marker to note the first sc for this round.
Round 3 :
Slip into first ch-5 loop, (sc, ch 3, sc) in each ch-5 loop around, sl st to first sc. This creates small arches. (12 clusters)
Round 4 :
Ch 1, sl st to center of first arch, ch 7, sc in center of next arch, ch 7, *sc in center of next arch, ch 7; rep across to create 12 long chain arcs (12 ch-7 arcs)
Info :
These long chains give the airy lace. Keep tension even; don’t pull chains tight or the web will pucker. If your chains are narrow, increase to ch 8 for extra openwork.
Round 5 :
Working into each ch-7 arc: sl st into arc, (sc, ch 3, sc, ch 3, sc) all in same arc, sl st to next arc center; rep around. This adds filling and small spokes. (12 clusters)
Round 6 :
Ch 1, *sc in next st, ch 5, skip 2 sts along arc, sc in next st; rep around to create scalloped joins between spokes. Sl st to first sc.
Round 7 :
Ch 1, sl st into the center of first scallop, ch 9, dc in 3rd ch from hook, treble cluster (3 tr worked together) across chain to make a tall fan, dc in center of next scallop, ch 9; rep around. End with sl st to join. (12 tall fans)
Info :
Use BLO occasionally on the outer edge if you want the web to lift a little from the table for dimension. If motifs will be joined later, leave one fan edge slightly tighter so joining stitches lie flat.
Round 8 :
Ch 1, sl st to center of a tall fan, (sc, ch 4, sc, ch 4, sc) across fan center to form decorative loops bridging fan tips; rep around, sl st to first sc. (12 decorative loop sets)
Round 9 :
Ch 1, *sc in next sc, ch 6, sc in next sc; rep around so that each decorative loop becomes a ch-6 connector; sl st to join. This readies the motif for a second round of webbing. (12 ch-6 loops)
Round 10 :
Slip into first ch-6, (sc, ch 3, sc) in each ch-6 to produce a second layer of small arches; sl st to join. (12 clusters)
Info :
At this point the web should be about 10–11cm across with worsted yarn and 4mm hook. If too small, work an extra fan round repeating rounds 7–10 with larger chains (ch 11 instead of ch 9).
Round 11 :
Ch 1, *sc in next sc, ch 8, skip next sc; rep around creating long arches between spokes for an outer edge; sl st to join. (12 ch-8 loops)
Round 12 :
Work into each ch-8: sc, hdc, 3 dc, hdc, sc across chain to form a scalloped outer petal; sl st to first sc. (12 scallops)
Round 13 :
Ch 1, sc in each st around working evenly across scallops (count will vary slightly by hook/tension; aim for about 84–90 sc total). Sl st to join and finish motif edge with tidy round.
Info :
Block each spiderweb flat with pins to open the scallops into a hexagonal web form. Blocking here ensures consistent joins later. Weave in ends now or leave short tails for joining.
Round 14 :
Optional edge: ch 1, *sc in each sc for 5 sts, picot (ch 3, sl st into 3rd ch); rep around to add tiny points around edge. Sl st to join.
Round 16 :
Leave long tail if you will sew spiderwebs together. Fasten off and weave in ends after blocking for best drape.
Info :
Make at least seven spiderweb motifs for a runner similar to the sample. You can adjust size and number to suit your table — add more webs for longer runners.
— Pumpkin Motif (Make 4–5) :
Round 1 :
With orange yarn, make mr, 6 sc into ring, pull tight. (6)
Round 3 :
(1 sc, inc) x 6 (18)
Round 4 :
(2 sc, inc) x 6 (24)
Round 5 :
(3 sc, inc) x 6 (30)
Info :
Work increases evenly to form a flat disc. Use a stitch marker to track the start of rounds. Keep tension slightly loose to allow disc to lie flat, not bowl up.
Round 6 :
(4 sc, inc) x 6 (36)
Round 7 :
(5 sc, inc) x 6 (42)
Round 8 :
(6 sc, inc) x 6 (48)
Round 9-10 :
1 sc in each st around (48)
Info :
If you prefer a slightly textured pumpkin, work rounds 9–10 in BLO (back loops only) to create a subtle ridge mimicking pumpkin ribs.
Round 11 :
(6 sc, dec) x 6 (42)
Round 12 :
(5 sc, dec) x 6 (36)
Round 13 :
1 sc in each st around (36)
Round 14 :
Fasten off leaving long tail for sewing if joining to runner, or continue to add facial details. Puff stitch row optional around edge: (ch 1, *sc, ch 2) repeat to create a bumpy outline.
Info :
For a more pronounced pumpkin 'rib' effect, use surface slip-stitch ridges radiating from center after rounds are finished. Make three or five ridges evenly spaced using black or darker orange for contrast.
Round 15 :
Switch to black yarn to embroider face: using a yarn needle, stitch two small triangle eyes and a triangular nose. For mouth, embroider a curved smiling mouth with three small teeth shapes. Use black yarn and work tidy satin stitches or chain-stitched outlines.
Round 16 :
Stem: with green yarn, join at top center, ch 8, sl st back along chain to form curled stem; sl st into center and fasten off. Weave in ends. (Make 1 stem per pumpkin)
Info :
Attach stem by stitching through center and anchoring with a few secure stitches. Curl the stem by wrapping it around a pencil and wet-blocking or by stitching in place as a spiral.
— Black Cat Motif (Make 3–4) :
Round 1 :
With black yarn, ch 21, join to form a ring with sl st being careful not to twist. This long chain will form the base for the cat arch. (21 ch)
Round 2 :
Ch 1, sc in each ch around joining with sl st. (21 sc)
Round 3 :
Ch 2 (counts as hdc), hdc across to end, turn and work back along same foundation without joining to create a thick strip: 21 hdc. (Start shaping legs later with increases)
Round 5 :
Row-style shaping: From now on you will work in rows (treating each 'round' as a row) to create arch shape. Row 1: hdc 5, dec (hdc2tog), hdc 6, dec, hdc 5. (19)
Round 6 :
Row 2: ch 2, turn, hdc in each st (19)
Round 7 :
Row 3: hdc 4, dec, hdc 7, dec, hdc 4. (17)
Info :
These decreases create the inward curve of the cat's belly and arch. Keep edges neat by slipping the first stitch and using consistent turning chains.
Round 8 :
Row 4: ch 2, turn, hdc across (17)
Round 9 :
Row 5: hdc 3, dec, hdc 5, dec, hdc 3. (15)
Round 10 :
Row 6: ch 2, turn, hdc across (15)
Round 11 :
Row 7: hdc 2, dec, hdc 3, dec, hdc 2. (13)
Round 12 :
Row 8: ch 2, turn, hdc across (13)
Round 13 :
Row 9: hdc 1, dec, hdc 1, dec, hdc 1. (11) This narrows into neck shape.
Info :
At this point you have a curved arch form. The foot/leg details will be created at the ends by working short fan rounds to create paw-like shapes and the tail will be added by crocheting a slender curled strip attached to the rear edge.
Round 14 :
Row 10: ch 2, turn, hdc across (11)
Round 15 :
Row 11: sc around entire shaped arch edge in continuous rounds to smooth edges: sc evenly across front and back edges for about 70 sc depending on shaping. This closes the row-style piece into a nice silhouette. Sl st to join.
Round 16 :
Tail: Join black at rear outer stitch, ch 20, sl st back along chain to create a curled tail, leaving tail free to curve. Fasten off and weave in ends.
Round 17 :
Head and ear shaping: At top center of arch, join black, ch 1, sc 3 in same st, skip 2, sc 3 in next st to make ear bases; sl st to join and work small triangle ears by (sc, inc, sc) in the ear base; fasten off. (2 small ears)
Round 19 :
Eye details: With white yarn, embroider two almond-shaped eyes on the head area using satin stitch; add a small black pupil or french knot at center using black yarn. Secure and weave ends.
Round 20 :
Finish: Work a tidy sc round around entire cat motif to balance thickness and create a stable edge for joins. Fasten off and block gently to keep arch shape.
Info :
Make three or four cat motifs spaced evenly along the runner. If you prefer a more stylized silhouette, work cat legs as separate small ovals and sew in place for more rounded paws.
— Witch Stocking & Curled Shoe Motif (Make 4) :
Round 1 :
With black yarn, ch 15, join with sl st to form small tube for top of shoe where foot begins. (15 ch)
Round 2 :
Ch 1, sc in each ch around for 2 rounds to create a firm cuff. (15 sc)
Round 4 :
Switch to striped section: join orange, ch 1, sc in each st around. (15 sc)
Round 5 :
Change to white yarn: sc in each st around. (15 sc)
Round 6 :
Change to orange yarn: sc in each st around. (Repeat stripes) (15 sc)
Round 7 :
Change to white yarn: sc in each st around (this completes about 4 bands of stripes). (15 sc)
Info :
Carry the unused colors up the inside of the tube for neat color changes, or fasten off each color and weave tails for crisp stripe edges. Use color changes at the start of a round for clean stripes.
Round 8 :
Switch back to black yarn for the shoe: join black, ch 1, sc in next 10 sts, leaving remaining approx 5 sts for toe shaping. (15 sc)
Round 9 :
Begin shoe toe rounding: sc 8, (inc) in next st, sc 4, (inc) in last st to give a slight curve. (17)
Round 10 :
Ch 1, sc around (17)
Round 11 :
Work decreases to curl shoe tip: sc 7, dec, sc 6, dec. (15)
Round 12 :
Ch 1, sc around (15)
Info :
To form curled toe, you will now create a spiral: in the next rounds work clusters of sc and hdc to bias the fabric outward and curve. Pin the curve into a spiral during blocking to set curl shape.
Round 13 :
Slip to front edge of toe, ch 1, in next 6 sts work (hdc, dc, tr) in each st across to build height for curling, then sc across remaining stitches. Sl st to join. (15 elevated segments)
Round 14 :
Working into the tall stitches: sl st into top of first tr, ch 6, sl st into base of next tall post to make chain arches that curve over toe tip; repeat 3 times to create decorative curled tip loops. Fasten off and weave ends.
Round 16 :
Edge: With black, sc evenly around entire stocking+shoe piece to create smooth edge for joining. Add a small picot at toe tip if desired for decorative effect.
Round 17 :
Make 4 identical stockings. Block each with curled toe positioned upward using pins and light steam to set shape. Leave long tails for joining to spiderweb connectors.
Info :
Alternate stripe order as you like; the sample uses orange/white/orange/white with black shoe. Keep striping consistent across all stockings for a uniform runner.
— Small Stem & Spiral Detail (Make per pumpkin) :
Round 1 :
With green yarn, ch 6, sl st into first ch to make small ring. (6)
Round 2 :
Ch 1, into ring work 6 sc, sl st to first sc. (6)
Round 3 :
Ch 1, in each sc work sc then (ch 3, sl st in next sc) to form little loop; sl st to join.
Round 4 :
Remove hook and using yarn needle, twist stem into a spiral and stitch through the base to hold shape. Fasten off and stitch to pumpkin center.
Info :
Make stems small and sturdy. If you prefer a taller spiral, chain 10 instead of 6 and sl st back along chain before stitching in place.
— Lace Connector Rows (Linking Motifs into Runner) :
Round 1 :
With purple yarn, decide motif order. Work between two pinned motifs by joining purple at a web outer point, ch 12, sl st to corresponding point on adjacent motif to form connecting arc. Repeat to create three or four chain arcs between each motif pair.
Round 2 :
Ch 1, into each long chain arc work (sc, ch 5, sc) to convert chains to stable link loops. This will create net-like joins that look like tiny spider-hung chains.
Info :
Working from the underside while motifs are pinned to the blocking board helps keep connectors uniform. Leave 6–8 chains between motifs for an airy lace effect like the sample.
Round 3 :
For added stability, work a second round of sl st across the base of the connectors on the underside to tack chain centers flat. Use discreet stitches so joins remain tidy on the surface.
Round 4 :
At points where a pumpkin or cat overlaps a web, whip-stitch the edge of the motif to the web with long tails or crochet sl st to secure. Use small stitches and hide yarn tails between layers.
Round 6 :
Make a continuous central chain: join purple at one end of runner, ch a length equal to desired runner width x number of motifs, and attach with sl st to various spokes to create a visual spine. This gives central support while keeping decorative joins airy.
Round 7 :
Edge finish: Work sc evenly around entire runner perimeter where exposed edges look raw. In corners or wavy edges, use (sc, ch 2, sc) to form neat picot-like points every 6–8 sts.
Info :
As you join motifs, step back frequently and pin motifs in desired placement — matching the sample arrangement requires alternating pumpkins, cats and stockings on a diagonal with spiderwebs filling the gaps.
Round 8 :
Final tidy: Weave in all ends on the underside, and give the whole runner a gentle steam block to set shape. Do not over-wet — cotton blends will set with a light steam from an iron held a few inches away.
Info :
To make runner longer, repeat sets of motifs and extend the central chain. The sample in the image uses 3 pumpkins, 3 cats, 4 stockings and 7 webs. Adjust motif counts to suit table length.
This Halloween motif runner brings a playful, handcrafted charm to your table — pumpkins glowing in orange, prowling black cats, striped witch stockings and airy purple webs combine for a delightful seasonal display. Each motif is easily repeatable so you can tailor the length and arrangement to your table. 🧶 Add a few cookies and a teapot and you have a festive setting ready for autumn gatherings. Happy stitching and spooky styling! 🎃🕸️