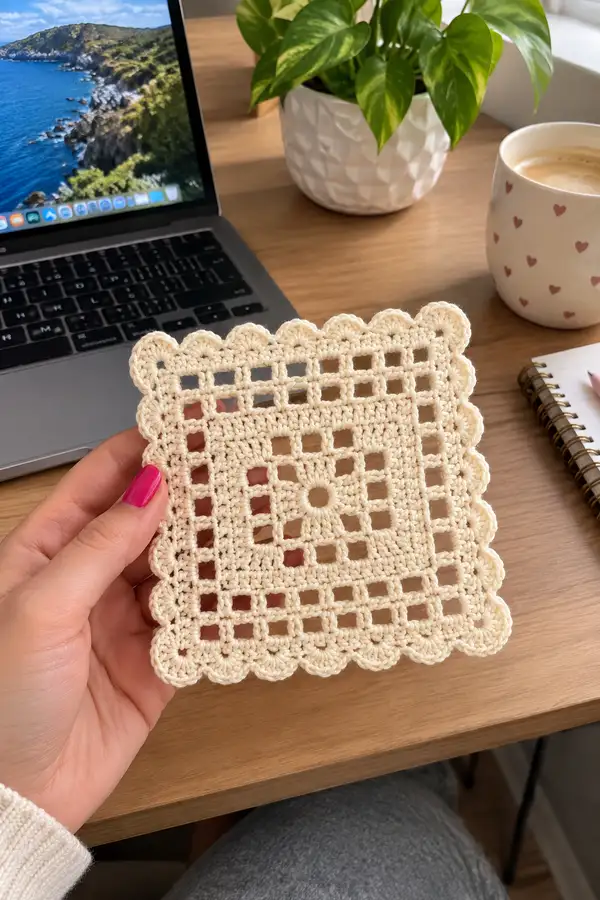
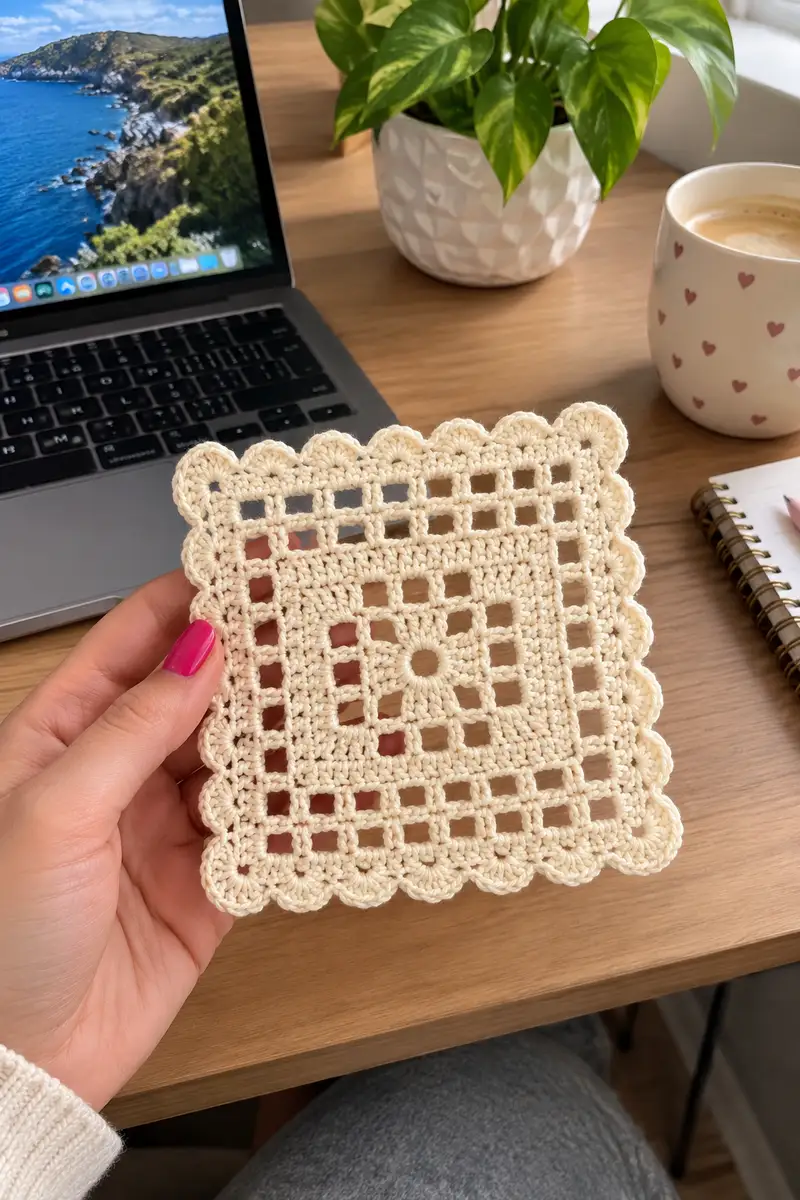
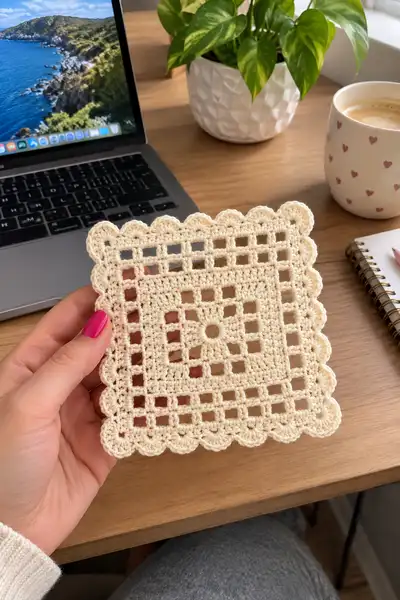
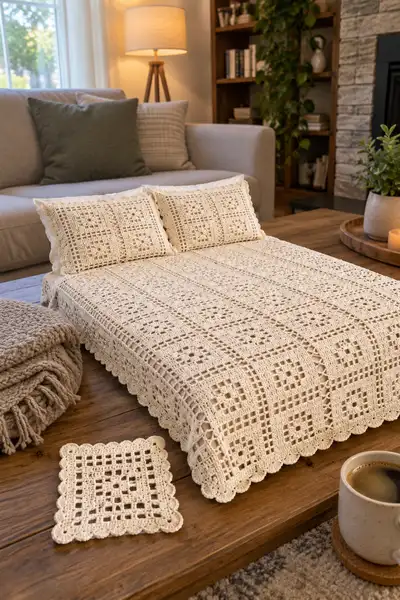
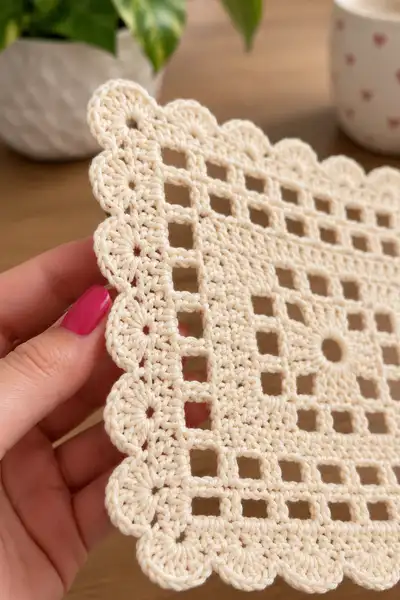
A timeless heirloom-style cream bedspread made from delicate lacy square motifs joined into an elegant full-bed cover. This pattern recreates the open filet squares, delicate center rosettes and scalloped border shown in the photos. Written for an experienced crocheter, it includes step-by-step motif instructions, detailed joining and a layered scalloped edging to finish the bedspread and coordinating pillow shams.
Progress Tracker
0% Complete
— Overview :
Info :
This bedspread is composed of identical square motifs worked flat in the round and joined with a lacy crocheted join. After assembling the required number of motifs into panels for your bed size, a multi-row scalloped edging is worked around the outer perimeter to create the softly undulating scalloped finish seen in the photographs. Choose a sport/DK cotton and a hook that produces a slightly open but tidy fabric — 3.5mm to 4.0mm is recommended. Gauge is less critical than consistent tension across motifs.
— Motif (Make X motifs — sample layout)
Info :
Sample queen-size layout shown in photos is 7 motifs across by 11 motifs down = 77 motifs. You may adjust the number of motifs to your mattress size (for twin, full, king, etc.). Each motif measures approximately 5.5–6.5 inches (14–16.5 cm) blocked, depending on yarn and hook. Make a sample motif and block to determine how many motifs you will need.
Note :
Rounds below create a 12-round central increase system built from classic 3-dc granny clusters and then transition into open-filet rounds to form the grid. Stitch counts reflect number of double crochet (dc) stitches for each round; chain spaces are shown but not included in the numeric count for dc stitches.
Round 1 :
Make a magic ring, ch3 (counts as first dc), work 2 dc into ring, ch2, (3 dc into ring, ch2) x 3 — close with sl st to top of ch3. (12 dc)
Round 2 :
Slip into the first ch2 corner, ch3, (2 dc, ch2, 3 dc) in same corner, *ch1, 3 dc in next ch2 space*, repeat from * to * around placing extra 3-dc clusters between corners so that each side now has two 3-dc clusters separated by ch1; sl st to top of ch3. (24 dc)
Round 3 :
Ch3, (2 dc, ch2, 3 dc) in first corner ch2 space, *ch1, 3 dc in next ch1 space*, rep around until you reach corner; finish with sl st to top of ch3. This round adds 12dc (one 3-dc cluster between each corner); total (36 dc)
Info :
The motif now has a small vintage-style square made of 3-dc clusters in rounds 1–3. Keep tension even — these early rounds set the proportion of the entire motif.
Round 4 :
Ch3, in each corner ch2 work (3 dc, ch2, 3 dc); along each side work (ch1, 3 dc) in each existing ch1 space from previous round; sl st to top of ch3. (48 dc)
Round 5 :
Repeat round 4 pattern to expand the square: ch3, (3 dc, ch2, 3 dc) in each corner ch2, between corners work (ch1, 3 dc) in each ch1 space; sl st to top of ch3. (60 dc)
Info :
At the end of round 5 you have a dense but lacy 'granny' square that will transition into the filet mesh. If you prefer a slightly smaller open center, stop increases earlier. Always join rounds with a sl st to the top of the beginning ch3 to maintain a tidy corner.
Round 6 :
Change to a lighter open filet approach now. Ch4 (counts as dc + ch1), *skip next 3 dc, dc in next dc, ch1* across each side until you reach a corner; at corner work dc in corner ch2 space, ch2, dc in same ch2 space to turn the corner; continue along next side repeating * pattern; finish sl st to 3rd ch of beginning ch4. (This round uses dc and ch spaces — number of dc stitches equals 12 dc placed in corner spots plus one dc per side block — approx 72 dc depending on side count)
Round 7 :
Ch3, work 2 dc into the corner ch2 space, ch1, sk the next ch1 space and place 1 dc in the following ch1 space; repeat along side so that each side alternates dc and ch1 creating a 1x1 filet grid; finish with sl st to top of ch3. (Approx. 84 dc)
Info :
Filet rounds are intentionally written in descriptive fashion because the grid is built of ch1 and dc repeats. Count your dc after each round to ensure evenness; the number of dc will increase by the perimeter growth from the previous rounds.
Round 8 :
Ch1, sc in same st to stabilize, ch3, *sk next ch1 space, dc in next dc, ch1* across until reaching the corner; in each corner ch2 work (dc, ch2, dc) to keep the square corners defined; sl st to first sc. (Approx. 96 dc)
Round 9 :
Ch3, (2 dc, ch2, 3 dc) into each corner to strengthen corners; along sides work alternating (ch1, dc) repeats in each filet opening to create a more pronounced grid; sl st to top of ch3. (Approx. 108 dc)
Info :
Now is a good point to check motif for squareness. Block lightly if your tension has created slight distortions; blocking will open the filet mesh and square your motif to proper dimensions.
Round 10 :
Ch1, sc in first st, ch3, *dc in next dc, ch1* across creating a second open filet row so the overall pattern of holes becomes regular; at corners maintain (dc, ch2, dc). Sl st to first sc. (Approx. 120 dc)
Round 11 :
Ch3, dc in each dc and (dc, ch2, dc) in each corner; if you wish to create a small framed square inside this round instead of full-filet, replace side repeats with (3 dc, ch1) across each side; sl st to top of ch3. (Approx. 132 dc)
Round 12 :
Optional decorative round to create the small rosette center transition: ch1, sc across the top of each cluster for one round to create a denser band; finish sl st. (Approx. 132 sc)
Info :
These 12 rounds produce a well-proportioned motif with a delicate center and an open grid toward the outer area. If you want a larger motif, continue repeating the filet expansion pattern: mesh rows separated by corner (dc,ch2,dc) placements. Each additional full mesh round adds approximately 12 dc stitches around the motif (consistent with the 3-dc cluster expansion).
Round 13 :
Ch3, dc evenly around working dc into top of previous dc rows and (dc, ch2, dc) into each corner to keep a square shape; sl st to join. (Approx. 144 dc)
Round 14 :
For the motif outer row before border, work a reinforced frame: ch1, sc in each st across; at corners make (sc, ch2, sc) to keep the corner opening consistent; sl st. (Approx. 144 sc)
Info :
Fasten off leaving a 12 in (30 cm) tail for assembly if you will be joining motifs using a sewn join. If you plan to join as-you-go by crocheting the join into the final motif round, do not fasten off — continue to the joining instructions below. Block the motif to the desired square size now.
— Joining Motifs (as-you-go crochet join or sewn join)
Info :
Two joining methods are recommended: A) As-you-go crocheted lace join (provides the open lacy look similar to the sample photographs); B) Sewn join (invisible whip/ladder stitch) for a denser seam. The sample bedspread uses the as-you-go crocheted join which forms little X-shaped lacy connectors between motifs.
Joining Method A — As-you-go (sample join rounds labeled J1–J12) :
Work the final motif round but do not sl st to join the last stitch; instead align the next motif and join corresponding corner ch2 spaces to create the lacy cross. The instructions below assume you are joining motifs into rows horizontally first, then joining rows vertically.
J1 (Round 1 join) :
With RS together, when you reach final outer frame on working motif, ch3 (counts as dc), *ch2, sk next side ch1 opening, join into adjacent motif by inserting hook through corresponding ch1 opening of neighbor, pull up a loop and ch1 to connect, then continue dc in next st* — essentially produce a (dc, ch2, join-ch1, dc) rhythm to connect motifs with small ch1 connectors. This creates small X-style lacy connectors in the grid intersections. (Join pattern places one connector per mesh opening along each adjoining side)
J2 :
Continue joining motifs along the first row using the same rhythm until the entire row is joined. When you reach the end of the row, fasten off and weave ends. Repeat to create each horizontal row of motifs.
Info :
Pin motifs together in their final positions before crocheting the join. Align corners precisely so that ch2 corner spaces line up; consistent blocking of motifs is critical so holes match and the lacy join lies flat.
J3 :
After horizontal rows are joined, join rows to each other vertically using the same as-you-go join by matching the open mesh spaces and working ch1 connectors through both motifs simultaneously. Each vertical seam will mirror the horizontal join creating a regular all-over lacy grid. Make sure to check motif orientation before joining to maintain symmetry across the bedspread.
Info :
If you prefer a sewn seam: leave 12 in tails from motif finishes and use a tapestry needle to whipstitch through corresponding ch1 openings to create a flat invisible seam. Sew in the ends and press motifs flat.
— Assembling the Bedspread Panels and Center Seams :
Info :
When motifs are joined into strips/rows, press each joined row with light blocking — pin with T-pins to a flat surface and mist with water. Make all row join seams before assembling full panels to avoid an uneven surface.
Assembly 1 :
Create the number of full rows required for your bed size (sample queen = 11 rows of 7 motifs each). Join rows vertically using the as-you-go join or sewn join described above. Ensure that the bedspread center is square and that motif pattern repeats line up across seams.
Assembly 2 :
Once all rows are joined into a large rectangular panel, check the overall dimensions. If you want additional drop on the sides, add extra motif strips to the left and right edges now before working the outer border rounds. The border will be worked into the outermost motif frame and will create the scalloped finish.
Info :
We recommend checking the spread on the bed before finalizing the border. If the spread is slightly small, you can add a narrow lace insertion strip (worked as a long filet band) to one or both sides and join it before edging.
— Outer Border and Scalloped Edge (work around entire perimeter)
Info :
The scalloped edge on the sample is built in three parts: a reinforcing frame round, a tall shell row to build scallops, and a finishing top-shell row for the soft, raised scallop. Work these rounds with careful stitch placements into corner ch2 spaces to maintain square corners and even scallops.
B Round 1 :
With RS facing, join yarn at any corner ch2 with sl st, ch1, work sc evenly across the side into the top loop of dc and into chain spaces — place (sc, ch2, sc) in each corner ch2 space. Continue around entire perimeter. This creates a solid frame for shells. (st count depends on perimeter)
Info :
Use stitch markers to mark the midpoint of each side so that scallops remain symmetrical even if your motif assembly isn't perfectly square. Adjust the number of sc between shells to spread scallops evenly.
B Round 2 :
Ch1, sc in same st, *skip 2 sc, work 7 dc cluster (shell) in next sc, skip 2 sc, sc in next sc* across the side; at corners when you encounter the corner (sc, ch2, sc), work the shell centered on the corner by placing shell stitches so two shells touch the corner evenly. Sl st to first sc to finish round. This first shell round establishes scallop shape.
B Round 3 :
Turn your work if preferred, ch3 (counts as first dc), work 1 dc in each of the 7 dc shell stitches across to create a raised scallop foundation: essentially make 7 dc across each scallop from the previous round, finish with sl st. This evens out shells and creates a fuller scallop. (Scallop count = number of shell positions placed around perimeter)
Info :
For a very crisp scallop, use a slightly smaller hook for the shell rounds than for your main motifs (for example, work shells with a 3.0mm hook if main motifs are on 3.5mm). This will make the scallops sit nicely on top of the mesh without gaping.
B Round 4 :
Ch1, sc in first dc, *work (picot: ch3, sl st to first ch) into the center of each scallop or at the edges of each shell if you prefer small decorative points, then sc into next st*; continue around and finish with sl st. Fasten off and weave ends. Block the whole bedspread coated lightly with water to open the filet and shape the scallops.
Info :
If you prefer the scallop edge shown in the photos (delicate circular shells), replace B Round 2 with smaller shells of 5 dc each and add a final finishing round of 5-dc shells worked into the top of the previous shell to create that rounded bead-like scallop edge.
— Pillow Shams (Make 2)
Info :
The coordinating pillow shams in the images are made from three motifs (arranged 3 across by 2 tall to form a rectangle) with the same scalloped border worked around the small sham. You can also make single-motif pillow fronts with a backing fabric or a crocheted plain back.
Sham Motif Layout :
Make 6 motifs per sham and join identically to bedspread but for a small rectangle. Leave the outer edge free to work the scalloped border.
Sham Border :
Work the same B Round 1–4 border instructions around the sham perimeter but scale down shell sizes if needed to keep scallops proportional; smaller shells of 5-dc will produce a neater small-scale scallop.
Info :
For pillow backs use a simple sc worked in rows to the same dimensions as the front rectangle and sew or zip closed. Alternatively, create envelope-style overlap backs using two crocheted panels with overlap equal to pillow depth plus 1-2 inches.
— Finishing and Blocking :
Info :
Blocking is essential for this heirloom bedspread. After joining and crocheting the final border, pin the entire spread to a clean surface (floor or blocking mats) to the exact rectangular dimensions you desire. Use rust-proof T-pins, mist the spread with water from a spray bottle, and allow to dry fully. This opens the filet mesh and shapes the scallops perfectly.
Finishing 1 :
Weave in all ends using a yarn needle, working tails through the nearest stitches and back again to secure. Trim ends close to fabric. If any joins or corners feel loose, reinforce with a few whipstitches from the wrong side.
Finishing 2 :
Lightly steam press (if yarn allows) or use a fabric-safe starch spray if you wish to make the scallops and mesh crisper. Handle gently to preserve the lacy texture.
Care :
Hand wash gently in lukewarm water with mild detergent and lay flat to dry. Avoid tumbling; iron on low with cloth between iron and bedspread if absolutely necessary.
Info :
Store folded in a breathable cotton bag; avoid plastic for long-term storage to prevent yellowing. Re-block if necessary before display to keep the triangular or scalloped edges crisp.
— Pattern Notes, Tips & Variations :
Info :
- If you prefer a more open look, use a slightly larger hook for motif rounds and a smaller hook for shell rounds to produce more contrast between motif body and scallop. - To make a smaller throw, reduce the number of motifs across and down; the shell and join instructions remain the same. - For a vintage look, tea-stain the finished spread very lightly (test on a sample) or use off-white yarn instead of bright cream. - For a heavier bedspread, use a heavier DK/ light worsted cotton yarn and adjust hook size accordingly. This will change motif counts and final size so make a gauge sample before committing to full spread.
Info :
Gauge example (blocked motif): one finished motif measures approximately 15 cm (5.9 in) square when worked with sport/DK cotton and 3.5mm hook. This is a guide only — adjust motif count to match your desired finished size.
This heirloom bedspread pattern blends delicate lacework with practical construction to create a piece you'll be proud to display. Each motif grows into a rhythmic, meditative process and the scalloped edge brings a beautiful vintage finish to your bed. Whether made as a wedding gift or a cozy family treasure, this cream bedspread warms a room with handmade charm. Gather your yarn, settle in, and enjoy stitching each motif into a timeless design. 🧶✨