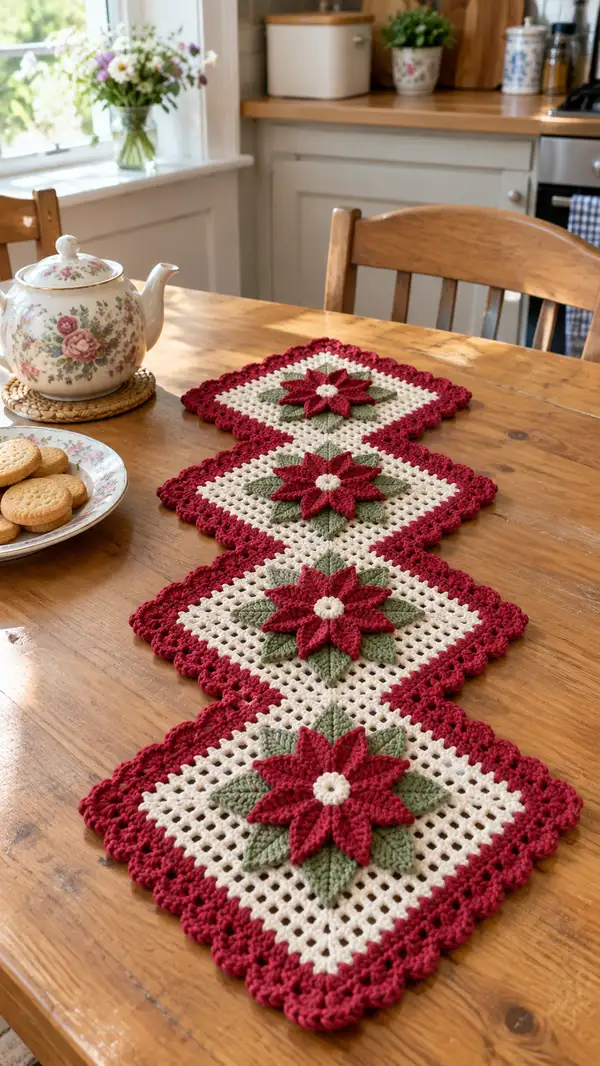
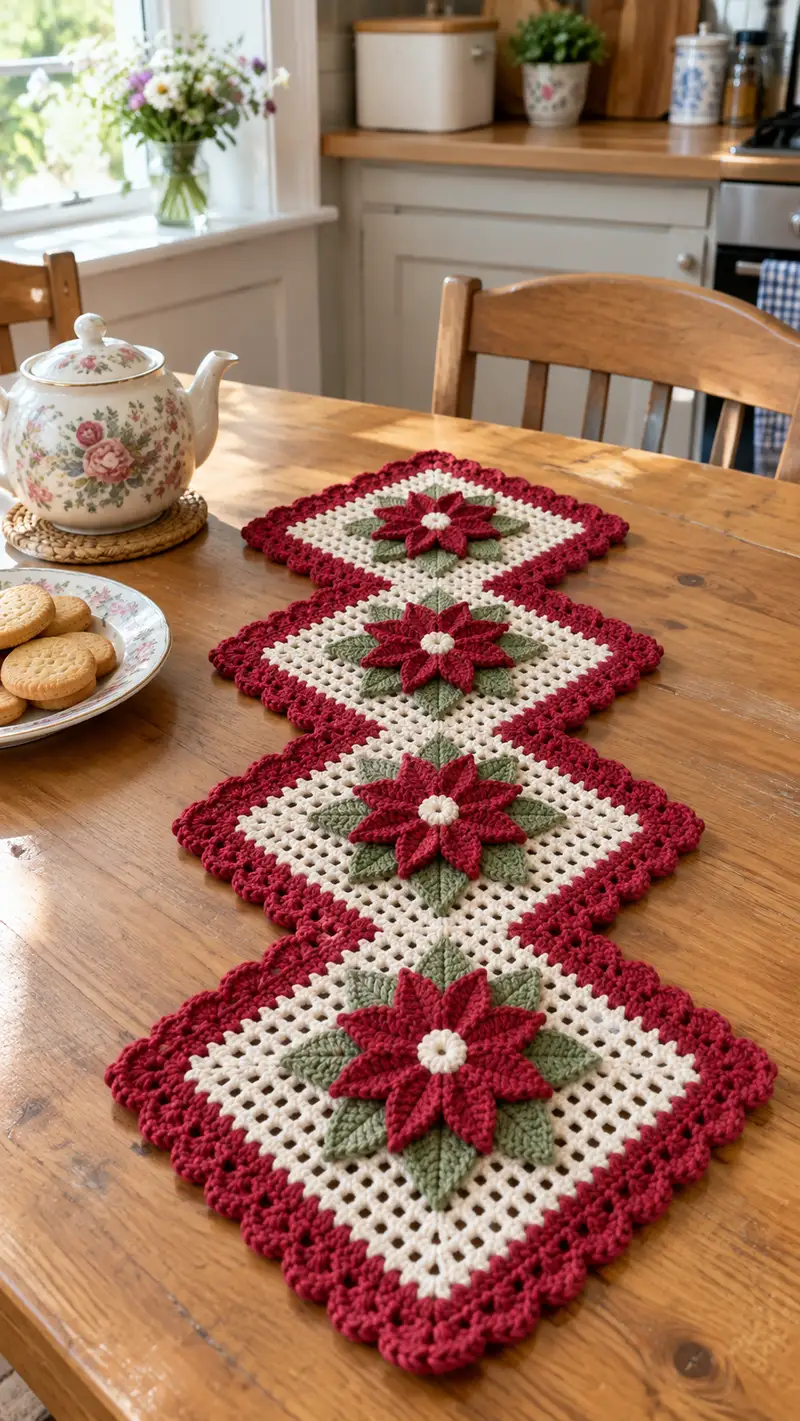
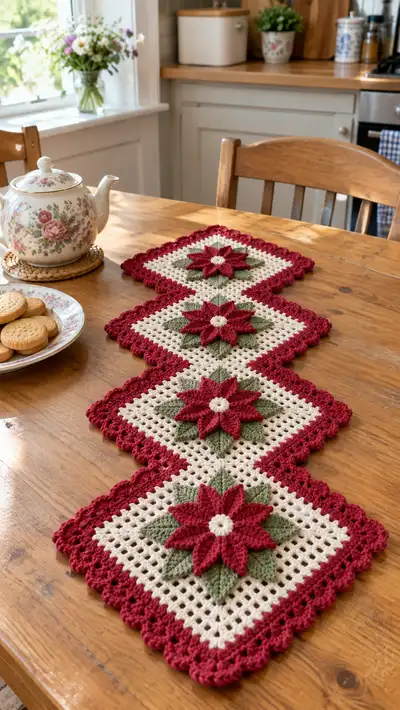
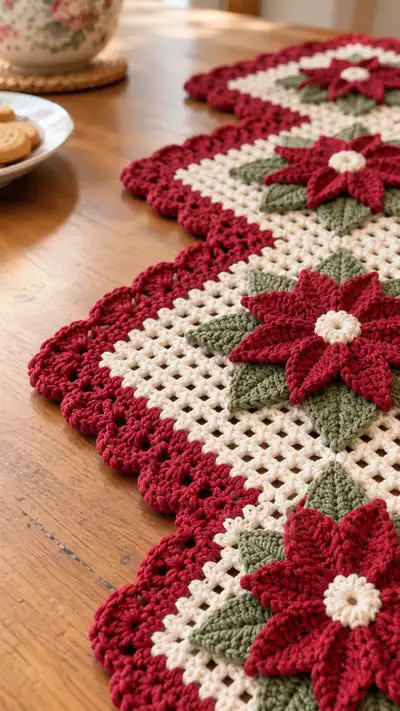
A festive table runner made from four linked poinsettia granny squares in classic Christmas red, green and cream. Each square features a layered 3D poinsettia with a textured cream center, green leaf layer, and bold red petals, set on a lacy cream mesh and finished with a scalloped red border. The squares are joined corner-to-corner to form a zigzag runner perfect for holiday tables or mantel displays.
Progress Tracker
0% Complete
— Overview :
Info :
This pattern is modular: make 4 identical poinsettia squares and join them corner-to-corner to create the runner. Each square consists of: a small cream center, a round of sage green leaf modules (8 leaves), a layer of deep red petals (8 petals), an optional upper petal layer (8 petals for extra depth), a cream mesh square built in rounds to a set size, and a final scalloped red border. The pattern below details how to make one complete square; repeat 4 times and then join. All counts are provided for a consistent finished look.
— Center (Cream) :
Round 1 :
Make a magic ring. 6 sc into ring. (6)
Round 2 :
Inc x6 (work 2 sc in each st) (12)
Round 3 :
(1 sc, inc) x6 (18)
Round 4 :
Switch to cream surface stitch: sl st into next st, ch1, work sc in each of next 18 sts to create a slightly raised disc. (18)
Info :
This small cream disc forms the little pom-like center of the poinsettia. Fasten off leaving a 12-15cm tail for sewing the disc to the next layer. Keep the tail for attaching the green leaves later.
— Leaf Module (Make 8 leaves in sage green) :
Info :
Leaves are worked one at a time around the center. Join green yarn to a stitch on the outside edge of the cream disc where you want the first leaf to sit; leaves are evenly spaced around the center (every 2 or 3 stitches of the disc depending on your prefered spacing) so make 8 leaves total.
Leaf Round 1 :
Join green with sl st to chosen stitch; ch3 (counts as first hdc), (hdc, dc, tr, dc, hdc) all in same join stitch, ch1, sl st in next st on disc to anchor. (This forms one full leaf)
Leaf Round 2 :
For added fullness, rejoin green at base of same leaf and work behind the first leaf: sl st into base, ch1, sc along the stem portion to shape (3 sc total across base), sl st to next anchor stitch on disc. Fasten off or carry yarn to next leaf.
Info :
Make 8 leaves evenly spaced around the center. If your disc has 18 sts, place leaves at approximately every 2nd stitch (or every 2 stitches then one at a third to distribute evenly). Pin the leaves as you go to confirm spacing before fastening off. Keep long tails from leaves for stitching to the mesh square later.
— Petal Module (Make 8 main petals in deep red) :
Info :
Petals are slightly larger than the leaves and sit on top of the leaves. Each petal is worked into the disc/leaf base area so they form a layered flower. You can make either 8 or 10 petals depending on desired fullness; this pattern uses 8 for a classic poinsettia look.
Petal Round 1 :
Join red with sl st to the stitch at the outer base of a leaf. Ch2 (counts as hdc), (hdc, dc, tr, tr, dc, hdc) in same base stitch, ch1, sl st to the next outer base stitch to anchor. (One petal completed)
Petal Round 2 :
To shape the petal edge: rejoin to the front loop of the petal base, ch1, sc in first st of petal, hdc in next, 3 dc across the top of the petal (work into the loop spaced along the petal top), hdc in next, sc in last, sl st to the next anchor on the disc. Fasten off and weave in or continue directly to next petal.
Info :
Repeat to make 8 petals, placing each petal centered over the green leaf below. Adjust placement so petals are evenly spaced and create a balanced circular flower. If you want an extra layer, make a second, slightly smaller set of petals offset between the first layer; instructions for the smaller layer follow below.
— Optional Upper Petal Layer (Make 8 small petals in deep red) :
Info :
For a fuller 3D flower, add a smaller petal layer. These are worked similarly but use fewer stitches and are attached to the central cream disc or to the bases of the larger petals.
Upper Petal Round 1 :
Join red in a small gap between two large petals, ch2, (hdc, dc, tr, dc, hdc) in same join, sl st to next small gap. Fasten off. Repeat 8 times so the smaller petals fill spaces between larger petals.
Info :
After completing all petals and leaves, place the cream center over the middle and sew the center disc to the petal bases with the long tail left when you fastened off the cream disc. Use small, neat stitches through center and petal bases so the disc sits slightly raised.
— Attaching Flower to Mesh Foundation :
Info :
Once your flower is assembled (center, leaves, petals, optional upper petals) leave tails long for attaching. We will build the mesh square around this assembled flower. Pin the flower to a flat surface with the right side up so you can judge where to join the background cream yarn. The flower center should sit centrally in the soon-to-be square. Starting joins are made into stitches or chain spaces around the base of the flower so it is well-anchored to the mesh.
— Mesh Square (Cream background) :
Info :
The mesh is an open filet-style mesh made in standard rounds using dc and ch1 mesh spaces. Corners are formed with dc, ch2, dc. This pattern uses a consistent increase rule: each round add 2 dc to each side (one near each corner) which maintains a square shape and produces a uniform grid. Below are rounds 1-18; continue if you desire a larger square but the counts here reach the size seen in the photos.
Round 1 :
Join cream yarn to a stitch at the base of the flower where you want the inside of the square to begin. Ch3 (counts as dc), 2 dc in same space, ch2, 3 dc in same corner space (this makes the first corner). Turn to work the next side: *3 dc in next marked side foundation space (or along a few stitches to create side), repeat to make 4 corners total; finish with sl st to top of ch3 to join. After first round you will have 4 sides with 3 dc each (3 dc x 4 = 12 dc) and 4 ch2 corners in between forming a small square. (12 dc + 4 ch2 corners)
Info :
At this stage the flower should fit comfortably within the square. If it sits too high, adjust by sewing the flower a touch lower before continuing. Keep flower attached to the mesh by occasionally catching petal and leaf bases with your joining stitches.
Round 2 :
Ch3, (3 dc) in each corner space; along each side between corners work (dc, ch1, dc) into the chain spaces or stitch spaces to create mesh. Each side now has 5 dc total (dc increases by 2 per side). Total dc this round: 5 dc x 4 sides = 20 dc plus 4 corner ch2s.
Round 3 :
Ch3, work (3 dc) into each corner ch2, along each side work dc, ch1, dc into each ch1 mesh space from previous round, increasing each side by 2 dc (side total = 7 dc). Total dc = 7 x 4 = 28 dc.
Round 4 :
Repeat mesh pattern: ch3, corners 3 dc in ch2, corss side spaces with dc, ch1, dc in every mesh space. Side total now 9 dc (9 x 4 = 36 dc).
Info :
Continue this same method: each round adds 2 dc per side producing an even square expansion. When working near the flower, catch petal and leaf tails into the mesh to anchor the flower. If you added the optional upper petal layer, be careful to leave small loops to weave into rather than sewing through the visible petal texture.
Round 5 :
Side total 11 dc. Work corners as (3 dc, ch2, 3 dc). Mesh along sides with dc, ch1, dc across each mesh space. Total dc = 11 x 4 = 44 dc.
Round 6 :
Side total 13 dc (13 x 4 = 52 dc).
Round 7 :
Side total 15 dc (15 x 4 = 60 dc).
Info :
At around round 6-8 your square will be visibly taking shape and the flower will likely sit close to center. Pin occasionally and check that petals aren't caught incorrectly; you want the flower glued to the mesh only at the base so petals remain raised.
Round 8 :
Side total 17 dc (17 x 4 = 68 dc).
Round 9 :
Side total 19 dc (19 x 4 = 76 dc).
Round 10 :
Side total 21 dc (21 x 4 = 84 dc).
Info :
If you desire a slightly smaller mesh hole, work the side dcs closer together by making the 'dc, ch1, dc' across the ch1 spaces but using 'dc into next st, ch1' instead of placing multiple dcs in a single space. The pattern here assumes a loose mesh to match the photographed openwork.
Round 11 :
Side total 23 dc (23 x 4 = 92 dc).
Round 12 :
Side total 25 dc (25 x 4 = 100 dc).
Round 13 :
Side total 27 dc (27 x 4 = 108 dc).
Round 14 :
Side total 29 dc (29 x 4 = 116 dc).
Info :
At round 12-14 you should be near the finished square size shown in the photo. Measure corner-to-corner if you're rotating the square to diamond placement for the runner. If your petals are being crowded, you may stop earlier and adjust the scalloped border to fill gaps.
Round 15 :
Side total 31 dc (31 x 4 = 124 dc).
Round 16 :
Side total 33 dc (33 x 4 = 132 dc).
Round 17 :
Side total 35 dc (35 x 4 = 140 dc).
Round 18 :
Side total 37 dc (37 x 4 = 148 dc). Fasten off if this is your desired size. Leave a long tail for the border join (about 25cm).
Info :
If you want a smaller square for a denser runner, stop at round 12-14. For a larger square, continue the same increase rule (adding 2 dc per side each round) until you reach the size you prefer. Keep the mesh consistent by always making corners as (3 dc, ch2, 3 dc) and working dc, ch1, dc across each side mesh space.
— Scalloped Border (Deep Red) :
Info :
The scalloped border is worked in deep red around the completed cream square. This final edging gives the runner the bold red frame. Work shells (5 dc in same st) spaced with single crochets to form consistent scallops. Adjust shell counts if your gauge differs; the counts below assume the mesh side totals above.
Round 1 :
With right side facing, join red in any corner ch2 space with a sl st. Ch1, sc in same corner, *skip 2 stitches on side (this will be two mesh spaces), shell (5 dc) in next stitch, sc in next stitch; rep across side until you reach corner; at corner work (sc, shell, sc) into the corner ch2; continue around for 4 sides. Adjust 'skip 2' or 'skip 1' depending on your mesh spacing so shells are evenly distributed. Join with sl st to first sc. Fasten off or continue to round 2 for deeper scallops.
Info :
If shells look too tall, reduce to 3 dc per shell. If scallops are too sparse, work shells closer together by reducing the skip between them to 1 stitch. The photographed scallop appears fairly full, so 5-dc shells were used with single crochet spaces between them.
Round 2 :
For extra depth, rejoin red to any shell top, ch1, sc in top of shell, ch2, sc in next shell top to form a picot-like ridge between shells—this gives a layered scallop effect. Repeat around and join. Fasten off and weave in ends neatly on the wrong side.
Info :
Block squares gently to set the scallops. Pin each scallop into shape while damp and allow to dry completely before assembly for the best final look.
— Repeat to Make 4 Squares :
Info :
Repeat all steps above to produce 4 identical poinsettia squares. Keep consistent tension and measure side counts at similar rounds so all 4 match. Label or stack finished squares as you go to keep track.
— Joining Squares Corner-to-Corner (C2C Style Join, Zigzag Layout) :
Info :
The runner in the photo is formed by joining squares corner-to-corner to create a diagonal (diamond) arrangement: square 1 joins to square 2 at a single corner; continue sequentially so the four squares read as a zigzag strip. Use whip stitch or slip-stitch join through the outermost loops on the wrong sides for an invisible seam.
Join Step 1 :
Lay two squares with right sides facing (or wrong sides together if you prefer to sew on the underside). Align the corners perfectly. Using red yarn (or cream for a subtle join), with a tapestry needle sew through the front loop of the border shell stitches and the corresponding loops on the adjacent square using a whip stitch, spacing your stitches uniform. Make 8-12 secure passes along the corner overlap region so the join is flat and stable.
Join Step 2 :
To junction the other squares, work in the same manner. When joining multiple squares corner-to-corner, ensure the outer scallops meet smoothly and that internal mesh edges sit flush. Fasten off and weave ends on the wrong side.
Info :
Alternatively, you can join squares using a decorative join like the join-as-you-go slip-stitch method while working the final scallop round. For consistency and less bulk at joins in the runner shown, the neat whip stitch join on the wrong side yields best results.
— Finishing Touches :
Info :
Weave in all ends securely. Use pins to position petals so that flowers are symmetrical and scallops fall evenly. Lightly block the entire runner: pin to shape on a flat surface, mist with water, and let dry completely. This helps scallops relax and mesh to lie flat.
Optional Embellishments :
Sew small metallic beads to the cream centers for sparkle, or add a tiny yarn-wrapped button in the center for vintage appeal. You can also embroider veins on leaves with a contrasting green if you want more botanical detail.
Info :
Care instructions: hand wash gently in cool water, lay flat to dry. Avoid machine washing to preserve scallops and 3D petals.
— Tips & Troubleshooting (throughout project) :
Info :
Keep stitch markers at each corner of your square mesh while building to mark where to work corner increases. Check alignment of petals before attaching them permanently to avoid off-center blooms. Maintain even tension especially for the mesh rounds to keep holes regular and scallops even.
This poinsettia square runner brings classic holiday charm to any table with layered flowers, open mesh, and a bold scalloped frame. Each square is a satisfying mini project, and watching the four panels come together into a coordinated runner is so rewarding. The finished piece is festive, tactile, and full of Victorian-inspired charm—perfect for holiday hosting or a handmade gift. 🎄🧶