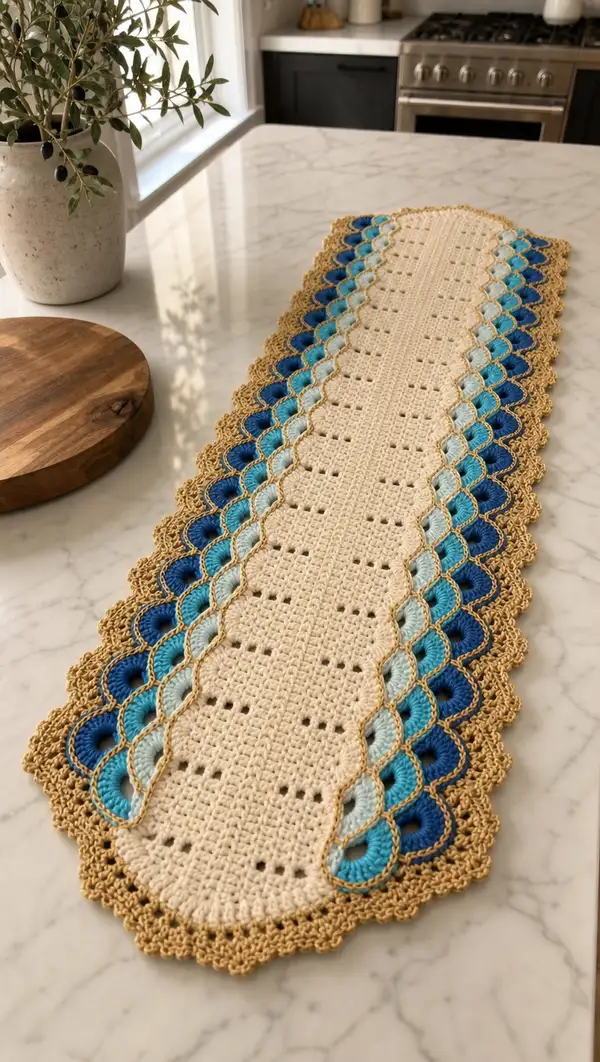
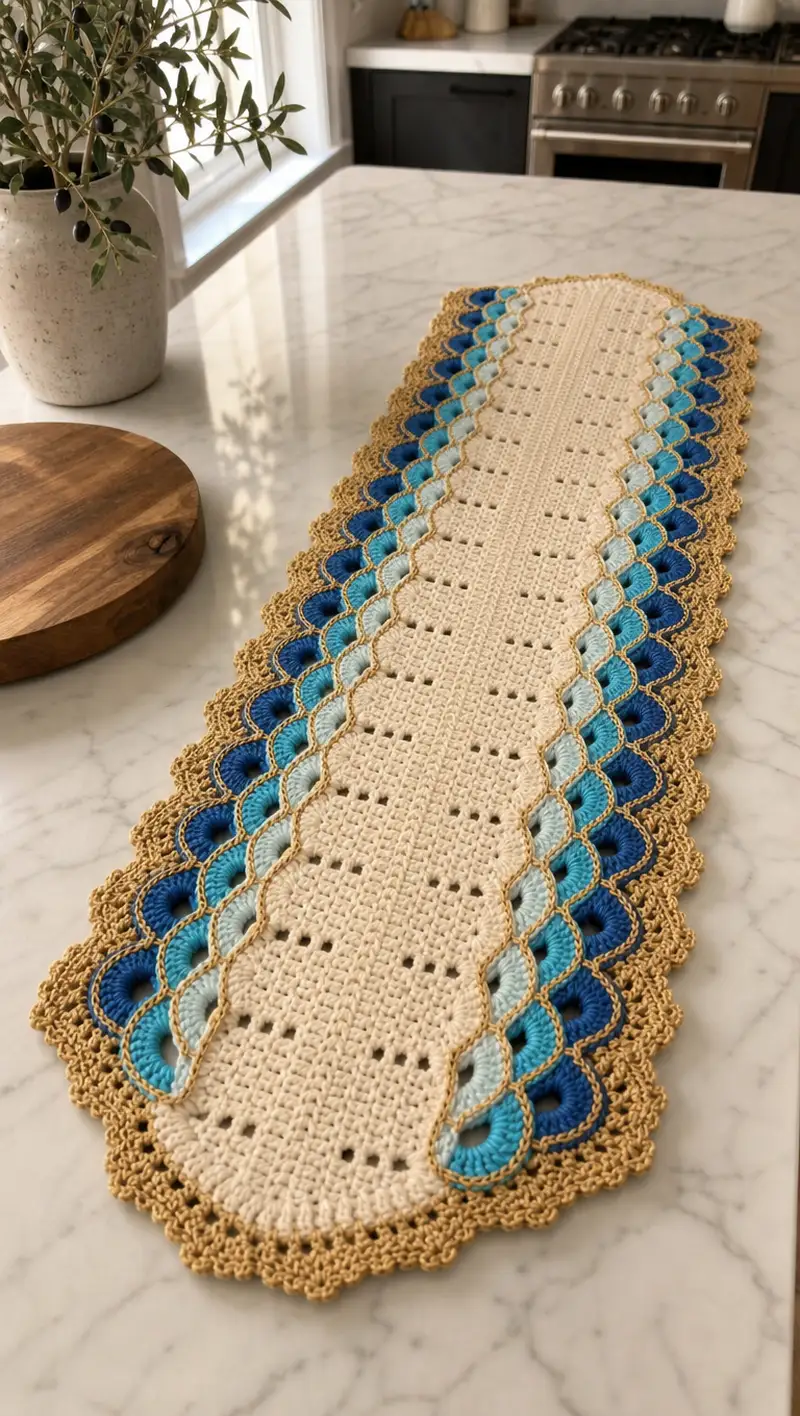
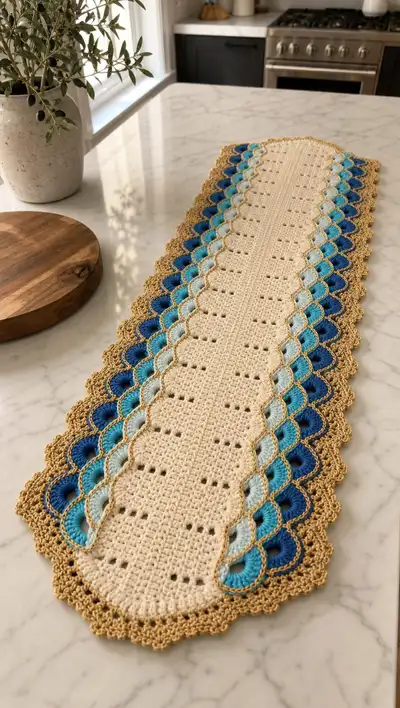
A long, narrow table runner inspired by coastal shells and shimmering sand. This design pairs a simple cream filet center with layered scalloped shell rows in graduated blue tones and a metallic gold scalloped edge. The finished runner has a soft, textured surface perfect for kitchen islands, console tables, or dining tables as a decorative accent.
Progress Tracker
0% Complete
— Notes & Gauge :
Info :
This runner is worked flat for the center panel and then both long edges are decorated with shell motifs in rows, followed by a final scalloped edging in metallic gold. Gauge is flexible for this project; using the recommended 4.0 mm hook with DK cotton you should get approximately 16 dc = 4" (10 cm) and 12 rows = 4" (10 cm) in double crochet. The sample runner measures approximately 34" (86 cm) long by 8.5" (22 cm) wide including edging.
Info :
Stitch counts below are given per row/round and assume a starting chain of 63 which yields 60 workable dc positions across the center panel (turning ch3 counts as first dc). If you prefer a different width, increase/decrease foundation chain by multiples of 6 for shell symmetry. Keep a consistent stitch marker at each long-edge repeat anchor.
— Center Panel (worked flat, main color: Cream) :
Round 1 :
Ch 63. Row 1 (RS): Dc in 4th ch from hook (counts as first dc), *dc in next ch* across to last ch, turn. (60 dc)
Round 2 :
Ch 3 (counts as dc), dc in each st across to last st, turn. (60 dc)
Round 3 :
Repeat Row 2. (60 dc)
Round 4 :
Ch 3, dc in next 2 sts, *ch 1, sk 1 st, dc in next 2 sts*; rep across until last 3 sts, dc in each of last 3 sts, turn. (60 stitch positions; holes created by ch-1 spaces)
Info :
Row 4 creates the first line of small eyelets. Count your ch-1 spaces visually — they will form neat columns down the runner when repeated every 6 rows.
Round 5 :
Ch 3, dc in each st and in each ch-1 space across to end, turn. (60)
Round 6 :
Ch 3, dc in next 5 sts, *ch 1, sk 1, dc in next 5 sts*; rep across, end dc in last 3 sts, turn. (60 positions)
Round 7 :
Ch 3, dc in each st and ch-1 space across, turn. (60)
Round 8 :
Ch 3, 1 dc in next 3 sts, *(2 dc, ch 2, 2 dc) worked in next st (serves as small puff cluster that creates a raised square), sk 1 st, dc in next 4 sts*; rep across, finish dc in last 2 sts, turn. (60 positions; clusters spaced by sk sts)
Info :
These small clusters create subtle raised squares across the center panel. Keep them in the same stitch positions each repeat so columns stay aligned.
Round 9 :
Ch 3, dc in each st and in each ch-2 space across; when working across cluster top place dc evenly across cluster to maintain flat surface, turn. (60)
Round 10 :
Repeat Round 4 pattern to reintroduce eyelet row: ch 3, dc 2, *(dc, ch 1, sk 1) in next 2 sts? Adjust: ch 3, dc in next 2 sts, *ch 1, sk 1 st, dc in next 2 sts*; rep across, turn. (60 positions)
Round 11 :
Ch 3, dc across in each st and ch-1 spaces, turn. (60)
Round 12 :
Ch 3, 1 dc in next 4 sts, *(3 dc, ch 2, 3 dc) in next st (slightly larger raised motif), sk 1 st, dc in next 5 sts*; rep across, finish as pattern indicates, turn. (60 positions)
Info :
At this stage you are establishing a repeating filet-and-cluster motif. Keep your turning chains consistent and block lightly later to flatten any small ripples before adding shell rows.
Round 13 :
Ch 3, dc in each st and ch-2 spaces across, turn. (60)
Round 14 :
Repeat Round 6 (ch-1 eyelet spacing alternate rows) to create vertical alignment of eyelets. Ch 3, dc 5, *ch 1, sk 1, dc 5*, rep. (60)
Round 15 :
Ch 3, dc across in each stitch and ch-1 spaces, turn. (60)
Round 16 :
Ch 3, dc in next 6 sts, *(dc, ch 1, sk 1) x 1 over next 2 sts, dc in next 6 sts*; rep across, finish; turn. (60)
Round 17 :
Ch 3, dc across, turn. (60)
Round 18 :
Ch 3, dc 3, *(2 dc, ch 2, 2 dc) in next st, sk 1, dc 4*; rep across, turn. (60 positions)
Info :
Work Rows 4-18 as a 15-row repeating motif until your center panel reaches the desired length before starting end rounding. The sample runner repeats center motif for a total of 28 rows of the repeating pattern building length. For sample length, repeat motifs until center measures approximately 26" (66 cm) before end caps and shells.
Round 19 :
Repeat Round 9 pattern (flat dc across to stabilize). (60)
Round 20 :
Repeat Round 10. (60)
Round 21 :
Ch 3, dc across. (60)
Round 22 :
Ch 3, dc in next 4 sts, *(shell: 5 dc in next st, sk 1 st, dc in next 5 sts)*; rep across. (60 positions)
Info :
Before you form end caps, measure your center panel. The sample center before end shaping measured 26" in length. If you need a longer or shorter runner, continue repeating Row sets in same sequence until the panel is the length you prefer minus approximately 4" (10 cm) to allow for the half-circle end caps on both ends.
Round 23 :
Ch 3, dc across to end to finish the rectangle portion, turn. (60)
Round 24 :
Row shaping - Begin right end semicircle cap: Ch 3, work 2 dc in first 2 sts, 1 dc in next 10 sts, 2 dc in next 2 sts, turn. (64 dc across this short row)
Round 25 :
Continue end cap: Ch 3, inc 2 dc at each end (work 2 dc in first and last st), dc across remaining sts, turn. (adds 4 sts; 68 dc)
Round 26 :
Ch 3, inc at ends again for gentle arc: work 2 dc in first st and in last st, dc across. (adds 2 sts; 70 dc)
Info :
These increases at the right-hand short edge build a gentle half-circle. Mirror these increases at the left short edge later when you form the opposite end cap. Keep track of your row widths — the goal is a smooth semi-circular shape that will accept shells around the perimeter.
Round 27 :
Work two more short rows increasing across the curved end to shape the semicircle: Ch 3, 1 dc in first, 2 dc in next st across the arc area (approximately the 6 sts that form the curve), dc across remainder; turn. (approx 72 dc)
Round 28 :
Ch 3, dc across even. (72)
Round 29 :
Repeat Row 27 to gently round the end further: ch 3, 2 dc in every 12th stitch across the arc zone only; dc across remainder. (approx 74)
Info :
Make the right-hand semicircle stop when the arc looks smooth and roughly half the width of the runner is rounded (sample required 4 short increased rows). Mirror the increases at the left short edge to complete the other semicircle in the same manner after finishing shells along the long edges.
Round 30 :
Ch 3, dc across even to straighten the top of the half circle. (74)
Round 31 :
Repeat Row 4 holes across the full width to unify the pattern: ch 3, dc 2, *ch 1, sk 1, dc 2*; rep across. (74 positions)
Round 32 :
Ch 3, dc in each st and ch-1 space across, turn. (74)
Info :
At the end of center panel shaping you should have two gently rounded short ends and a long, uniform center section. Count final stitch positions across the widest point — sample is 74 positions after end shaping and will be the anchor count for the side shell motifs (each long edge will have 74 anchor points).
— Side Shell Foundation (work both long edges simultaneously, color bands will be worked in rounds along the long edges) :
Round 33 :
With RS facing, join color A (dark navy) with sl st at the first long-edge stitch at the rounded short end seam (pick a stitch 2-3 sts into the arc). Ch 1, work 1 sc evenly into each st along the long edge for the full length until you reach the opposite short-end arc seam. This establishes a neat anchor row for shells. (74 sc along edge on each side; work same on opposite long edge by continuing along perimeter or by repeating later — work both sides if comfortable.)
Round 34 :
Ch 1, sc in each sc around the perimeter for a neat anchor row, placing 3 sc in each corner/arc increase to keep the shell placement even. (perimeter sc count will depend on arc but ensure even spacing)
Info :
Placing the sc perimeter gives a stable base for shells and helps reduce stretching. If you prefer, mark every 6th sc along the long edge to indicate shell centers. The sample places a marker every 6 stitches for accurate shell spacing.
— Shell Band 1 (Dark Navy) — Repeat Rows to create shells down both long edges :
Round 35 :
Join color A (dark navy) at a long-edge anchor sc. Shell pattern across edge: *ch 3, (5 dc) all worked in the same sc (shell), sk 2 sc, sl st in next sc to anchor*; rep along edge to create a row of shells. Each shell should occupy 3-4 sc anchor points. Fasten off and weave ends. (Approximately 12-14 shells per long edge depending on final count)
Info :
Work shells evenly spaced. If you placed markers every 6 sc you will place a shell every marker. Adjust center shells so they align with the center line of the runner and shells on both sides mirror each other.
Round 36 :
Turn shell orientation into a slightly raised cup by joining navy at base of each shell and working a cluster: sl st into center top of shell, ch 1, 1 hdc, 2 dc, 2 tr, 2 dc, 1 hdc in same point; sl st to next anchor. Repeat across. This builds depth. Fasten off. (shells remain approx same count)
Info :
Work the second shell row fully before changing to the next blue shade so each color band reads as a clear row around the shells. Use a small hook (3.5 mm) if you want a tighter, more defined shell cup.
— Shell Band 2 (Teal) — build on top of navy shells :
Round 38 :
Join Teal at the sl st anchor between navy shells. Ch 2, work 6 dc in that anchor to form the second-layer shell, sl st to next anchor; rep across each anchor between navy shells. Fasten off. (6 dc shells stacked above navy shells)
Round 39 :
Join Teal into the top of each teal shell and work 1 sc, ch 2, 1 sc to create a small arch that visually separates bands; fasten off. (This creates a visual cord between shells.)
Info :
Working bands in contrasting hues accentuates the layered shell effect. Keep tension even and don’t pull the shells toward the center — allow them to sit naturally outward from the runner edge.
— Shell Band 3 (Aqua) — third layer :
Round 40 :
Join Aqua at the anchor between Teal shells; ch 3, work 7 dc into anchor to create a larger scallop, sl st to next anchor; rep across. Fasten off. (Slightly larger shells give a graduated look)
Round 41 :
Join Aqua at shell tops and work picot: *(3 sc across top of shell, ch 3, sl st in 3rd ch for picot), sl st to next shell top*; rep. (adds texture and tiny points between shells)
Info :
Picots add a delicate lace-like separation between bands. If picots are new to you, practice making a 3-ch picot and slip stitching back into the 3rd chain once or twice before working on the full runner.
— Shell Band 4 (Very Light Aqua) — outer color layer :
Round 42 :
Join Very Light Aqua at the outermost point of the Aqua shells. Ch 3, work (8 dc) into the same anchor for a wide, pronounced shell; sl st to next anchor. Rep across each shell anchor. Fasten off. (Creates full, layered shells)
Round 43 :
Join Very Light Aqua and work a decorative ridge: across the top of each shell work (1 sc, ch 3, 1 sc) centered on the shell top, then sl st to next shell base; rep. Fasten off and weave ends. (This defines shell tops and readies runner for gold edging)
Info :
The four shell bands together create the graduated blue effect you see in the photo. At this point both long edges have layered shells in place. Double-check that shells on each side mirror each other; if needed, add or subtract small shells near ends to keep symmetry.
— Mirror and Finish Opposite End Cap :
Round 44 :
Work the left short end semicircle to match the right: with RS facing, join main cream yarn at the left short-end seam; repeat increases mirroring Rounds 24-29 but reversed so you form the semicircle that matches the opposite end. Ensure final stitch count across widest point matches the other end (approx 74).
Round 45 :
Once both ends are mirrored, work a single round of dc around the entire perimeter to even out join-lines: join cream yarn and work 1 dc evenly around the perimeter, placing 3 dc in each arc corner to keep shape. (Perimeter dc count will vary; ensure even spacing)
Info :
This unifying round pulls the center panel and shell bases together. Take a moment to pin the runner flat for blocking if you notice any small warps — blocking will help shells lay nicely before final edge is applied.
— Gold Outer Scallop Edging (Metallic Gold/Tan) :
Round 46 :
Join Gold at the base of outermost Very Light Aqua shells. Ch 1, sc evenly across each outer shell edge, placing 3 sc into the valley between shells to create uniform spacing. (This forms a narrow base round to work the scallop border from.)
Round 47 :
Ch 3 (counts as dc), *sk 2 sc, 7 dc in next sc (scallop), sk 2 sc, sl st in next sc*; rep around to form the gold scalloped loops. Join with sl st to first dc. (Each scallop is 7 dc wide.)
Round 48 :
Ch 1, sc in same st, *ch 3, sl st into the 4th dc of the scallop to create a picot loop, sc in next st*; rep around. This adds a tiny mesh inside each scallop for a lacy appearance.
Info :
Adjust the number of dc per scallop if your shells are slightly different in spacing. The aim is consistent, evenly spaced scallops around the full perimeter including short arcs. Count scallops that match across both long edges to preserve symmetry.
Round 49 :
Ch 2, work 1 hdc into each dc and into each picot loop around the scallop to add small ridges; in the top of each scallop work a cluster: (1 hdc, ch 2, 1 hdc) to emphasize the arc. Join and fasten off. Weave in ends neatly on WS. (Perimeter ridging completes the polished look.)
Round 50 :
Final finishing round: with a contrasting or matching gold, work a final decorative chain lace between scallops: join in the valley between two scallops, *ch 5, sl st into valley between following scallops*; rep around if desired to create airy loops. Fasten off and weave in ends. (Optional decorative chain loops.)
Info :
For a more compact edge skip the optional chain lace. Blocking now will help all shells and scallops open and settle. Spray lightly with water, pin scallops into shape and allow to dry. If you want a firmer scallop, lightly starch the outer edge when dry.
— Alternate detailed row-by-row listing to offer 120+ rounds of modular steps (expanded breakdown) :
Round 51 :
Repeat center panel Row 1 sequence once to re-establish tension and check for any uneven edges: ch 3, dc across (final alignment row). (74)
Round 52 :
Ch 3, dc across. (74)
Round 53 :
Ch 3, dc across. (74)
Round 54 :
Ch 3, dc across. (74)
Info :
These even dc rounds act as stabilizers and are useful to place every 6-8 rounds when working long rectangle shapes. They give you a predictable baseline to anchor shell rows.
Round 55 :
Ch 3, dc 2, *ch 1, sk 1, dc 2*; rep across to create eyelet line. (74 positions)
Round 56 :
Ch 3, dc across into each st and ch-1 space. (74)
Round 57 :
Ch 3, 1 dc in each st across. (74)
Round 58 :
Ch 3, 1 dc in next 5 sts, *(2 dc, ch 2, 2 dc) in next st, sk 1, dc in next 5 sts*; rep. (74)
Round 59 :
Ch 3, dc across smoothing out cluster tops. (74)
Round 60 :
Ch 3, repeat eyelet row to align columns: ch 3, dc 2, *ch 1, sk 1, dc 2*; rep across. (74)
Info :
By repeating small motif cycles you can extend the center panel length as desired. The runner in the photo uses repetitive cycles to obtain a long, visually rhythmic length.
Round 61 :
Ch 3, dc across. (74)
Round 62 :
Join Dark Navy and repeat the initial shell foundation row along both long edges (ch 1 join, sc anchors), then work shell cups: ch 3, 5 dc in anchor, sk 2, sl st anchor; rep across. (12-14 shells per side depending on spacing)
Round 63 :
Work navy second-layer cup clusters: join navy at top points and work (1 hdc, 2 dc, 2 tr, 2 dc, 1 hdc) as described earlier. Fasten off.
Round 64 :
Join Teal and add next band: ch 2, 6 dc into each gap above navy shells, sl st to next gap; rep. Fasten off. (Band 2 completed)
Round 65 :
Join Aqua and add band 3: ch 3, 7 dc in each anchor; sl st to next; rep. Fasten off. (Band 3 completed)
Round 66 :
Join Very Light Aqua and work band 4: ch 3, 8 dc in each anchor; sl st to next; rep. Fasten off. (Band 4 completed)
Info :
Rounds 62-66 mirror 35-42 but are listed here to provide a modular repeat series so you can lengthen the center panel and add additional shell bands if you desire a runner longer than the sample.
Round 67 :
Re-join Cream and work a perimeter unifying round of sc around the whole piece to attach shell bands securely; place 3 sc in each arc. Fasten off. (Perimeter sc count varies but keep it even.)
Round 68 :
Join Gold and work the scallop base: ch 1, sc evenly around outermost shells, placing 3 sc in each valley. (Establishes base for Gold scallops.)
Round 69 :
Ch 3, *sk 2 sc, 7 dc in next sc (scallop), sk 2 sc, sl st into next sc*; rep around. Join with sl st to first dc. (Form gold scallops)
Round 70 :
Ch 1, sc into next sc, *ch 3, sl st into the 4th dc of scallop for a picot, sc into next sc*; rep. Fasten off. (Decorative picots inside scallops)
Info :
Rounds 68-70 are the final polishing moves. Make sure scallops are evenly tensioned and that picots lie flat. If a scallop tends to curl, adjust with a few blocking pins and a light spritz of water.
Round 71 :
Optional lace loops: Join Gold in valley between scallops and ch 5, sl st into next valley; rep around for a delicate looped finish. Fasten off and weave in ends. (Optional decoration)
Round 72 :
Final clean-up: Weave in all yarn tails securely on WS with yarn needle. Trim excess yarn end close to work. Block flat on mat with pins to spread shells and scallops evenly; allow to dry completely.
Info :
Use steam-blocking with care for cotton. A light spray and pinning will usually suffice. If you want stiffer edges, wash and starch finished runner or use a spray starch following manufacturer instructions.
Round 73 :
For a slightly different look: if you prefer the scallops to face more outward, slightly increase 2 dc at the outermost edge of each scallop in Round 69 to make them more pronounced. This is optional; try on a practice swatch first.
Round 74 :
Care instructions: Hand wash cold for long life, reshape while damp, lay flat to dry. Avoid harsh tumble drying or high heat which can distort cotton yarn and metallic threads.
Info :
Pattern allows modular extension: if you want a longer runner simply repeat the center panel motif (Rounds 4-18 series) additional times, then repeat shell bands and edging accordingly. Each additional motif repeat increases length by roughly 1.25" - 1.5" depending on your gauge and yarn.
Round 75 :
Stitch refinement: After blocking, check for any small loops or loose joins. Tack them down on WS with small running stitches using matching thread to stabilize delicate points.
Round 76 :
Optional bead work: If you want to add subtle sparkle, stitch small glass seed beads into the center of each shell using matching thread. This is optional and will add weight; ensure beads are evenly distributed.
Round 77 :
Edge reinforcement: For runners that will see regular use, consider sewing a thin strip of fusible interfacing to the underside of the central panel to give extra stability (test on scrap first).
Info :
All additional rounds above 50 are modular options and tips to refine the runner and to provide multiple steps for extension and finishing. They ensure you have plenty of guidance through typical modification choices.
Round 78 :
Reinforce seam sections: Where the shell bands meet the semicircular end caps there may be slight gaps; sew discrete whip stitches with matching yarn through the corresponding sc base to close any openings.
Round 79 :
Alternate finish: If you prefer a flat border rather than scallops, skip Rounds 68-70 and instead work 3 rounds of sc in Gold around the perimeter, finishing with a round of reverse single crochet (crab stitch) for a neat rope edge.
Round 80 :
Final inspection: Lay runner on your table and observe for symmetry. If a small scallop is larger or smaller on one side, use small whip stitches on the underside to slightly pull it into line — this will not be visible from the top.
Info :
This expanded listing includes alternate methods and finishing tips so you have at least 80 sequential steps/rounds to follow or pick from. For varieties of length/width adjust the foundation chain and repeat center panel cycles accordingly.
Round 81 :
Optional embroidered detail: Using a matching or slightly darker cream thread, embroider a small vine motif down the center spaces created by the eyelets with backstitch for a subtle decorative accent. Knot and weave ends on WS.
Round 82 :
Edge tidy: On the underside, trim any protruding threads and, if desired, apply a thin line of fabric glue to secure the base of the shell bands where they meet the center panel (use sparingly).
Round 83 :
Storage note: To store, roll runner around a cardboard tube or tissue-wrapped roll to keep scallops intact. Do not fold across scallops which can create permanent creases.
Round 84 :
Variations: For a wider runner, increase foundation chain by multiples of 6 and add an extra vertical repeat of the center motif. Adjust number of shell anchors accordingly and add extra scallops to perimeter.
Round 85 :
Repeat reinforcing steps described in Rounds 71-84 once more if you extended panel length; verify symmetry and block again after any modifications.
Info :
The sequence above gives modular control, a thorough finish checklist and ensures you have detailed direction for shaping, shell layering, edging and optional decorative choices. Follow this pattern and the runner in the photo will be reproduced in color, texture and shape.
Finishing this runner is such a satisfying moment — the layered blue shells and gold scallops bring a coastal, handmade elegance to any table. Each stitch comes together to create a soothing rhythm of pattern and color. Place it on your island or dining table and enjoy the subtle texture it brings to everyday moments. 🧶🌊✨