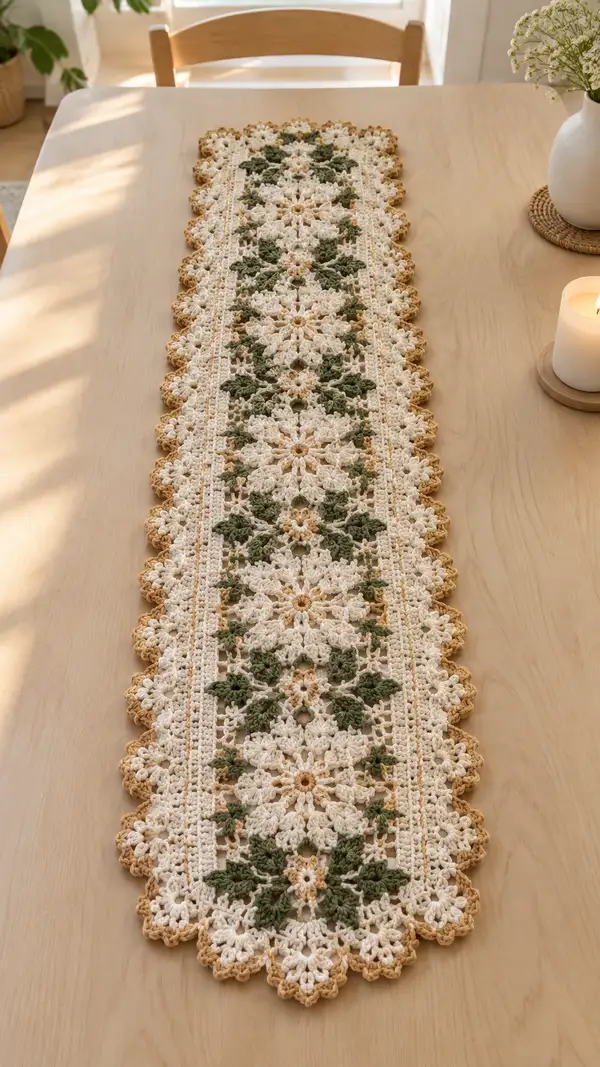
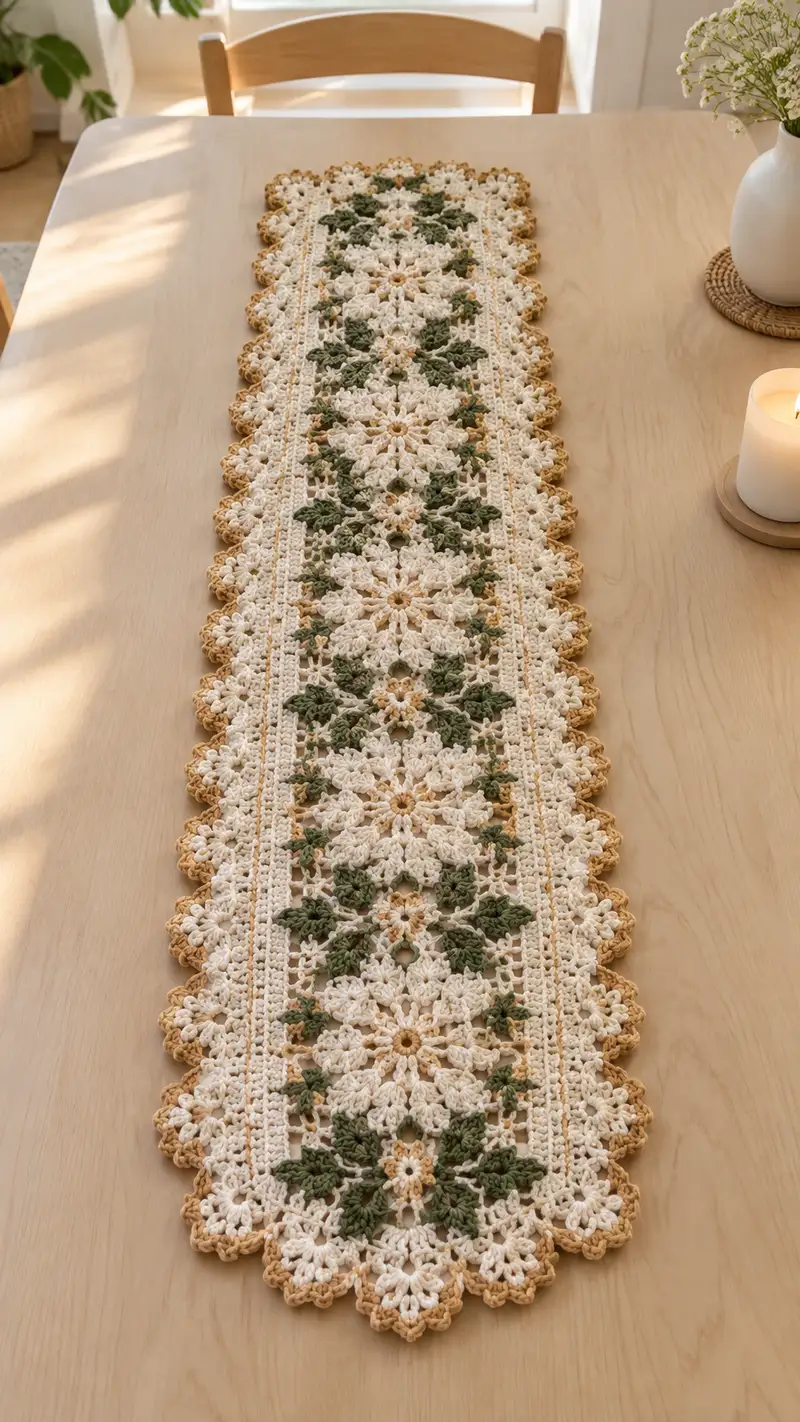
Create a charming ivory table runner decorated with delicate daisy motifs and olive-green leaves, edged in a warm tan scallop. This pattern uses motif construction, join-as-you-go technique, and a layered scalloped border to produce a vintage-inspired centerpiece. Clear step-by-step rounds and joining instructions guide you through motif builds, leaf inserts, central strips, and a decorative edging.
Progress Tracker
0% Complete
— Notes & Gauge :
Info :
Gauge: One completed daisy motif (after blocking) measures approximately 9.5cm/3.75in across with 3.5mm hook and DK weight cotton. Adjust hook if your tension differs. The sample runner pictured has 9 large daisy motifs in the center column and two narrow motif columns at the sides; adjust motif count to reach the desired length.
Info :
Techniques used: magic ring, puff stitch, 3-doublecluster petals, join-as-you-go (JAYG), surface slip stitches for some leaf placement, and a layered scallop border. Read all Info boxes before beginning each section.
— Daisy Motif (Make 20-30 depending on runner length) :
Round 1 :
With tan for center: Make a magic ring, ch3 (counts as dc), work 11 dc into ring, pull ring tight and join with sl st to top of ch3 (12)
Round 2 :
Ch1, sc in same st, *ch4, skip next dc, sc in next dc; rep from * around to form 6 ch-4 loops and 6 sc spaced between (12 sc, 6 ch-4 loops). Join with sl st to first sc
Info :
This round creates the base petals spaces. Keep tension even; avoid pulling loops too tight as petals will be worked into these ch-4 loops.
Round 3 :
Change to ivory. Sl st into first ch-4 loop, ch1, (sc, hdc, 3tr cluster, hdc, sc) all in same ch-4 loop to form a full petal. *Sl st into next sc, sl st into next ch-4 loop, repeat petal in that loop; rep from * around to make 6 full petals. Join with sl st to first sc at base of first petal (6 petals total)
Round 4 :
Ch3 (counts as dc), work 2 dc in valley between each petal separated by a sl st (work 3 dc groups in each valley), *ch2, sl st into top of next petal to anchor; rep from * around creating a decorative round of clusters and chaining for spacing. Join to top of ch3. Effective stitch points: 12 groups of 3 dc (36 dc) separated by ch2 spaces
Info :
This round creates an intermediate ring that builds height for the next layer of smaller petals; keep stitches even so clusters sit flush.
Round 5 :
Ch1, *in ch2 space: (sc, ch3, puff in same space 3 times, ch3, sc) to create small raised petal sets; move to next ch2 space and repeat; rep around to match 12 spaces (12 small petal sets)
Round 6 :
Ch1, sc in each stitch and in each puff top around to tidy and anchor petals. At the end you should have a smooth round that ties petal tops together, approximate count 48 sc (varies with puff space tension)
Info :
Puff stitch technique: Yarn over, insert hook in indicated space, yo and pull up a loop, repeat 2 more times (you have 7 loops on hook), yo and draw through all loops, ch1 to secure. Keep puffs consistent in height; do not tighten completely so they remain slightly raised.
Round 7 :
Ch3, *dc in next 2 sts, (dc3tog cluster across top of next puff using dc cluster technique) to make small textured stars between petals; rep around. Join with sl st. Approx count 48 dc/cluster combination
Round 8 :
Switch to ivory if not already. Ch3, 1 dc in each st around maintaining pattern and spacing for a round of even stitches to enlarge motif (48)
Round 9 :
Ch1, *ch5, skip 3 stitches, sc in next; rep around to form openwork picot loops between rounded petals. Join with sl st. You should form 16-18 ch-5 loops depending on counts (this creates spaces for leaf joins)
Info :
If you plan to use join-as-you-go, align motif now with neighbor motif and use these ch-5 loops to slip-stitch-join where indicated in the Joining section. Otherwise leave loops intact and sew motifs later.
Round 10 :
Ch1, sc in each st and in each ch-5 loop, placing 3 sc inside each ch-5 loop to flatten them and create small mounting points for leaf motifs. Approx count 60 sc after flattening loops (adjust to actual ch-5 loop count)
Round 11 :
Change to tan for small center highlight: Sl st to an inner junction near the center, ch1, *sc around inside ridge to create a tidy inner ring of 12 sc; join with sl st. This is primarily decorative (12)
Round 12 :
Change back to ivory. Work 1 sc in each st around to stabilize outer edge. Join and fasten off leaving 25cm tail for sewing if not using JAYG. Block motif flat and pin to size. (approx 60 sc)
Info :
Blocking tip: Pin to flat shape and lightly mist with water or fabric spray; allow to dry thoroughly. Block each motif before joining to ensure even joins and tidy scalloped edges later.
— Olive Leaf Motif (Make 40-60 leaves as accent) :
Round 1 :
With olive: ch6, sl st to form ring or make mr and ch1, 6 sc into ring (6)
Round 2 :
Ch2 (counts as hdc), 2 hdc in each sc around (12)
Round 3 :
Ch1, (sc, hdc, dc, tr, dc, hdc, sc) all in next stitch or space to form elongated leaf shape; sl st to base; fasten off leaving tail for sewing. Leaf measures ~2.5-3cm.
Info :
Make leaves slightly firmer by working last round in BLO to create a curved ridge, which allows leaves to cup slightly when sewn to petals.
Round 4 :
Optional shallow vein: With contrasting tan, surface sl st along center of leaf from base to tip. Fasten off. Add as many leaves as desired to match photo layout (small clusters at motif junctions).
— Small Connector Motif (Make 40-60 for flanking columns) :
Round 1 :
With ivory: mr, ch3, 7 dc into ring (8). Join with sl st (8)
Round 2 :
Ch1, sc in each st around (8). Join. This small octagon forms a neat spacer for side columns.
Round 3 :
Ch3, dc in same st, (ch2, 2 dc) in each st around forming scallop arcs, join. After blocking this piece should sit slightly raised (16 dc clusters).
Info :
These small connectors become the narrow motif columns shown at the sides of the runner. Work enough to make two columns as long as the central daisy column.
— Layout & Planning :
Info :
Sample layout for pictured runner: Central column: 9 Daisy Motifs stacked end-to-end. Flanking each side: two narrow columns of Small Connector Motifs aligned with each daisy row (i.e., 9 connectors per side column). Leaf motifs are added in clusters of 2-4 between daisies at the internal joins to emulate olive sprigs. Adjust motif count to your table length.
Info :
Work a test strip of three daisies joined together and block before committing to full count to confirm motif size and overall runner length. This is the best time to customize motif spacing and rows.
— Join-As-You-Go Joining (Center Column) :
Info :
These instructions assume you are working rows of motifs and joining them as you complete the last round of each motif using ch-5 loops or exterior points. If you prefer sewing, leave long tails for mattress or whip stitch joining.
Round 1 :
Complete Daisy Motif through Round 9 leaving ch-5 loops intact for JAYG (do not fasten off). Align completed motif A and completed motif B so their ch-5 loops meet (loop-to-loop).
Round 2 :
On motif B, when you reach a ch-5 loop that aligns with a loop on motif A, insert hook through loop of motif B and corresponding loop of motif A, yo and sl st through both loops to join; ch1 to secure and continue. Join at every second or third loop based on desired firmness until two motifs are connected with even tension.
Info :
Use a tapestry needle at the end to tidy slight gaps. When joining, avoid pulling too tight or the runner will pucker; maintain relaxed tension to keep motifs flat.
Round 3 :
For vertical joins along central column, repeat join at each adjacent motif. After joining a pair, continue to finish outer motif rounds 10-12 and add leaf motifs into vacant ch-spaces using a few tidy whip stitches or small sl st anchors to secure them in clusters of two on alternate sides to mimic the photo layout.
Info :
Place leaf clusters (two to three leaves) alternating left and right between daisies. Use tan yarn for small center knots if you want highlighted centers; tack centers with a couple of tight stitches to hold without distorting petals.
— Joining Small Connector Columns :
Round 1 :
Align connector motifs in two long columns. Join edge-to-edge using sl st through outer edge loops and corresponding loops on adjacent connector motifs so columns remain narrow and slightly raised.
Round 2 :
When attaching the connector columns to the central daisy column: position connector motif edges adjacent to daisy motif sides. Use a joining row of sc ladder stitch across corresponding stitch counts, working through both motif edges to secure. Aim for 2-3 sc per approximate petal valley to keep edge stable.
Info :
Check alignment frequently and pin motifs in their final positions before final tacking. The runner pictured shows very even spacing—pin each row of three (connector, daisy, connector) together and check front and back alignment before final permanent joins.
— Central Panel Stabilizing Rows (worked after joining motifs) :
Round 1 :
With ivory, pick up at any seam between central motifs and work 1 sc all around the joined seam working through both layers to create a neat panel seam. Work evenly around full length of center column (approx stitch count variable; maintain even sc spacing)
Round 2 :
Ch2, hdc in each sc around for two rounds to build a flat fabric strip on either side of the central motifs. Work 2 rounds of hdc to create a stable strip for border anchoring.
Info :
If you prefer a lacy transition, work alternating dc and ch1 spaces instead of hdc; the pictured runner uses tidy, narrow strips that read as faint ribs between the flower columns.
Round 3 :
Work 1 round of sc in BLO to create a subtle ridge that will help the scallop border sit neatly. Fasten off and weave in ends for this section.
— Border Edging (worked around entire perimeter) :
Info :
Border uses 16 rounds broken into foundation rounds, ribbing, scallop foundation and final scallop layering. Work border after full runner is assembled and blocked flat. Change to tan for final scallop color as pictured.
Round 1 :
With ivory, attach yarn at any outer seam. Ch1, work 1 sc evenly around the entire outer edge through both layers where joins exist. For the scalloped edges (petal edges), place 2-3 sc in points to avoid bunching. Continue around. This is a tidy anchoring round. (st count variable)
Round 2 :
Ch2, 1 hdc in each sc around to build a small raised band for the border (1 round). Join.
Round 3 :
Switch to 3.0mm hook if you want tighter border. Work 1 round BLO sc to emphasize edge ridge. This creates a nice line before scallops. Fasten off if switching color. (same stitch count as previous round)
Info :
Measure short edges: the pictured runner has scallops repeat at every petal valley resulting in 18 scallops along the long side per side. Adjust repeats to match motif spacing on your runner.
Round 4 :
Change to tan. Working along long sides and short ends: *in next 3 sc: (sc, ch3, sc) to form small arch, skip 1-2 stitches as necessary to keep arches even; rep across. On corners increase to form a smooth rounded corner by working (sc, ch3, sc) twice in the corner junction to maintain shape.
Round 5 :
In each ch3 arch from previous round work 7 dc to form first scallop row; sl st into next base to anchor. Repeat all around. This forms a deep scalloped silhouette (7 dc scallop).
Round 6 :
Ch1, sc across base of scallops and place 3 sc across the top of each 7-dc scallop to form a shallow ridge (3 sc per scallop). Join and fasten off tan if desired and switch back to ivory for final accent round.
Info :
Layering a smaller scallop on top of a larger scallop (two-color scallop) achieves pictured look: tan base, ivory highlights at petal tips. Consider working a final picot in ivory on the tip of each scallop if you prefer more definition.
Round 7 :
Change to ivory. Work 1 sc in between scallops and 1 picot (ch3, sl st first ch) on every alternate scallop top to give delicate ivory highlights. This will produce tiny loop details that mimic petal edges. Repeat around and weave in ends.
Round 8 :
Optional: Work a final decorative slip-stitch line in tan across the border base for extra contrast and to hide any join unevenness. This is formed by working sl st in the back loop of the final row around the whole runner.
— Finishing Rounds & Details :
Round 1 :
Weave in all tails: use tapestry needle to bury tails through several interior stitches to secure. Trim close but not flush to leave security inside work.
Round 2 :
Check all leaf clusters and tack any loose leaves with a few discreet stitches on the underside so leaves lay flat on the runner surface. Tie a small knot and hide it beneath neighboring petals.
Info :
Blocking final runner: pin to a flat blocking board, keeping scallops evenly spaced. Use rust-proof pins and steam or damp-blocking technique to open scallops and petals. Leave to dry fully to hold shape.
Round 3 :
Optional surface embroidery: use tan thread to place small French knots in center of daisies for extra texture. Use strong embroidery thread and a sharp needle to pierce the cotton fabric gently to prevent snagging.
Round 4 :
Final inspection: ensure runner lies flat, trim any stray fibers, and press gently if necessary. Your runner is ready for use or gifting.
Info :
Storage tip: roll runner loosely rather than folding to avoid creases in the scallop border. If gifting, present rolled with tissue paper and a ribbon for a sweet handmade gift.
— Advanced Joining Options and Variation Rounds :
Round 1 :
Alternate join: Instead of sl st JAYG, use mattress stitch with a yarn needle for an invisible flat seam. This is slower but gives a firmer flat seam for high-use tabletops.
Round 2 :
Variation: Make larger daisies by increasing initial dc count to 16 in round 1 (ch3 + 15 dc = 16) and expanding subsequent rounds proportionally (this will increase motif diameter by about 25%). Adjust connector motif and border repeats accordingly.
Info :
When increasing motif size, add additional rounds of even dc before beginning ch-loop petal creation. Ensure neighbor motifs are made to same new size so joins remain even.
Round 3 :
Colorwork tip: To create a more vivid runner use tea-stained tan or warm gold for the scallop and a darker olive for more contrast. Carry small lengths of yarn inside motifs if you prefer less ends to weave, but secure carries at least every 2-3 stitches to avoid long floats.
This elegant ivory and olive runner is a lovely centerpiece that brings gentle botanical charm to any table. Each daisy motif and leaf cluster comes together in a repeating melody of texture and color, finished with a warm tan scallop that frames the whole piece. Working motif-by-motif makes this project wonderfully portable—and the join-as-you-go finishing creates a seamless, professional look. 🧶🌿 Enjoy creating, blocking, and styling this special piece in your home. Happy crocheting! ✨