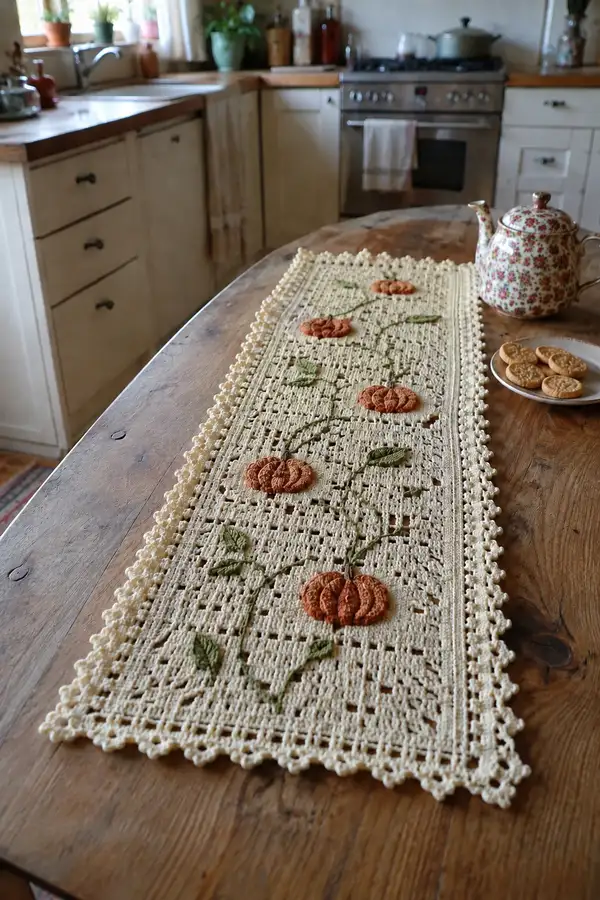
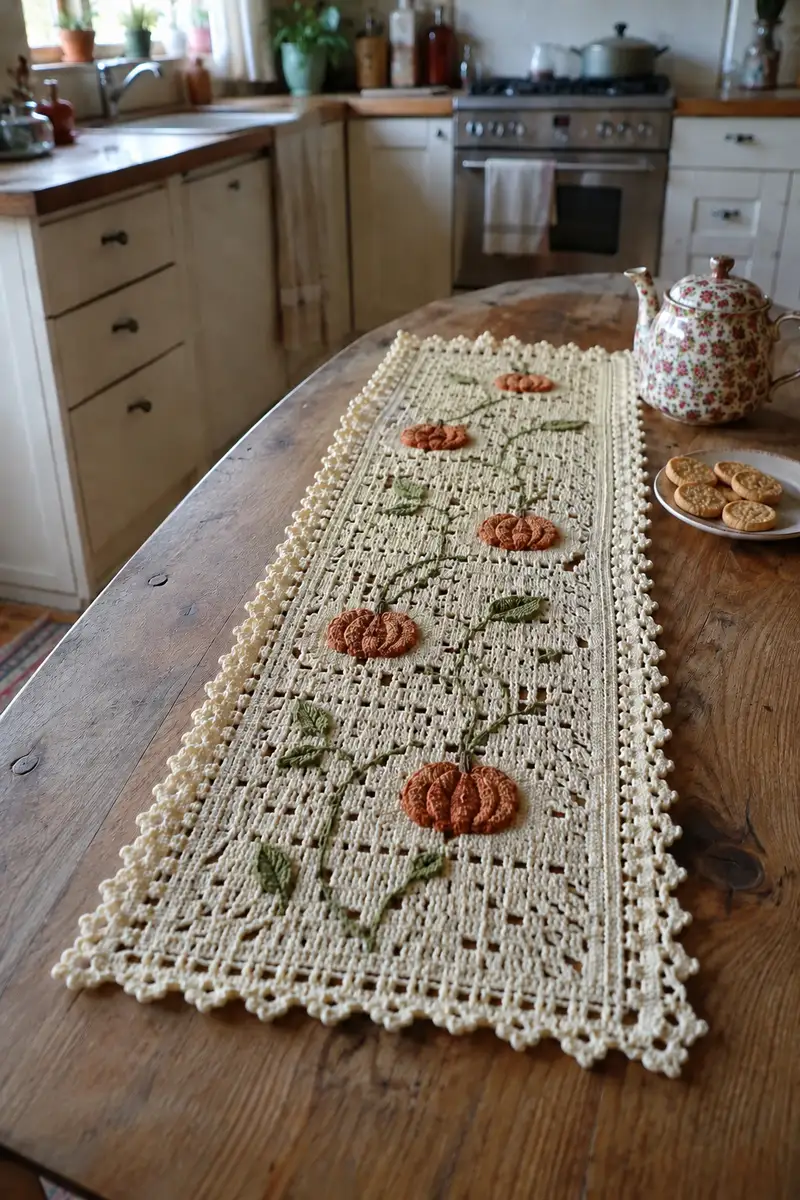
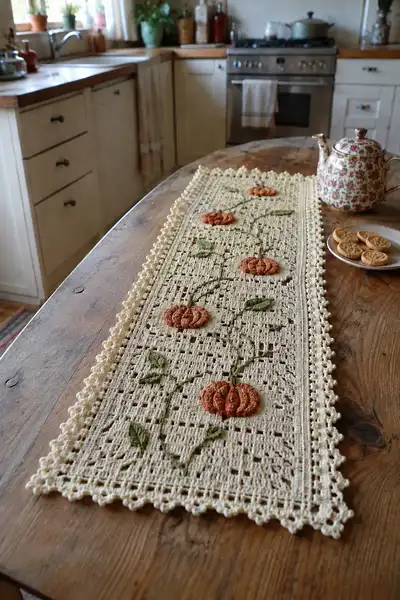
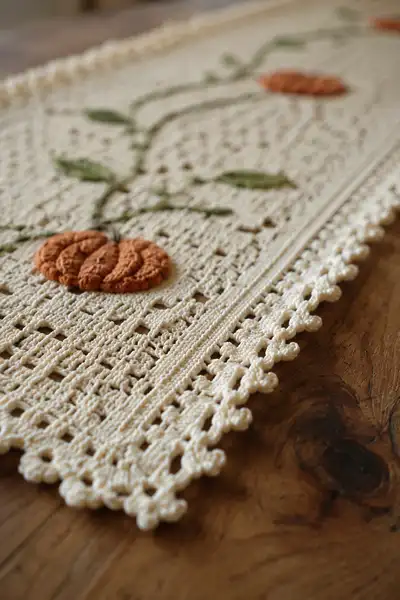
Create a warm, vintage-inspired ivory table runner embellished with raised pumpkin appliques, embroidered vine details and a delicate picot bobble edge. This pattern uses filet-style meshes for an airy, textured background and 3D pumpkin motifs in rust-orange with leafy green accents. Perfect for an autumn table or seasonal decor, the runner lies flat and blocks beautifully for a polished finish. Detailed round-by-round instructions guide you through the main panel, pumpkins, vines, leaves and the decorative edge.
Progress Tracker
0% Complete
— Notes & Preparation :
Info :
This pattern works in flat rows for a filet-style central panel, with separate pumpkin appliques sewn on and surface-stitched vines and leaves. The central panel uses a mesh repeat; foundation chain and mesh counts are calculated for 60 mesh blocks across. Gauge is less critical for a runner than for garments, but consistent tension will produce the cleanest edges and even applique placement. Block the panel before attaching pumpkins and edging for best results.
Info :
Suggested finished size: approx 14-16" wide x 58-62" long depending on blocking and edging. This is an approximate size; adjust foundation chain and number of mesh repeats to change runner length and width proportionally.
— Materials & Abbreviations Used in This Section :
Info :
Main yarn: Ivory worsted weight cotton. Accent yarns: rust/orange for pumpkins, muted green for vines/leaves, small brown for stems. Hook: 3.5mm recommended. Abbreviations follow the list above.
— Main Panel (Filet Mesh) :
Round 1 :
Foundation: Ch 123 (this yields 60 mesh repeats across when worked as filet; chain 3 counts as first dc) - (foundation ch 123)
Round 2 :
Row 1 (RS): Dc in 4th ch from hook (counts as first dc), *ch1, sk next ch, dc in next ch* repeat from * to * across, ending with dc in top of turning ch. You will have 60 dc and 60 ch1 mesh spaces across. (60 meshes)
Round 3 :
Row 2 (WS): Ch3, turn. To create a solid row for the border edge at start, dc in each dc and in each dc space across. Work 60 dc across. (60 dc)
Round 4 :
Row 3 (RS): Ch3, turn. Work filet pattern: *dc in next dc, ch1, sk next dc* across, producing 60 meshes across. (60 meshes)
Round 5 :
Row 4 (WS): Ch3, turn. Dc in each dc across, closing meshes as needed to create a slightly denser strip that frames the runner interior. (60 dc)
Info :
These first four rows create a subtle inner frame inside which the pumpkin motifs will sit. If you prefer a wider inner band, add additional solid rows now before continuing the main mesh body.
Round 6 :
Row 5 (RS): Ch3, turn. Work filet chart rows for mesh background: *dc in next dc, ch1, sk next dc* repeat across. (60 meshes)
Round 7 :
Row 6 (WS): Ch3, turn. Dc into each dc across, maintaining count at 60 dc. (60 dc)
Round 8 :
Row 7 (RS): Ch3, turn. Filet pattern row: *dc, ch1* repeat for 60 meshes. (60 meshes)
Round 9 :
Row 8 (WS): Ch3, turn. Dc in each dc across. (60 dc)
Round 10 :
Row 9 (RS): Ch3, turn. Filet mesh: *dc, ch1* across. (60 meshes)
Info :
Begin marking the approximate pumpkin placement now. Using pins or removable stitch markers, plan to place three pumps in the central corridor spaced roughly every 14-16 rows vertically; adjust if you prefer more or fewer pumpkins. The pattern here continues as a repeating mesh to give an airy background for the appliques.
Round 11 :
Row 10 (WS): Ch3, turn. Dc in each stitch across (60 dc). (Continue mesh.)
Round 12 :
Row 11 (RS): Ch3, turn. Filet mesh row: *dc, ch1* across. (60 meshes)
Round 13 :
Row 12 (WS): Ch3, turn. Dc in each dc across. (60 dc)
Round 14 :
Row 13 (RS): Ch3, turn. Filet mesh row: *dc, ch1* across. (60 meshes)
Round 15 :
Row 14 (WS): Ch3, turn. Dc across (60 dc). (If you plan to place the first pumpkin here, note this row number for alignment with pumpkin center later.)
Info :
For the runner pictured there are five pumpkins staggered in two offset columns; this pattern will show instructions for five appliques (spaced evenly). Use stitch markers to map vertical positions and horizontal offsets — center column and two offset columns shifted by 6-8 meshes left and right. Pin the appliques before sewing for best visual balance.
Round 16 :
Row 15 (RS): Ch3, turn. Filet mesh: *dc, ch1* across. (60 meshes)
Round 17 :
Row 16 (WS): Ch3, turn. Dc across (60 dc)
Round 18 :
Row 17 (RS): Ch3, turn. Filet mesh row: *dc, ch1* across (60 meshes)
Round 19 :
Row 18 (WS): Ch3, turn. Dc across (60 dc)
Round 20 :
Row 19 (RS): Ch3, turn. Filet mesh row: *dc, ch1* across (60 meshes)
Info :
Every 10-12 rows, pause and line up a straight edge or ruler along the runner to ensure rows are staying straight. Blocking later will correct some irregularities, but early corrections are easier. Keep the piece flat as you work by smoothing and aligning often.
Round 21 :
Row 20 (WS): Ch3, turn. Dc across (60 dc)
Round 22 :
Row 21 (RS): Ch3, turn. Filet mesh: *dc, ch1* across (60 meshes)
Round 23 :
Row 22 (WS): Ch3, turn. Dc across (60 dc)
Round 24 :
Row 23 (RS): Ch3, turn. Filet mesh: *dc, ch1* across (60 meshes)
Round 25 :
Row 24 (WS): Ch3, turn. Dc across (60 dc)
Info :
If you prefer a denser corridor for sewing on pumpkins, add 2-4 solid rows (dc across) between mesh repeats to create a stiffer panel for applique attachment.
Round 26 :
Row 25 (RS): Ch3, turn. Filet mesh row: *dc, ch1* across (60 meshes)
Round 27 :
Row 26 (WS): Ch3, turn. Dc across (60 dc)
Round 28 :
Row 27 (RS): Ch3, turn. Filet mesh: *dc, ch1* across (60 meshes)
Round 29 :
Row 28 (WS): Ch3, turn. Dc across (60 dc)
Round 30 :
Row 29 (RS): Ch3, turn. Filet mesh: *dc, ch1* across (60 meshes)
Info :
Stop at Row 29 and lay out where you want each pumpkin approximate centers to be. For a balanced look similar to the photograph: place pumpkins at roughly Rows 14, 28, 42, 56 and near the far end accordingly. Horizontal placement is centered along the mesh columns; leave at least 6 meshes from each long edge to the nearest pumpkin.
Round 31 :
Row 30 (WS): Ch3, turn. Dc across (60 dc)
Round 32 :
Row 31 (RS): Ch3, turn. Filet mesh: *dc, ch1* across (60 meshes)
Round 33 :
Row 32 (WS): Ch3, turn. Dc across (60 dc)
Round 34 :
Row 33 (RS): Ch3, turn. Filet mesh: *dc, ch1* across (60 meshes)
Round 35 :
Row 34 (WS): Ch3, turn. Dc across (60 dc)
Info :
When working the central body keep an eye for small yarn bridges where you change directions often. If a gap appears, anchor with a tiny sl st to the previous row to avoid long floats. The filet meshes will help disguise any small anchoring sl sts.
Round 36 :
Row 35 (RS): Ch3, turn. Filet mesh: *dc, ch1* across (60 meshes)
Round 37 :
Row 36 (WS): Ch3, turn. Dc across (60 dc)
Round 38 :
Row 37 (RS): Ch3, turn. Filet mesh: *dc, ch1* across (60 meshes)
Round 39 :
Row 38 (WS): Ch3, turn. Dc across (60 dc)
Round 40 :
Row 39 (RS): Ch3, turn. Filet mesh: *dc, ch1* across (60 meshes)
Info :
At mid-length you may add an extra pumpkin motif or a small cluster of leaves if you like. The provided layout calls for five pumpkins spaced along the length; you can adjust if you prefer three larger or seven smaller ones.
Round 41 :
Row 40 (WS): Ch3, turn. Dc across (60 dc)
Round 42 :
Row 41 (RS): Ch3, turn. Filet mesh: *dc, ch1* across (60 meshes)
Round 43 :
Row 42 (WS): Ch3, turn. Dc across (60 dc)
Round 44 :
Row 43 (RS): Ch3, turn. Filet mesh: *dc, ch1* across (60 meshes)
Round 45 :
Row 44 (WS): Ch3, turn. Dc across (60 dc)
Info :
From Row 45 onward prepare to end the main mesh at your desired runner length. Count remaining rows and save 6-8 solid rows at the far end mirroring the near-end framing rows for symmetry.
Round 46 :
Row 45 (RS): Ch3, turn. Filet mesh: *dc, ch1* across (60 meshes)
Round 47 :
Row 46 (WS): Ch3, turn. Dc across (60 dc)
Round 48 :
Row 47 (RS): Ch3, turn. Filet mesh: *dc, ch1* across (60 meshes)
Round 49 :
Row 48 (WS): Ch3, turn. Dc across (60 dc)
Round 50 :
Row 49 (RS): Ch3, turn. Filet mesh: *dc, ch1* across (60 meshes)
Info :
Work the final 6-8 rows as mirror of the start: solid rows alternating with mesh rows to create the inner frame before the decorative edging. At the very last mesh row stop and finish off, leaving long tails for joining edge if you prefer to crochet edging directly.
Round 51 :
Row 50 (WS): Ch3, turn. Dc across (60 dc)
Round 52 :
Row 51 (RS): Ch3, turn. Filet mesh: *dc, ch1* across (60 meshes)
Round 53 :
Row 52 (WS): Ch3, turn. Dc across (60 dc)
Round 54 :
Row 53 (RS): Ch3, turn. Filet mesh: *dc, ch1* across (60 meshes)
Round 55 :
Row 54 (WS): Ch3, turn. Dc across (60 dc)
Info :
Fasten off and weave in ends after completing main panel. Gently wet-block the panel, stretching to square off outer edges and open the mesh. Let dry thoroughly before attaching pumpkins or working edging to ensure even results.
— Pumpkin Appliques (Make 5) :
Info :
These pumpkins are worked flat in rounds to produce a slightly domed applique with defined ribs. Yarn: rust/orange. Use 3.0–3.5mm hook for a moderately dense fabric. Each pumpkin finished diameter approx 2.25–2.75 inches, depending on tension.
Round 1 :
Make magic ring. Work 6 sc in MR. (6)
Round 2 :
Inc in each st around (12)
Round 3 :
(1 sc, inc) x6 (18)
Round 4 :
(2 sc, inc) x6 (24)
Round 5 :
(3 sc, inc) x6 (30)
Info :
To create the pumpkin ribs, we will use surface rounds with front-post stitches and alternating slip-stitch gathers. After Round 5 we will define ribs by working in FLO for texture on next rounds.
Round 6 :
1 sc in each st around working in FLO to produce a slightly raised edge (30)
Round 7 :
Work 1 sc in next 2 sts, *hdc inc (2 hdc in next st) to slightly puff, 1 sc in next 2 sts* repeat around to create subtle bulges (approx 36) — re-distribute evenly to maintain shape (36)
Round 8 :
1 sc in each st around (36)
Round 9 :
FLO: 1 sc in each st around to accentuate a rim (36)
Round 10 :
Begin forming the dome top: (3 sc, dec) x9 (27)
Round 11 :
(2 sc, dec) x9 (18)
Info :
Do not close completely; leave a small opening and place a very small pinch of stuffing or fold the center slightly to create the raised center typical of a pumpkin. For a flatter applique, skip stuffing and flatten with finger as you close.
Round 12 :
(1 sc, dec) x6 (12)
Round 13 :
6 dec (6). Fasten off leaving long tail for sewing. Pull remaining hole closed slightly to create a petit dome. Weave tail through center and pull tight, knot to secure, hide tail on WS. (6)
Info :
To create the pronounced ribs seen in the photograph, use a heavy contrasting yarn needle to stitch vertical channels across the pumpkin top: insert needle through center to front then out at edge, pull yarn snugly and repeat at evenly spaced intervals (6-8 channels depending on size). This cinches segments and forms the ridges.
Round 14 :
Using same rust yarn, with yarn needle and long tail from center, stitch 6-8 evenly spaced vertical channels from center to edge. Pull gently after each stitch to create ribbing; knot securely at back. Cut and weave in ends. (No numerical stitch count)
Round 15 :
Make a small stem: With brown, ch4, 1 sc in 2nd ch from hook, 1 sc in next, 1 sc in last (3 sc). Fasten off leaving tail and sew into center top of pumpkin, securing through center and underside. Weave ends. (3)
Info :
Create five pumpkins using the same process. Make two slightly smaller by omitting Round 7 and 8 to create tighter, flatter pumpkins if you want a variety of sizes to match the photo’s staggered look.
— Leaf Appliques (Make 8–10) :
Round 1 :
With muted green, ch8. Row 1: 1 sc in 2nd ch from hook, hdc in next, dc in next 3, hdc, sc, sl st to finish. Fasten off leaving tail for sewing. (leaf length approx 1.5")
Round 2 :
Make two sizes: for smaller leaf ch6 and work 1 sc, hdc, dc, hdc, sc. For elongated leaf ch10 and add two dc in center. Make 8–10 leaves total in mixed sizes. Fasten off and weave ends, leaving long tails for sewing. (varies)
Info :
For realistic leaves, press lightly with steam after blocking; if you want slightly cupped leaves, block over a small rounded object until dry.
— Vines & Surface Embroidery :
Round 1 :
Thread tapestry needle with muted green yarn doubled for sturdiness. Using sl st or surface crochet, work vines across the runner connecting pumpkin positions. Use a simple chain stitch embroidery (or surface slip stitch) to form stems approximately 2–6 meshes long between leaves and pumpkins.
Round 2 :
Surface slip-stitch: Insert needle from WS to RS at start point, pull yarn through, insert into next mesh hole on RS and bring up two meshes later, forming a small connecting chain. Continue to form a natural curving line connecting pumpkins; anchor leaves by stitching through their center long tail and runner fabric.
Info :
When placing vines, use photos as reference to stagger the placement and avoid straight lines. Vines should meander and branch; anchor them to the runner every 6-8 stitches to prevent catching on tableware.
— Assembly (Attach Pumpkins, Leaves & Vines) :
Round 1 :
Layout: Place the main panel flat and pin each pumpkin applique in position per your earlier planning marks. Use fine pins or sewing pins to test placement. Leave at least 6 mesh spaces (approx) between pumpkins and the long edges to maintain the visual border.
Round 2 :
Sewing: Using long tail left from pumpkin or matching yarn, whip stitch through the pumpkin back and the runner through several discrete stitches spaced around the pumpkin edge. Use small stitches to make the join invisible on the RS. Make 8–10 small stitches around each pumpkin for secure attachment. Weave in tails to WS.
Round 3 :
Attach leaves: Position leaves along vines and around pumpkins. Sew through leaf center tail and runner at leaf base, anchoring leaf with a few small stitches so it sits naturally on the vine. Leave small stems free for a lifelike look.
Round 4 :
Final embroidery: Using long green yarn, add vein details to leaves by couching a single thread down the center of each leaf and securing at both ends with small stitches. Add small tendrils with single chains stitched down through mesh holes for a delicate touch.
Info :
Keep embroidery threads short and anchored to the WS to prevent fraying. If you anticipate heavy use, secure embroidery with a small dab of fabric glue on the underside to add durability (optional).
— Decorative Picot-Bobble Edge :
Info :
We will work the edging around the entire perimeter. Join yarn at the corner with sl st on RS. The edging uses alternating picot clusters and small bobble/cluster stitches to mimic the photo's delicate bobble edge.
Round 1 :
Join ivory at corner RS with sl st. Ch1, sc evenly along short edge into each mesh/dc edge for approx 60 sc along long sides and adjust to match corners. Work 3 sc into each corner space to turn neatly. (sc around)
Round 2 :
Work a second round of sc around, placing 3 sc in corner sts to build strength. Keep counts even and lay runner flat to avoid pulling. (sc around)
Round 3 :
Picot row: *(sc in next 3 sts, ch3, sl st in 3rd ch from hook to form picot)* repeat around, placing 3 sc between picots. At corners, work (sc in next 2 sts, picot, sc in next 2 sts) to maintain shape. (picot repeat)
Round 4 :
Bobble cluster row: Working into the spaces created by picots, *skip picot and sc in next 3 sc, bobble in next sc (bobble = 5 dc together leaving last loop on hook each time, pull through all loops and ch1 to close), sc in next 3 sc* repeat around to form bobbly scallops. Fasten off and weave ends. (bobble repeats)
Info :
Edge counts will vary slightly with tension; focus on consistent spacing and even picots. If the edge tends to pull in, add an extra sc in the long sides to ease the fabric. Evening out is easiest before final blocking.
Round 5 :
Optional extra trim: For a more pronounced scallop, work a final round of (sl st, ch3, sl st) across each bobble to accentuate pods. Fasten off and weave ends invisibly to WS. (trim optional)
Round 6 :
Final weave: Using a yarn needle, weave in all ends on WS along existing stitch lines; trim close. Gently steam-block the entire runner again to set the edge and appliques. Press picot edges by dabbing with a steam iron held a short distance away to shape picots and bobbles if desired (avoid direct iron contact with worsted cotton if mercerized).
Info :
Once blocked and dried, flatten and re-check applique attachment points; re-secure any loose stitches from the WS. The runner is now ready for display.
— Finishing Touches & Care :
Info :
Care: Hand wash gently in lukewarm water with mild soap. Rinse and press between towels to remove excess water; never twist. Re-block while damp to restore shape. Avoid bleach and tumble drying to maintain color and texture.
Info :
Storage: Store flat or rolled in acid-free tissue to preserve shape and prevent creasing. Keep away from prolonged direct sunlight to prevent fading, especially for accent rust and green yarns.
This Ivory Pumpkin Vine Table Runner brings a touch of handmade warmth to your table, blending airy filet stitch with charming 3D pumpkin appliques and embroidered vines. The delicate picot-bobble edge finishes the runner with a vintage-inspired flourish that feels both cozy and elegant. Block well and place it on your autumn table to enjoy a handmade heirloom-like centerpiece. 🧶🍂✨