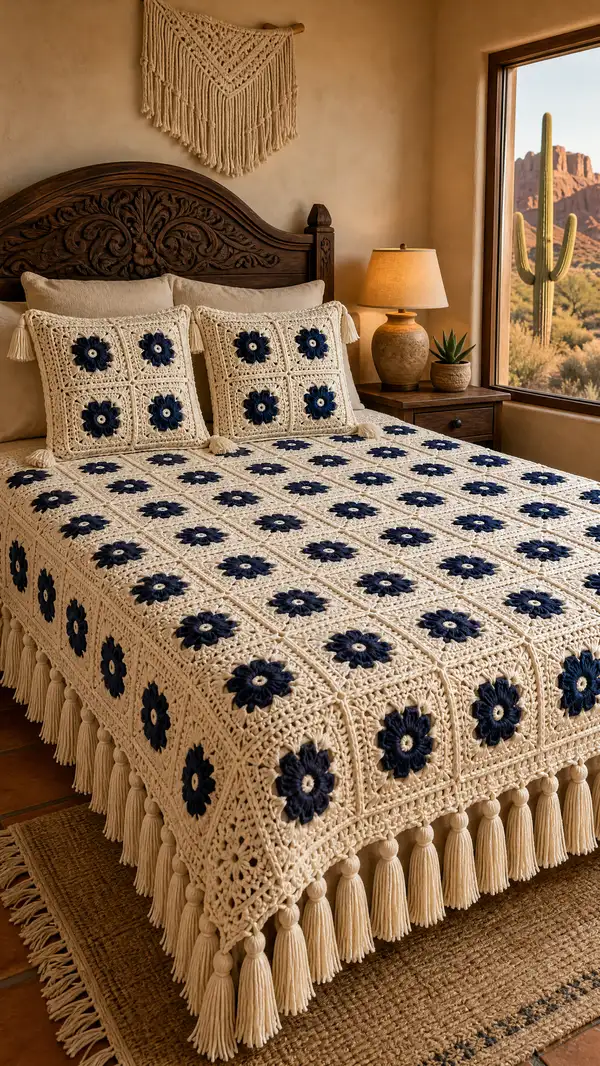
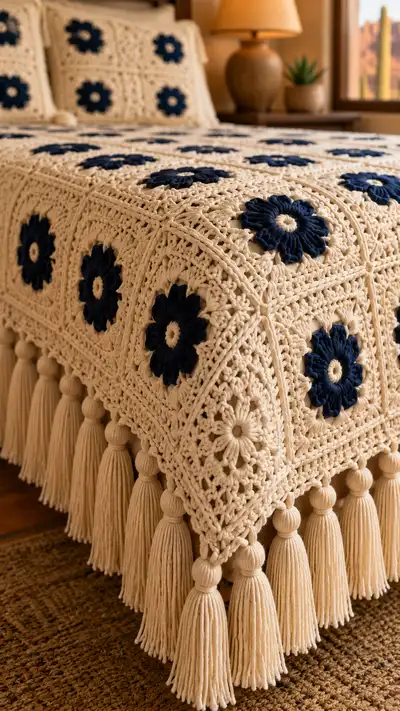
A vintage-inspired granny-square bedspread featuring deep midnight navy floral centers on a warm cream background. This generous bedspread is built from textured floral granny squares, joined with a decorative lacy border and finished with dramatic tassel fringe. The classic color contrast and rich texture make it a statement piece for a cozy, rustic bedroom.
Progress Tracker
0% Complete
— Motif: Flower Center & Petals :
Round 1 :
Using Cream (A): Make a magic ring, ch1, work 8 sc into the ring. Pull tight. (8)
Round 2 :
1 sc in each st around. Join with sl st to first sc. (8)
Info :
We will form 8 petals. Keep the round small and tight; place a stitch marker in the first stitch to mark the beginning.
Round 3 :
Change to Midnight Navy (B). *In next st work: (yo, insert hook, pull up loop) 3 times to create a 3-loop puff, yo and draw through all loops, ch1 to secure, sl st into the same base stitch to close petal.* Repeat from * to * around in every other st to create 8 petals. End with sl st to base of first petal. (Petal count: 8; base stitches still 8)
Info :
Puff/petal technique: keep loops even and do not overfill petals. The ch1 between petals creates a small stitch gap; keep tension consistent for smooth petals.
Round 4 :
Change to Cream (A). Working behind the petals, join with a sl st into the space behind a petal, ch1, work 1 sc in each base stitch around (8). Sl st to first sc. (8)
Round 5 :
(inc) x8 — work 2 sc in each st around to expand the circle evenly. (16)
Round 6 :
1 sc in each st around. (16)
Round 7 :
(1 sc, inc) x8. (24)
Info :
At this point the circle is widening; keep it flat by smoothing each round with your fingers. If it cups, use a slightly larger hook for the round.
Round 8 :
1 sc in each st around. (24)
Round 9 :
(2 sc, inc) x8. (32)
Round 10 :
1 sc in each st around. (32)
Round 11 :
(3 sc, inc) x8. (40)
Round 12 :
1 sc in each st around. (40)
Round 13 :
(4 sc, inc) x8. (48)
Info :
We now prepare to form the first square shaping round. With 48 sts you can create four corner chain spaces spaced every 12 stitches to begin the square conversion.
Round 14 :
*Work 11 sc, ch3 (corner), next 12 sc, ch3 (corner), next 12 sc, ch3 (corner), next 12 sc, ch3; join to first sc.*(This uses the 48 stitches as 11+12+12+12; adjust the first group to 12 sc if you prefer fully even spacing) (48 sc + 4 ch3 corners)
Round 15 :
Working into the ch3 corners: join with sl st into the first ch3 space, ch3 (counts as dc), work (2 dc, ch2, 3 dc) into same ch3 space to form first corner; *work 12 dc evenly across next set of 12 base stitches into their tops (approx 1 dc in each of 12 sts); in next ch3 space (3 dc, ch2, 3 dc) for corner; repeat around.* Join to top of ch3. (This round converts the circular motif to a square with 4 defined corners; dc counts vary per side ≈ 15 dc per side including corner clusters)
Info :
If you find the sides too small, add one more dc into the side distribution so each side has a symmetric number of dc; symmetry matters for the next rounds.
Round 16 :
Ch1, sc in same stitch, sc evenly across each dc around until you reach a corner cluster; in corner work (sc, ch3, sc) into corner ch2 space. Repeat around. This establishes a sc frame. (sc count will depend on dc distribution — approx 64 sc total)
Round 17 :
Ch3, dc in each sc around, making (2 dc, ch2, 2 dc) in each corner ch3 space to maintain corners. (Approximate dc count ~ equal to sc count) (Est. 64 dc)
Round 18 :
Ch1, 1 sc in each dc around to create a tidy edge for eventual join. (Est. 64 sc)
Info :
At the end of Round 18 you have one completed motif square: center, petals, and a rectangular-ish square frame. Aim for each square to measure about 6.5" (16.5cm) across after blocking for the spread pictured; adjust hook if needed.
— Square Expansion Rounds (make motifs to size) :
Round 19 :
Change to Cream (A). Begin square expansion rounds: ch1, sc around in BLO (back loops only) for a ridge, placing (sc, ch2, sc) in each corner to keep corners sharp. (Est. sc count increases slightly as corners add chains)
Round 20 :
Ch3, dc in each st around, and in each corner ch2 space work (2 dc, ch2, 2 dc) to enlarge square. (Est. 80 dc)
Round 21 :
Ch1, sc in each st around for a tidy frame. (Est. 80 sc)
Round 22 :
(3 sc, inc) around evenly to increase the square for a larger bedspread — place increases evenly between corners so they remain aligned. Example: if 80 sc, distribute 8 incs spaced around: (3 sc, inc) x8 then sc the intervening stitches to maintain shape. (Est. 88 sc)
Info :
Work these expansion rounds on every square until you reach the desired motif size. The sample bedspread motifs were expanded to roughly 8-9" square after blocking. Keep the same number of expansion rounds for each square.
Round 23 :
1 sc in each st around. (Est. 88 sc)
Round 24 :
(4 sc, inc) x? to add another expansion round depending on desired final size; for sample, perform (4 sc, inc) x8 resulting in Est. 96 sc. Then sc around to even out. (Est. 96 sc)
Info :
Repeat alternating textured rounds (BLO sc ridge) and expansion dc rounds until your motif reaches your target finished square size. For the bedspread shown, motifs were expanded uniformly and then blocked to measure 8.5" each.
— Alternate Square Texture Rounds :
Round 25 :
Work a surface texture round: Ch1, sc in BLO around entire square to form a raised ridge. If you want extra texture, use FPdc in side stitches to create vertical ribbing. (Stitch counts follow previous round.)
Round 26 :
Ch3, 1 dc in each st across sides, and in corner ch2 spaces work (2 dc, ch2, 2 dc). This evens sides and prepares for join-as-you-go. (Counts same as previous dc round.)
Info :
Make the same number and order of rounds on each square to ensure matching edges for joining. Keep rounds consistent across all motifs.
— Make Enough Motifs :
Info :
Layout plan for the sample bedspread: 7 squares across × 9 squares down (front-facing bedspread part) = 63 main motif squares. Add an additional single-row skirt/edge around sides — total motif count may be and is variable depending on bed size: queen shown uses approx. 7×9 plus additional side squares for drape. Measure your bed and plan accordingly.
Round 27 :
Finish and fasten off each motif after the final sc or dc round. Leave a 10-12" tail for weaving/joining (if sewing) or for join-as-you-go leave a working tail according to method chosen.
Info :
Blocking tip: damp-block each square to exact final measurement, pinning corners so the squares are uniform; allow to dry completely before joining to prevent mismatch.
— Joining Squares (Join-As-You-Go and Seaming Options) :
Round 28 :
Option A - Join-as-you-go (JAYG) seam: When working the last round on a motif, instead of completing normally, align the previous square edge and slip-stitch through the corresponding stitch of the adjacent square for each stitch across the side, making (sc or sl st) joins. Work corners by matching corner ch2 spaces with (sc, ch2, sc) joins. Repeat to join motifs into rows.
Round 29 :
Option B - Mattress stitch/whip stitch: Lay squares RS together and whip stitch through matching sc rows, or use mattress stitch for invisible joins; use the long tail left from each motif to sew securely and weave in ends after joining.
Info :
Whichever method you choose, pin and align motifs on a flat surface. Join row-by-row to avoid distortion. Press lightly with steam if necessary to settle joins.
Round 30 :
Seam reinforcement (optional): After joining squares, run a single crochet border along both sides of each seam on the RS to reinforce joins and flatten seams. Use Cream (A) for a seamless look.
Info :
Check join tension frequently. If joins pull too tightly, the bedspread will pucker; keep joins firm but not stretched.
— Border and Corner Panels (Large-Scale Border to Turn Squares into Sheet) :
Round 31 :
Once all motifs are joined into a single large rectangle for the bed top, we will add a decorative border that transitions to the tassel skirt. Begin with Cream (A): ch1, sc evenly around the whole assembled rectangle, placing (sc, ch3, sc) in each corner to keep corners squared. Work approx 1 sc per motif outside stitch; adjust to keep edges straight.
Round 32 :
Ch3, *dc in next 3 sts, ch1, sk 1* around to establish a gentle mesh. In corners work (2 dc, ch2, 2 dc). This forms a lacy transition row. (Mesh count depends on completed edge circumference.)
Round 33 :
Ch1, sc in each st and each ch1 space around to tidy the mesh. (This creates a consistent base for more open border rounds.)
Info :
Measure the bed edge and decide how wide you want the border and drop. The sample has a wide decorative border of approx. 8-10" before the tassel row.
Round 34 :
Working in repeated pattern for the open lacy border: *ch4, sk 2, sc in next st, ch4, sk 2, sc in next st* across the side rows; in corners maintain (sc, ch3, sc) to keep shape. This creates larger open squares that echo the motif grid.
Round 35 :
Ch1, sc in each ch4 loop and st around to stabilize the lace. (Count will expand based on how many ch4 loops you placed.)
Round 36 :
Ch3, dc in each st around for a solid ridge (one round). Place (2 dc, ch2, 2 dc) in corners. This ridge is the line where we will place decorative bobbles and prepare for the tassel base.
Info :
The sample uses repeat rows of mesh followed by firm dc/sc ridges to create texture and stability where tassels and bobbles attach. Plan at least two rows of firm stitches before attaching heavy tassels.
Round 37 :
Work a bobble row in Cream (A): *ch1, sk 2, bobble in next st (bobble = yo 5 times, pull through loops to close), ch1, sk 2, sc in next st* repeat around; place 1 bobble per motif-width interval along the edge to echo squares. Fasten off and weave ends. (Bobble count variable.)
Round 38 :
Ch1, sc around to tidy the bobble row and create even loops for tassel attachment. (This is the final base row from which tassels are hung.)
Info :
If using bulky tassels, add an extra sc round to increase the base thickness for secure attachment — you will be threading tassel loops through these sc stitches or bobble spaces.
— Bedskirt & Tassel Row (Skirt that creates drop) :
Round 39 :
To create the drop/skirt that covers the mattress side: attach Cream (A) and ch3, dc into each stitch down the side to create a vertical panel. For the sample, work 8-10 rows of dc down each side to produce the desired drop length before beginning the skirt-lace round. (Rows variable based on mattress depth; measurement tip below.)
Info :
Measure your mattress depth including padding and add desired skirt length (e.g., 14-18" drop). Adjust number of dc rows to match your measurement — approximately 4 dc rows = 1" in worsted cotton depending on tension.
Round 40 :
At the bottom of the vertical panel, work a foundation for skirt fringe: ch1, sc evenly across bottom, placing (sc, ch3, sc) into corner to turn for the next side. Repeat around the bed perimeter to create a continuous skirt base.
Round 41 :
Ch3, dc in each st across the skirt base to create an even rope. Repeat 2 more rounds of dc for a solid base for tassel attachments (3 rounds total). (Stitch count depends on bed perimeter.)
Round 42 :
Switch to a decorative shell round to give a final lacy look above the tassels: *skip 2, (5 dc) in next st, skip 2, sc in next st* around. Space shells to line up under each motif edge for a balanced look.
Info :
Mark positions where tassels will be attached. The sample places tassels at each corner of the motif squares along the border and every half-motif interval along the skirt bottom to echo the square rhythm.
— Tassels & Bobbles (Make and Attach) :
Round 43 :
Tassel assembly (basic): Using Cream (A) and a tassel template (e.g., 6-8" wide board), wind yarn around template 40-60 times for a full tassel (adjust winding for desired fullness and tassel length). Slide off, tie top with a short piece to form the head, cut bottom loops, and trim to even length. For the large tassels shown, wrap extra yarn around the head to form a smooth neck and giant bobble above tassel fringe.
Round 44 :
For the decorative bobbles above each tassel: wrap yarn around a small core 10-16 times to form a ball shape then secure tightly and stitch through the center of your chosen base st on the skirt edge. Alternatively create a yarn-wrapped bead by winding around a small cardboard form and stitch in place.
Round 45 :
Attach tassels: Using a yarn needle or crochet hook, pull the attaching loop through the designated sc or bobble space on the last border round, fold tassel top in half and knot the loop to the head, and secure by sewing through the head with yarn tails. Space tassels evenly; sample spacing is one large tassel per motif-corner along the skirt plus larger corner tassels.
Info :
For heavy tassels, tie a small reinforcing stitch through the base of the tassel head and into two adjacent stitches on the border to secure it. Weave the tails into the head for a tidy finish.
Round 46 :
Optional: Add smaller tassel clusters by combining 2-3 small tassels together and attaching at every half-motif interval for the fuller fringe shown in the sample. Trim and shape tassels evenly with scissors.
Round 47 :
Trim and even all tassels and bobbles to uniform lengths. Steam-block the fringe gently if necessary to keep strands straight. Fasten off and weave in any remaining tails.
— Pillow Covers (2 square pillows as pictured) :
Round 48 :
Make 9 motifs for each pillow (3x3 grid), following the Motif rounds. Use identical expansion rounds so pillow motifs match bedspread motifs exactly. Block squares to measurement so each pillow top measures approx 20-22" finished (depends on your gauge).
Round 49 :
Join the 3x3 motifs using join-as-you-go or whip stitch to create a pillow front. Work a matching back panel from 1 large square of solid granny or 9 motifs joined RS together. Leave a 4" opening or add a zipper for insert placement.
Round 50 :
Border the pillow: with Cream (A) sc around the entire pillow panel 2 rounds to make a sturdy edge. Add tassels at each pillow corner by making smaller tassels (approx 3-4" fringe) and attaching as for the bedspread.
Info :
For cushion inserts, use slightly smaller inserts (1-2" less) than the pillow cover dimensions to achieve a plump finish when stuffed.
— Finishing Touches & Weaving :
Round 51 :
Weave in any remaining tails with a yarn needle, following stitches for an invisible finish. For tassel heads, wrap tails through the head and knot securely before trimming.
Round 52 :
Final steaming: Lightly steam-block the assembled bedspread on a large flat surface if possible. Use a gentle steam to relax fibers and eliminate irregularities — do not press hard or over-wet cotton yarn.
Round 53 :
Edge inspection: Walk the perimeter and ensure tassels and bobbles are evenly spaced and secure. Add reinforcement stitches where necessary (2-3 extra securing stitches per tassel).
Info :
Because this is a heavy piece when finished, store it folded on its side, and hand-wash or spot-clean as needed; avoid machine washing heavy tassel fringe to prevent tangling.
— Alternate Sizes & Adjustments :
Round 54 :
To make a smaller throw: reduce motif count (e.g., 5x5 or 6x6) and use fewer skirt rows. To make a larger spread for king-size: add more motifs to width/length and increase skirt rows accordingly.
Round 55 :
To change scale: use lighter DK yarn (#3) and decrease hook size for a smaller, denser motif; or use bulky yarn and a larger hook for a chunky oversized version. Adjust motif count and yarn quantities accordingly.
Info :
Swatch & gauge: make a single motif and block it to measure your finished motif size; calculate how many motifs you will need across and down for your bed or desired finished size before starting the full project.
Completing this Midnight Navy Flower Granny Bedspread is incredibly rewarding — it transforms a room with texture, color contrast, and handmade charm. The bold navy flowers pop against the creamy background, while the tassel fringe adds a dramatic finishing touch. Every square is a small celebration of crochet technique, and joining them creates a beautiful large-scale piece you'll love for years. 🧶✨ Don't forget to snap a photo and savor the sense of accomplishment!