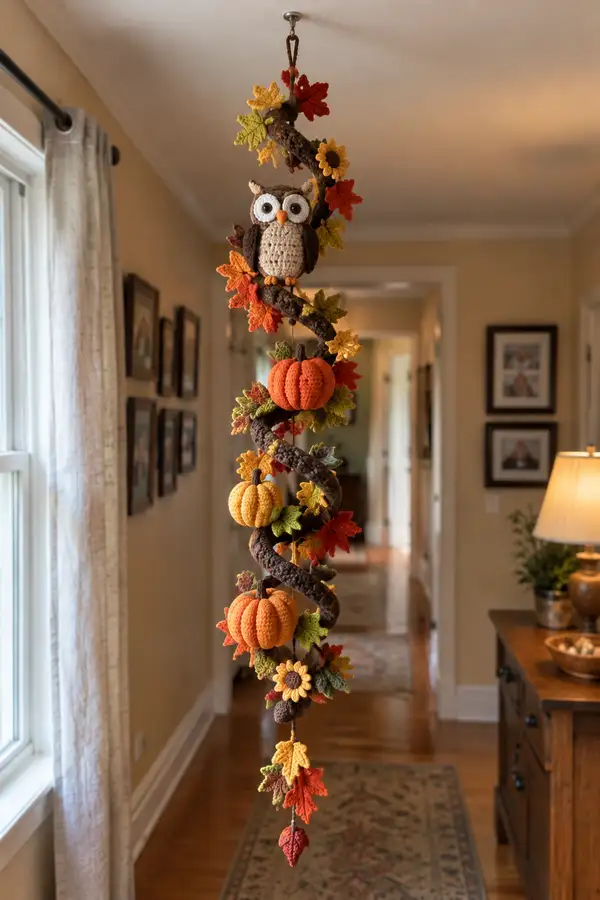
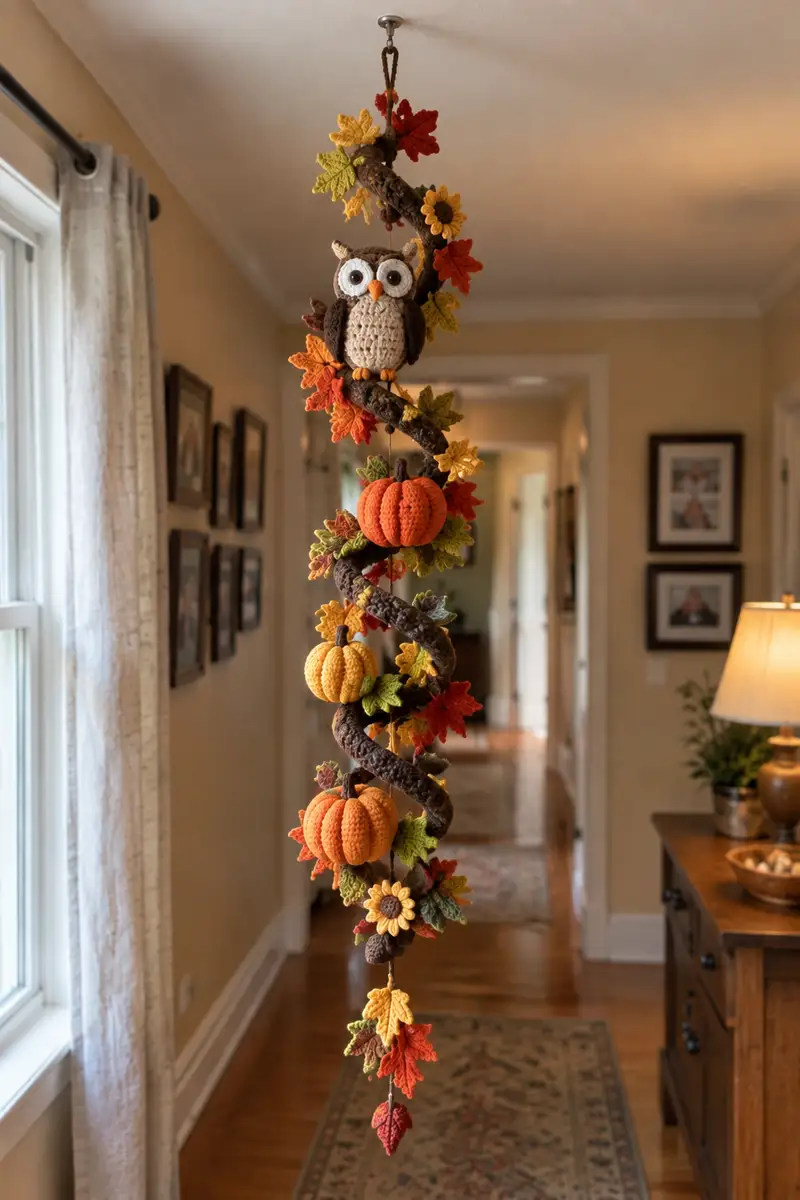
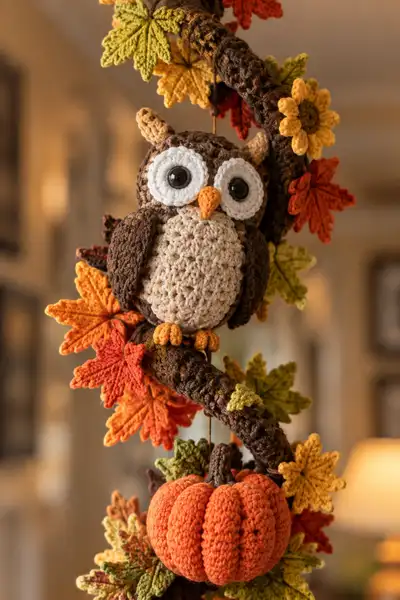
Create a long hanging autumn garland that spirals with a crocheted branch, cheerful pumpkins, colorful maple leaves, sunflowers and an adorable owl perched at the top. This pattern uses worsted-weight yarn in warm fall tones and step-by-step assembly instructions to make a seasonal hanging decoration perfect for hallways, porches, or doorways. Includes full instructions for the owl, three pumpkins, many detailed leaves, a sunflower, and the spiral branch that ties everything together.
Progress Tracker
0% Complete
— Owl Head :
Round 1 :
6 sc in magic ring (6)
Round 3 :
(1 sc, inc) x 6 (18)
Round 4 :
(2 sc, inc) x 6 (24)
Round 5 :
(3 sc, inc) x 6 (30)
Round 6 :
(4 sc, inc) x 6 (36)
Round 7 :
(5 sc, inc) x 6 (42)
Round 8 :
(6 sc, inc) x 6 (48)
Round 9-12 :
1 sc in each st around (48)
Info :
Use dark brown yarn for the head. Place stitch marker at first stitch and work in continuous rounds. Plan eye placement: safety eyes will be attached between Rounds 13 and 15 about 8-10 sts apart depending on desired expression.
Round 13 :
(6 sc, dec) x 6 (42)
Round 14 :
(5 sc, dec) x 6 (36)
Round 15 :
(4 sc, dec) x 6 (30)
Info :
Before Round 16 attach safety eyes through rounds 13-14 spacing them approximately 8 stitches edge-to-edge to match the reference. Use washers and pull tightly. If embroidering eyes later skip washers and mark centers now.
Round 16 :
1 sc in each st around (30)
Round 17 :
1 sc in each st around (30)
Round 18 :
(2 sc, dec) x 6 (24)
Round 19 :
(1 sc, dec) x 6 (18)
Info :
Begin stuffing head moderately now, filling around the eyes first to create stable eye sockets. Add stuffing in small amounts and shape with your fingers for a rounded forehead and defined eye area.
Round 20 :
1 sc in each st around (18)
Round 21 :
(1 sc, dec) x 6 (12)
Info :
Fasten off leaving a long tail for sewing to body later. Finish stuffing until firm but not overfilled. Weave tail through remaining 6 stitches and pull closed; weave tail securely inside head.
— Owl Face & Eye Whites (Make 2) :
Round 1 :
6 sc in magic ring (6)
Round 3 :
(1 sc, inc) x 6 (18)
Round 4 :
1 sc in each st around (18)
Round 5 :
1 sc in each st around (18)
Info :
Work face rounds in cream. Fasten off leaving a 10-12cm tail for sewing. Flatten slightly and sew onto head centered around safety eyes. Add a small round of brown for pupil backing if desired.
— Beak :
Round 1 :
4 sc in magic ring (4)
Round 2 :
1 sc in each st around (4)
Round 3 :
(1 sc, inc) x 2 (6)
Round 4 :
1 sc in each st around (6)
Round 5 :
Fold and sl st across center to make a triangular beak shape, fasten off leaving tail for sewing
Info :
Sew beak between eyes at the lower edge of the eye circles. Use orange yarn for bright contrast and tack firmly with several passes.
— Owl Ears (Make 2) :
Round 1 :
6 sc in magic ring with light brown (6)
Round 2 :
1 sc in each st around (6)
Round 3 :
(1 sc, inc) x 3 (9)
Round 4 :
1 sc in each st around (9)
Round 5 :
Fold triangle and sl st across base to close slightly, fasten off leaving long tail for sewing
Info :
Position ears on top of head between Rounds 7-9, slightly angled outward. Sew through head stitches for secure attachment.
— Owl Body :
Round 1 :
6 sc in magic ring (6)
Round 3 :
(1 sc, inc) x 6 (18)
Round 4 :
(2 sc, inc) x 6 (24)
Round 5 :
(3 sc, inc) x 6 (30)
Round 6 :
(4 sc, inc) x 6 (36)
Round 7 :
(5 sc, inc) x 6 (42)
Round 8 :
(6 sc, inc) x 6 (48)
Round 9-12 :
1 sc in each st around (48)
Info :
Switch to light tan/beige yarn for the tummy panel. The body is worked in continuous rounds; plan to attach head after Round 24. Use stitch markers for every 8 or 12 rounds to track height.
Round 13 :
Change to beige for tummy. Work 1 sc in each st around (48)
Round 14 :
1 sc in each st around (48)
Round 15 :
1 sc in each st FLO for textured tummy ridge (48)
Round 16 :
1 sc in each st around (48)
Round 17-18 :
1 sc in each st around (48)
Info :
Use a crochet texture for the tummy — an alternating puff or V-stitch in beige will create the star-like belly seen in the image. If using V-stitch: (dc, ch1, dc) spaced. Here we simulate texture by alternating 1 sc FLO round followed by a textured round.
Round 19 :
(6 sc, dec) x 6 (42)
Round 20 :
(5 sc, dec) x 6 (36)
Round 21 :
1 sc in each st around (36)
Info :
Begin stuffing the body from the bottom up with polyester fiberfill. Stuff more firmly at the base for stability and leave the neck opening slightly unstuffed so you can sew the head in tightly.
Round 22 :
(4 sc, dec) x 6 (30)
Round 23 :
(3 sc, dec) x 6 (24)
Round 24 :
(2 sc, dec) x 6 (18)
Round 25 :
(1 sc, dec) x 6 (12)
Info :
Fasten off leaving 15cm tail. Position head over opening, pin evenly and sew neck to body with ladder stitch. Pull evenly as you sew to avoid puckering. Weave in ends inside the body.
— Owl Wings (Make 2) :
Round 1 :
6 sc in magic ring (6)
Round 2 :
(1 sc, inc) x 3 (9)
Round 3 :
(2 sc, inc) x 3 (12)
Round 4 :
(3 sc, inc) x 3 (15)
Round 5 :
1 sc in each st around (15)
Round 6 :
BLO 1 sc in each st around to create a flat wing edge (15)
Round 7 :
1 sc in each st around (15)
Round 8 :
Shape tip: (3 sc, dec) x 3 (12)
Round 9 :
(2 sc, dec) x 3 (9)
Round 10 :
Fasten off leaving long tail for sewing. Make second wing identical.
Info :
Sew wings to body on Rounds 14-16 of body, slightly behind the tummy, with the flat ridge forward for the layered feather look. Use small whip stitches for a neat seam.
— Owl Feet (Make 2) :
Round 1 :
6 sc in magic ring in orange yarn (6)
Round 2 :
1 sc in each st around (6)
Round 3 :
(1 sc, inc) x 2 (8)
Round 4 :
1 sc in each st around (8)
Round 5 :
Create toes by chaining 4, sl st back into base stitch to make a small loop; repeat to create 3 toes. Fasten off leaving tail for sewing.
Info :
Sew feet to bottom of body so the owl appears perched. Tuck toes under slightly to grip the crocheted branch when assembled.
— Spiral Branch Core & Tube :
Info :
Cut a length of thin cotton cord or jute (approx 1.2–1.6m depending on desired final hanging length). This will be the central core that everything attaches to. We will crochet a textured tube around it to create the thick twisted branch. You can optionally insert floral wire inside for rigidity and shaping.
Round 1 :
Using dark brown yarn, make a foundation chain to fit cord length: ch 6, join to form a loop around cord core, or alternatively crochet a tube in the round: 6 sc around core (6)
Round 3 :
(1 sc, inc) x 6 (18)
Round 4 :
(2 sc, inc) x 6 (24)
Round 5-8 :
1 sc in each st around (24)
Info :
Work the branch as a long tube in continuous rounds, sliding it over the cord/core as you go. If working in pieces, make several 40–60cm tubes then join seamlessly with a few rounds of slip stitches and sc to hide joins.
Round 9-20 :
1 sc in each st around (24)
Round 21 :
Change to a variegated brown or work a striping effect: alternate 2 rounds dark brown, 2 rounds lighter brown for a textured bark look
Round 22-36 :
1 sc in each st around, work surface slip-stitch texture randomly to mimic bark (24)
Round 37 :
Start spiral shaping: in the next 6 rounds add two increases spaced evenly to create slight bulges for pumpkins and owl perch (26)
Round 38-80 :
Continue crocheting tube to desired length, 1 sc in each st around. Add occasional (1 sc, inc) repeats to form slight knobs where elements will attach (approx every 10–18cm) (26–30 sts depending on increases)
Info :
The spiral look is achieved during assembly by wrapping the stuffed pumpkins and leaves around the tube and stitching them to the cord at staggered positions. Keep the tube flexible; do not overstuff with yarn. If using multiple tubes, join them and disguise seams with leaves and sunflowers.
— Pumpkins (Make 3 similar) :
Round 1 :
6 sc in magic ring (6)
Round 3 :
(1 sc, inc) x 6 (18)
Round 4 :
(2 sc, inc) x 6 (24)
Round 5 :
(3 sc, inc) x 6 (30)
Round 6-8 :
1 sc in each st around (30)
Round 9 :
(3 sc, dec) x 6 (24)
Round 10 :
(2 sc, dec) x 6 (18)
Round 11 :
Start stuffing pumpkin firmly but leave central cavity open (18)
Round 12 :
(1 sc, dec) x 6 (12)
Round 14 :
Fasten off leaving long tail for closing and securing ribs
Info :
After closing, create pumpkin ribs by threading yarn through the center top, bringing down to bottom then back to top several times to carve vertical sections. Tie off at the top to create deep ribs. Add a small brown stem: ch3, sc back along chain, sew to pumpkin top.
— Small Pumpkin Stem :
Round 1 :
ch4, 1 sc in 2nd ch from hook and each ch back (3)
Round 2 :
Turn and sc in each st (3)
Round 3 :
Fasten off leaving tail to sew to pumpkin top and attach to branch tube
— Maple Leaves (Make 12 varied colors) :
Round 1 :
ch6, 1 sc in 2nd ch from hook, hdc in next, dc in next, tr in next, sl st in last. Turn and work back along chain: sl st, tr, dc, hdc, sc. Fasten off (small leaf)
Round 2 :
For larger maple-style leaf: ch8, sc across base then create points by (hdc, dc, tr, dc, hdc) across chain with sl st joins between points to define lobes. Work a second row of smaller points into the top loops for detailed maple silhouette. Fasten off and block lightly (medium leaf)
Info :
Leaves are stitched flat and then slightly shaped by folding the middle and running a length of yarn through the center to create a raised midrib. Use a backstitch with dark thread to embroider veins on each leaf. Make a mix of small and medium leaves in green, yellow, rust, and red.
Round 3 :
Edging: add 1 sc around leaf perimeter to neaten and stiffen shape (optional)
Info :
Make at least 12 leaves but you can make more to achieve dense coverage. Fasten leaves to branch strategically; stitch in place from the back so surface looks seamless.
— Sunflower (Centers and Petals) :
Center Round 1 :
6 sc in magic ring with brown (6)
Center Round 2 :
6 inc (12)
Center Round 3 :
(1 sc, inc) x 6 (18) Fasten off and leave tail to attach petals
Petal Round 1 :
With golden yellow, ch6, (sl st in 2nd ch from hook, sc, hdc, dc) sl st into next stitch of center. Repeat 12 times to form 12 petals. Fasten off and weave in ends.
Info :
Sew sunflower to branch near a cluster of leaves and a pumpkin to emulate the photo. Stiffen petals slightly with diluted fabric glue or starch if you want petals to hold shape.
— Extra Small Accent Leaves and Fillers (Make 10) :
Round 1 :
ch5, 1 sc in 2nd ch, hdc, dc, sl st back to base. Fasten off (tiny leaf)
Info :
These accent leaves are worked quickly and stitched around junctions to hide seams and add dimensional color. Use colors to pick out warm fall highlights.
— Assembly & Spiral Wrap Technique :
Info :
Lay your branch tube and cotton cord core flat. Decide top and bottom. If the cord extends through the tube, tie a secure knot at the bottom and make a hanging loop at the top. Leave extra cord between attachment points to string elements later.
Step 1 :
Position the owl near the top: slide the owl feet over tube or sew feet to tube at a bulge created earlier. Secure with ladder stitch through body base to tube. Ensure owl faces forward and sits stable.
Step 2 :
Attach pumpkins: use the preformed knobs on the tube as markers. Sew a pumpkin directly to the tube through its top and bottom with strong thread, then also stitch it to the cord core to secure. Add vertical ribbing stitches to make pumpkin sections pronounced.
Step 3 :
Wrap leaves around seams and between pumpkins to hide joins. Position the sunflower and stitch at its center to the branch. Use pins to hold pieces while you sew from behind the tube.
Step 4 :
Create spiral effect: once all elements are attached on alternating sides, gently twist the tube while holding the top so items appear to spiral. Stitch leaves and small fillers to keep the twist stable. Space clusters at regular vertical intervals for balanced composition.
Info :
For safe long-term hanging indoors, consider knotting or gluing the cord core at the top hook and covering the knot with leaves. Make sure all pieces are secured with multiple stitches so the garland can be moved without parts loosening.
— Final Finishing Touches :
Step :
Sew in all loose tails, trim threads, and add any embroidered veins or small French knot berries to add visual interest. Optionally spray a light starch on leaves for hold. Hang and adjust the spiral until you are satisfied with the balance.
This autumn garland combines cute amigurumi character work with decorative seasonal motifs for a charming hanging accent. Each pumpkin rib, layered leaf and the wide-eyed owl bring a cozy harvest feeling to any room. It’s a bit of work, but the result is a handcrafted heirloom you’ll be proud to display. 🧶🍁🎃