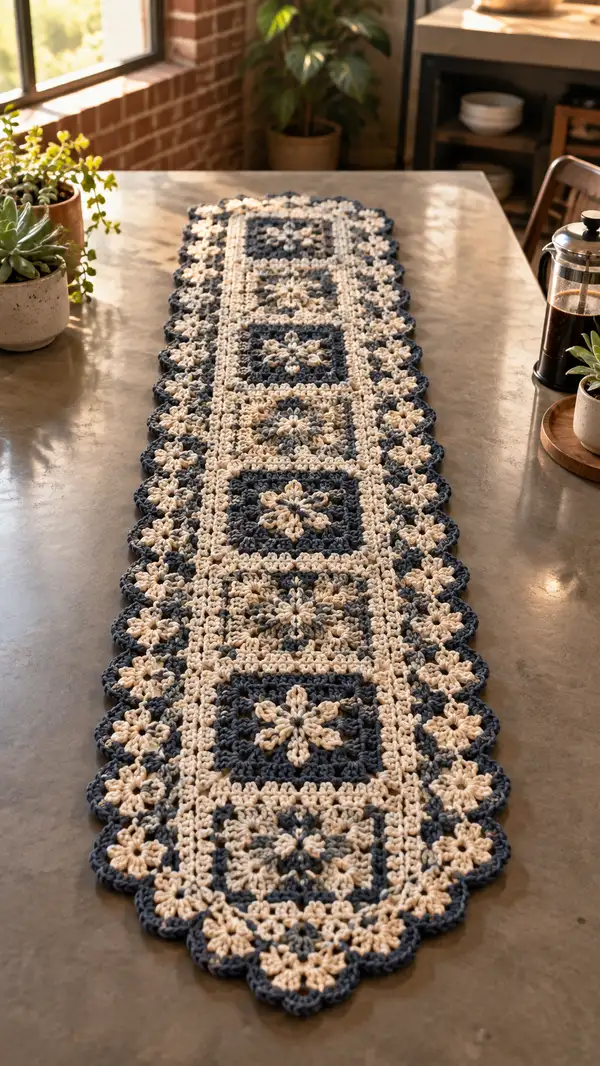
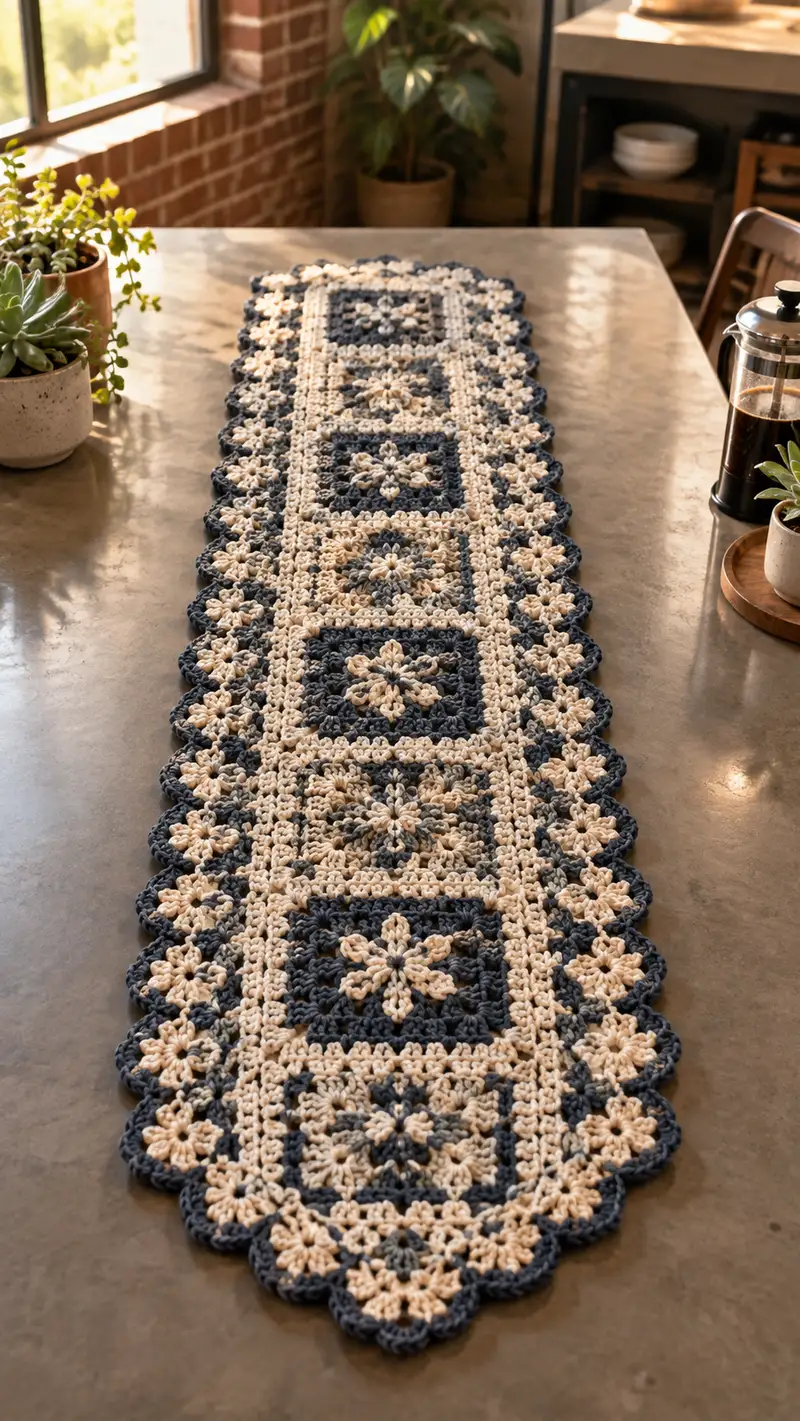
This elegant table runner features connected floral granny squares in navy and cream with a scalloped floral edge. Worked in contrasting colors, the runner showcases textured puff petals, classic granny joins, and a decorative scalloped finish. The long, narrow layout is perfect for dining tables or console surfaces, bringing hand-made charm to any room. Detailed step-by-step instructions guide you through motif construction, joining, and finishing.
Progress Tracker
0% Complete
— Overview :
Info :
This table runner is constructed from floral granny square motifs: five large floral squares arranged in a single column and connected by narrow granny strips and a central join. Motifs alternate navy and cream centers to create contrast. Use worsted weight yarn and a 5.0mm hook for the main fabric. The pattern below breaks the project into: Floral Square Motif, Small Corner Flowers, Connecting Strips, Joining Rounds, and Final Border/Scallop. Read through all sections first and maintain consistent tension. Block squares before joining for best results.
Info :
Gauge note: Because this design uses open cluster and puff stitches, gauge is flexible. A single finished motif (after rounds listed here) should measure approximately 8" square unblocked with 5.0mm hook. Adjust hook if your motifs are larger or smaller to obtain desired runner dimensions. The finished runner approximately measures 46" x 9.5" depending on blocking and gauge.
— Materials & Techniques Info :
Info :
Puff stitch (standard): yarn over, insert hook into stitch, yarn over and pull up a loop, repeat this 3 more times (4 loops on hook), yarn over and pull through all 5 loops, ch1 to close puff. Adjust number of repeats for larger or smaller puffs. For this pattern each puff uses 4 draws (resulting in a large, full petal). Use consistent tension for puffs for uniform petals.
Info :
Cluster conventions: A 'cluster' in this pattern often refers to (dc cluster or 3-dc cluster) where you begin multiple dc partials and finish together. Where used, follow the bracket instructions and count clusters as single stitch units for counts. When rounding counts are provided, they reflect number of clusters or chain spaces in that round.
— Floral Granny Square Motif (Make 5 - alternating colors as shown) :
Round 1 :
Using Color A (for first motif choose Navy or Cream depending on desired placement). Make a magic ring. Ch3 (counts as first dc). Work 7 dc into magic ring (8 dc total). Join with sl st to top of ch3. (8)
Round 2 :
Ch1 (does not count). *Puff in next dc: work puff (4-loop) into same stitch as sl st; ch2; sl st in next dc; repeat from * around to create 8 puffs separated by ch2 spaces. Join with sl st to first puff. This forms an 8-petal floral center. (8 petals, 8 ch-2 spaces)
Info :
Keep all puffs worked into the base dc stitch for a tight flower center. Ensure each puff has the same number of loops and that ch-2 spaces are consistent. If petals look loose, tighten by pulling the yarn tail gently while closing each puff with a ch1.
Round 3 :
Change to Color B (contrasting color) if you prefer two-color petals; otherwise continue with Color A. Work into each ch-2 space: (sl st into ch-2 sp, ch3, 2 dc, ch2, 3 dc) into each ch-2 space to begin forming 8 corner clusters. Join with sl st to top of ch3. (8 corner clusters)
Round 4 :
Ch1, sc in same st, *ch3, skip to next corner cluster, work sc in top of next corner between the 3-dc groups; rep from * around with sc placed in the midpoints between corner clusters and ch-3 along sides. You should have 8 sc and 8 ch-3 side loops. Join with sl st to first sc. (8 sc, 8 ch-3 sps)
Round 5 :
Using the ch-3 sps as side openings, work along each side: in each ch-3 sp work (3 dc, ch2, 3 dc) to enlarge the corners and create a squaring beginning. In each sc between corners, work 1 sc to maintain side edge. Join with sl st to first dc. At the end of this round you will have 8 corner blocks (3dc-ch2-3dc) and 8 side scs. (8 corner blocks, 8 side scs)
Info :
This round begins to square the motif. When working the corner (3dc-ch2-3dc) treat it as a single corner unit; counts are in corner units rather than individual stitches for clarity. Make sure corners sit clearly 90 degrees apart.
Round 6 :
Ch3 (counts as dc), dc in next 2 sts, *dc in next side stitch, dc in next side stitch, (3 dc, ch2, 3 dc) in corner, dc in each of next 2 side stitches; rep from * around. Join with sl st to top of ch3. After completing this round the motif is clearly square with four larger corner clusters; count total dc approx 48 depending on spacing. (Approx 48 dc)
Info :
If you want a more open look, substitute ch2 for ch1 spaces in side repeats; for a denser fabric use sc along sides instead of dc. Maintain consistent stitch count per side so squares line up when joining.
Round 7 :
Ch1, sc in first 3 dc, *ch3, skip across to next corner, sc in the space between corners (the top of the 3dc block), rep from * around. This creates neat side chain spaces for the next round of petal clusters. Join with sl st to first sc. (4 sc and 4 ch-3 sps per side total depending on previous spacing; overall approx 16 ch-3 sps)
Round 8 :
Change to Color A for petal contrast (Info section details color change). Into each ch-3 space work: puff stitch (4-loop puff) followed by ch1, sl st into same space to anchor puff (this creates mini petals along side spaces). In sc positions work 1 sc. Join with sl st. This adds a delicate petal texture around the square. (Number of puffs equals ch-3 spaces counted)
Info :
Change to Color A: break Color B leaving 6" tail and join Color A with a standing dc or sl st and then continue the round. Carrying is not recommended for large color blocks; weave in ends later or join with join-as-you-go technique where appropriate.
Round 9 :
Ch3, dc in next dc, *ch1, skip a small space, dc across next set of side stitches to make an even textured round; at each corner (3 dc, ch2, 3 dc), rep from * around. Join with sl st to ch3. This round evens out the perimeter and prepares for an outer granny joining round. (Approx 56 dc and 4 corner clusters)
Round 10 :
Ch1, sc in same st, *(ch3, sk 2 dc, sc in next st) across side to create open chain mesh; at corners sc in corner ch-2 then ch3 and sc again to reinforce corners; rep from * around. Join with sl st. (Mesh with even ch-3 spaces along each side)
Round 11 :
Change to Color B for outer square ground (this is typically cream if the center was navy). Work 3-dc clusters (classic granny cluster) into each ch-3 space: (3 dc, ch2, 3 dc) into each corner ch-3 and (3 dc) into each side ch-3 to begin forming a traditional granny round. Join with sl st. Count clusters: corners = 4 corner clusters, sides = number of side 3-dc groups (approx 12-16 depending on earlier counts).
Info :
Use the standard granny cluster technique: dc3 cluster means: (dc, ch0, dc, ch0, dc) in the space or stitch specified. Treat any chain space (ch-3) as a point for cluster placement to maintain square symmetry.
Round 12 :
Ch3, *3 dc in each side space, (3 dc, ch2, 3 dc) in each corner ch-2 space; rep from * around. Join with sl st to top of ch3. After this round the motif is square and measures approximately 8" unblocked. (Count approx 4 corner clusters + side clusters as created)
Round 13 :
Ch1, sc in each dc across the round working one sc into the middle dc of each 3-dc cluster, ch1 between clusters where necessary to preserve side shaping. Join with sl st. This creates a stable ground for joining motifs later. (Total sc equals number of clusters across round, approx 48 sc)
Info :
If you prefer a slightly larger motif, repeat Round 11 and Round 12 once more to increase the motif by one granny round. For this pattern use the 13-round size described to match the runner sizing shown.
Round 14 :
Optional decorative round: Change to Color A and work a round of puff clusters in every other side space to emphasize floral detail. Work (puff, ch1, sl st) into each designated space, sc in the remaining spaces. Join with sl st. This is purely decorative; counts vary based on number of side spaces.
Info :
Fasten off and weave ends long enough to sew if you plan to sew motifs together instead of join-as-you-go. Block motif flat and square to precise 8" measurement for even joining later. Make five motifs total for a single-column runner; alternate color placement so that third motif acts as a repeat center with either navy or cream center depending on your visual preference.
— Small Corner Flower Motif (Make 12 for runner corners and border details) :
Round 1 :
With Color A or B as desired, make magic ring, ch3, work 7 dc into ring, join with sl st to ch3. (8 dc)
Round 2 :
Ch1, *puff into next dc, ch1, sl st in next dc; rep around to create 4 small puffs alternating by sl sts (use every other dc). Join with sl st. (4 small puffs)
Round 3 :
Ch3, (2 dc) in same st, ch2, (3 dc) in next puff space; ch1, sc in next sl st; rep across to form a tiny square-flower unit, join with sl st. This motif measures approx 1.75" unblocked. (4 mini corner clusters)
Info :
These small corner flowers are used along the runner edges between larger squares and scallops to create the visible scalloped floral border pictured. Make at least 12—more if you want denser edging. Block and set aside.
— Narrow Connecting Strip (Make 4 strips to bridge gaps between large motifs) :
Round 1 :
Using Cream for the main connecting strip, ch26 (or length equal to distance between centers plus 2 for turning). Row 1: sc in 2nd ch from hook and across (25 sc). (25)
Round 2 :
Ch1, turn, sc across in BLO for a neat ridge (25 sc). Continue working even in sc for 4 rows total to create a stable narrow strip about 4 rows high. (25 sc)
Info :
Adjust ch length to exactly match spacing between centers of motifs when blocked. These strips will be joined to motif edges using whip stitch or slip stitch join; measure carefully after blocking motifs so joins are even and flat.
Round 3 :
Optionally add a decorative edge to the strip: ch2, hdc in next 2 sts, *ch2, skip a st, hdc in next 3 sts; rep across; turn and work one more row of hdc to lock pattern. (Decorative textured strip ready for joining)
Info :
Make 4 strips of equal length to bridge the gaps between the five main motifs: between motif 1 and 2, 2 and 3, 3 and 4, 4 and 5. You can also work these strips as join-as-you-go connectors to eliminate sewing later if you prefer slip-stitch joining.
— Join-As-You-Go & Assembly Prep :
Info :
Lay out motifs in a single column alternating center colors as shown in the image: e.g., top motif Navy center, next motif Cream center, center motif Navy center, next Cream, bottom Navy. This alternating pattern gives a balanced navy-cream rhythm down the runner.
Info :
Blocking: Pin all motifs square and damp-block to 8" square. Allow to dry completely. Blocking is essential to ensure straight sides and consistent join points. Block small corner flowers as well to make edges neat.
Round 1 :
Join 1: Using cream, place two adjacent motifs RS facing UP. Align edges and join using join-as-you-go slip stitch method: slip stitch through loop of Round 13 sc on first motif and corresponding sc on second motif across a full side. Work sl st in each sc until the corner where you sl st into corner ch-2 on both motifs twice to lock. Fasten off at the end of the seam. Repeat joining for each adjacent pair to form a column of five motifs. (Seams per side equal number of side sc from Round 13)
Info :
If you prefer a sewn seam, use mattress stitch or whip stitch with a yarn needle. Slip-stitch join-as-you-go gives flatter seams and is recommended for runners intended to lie flat under dishes and decorative objects.
Round 2 :
Attach narrow connecting strips: seam each strip between the side edges of motifs where more visual space is desired (use strips between motifs on one side of the runner if you want the double-row border shown). Pin positions, then sew with cream yarn using whip stitch through round 13 sc positions and strip edges. Repeat for the opposite side if the design calls for double borders. (4 strips joined)
Info :
When joining with strips, keep the fabric flat and avoid pulling seams tight; you want a secure but relaxed join so the runner can drape naturally. Measure the length across to ensure strips are not slightly shorter or longer than motif edges — trim or add small chain loops if necessary to equalize lengths.
— Border & Scalloped Floral Edge (Detailed rounds to create scallop shown) :
Round 1 :
Work evenly around the entire joined runner with one round of sc in cream to create a clean edge. Starting at one long side, join cream to the outermost sc of Round 13, ch1, sc in each st around including 3 sc in each corner ch-2. Join with sl st to first sc. (Total sc equals perimeter count; maintain even tension)
Info :
This sc round gives a stable base for the decorative scallop rounds that follow. Keep stitches uniform—do not over-tighten corners; 3 sc in corners will preserve the runner's rectangular outline.
Round 2 :
Change to Color A (Navy) for scallop contrast. Ch1, *skip 2 sc, 5 dc in next sc (shell), skip 2 sc, sc in next sc; rep from * around to form shell scallops spaced evenly. At corners work (sc, ch2, 5 dc, ch2, sc) to round the corner into a scallop. Join with sl st to first sc. (Shells around perimeter)
Info :
Space shells evenly; count perimeter scs and divide by pattern repeat to determine precise placement (for example, if there are 96 sc and you want shells every 6 stitches, you will have 16 shells). Adjust skip counts to maintain full repeats along each side.
Round 3 :
Change to Cream. In each navy shell work: *(sc in first dc, ch1, puff in center of shell (work puff into center dc space), ch1, sc in last dc), sc in next sc between shells; rep around. At corners treat shells as a single larger shell and work (sc, ch2, puff, ch2, sc) to maintain corner shape. Join with sl st. (Decorative puffs centered in each shell)
Info :
These puffs create the floral scallop appearance seen in the photo. Keep puff stitch loop counts consistent (4-loop puff) to match motif petals. Use a hook one size smaller if puffs become loose and floppy.
Round 4 :
Change back to Navy. Work into each cream sc between shells: ch1, (3 dc) in the sc, ch1, sl st into center of adjacent puff to anchor; rep around creating an interlaced shell connection. This round ties the scallops to the runner edges and produces the darker scallop outline pictured. Join with sl st. (Anchored shell rounds)
Info :
Check that corner shells remain smooth; add or remove a ch1/skip as needed to keep repeats even. This interlaced round gives a neat navy scalloped edge and emphasizes the floral motif at each scallop tip.
Round 5 :
Final decorative pick-up round in Cream: *(sc in top of shell edge, ch3, sl st into center of next shell puff) around to create small lacy arches between scallops. At corners work (sc, ch4, sl st) to keep corner arc. Fasten off and weave ends. This final light lace round brightens the scallop joins. (Lacy arch round)
Info :
Weave in tails using a blunt tapestry needle, following the color of the yarn to hide ends along the reverse of the work. Secure ends by threading through several stitches before trimming close to the yarn.
— Alternate Border Option (If you prefer fuller scallops) :
Round 1 :
After base sc round in cream, work 7-dc shells in navy (7 dc in shell) with sc between shells; at corners use (sc, ch3, 7 dc, ch3, sc). Join and then place cream puffs as in prior sequence but with 7-dc shells for a fuller edge. This will produce larger, deeper scallops like those in the picture. (Full scallop option)
Info :
Choose full scallop if the runner sits along an open edge where a bolder scallop will be visible. The standard 5-dc shell is more delicate and lies flatter under objects on the table.
— Finishing & Blocking :
Info :
After all joining and border rounds are complete, wet block the entire runner to square and shape the scallops. Pin scallop edges evenly and allow to dry fully. Steam blocking with a cloth is also acceptable but be careful with heavier yarns to avoid flattening puffs too much.
Info :
Final touch: run a contrasting slip stitch in navy along the central spine (if desired) to emphasize the runner's central axis. This is purely aesthetic and optional—test on a scrap before committing to the length of the runner.
Round 1 :
Optional surface embroidery: Use a tapestry needle and small amounts of navy or gold to add tiny stitches in the center of puffs for added definition. Keep stitches shallow and avoid pulling tightly to maintain puff texture.
Info :
Weave in all ends on the WS using the yarn needle and hide ends under adjacent stitches. Trim close when secure. Give runner a final light blocking to ensure all seams and scallops lie perfectly.
— Pattern Variations & Size Adjustments :
Info :
To lengthen the runner, add more floral granny motifs to the column and corresponding connecting strips. Each extra motif adds approximately 8" after blocking. To shorten, remove a motif from the column. To widen, create two columns of motifs and join into a wider runner, adjusting border repeats accordingly.
Info :
For a denser table protector, use a smaller hook (4.5mm) and/or higher density rounds on connecting strips, or add an extra granny round to each motif before joining. Conversely, use a larger hook (5.5mm) for a looser, more drapey runner.
Completing this runner brings such satisfaction—the floral puffs and scalloped edge feel timeless and special. Each motif joining is a little step toward a beautiful heirloom you can display proudly. I love how the navy frames each cream flower and how the scalloped edge finishes the piece with personality. Enjoy the process and the elegant result! 🧶🌸