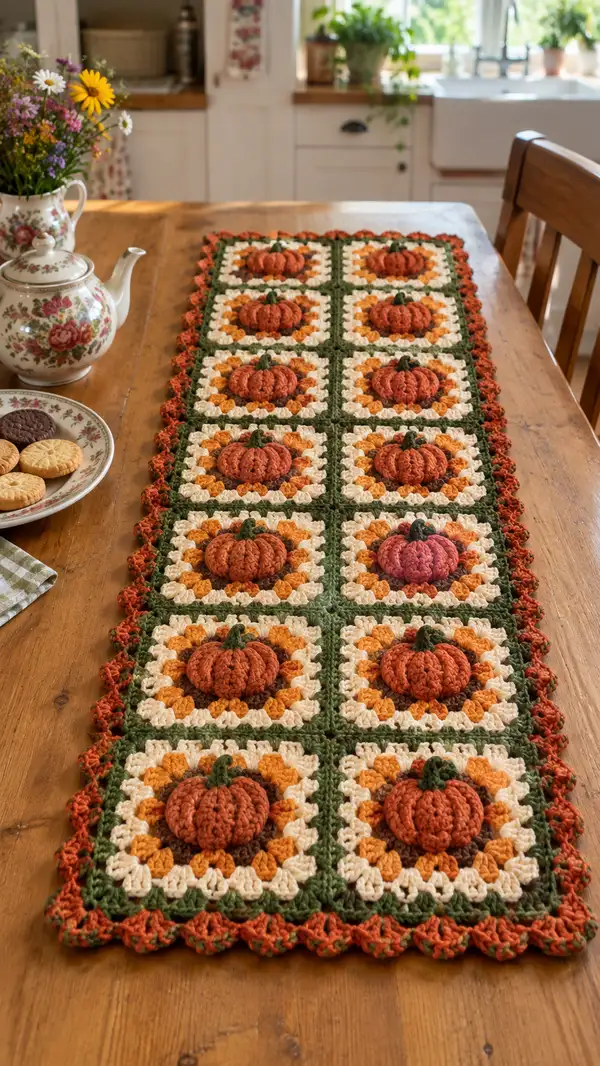
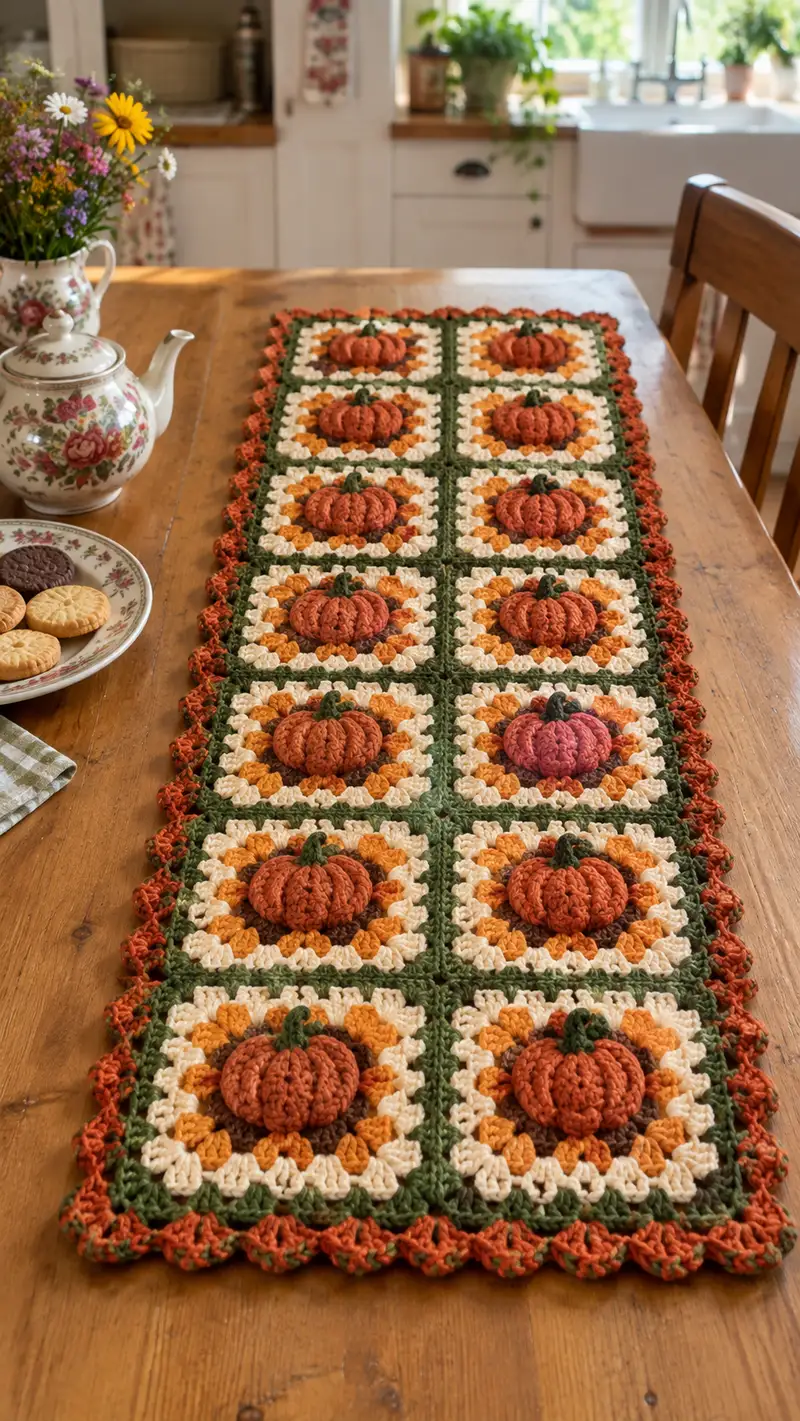
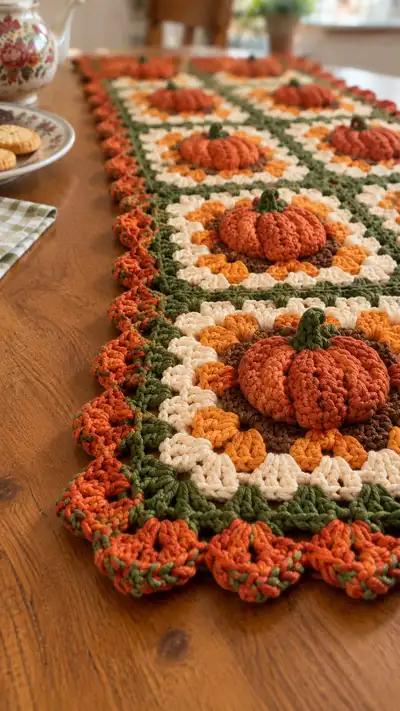
A warm, autumnal table runner made from 12 pumpkin-centred granny squares joined into a long runner. Each square features a raised 3D pumpkin in the centre, surrounded by layered granny rounds in cream, gold and brown, framed with a leafy green and finished with a scalloped rust border. The finished runner is perfect for seasonal decor, a harvest table, or a cozy kitchen centerpiece.
Progress Tracker
0% Complete
— Notes & Overview :
Info :
This runner is made from 12 identical pumpkin granny squares (3 wide x 4 long). Work one complete square (Pumpkin centre + Surrounds + Frame), then make 11 more. Join squares using the join-as-you-go (JAYG) method shown below or sew them together with whipstitch. Use a hook that gives a tight fabric for puffy stitches; I used a 5.0 mm hook with worsted cotton. Block squares lightly if needed before joining to even edges.
Info :
Throughout the pattern I use standard US terms. Puff stitch: Yarn over, insert hook, pull up loop (repeat 4 times total to have 9 loops on hook), yarn over and pull through all loops, ch1 to close puff. If you prefer a smaller puff, work 3-times pull-up instead of 4.
— Pumpkin Centre (Make 12) :
Round 1 :
6 sc in magic ring (6)
Round 3 :
(1 sc, inc) x 6 (18)
Round 4 :
(2 sc, inc) x 6 (24)
Round 5 :
(3 sc, inc) x 6 (30)
Round 6 :
(4 sc, inc) x 6 (36)
Info :
Change to burnt orange yarn now. This creates a solid base round before working puff rounds. Place a marker at the start of this round. These first six rounds build a slightly domed disk that becomes the foundation of the pumpkin ribs. Keep tension consistent.
Round 7 :
1 sc in each st (36)
Round 8 :
1 sc in each st (36)
Info :
The pumpkin will be divided visually into 12 ribs. Since you have 36 stitches, plan to group 3 stitches per rib. Place temporary markers at every 3rd stitch (after stitch 3,6,9…36) to help you place puff clusters evenly in the next rounds.
Round 9 :
*Puff in next 3 sts, skip 0 sts, sl st in next st* repeat around making 12 puff groups (36 loops worked as 12 puffs) (36 puff bases)
Info :
To make each puff: yarn over, insert hook into first target stitch, pull up loop; repeat 3 more times into same stitch (4 pulls total), yarn over and pull through all loops, ch1 to close puff. For this pattern we will anchor three small puffs across the three-stitch rib area to create a fuller rib - but in round 9 we place one base puff in every third stitch to mark rib centres. Precise counts are maintained as you worked into single stitches evenly.
Round 10 :
*In same position as puff from previous round work: (puff into previous puff ch1 space), then sc in each of the next 2 standard stitches between puff groups* repeat 12 times (36)
Round 11 :
*Puff in the flo of the next 3 sts (work puff across the three stitches that form a rib), sc in the next st between ribs* repeat around for 12 ribs (36)
Info :
These rounds begin to build the height of each pumpkin rib. Work puffs into the front loop or into clustered stitches so that each rib becomes raised and distinct. Keep the puffs consistent in height and size. If stitches feel loose, switch to a smaller hook for puff rounds only.
Round 12 :
*Puff in same 3-st rib location (stack puff directly over previous puff), sc in next st between ribs* repeat around (36)
Round 13 :
*Puff in same rib (one more stacked puff), sc in next st between ribs* repeat around (36)
Info :
After stacking 2-4 puff rounds you will have visible ribs. Check your tension: pumpkins should be plump but not floppy. If you prefer deeper ribs, add an extra puff round here (work an extra Repeat of Round 13) before the closing sequence. Excessive puff rounds will increase width—maintain the 36 stitch count by keeping puffs worked into the same stitch groupings and inserting single crochet in the inter-rib spaces as written.
Round 14 :
1 sc in each st around working tightly through the top loops of puffs to bind the ribs together (36)
Round 15 :
(1 sc, dec) x 12 (24)
Info :
We begin to gather and shape the pumpkin. Rounds 15–17 step down stitch counts to make the disc slightly concave and gatherable. Use a tapestry needle and length of yarn later to gather center if you prefer a tighter, more pronounced pumpkin belly.
Round 16 :
(2 sc, dec) x 6 (18)
Round 17 :
(1 sc, dec) x 6 (12)
Info :
Fasten off leaving a long tail (approx 40–60 cm) for gathering. Thread tail onto tapestry needle and weave through the front loops of the last round, pull gently to gather and create the cupped underside of the pumpkin. Adjust gathering so the top retains the puff ribs evenly spaced. Knot securely and weave in end on the underside of the pumpkin.
Round 19 :
Optional: With a length of contrasting yarn (same burnt orange), make surface slip-stitch ribs across the pumpkin by stitching from the center down between ribs to emphasize segmenting. Work 12 surface stitches radiating out to meet the outer puff ridges. This is an optional decorative technique.
Round 20 :
Stem: With forest green, ch 6, sl st in 2nd ch from hook and across to form a short tube (4 sc). Fold and sc through both layers to give small stalk approx 3-5 rows tall. Fasten off leaving tail for sewing. Attach stem to pumpkin top using yarn tail and needle, inserting tail through gathered center and stitching around base of stem to hold firmly.
— Inner Brown Disc & Petal Base (Make 12) :
Round 1 :
With chocolate brown, mr, ch1, 8 sc in ring (8)
Round 3 :
(1 sc, inc) x 8 (24)
Info :
This small brown circle sits under the pumpkin to give a soil/contrast ring. Make 12 discs. You will join the brown disc to the granny petal round using slip stitches so counts must line up. Keep the final discs flat by not over-gathering.
Round 4 :
1 sc in each st (24). Fasten off and leave long tail for sewing into centre of the petal round later.
— Golden Petal Round (Make 12) :
Round 1 :
Join golden orange yarn to brown disc outer round with a sl st. Ch2 (counts as first hdc), (skip 1, 3 dc cluster in next st, skip1, 1 hdc in next st) repeat around to make a ring of small petals. Aim for 12 petal clusters (matching brown disc 24 sts gives 12 clusters). Fasten off and weave ends.
Info :
The petal clusters are worked as 3-dc shell clusters (3 dc in one stitch) to create a sunflower-like ring around the brown centre. Make sure clusters are evenly spaced by aligning with the 24 stitches of the brown base—one cluster every 2 stitches.
— Cream Background Granny Rounds (Make 12) :
Round 1 :
With cream yarn, join in an outer stitch of the petal round, ch3 (counts as first dc), (dc, ch2, 2 dc) in same corner stitch to make first corner shell, *skip 2 sts, (2 dc, ch2, 2 dc) in next sp* repeat around to form first granny square round. You will create a square shape by working 4 corner spaces total. Aim for 12 shell clusters on each side pattern to form square edges.
Round 2 :
Ch3, (2 dc in same ch2 sp), *2 dc in next ch2 sp, 2 dc in next ch2 sp* across each side placing (2 dc, ch2, 2 dc) in each corner ch2 sp. This makes the second square round larger. Keep stitch count: each side will have 12 dc-clusters; total stitches will vary according to clusters but maintain square shape.
Info :
These granny-style rounds convert the circular motif into a square. Count each shell and corner carefully — the first cream round should set 4 corners so the square expands evenly. If you prefer a tighter square, use sc instead of dc for the first round out of the petals.
Round 3 :
Repeat Round 2 once more to enlarge the square to a comfortable size for the green frame (this will bring outer dimension of each square to approximately 5.5–6 inches depending on yarn/hook). Fasten off cream and weave ends.
— Green Frame & Join Preparation (Make 12) :
Info :
Work green rounds to create a defined frame that becomes the joining border between squares. The first green round will also include spacing for join-as-you-go (JAYG) sl st points where you will connect adjacent squares during their green round.
Round 1 :
With forest green, join to any corner ch2 sp, ch1, sc in corner, *ch2, skip next two dc-clusters, (sc, ch2, sc) in next corner ch2 space* repeat around making 4 corner sc groups. This makes a narrow green frame. Work evenly so each side has same number of sc groups between corners.
Round 2 :
Ch2 (counts as first hdc), hdc in each sc across to corner, in corner (hdc, ch2, hdc), continue around to create a smooth framed edge. Aim for about 24–28 hdc per side depending on your previous counts. Fasten off leaving long tail if joining later; or leave working yarn to use for JAYG method.
Info :
If using join-as-you-go, plan the order: work the runner row-by-row. As you make the green round on a new square, you will connect it to the neighbour square(s) on the left and above with slip stitches into the neighbour's green round; instructions for that appear in the Join section below.
— Join-As-You-Go Method (Row Assembly) :
Info :
Lay out squares in final arrangement (3 x 4). Work squares left to right by row. For the first square of a row, complete the green frame but do not join. For the second square in row, when you reach the corresponding side on the green round, instead of working your stitch into a chain or space, sl st into the corresponding sp of the already-made square and then continue. This joins squares with a neat seam within the green frame.
Round 1 :
When joining side-to-side, align squares and join with sl st every third hdc (or at regular intervals matching your hdc counts) to create a flat seam. Work neat, snug joins but avoid pulling too tight which will skew the square.
Info :
When joining at the top/bottom between rows, work the JAYG slip stitch along the top edge of the square below while you make the green round on the square above. This way each seam is made just once. Keep your joins mild to allow runner to lie flat on the table.
— Assembling the Full Runner (3 x 4 Layout) :
Info :
Make and frame your first row of three squares using the JAYG method. After the first row is complete, work the second row and join it to the first along the long edges. Repeat for the third and fourth rows until you have a single long panel of 12 squares joined together.
Round 1 :
After joining squares into rows, check alignment and make minor adjustments by evening out stitches at joins with a tapestry needle. Pin the runner flat and measure that the outer edges are straight before the outer border is added.
— Outer Scalloped Border :
Info :
We finish the runner edge with two rounds: a green base round to even the join seams, then a rust/orange scallop round to create a pretty decorative edge. Work around the entire outside, including across inner seams if needed, to give a continuous border. Scallops are made in groups of 5 dc for a fuller shell.
Round 1 :
With forest green, join at any outer corner, ch1, sc evenly around entire outer edge of runner (including across the join seams) placing 3 sc in each corner ch2 sp to keep corners square. Aim to work evenly so scallops later fall into place. Keep stitch count consistent by placing sc across each exposed dc or ch sp. Fasten off and change to rust/orange.
Round 2 :
With rust/orange, join with sl st, *skip 2 sc, 5 dc in next sc, skip 2 sc, sl st in next sc* repeat around. When you reach corner areas, work scallops so they nestle into corner spaces (can do 3 dc clusters in corner to keep shape). Fasten off and weave ends carefully. This creates the raised scalloped edge seen in the photo.
Info :
For a fuller picot-like edge, work an additional rounds alternating green slip-stitch woven through scallop bases then a final rust single scallop edge. The pictured runner has a double-tone scallop (rust with flecks of green from carried yarn) — if you want this effect, join a second strand of green and hold loosely with rust for the final shell round, making the scallops slightly variegated.
— Decorative Stem & Leaf (Optional for some squares) :
Round 1 :
Stem (if making separately): With green ch5, sc in 2nd ch from hook and across (4 sc). Continue 4 more rows of sc around to build a short tube. Fold, sc through both layers to close and stitch base to pumpkin center. Tip: sew base of stem into gathering stitch to anchor.
Round 2 :
Leaf: With green ch6, sc in 2nd ch from hook, hdc in next, dc in next, hdc in next, sc in last, sl st back along the underside to create a slightly cupped leaf. Fasten off and sew to base of stem if desired.
Info :
Sew stems on after pumpkins are gathered and sewn to the cream square. Place stem slightly forward on the gathered centre so it sits upright. Use a small dab of fabric glue if stems are floppy, but reinforce with stitches as shown.
— Finishing Touches :
Info :
Weave all ends into the nearest green border so they are hidden. Lightly steam-block runner on low setting (cotton safe) or pin flat and mist with water; allow to dry to ensure it lays flat on a table. Use blocking to square up joins and align scallops.
Round 1 :
Optional: Using brown embroidery thread or thin yarn, add a few surface stitches across the pumpkin ribs to exaggerate the segment lines visually. Work from the stem to the outer green frame in small flat stitches. This is purely decorative.
Info :
Ensure the runner is stable for use on table surfaces: block, then lay a non-slip pad under it if used on a polished table to prevent sliding. Cotton yarn may be slightly heavy; consider lighter yarn for a less heavy runner.
This pumpkin granny square runner brings an inviting, handmade autumnal vibe to any table — each 3D pumpkin centre is a tiny celebration of texture and color. The step-by-step instructions ensure even beginners can build their skills while creating a show-stopping seasonal piece. I hope this pattern sparks cozy afternoons of crochet and becomes a cherished seasonal favourite. 🧶🍂🎃