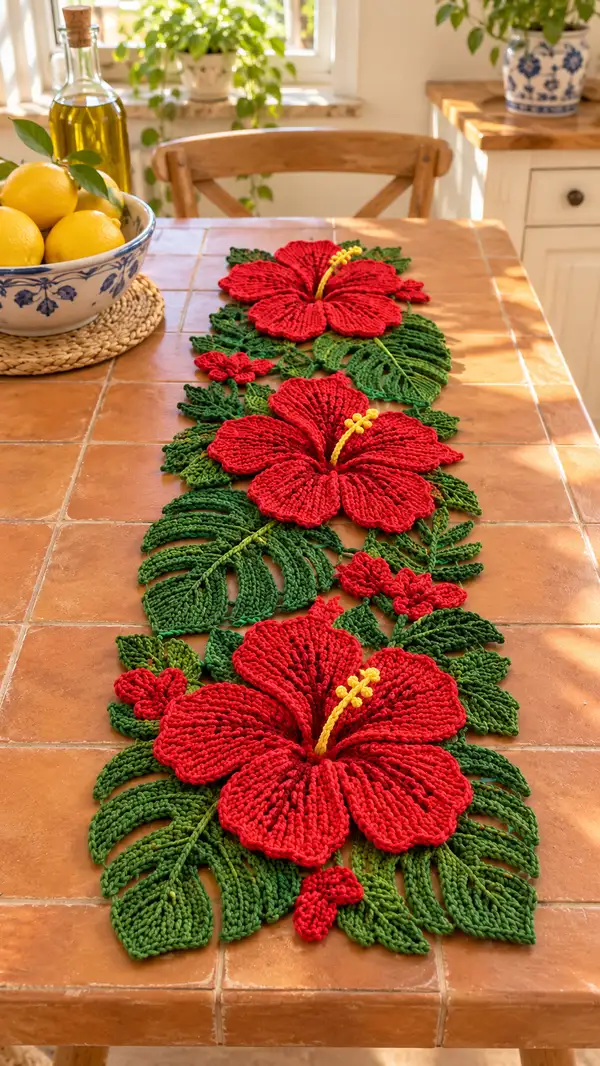
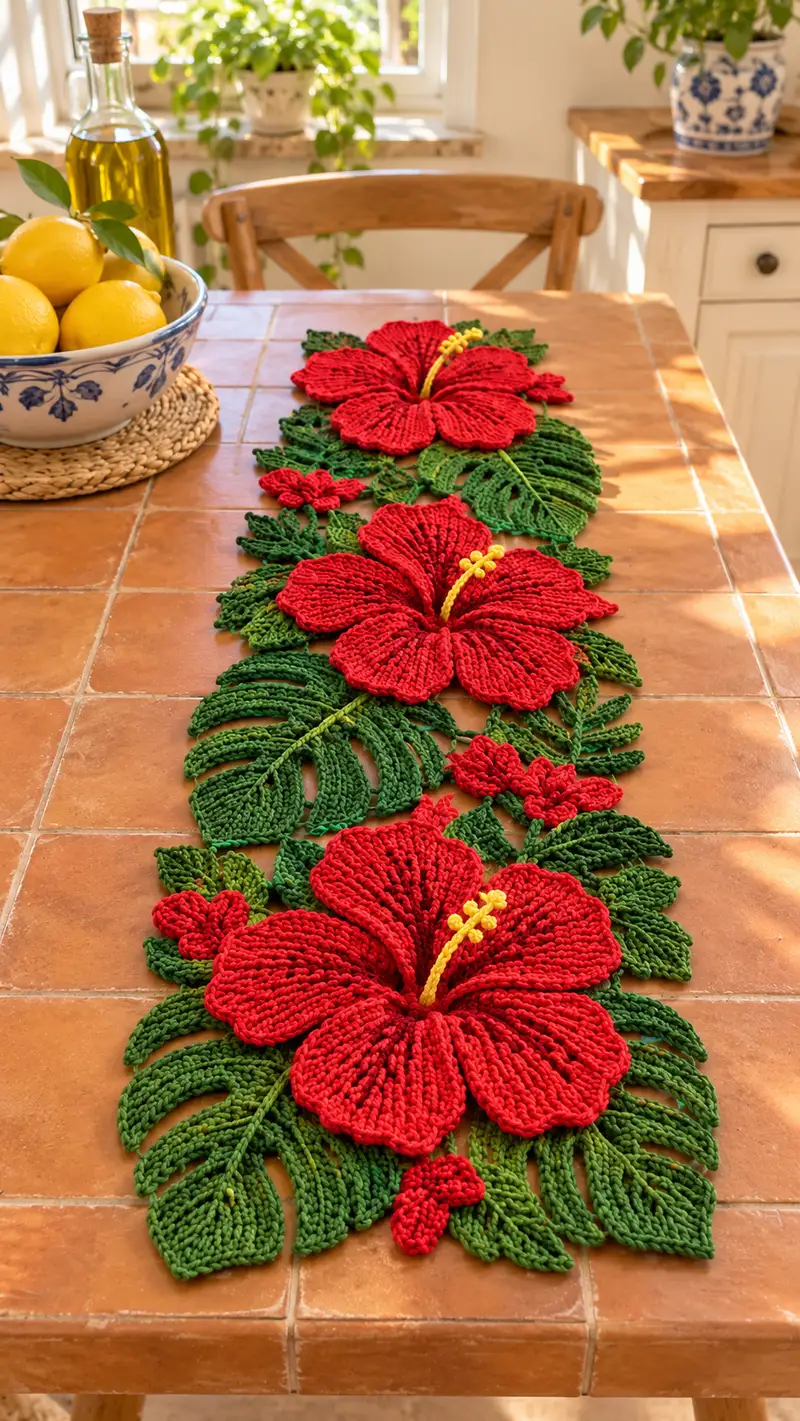
Bring tropical flair to your table with this striking Red Hibiscus Tropical Table Runner. Three oversized, sculpted hibiscus flowers sit on a bed of layered green leaves and delicate buds, all crocheted in bold red, leafy greens and sunny yellow accents. The runner is designed as modular motifs you crochet separately and join to form a continuous centerpiece. Detailed shaping, textured ribbing and layered assembly make this a standout home accessory for summer and year-round decor.
Progress Tracker
0% Complete
— Flower Center (make 3 per runner) :
Round 1 :
6 sc in magic ring (6)
Round 3 :
(1 sc, 1 inc) x 6 (18)
Round 4 :
(2 sc, 1 inc) x 6 (24)
Round 5 :
1 sc in each st (24)
Info :
The center disk is slightly domed to give the base of the stamen something to anchor to. Work steadily with a tight tension so centers hold shape when attached to petals.
Round 6 :
Work in BLO: 1 sc in each st BLO (24)
Round 7 :
(3 sc, 1 inc) x 6 (30)
Round 8 :
1 sc in each st (30). Fasten off leaving long tail for sewing (about 25 cm)
Info :
We use BLO on Round 6 to create a subtle ridge where the stamen will be sewn. If you prefer a flatter center, omit the BLO round and keep rounds even.
— Stamen (make 3; yellow) :
Round 1 :
ch 12, sc in 2nd ch from hook and across (11). Do not join; leave long tail for sewing
Round 2 :
ch 1, turn. 1 sc in each st across (11)
Round 3 :
Repeat Round 2 five more times (11) (you should have 7 rows total including foundation)
Info :
The stamen is worked as a narrow strip to be rolled and sewn into a tubular stalk. Use light stuffing or a thin strand of yarn inside to keep it slightly raised.
Round 4 :
Fold strip lengthwise and sew along long edge with running stitch to form tube; fasten off leaving tail for attaching. Wrap a thin sliver of yarn inside to stabilize if needed.
Round 5 :
For the little pollen buds: make 6 tiny 'knob' beads by ch 3, 4 sc into 2nd ch from hook and join to make small round bulbs. Make 6 per stamen. Fasten off short tails.
Info :
Sew the 6 tiny buds spaced evenly along the outer half of the rolled stamen tube. Use the center disk as an anchor and slightly curve the stamen upward when sewing in place.
— Petal (Make 15 total: 5 petals per flower, 3 flowers) :
Round 1 :
6 sc in magic ring (6)
Round 3 :
(1 sc, 1 inc) x 6 (18)
Round 4 :
(2 sc, 1 inc) x 6 (24)
Round 5 :
(3 sc, 1 inc) x 6 (30)
Round 6 :
1 sc in each st (30)
Info :
From Round 5 we establish a wide oval that will be elongated. Keep tension firm to create structural ribs later.
Round 7 :
Work in BLO: 1 sc in each st BLO (30) to create a foundation ridge for ribbing
Round 8 :
1 sc in each st (30)
Round 9 :
Transition to taller stitches for center ridge: (1 sc, 1 hdc, 1 dc) across in each grouping to create texture; repeat sequence across 10 groups (total stitch equivalents remain proportional to 30)
Info :
Round 9 introduces height differences that will fold the petal slightly inward at the center. Maintain pattern alignment so ribs form down the petal.
Round 10 :
1 sc in each st across (30)
Round 11 :
(4 sc, 1 inc) x 5 (35)
Round 12 :
1 sc in each st (35)
Info :
Round 11 increases the edge count to allow for the petal flare. This beginning of flaring will make petals sit above surrounding leaves.
Round 13 :
1 sc in each st BLO (35)
Round 14 :
(5 sc, 1 inc) x 5 (40)
Round 15 :
1 sc in each st (40)
Info :
Add visible ribbing by working fpdc rows next: this creates the deep channeling seen on the hibiscus petals. The fpdc should be aligned on the 'ribs' every 2-3 stitches.
Round 16 :
Work pattern for ribbing: *fpdc around post of next st, 1 sc in next 2 sts* rep across to end (the total equivalent remains 40)
Round 17 :
1 sc in each st (40)
Round 18 :
(4 sc, 1 dec) x 6 + (2 sc) (34) — shape the tip by decreasing evenly across the final arc; result should be 34 sts
Round 19 :
(3 sc, 1 dec) x 6 + (1 sc) (28)
Info :
Begin light blocking of each petal by pinning to a flat surface, gently shaping the center ridge upward so the petal achieves natural curvature before final attachment. Do not over-stretch; cotton relaxes slightly after blocking.
Round 20 :
(2 sc, 1 dec) x 6 (18)
Round 21 :
(1 sc, 1 dec) x 6 (12)
Round 22 :
6 dec (6). Fasten off leaving long tail for sewing petal to center disk
Info :
Each petal is slightly cupped. When sewing petals to the center disk, place the raw edge under the rim of the center disk so they nest and form a natural flower. Use the long tail to stitch from underside for an invisible join.
— Small Buds (make 6 per flower) :
Round 1 :
mr, 6 sc in ring (6)
Round 3 :
1 sc in each st (12)
Round 4 :
(1 sc, 1 dec) x 4 (8)
Round 5 :
4 dec (4). Fasten off and leave tail for sewing. Make 6 per flower to be placed near petals as filler.
Info :
Small buds add realism to the cluster and are sewn in small groups on the runner near each flower base.
— Large Split Leaf (Monstera-style) (Make 6-8 total) :
Round 1 :
ch 14, sc in 2nd ch from hook and across (13). Turn — treat rows as rounds for consistency.
Round 2 :
ch 1, 1 sc in each st across (13)
Round 3 :
ch 2, turn. 1 hdc in first st, 1 dc in next 3 sts, 1 hdc in next 3 sts, 1 sc in next 3 sts, 1 hdc in last 3 sts (13 index positions maintained for shaping)
Info :
This leaf is worked in short rows and shaped with taller stitches toward the center to create a central midrib and tapering edges. We'll create slits by skipping stitches in later rounds.
Round 4 :
Ch 1, turn. 1 sc across but on the right side of the leaf skip every 3rd stitch to create a slit; across the central region maintain full stitches. The resulting stitch count adjusts: (approx 10-11 effective stitches) — do not be alarmed by the reduced count, this creates the divisions.
Round 5 :
Work evenly back across in sc to realign left edge; if necessary add a few sc increases at the tip to round out shape so the long edge has ~12 visible loops
Round 6 :
Work BLO rib row: 1 sc BLO in each st to create a slightly raised midrib texture across the leaf (12-13)
Round 7 :
Work decorative veins by sewing with a strand of darker green across the leaf in a chevron pattern; alternately use bpdc rows: *bpdc around next 2 sts, 1 sc next 2 sts* rep to end
Round 8 :
Decrease along tip: (1 sc, 1 dec) x 3 resulting in approx (9) stitches; fasten off leaving long tail for attachment
Info :
Monstera slits are made by intentionally skipping stitches and then working back across to anchor the edges. Pin the leaf flat during blocking with the slits opened to emphasize the sculptural cut-outs.
— Small Leaf (Make 12-16) :
Round 1 :
mr, 6 sc in ring (6)
Round 3 :
(2 sc, 1 inc) x 4 (16)
Round 4 :
1 sc in each st (16)
Round 5 :
Work in FLO: 1 sc in each st FLO (16) to create a subtle ridge along one side
Round 6 :
(2 sc, 1 dec) x 4 (12)
Round 7 :
(1 sc, 1 dec) x 4 (8)
Round 8 :
4 dec (4). Fasten off leaving tail for sewing. Block lightly into elliptical leaf shapes before joining.
Info :
Small leaves help fill gaps and give the runner a lush look. Use two shades of green for visual depth; vary placement slightly for a natural effect.
— Fern Frond (Make 4-6) :
Round 1 :
ch 20 (long stem foundation). Row 1: sc in 2nd ch from hook and next 6 ch (7 sc), ch 1 turn
Round 2 :
On right side of stem attach new yarn to form first leaflet: ch 6, sc in 2nd ch from hook and across (5), sl st to next base st on stem. Repeat leaflet every 2-3 foundation chains along the stem until you reach the desired length (approx 7-9 leaflets)
Round 3 :
Work back along the stem on the other side repeating leaflets in mirror image: ch 6, 5 sc, sl st to next base. Fasten off when stem complete and weave ends.
Info :
Fern fronds are delicate fillers. Leave the stem slightly flexible — do not overstiffen. Pin shape gently during blocking to create a graceful arc.
— Connecting Motif: Lace Chain Panels (Make 4 panels) :
Round 1 :
ch 40, sl st to form a long chain loop (40)
Round 2 :
ch 3 (counts as dc), *ch 3, skip 2 ch, dc in next ch* rep across to create mesh (approx 10 dc and 10 ch-3 loops)
Round 3 :
Ch 1, sc in each dc and ch-3 loop across maintaining the mesh and creating solid anchor points for sewing leaves into place. Fasten off leaving long tails.
Info :
These lace chain panels form the base that allows motifs to sit slightly apart while creating a cohesive runner. Size panels to match the distance between large flowers for a balanced composition.
— Edge Trim: Picot Scallop (Optional) :
Round 1 :
With green yarn join along outer edge of assembled runner with sc evenly spaced about every 3-4 mm around the perimeter
Round 2 :
*sc in next 3 sts, ch 3, sl st in 3rd ch from hook (picot made), sc in next 3 sts; rep around to create soft scalloped edge*
Info :
A delicate picot edge frames the runner and hides the joining seams. If you prefer a clean modern edge, omit the picot and simply work a single sc border.
— Final Assembly and Joining :
Info :
Arrange your three flower assemblies and accompanying leaves on a flat surface. Typical order from one end to the other: half-leaf cluster, large flower, lace panel, large leaf, large flower, lace panel, large leaf, large flower, half-leaf cluster. Adjust spacing to fit the table length.
Round 1 :
Pin the center disks to their intended positions on the layout. Use the long tails from centers and petals to sew disk to lace panel or to neighboring leaves using a whip stitch; bring the petal edges under the center disk rim so seams are hidden.
Round 2 :
Sew each petal in order around the center disk so that petals overlap slightly at the base; use even spacing and check symmetry. Reinforce each petal with 6-8 small stitches along the base.
Round 3 :
Attach stamen by inserting the long tail up through the center disk from the underside and positioning the rolled stamen so it curves upward. Sew firmly to center disk and secure tiny pollen buds around the tip of the stamen using small stitches.
Round 4 :
Sew leaves and buds into the lace panels and around flower bases. Use the long tails on leaves and buds for attaching. When sewing leaves that have slits, anchor the inner and outer lobes separately so the leaf holds its cutaway shape.
Round 5 :
Join adjacent lace panels and motifs by sewing along matching anchor points with yarn tail or a thin yarn strand. Use mattress or whip stitch for a flat, invisible seam. Keep joins flexible so the runner relaxes onto the table naturally.
Info :
Work from center outward when sewing motifs together. Periodically lift and view the runner from standing height to ensure balanced composition. Add small filler leaves or fronds to hide visible joins.
Round 6 :
After all pieces are sewn, block the entire runner on a flat surface. Pin edges and steam lightly or mist with water then allow to dry. This opens stitches and helps motifs settle into a cohesive runner shape.
Round 7 :
Finish by weaving all remaining tails into the underside of the runner across several rows to hide them and trim neatly. Optionally add non-slip pads under each major flower to keep the runner in place on smooth tabletops.
Info :
If you desire a longer runner, add additional lace panels and repeat leaf/flower groupings as required. The modular construction makes length adjustments straightforward.
This Red Hibiscus Tropical Table Runner brings exuberant island style into your home with bold, sculpted flowers and lush layered leaves. Each motif is a small piece of wearable art that comes together to make a dramatic table centerpiece. I loved working on the ribbed petals and the way the leaves open into sculptural cutouts—it's a joyful make that dresses any surface with color and texture. Gather your yarn, block your pieces, and enjoy building this bright, customizable runner for summer gatherings and everyday beauty. 🧶🌺