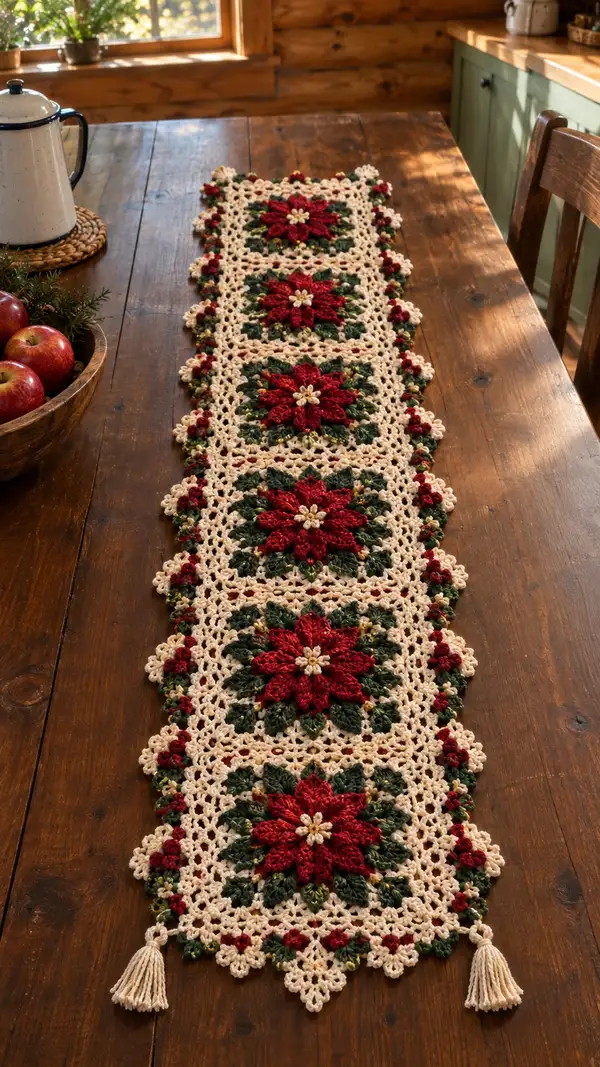
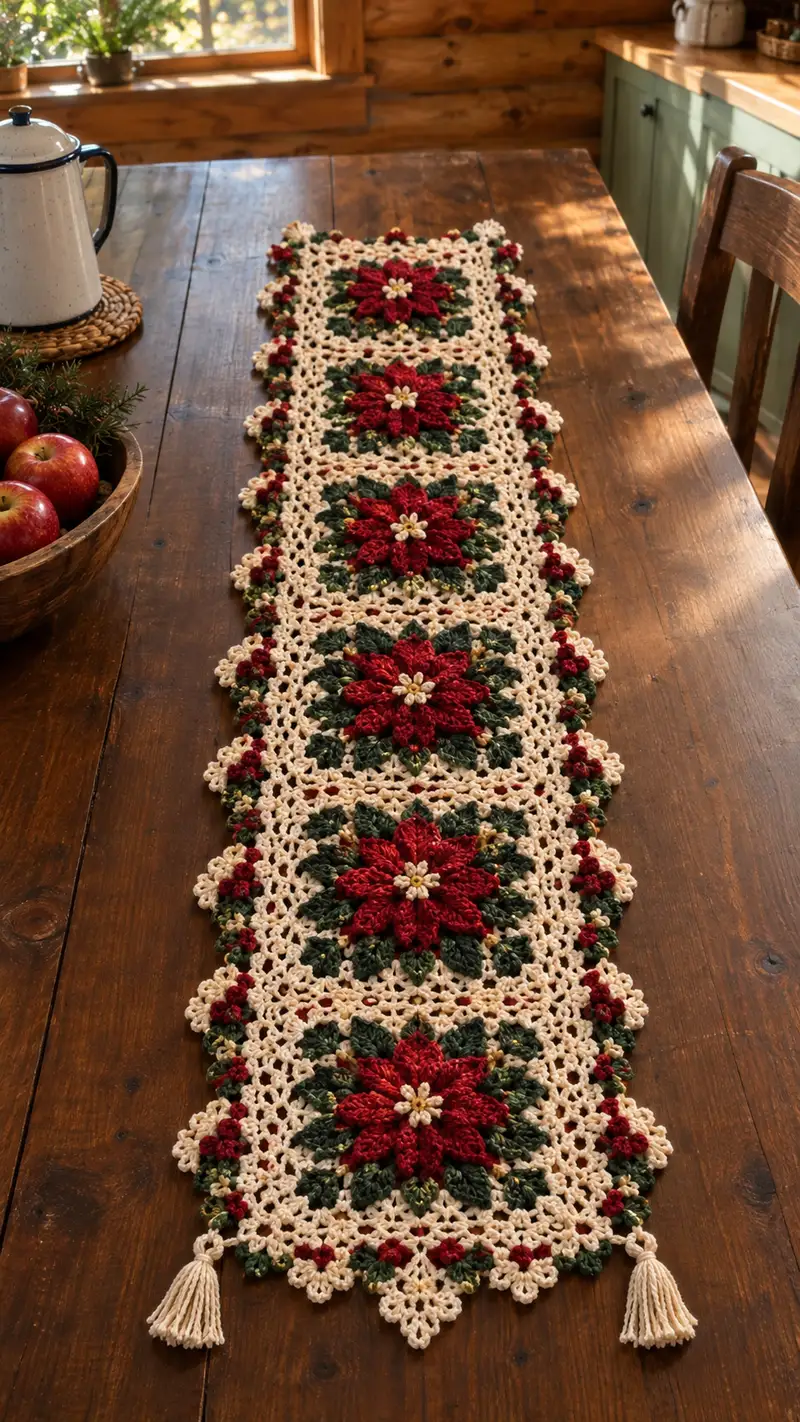
Create a festive, vintage-inspired table runner featuring rich red poinsettia motifs set into a delicate cream lace grid. This pattern uses layered puff petals and textured green leaves, joined into a long runner with scalloped edges and tassels. Perfect for holiday decorating and gift-making, the finished piece brings traditional charm and handmade warmth to any table.
Progress Tracker
0% Complete
— Notes & Gauge :
Info :
This runner is constructed from repeated poinsettia square motifs; each finished square measures approximately 6.5-7.5 inches (16.5-19 cm) before blocking when worked in worsted weight yarn with a 3.5mm hook. Final runner length depends on number of squares joined; the photographed runner uses six motif squares joined end-to-end with tassels to create an elegant centerpiece. Gauge is not critical for aesthetics but keeps motif sizes consistent.
Info :
Special stitches used: puff stitch (puff3 or puff4 specified), 3-tr cluster for raised petals, and join-as-you-go (JAYG) in later rounds. Keep stitch markers handy and work tightly for defined texture. Carry unused colors along the back where possible and weave in ends between rounds to reduce finishing work.
— Poinsettia Center (Round-by-Round) :
Round 1 :
Using Gold/Yellow, ch 4, sl st to first ch to make a small ring. Ch 1, 8 sc into ring and join with sl st to first sc (8)
Round 2 :
Ch 2 (counts as hdc), *hdc in next st; ch 2, sl st into same st to form small petal base* rep around 8 times. End with sl st to top of initial ch-2. (8 petal loops)
Info :
These small loops form the anchor points for the petal layer. Keep tension relaxed here to allow petals to sit smoothly. Change to Red yarn with last sl st if preferred to begin petals seamlessly.
— Petal Foundation (Build out petals) :
Round 3 :
Change to Red. Work into each ch-2 loop: [sl st into loop, ch 3, (puff3) into loop, ch 3, sl st into loop] across each loop to create 8 raised petal bases. After last petal base, join with sl st to start. (8 petals)
Round 4 :
Ch 1, in front loop of each petal base work: sc, (puff4) in same front loop, sc to finish petal. Repeat around for 8 sculpted petals. Join. (8 raised petals)
Round 5 :
Ch 2, into each petal top: 2 dc, ch 2, 2 dc to create a fuller petal shell. Join. (8 petal shells)
Info :
For consistent petal shape, make each puff stitch identical height—yarn over and pull loops to approximately same length before finishing the puff. Use a smaller hook for puffs if you prefer tighter, denser petals (3.25mm).
Round 6 :
Ch 1, sc evenly around petal bases (work 6-8 sc across each petal shell depending on space) to create a roundish motif foundation. Total stitch count expected will be approximately 64-72 depending on scs per petal; keep even distribution. Join. (approx 64-72)
Info :
At the end of this round the central poinsettia cluster is established. Leave a long tail if you prefer to embroider extra center detail later; otherwise weave in ends. The stitch count here will vary slightly depending on puff density—note count for repeat consistency across motifs.
— Outer Petal Layer & Petal Sculpting :
Round 7 :
Change to Red if not already. Ch 3 (counts as dc), *sk 2 sc, (3 dc, ch 2, 3 dc) in next sc (creates a petal point), sk 2 sc, dc into each of next 2 sc* rep around to form larger petal points between inner petals. Join. (8 larger points)
Round 8 :
Ch 1, sc in each stitch around smoothing the transitions, placing 3 sc across each petal point top to create a solid foundation. Expected count around 88-96 depending on earlier counts. Join.
Round 9 :
Ch 2, work 1 hdc in each of next 3 sts, then in the center of each petal point work a cluster: (ch1, [yo, insert, pull up loop] x 3, yo draw through all loops, ch1) to create a decorative raised cluster; follow with hdc across next 3 sts. Repeat around. Join. (clusters=8)
Info :
Round 7-9 add dimensionality to petals and help the poinsettia stand out from the background. Keep petals symmetrical by counting stitches across each petal and adjusting sc/hdc counts as needed to maintain uniform shape.
Round 10 :
Ch 1, sc across all stitches to form an even round. This creates the base to attach leaves in the next section. Expected stitch count 96-104. Join.
— Leaf Foundation (Dark Evergreen layer) :
Info :
Change to Dark Evergreen yarn now. You will work a leaf group between each petal set for 8 leaves total around the motif. Work each leaf into the spaces created by petal shells.
Round 11 :
Ch 1, *skip 4 sc, in next sp work [sl st, ch 3, puff4, ch 3, sl st] to form leaf base* rep around to create 8 leaf anchors. Join. (8 leaf anchors)
Round 12 :
Ch 1, in each leaf anchor work: sc, (hdc, dc, tr, dc, hdc) across the puff area shaping a leaf point, sc to finish. Ensure leaves point outward between petals. Join. (8 leaves)
Round 13 :
Ch 1, sc across entire round incorporating leaves; place 2 sc between leaf clusters to space them evenly. Expected stitch count 100-112. Join.
Info :
For a speckled look, carry a strand of variegated green and occasionally work a sc using both greens held together for several stitches. This creates natural-looking highlights in leaves similar to the photo.
— Leaf Sculpting & Background Transition :
Round 14 :
Ch 2, 1 hdc in each sc across for two rounds to build height around motif (Round 14-15). This evens out the profile and prepares edges for corner shaping. Join. (expected 104)
Round 15 :
Repeat Round 14. Join. (104)
Info :
These rounds act as a buffer so the later square framing sits evenly around the circular/flower center. Keep counts consistent between motifs for easier joining later.
Round 16 :
Change to Cream. Ch 3, *dc in each of next 12 sts, ch 2, sk next 2 sts* rep around to create the beginnings of openwork. Join. (dc blocks x8 with ch-2 spaces)
Round 17 :
Ch 3, dc in each dc across, in each ch-2 space work [2 dc, ch 2, 2 dc] to form 8 corner points. Join. (creates square impression; count increases to approx 136)
Info :
Round 17 begins the conversion from round motif to square motif. The ch-2 corners establish where corners will be built. Check that petal and leaf clusters remain unhindered by these stitches; adjust tension if petals become flattened.
— Square Expansion & Lacy Grid (multiple rounds) :
Round 18 :
Ch 3, dc across to each corner point, at corner work [2 dc, ch 3, 2 dc], continue dc across edges into next corner. Join. (approx 160)
Round 19 :
Ch 1, sc evenly around to define edge. Place 3 sc in each corner chain-3 space. Join. (evening round approx 168)
Round 20 :
Ch 4 (counts as tr), *sk next 3 sts, (tr, ch 1, tr) into next st to form small open arches; ch 2 between arch groups along edges; in corner chain-3 work (tr, ch1, tr, ch1, tr)* rep around to form lacy grid. Join. (decorative arches x8)
Round 21 :
Ch 1, sc across forming small motifs: sc in each stitch and sc in each ch-1 and ch-2 space to fill. Join. (approx 180)
Info :
From Round 18-21 you are creating the square frame and open lattice that will be used later to join squares. Keep the number of dc/tr groups equal on each side of the motif so adjoining squares match up when joined as you go.
Round 22 :
Ch 3, in each small arch work (2 dc, ch2, 2 dc) to create larger mesh spaces; work corners as (2 dc, ch 4, 2 dc). Join. (mesh grid formed; approx 200)
Round 23 :
Ch 1, sc around filling every available space to create a firm but lacy edge. Place picot accent in each corner if you desire: (sc, ch 3, sl st into first ch). Join. (approx 200)
Info :
At this point each square should measure roughly 6.5-7.5 inches. Block each completed motif to square it up and align corners before joining. Blocking will open lace spaces and set petals upright.
— Decorative Square Border (final motif rounds) :
Round 24 :
Ch 1, sc around placing 3 sc in each corner chain-4 to reinforce corners. Join. (approx 208)
Round 25 :
Ch 3, *skip 2 sc, (5 dc shell) in next sc, skip 2 sc, sc in next sc* rep along each side; in corners work extended shell (7 dc) to make a pointy scallop. Join. (scallops across each side)
Info :
Round 25 creates the distinctive cream scalloped edge visible between motifs in the photo. Keep shell counts consistent; the scallop rhythm must match for even joins in the JAYG step.
Round 26 :
Ch 1, sc in each stitch and work a small picot at the top of each shell: (sc, ch 3, sl st into top of same stitch) to create a lacy scallop edge. Join. (approx 220)
Round 27 :
Ch 1, working into each picot space around, sc and add mini clusters of Red and Variegated Green alternately to mimic the small berry clusters that appear between scallops in photo: change to Red, (sc, ch1, sc) in every 3rd picot, return to Cream; change to Variegated Green and work small 3 sc cluster in next picot. Repeat alternating clusters to create decorative spots. Join. (decorative clusters x around)
Info :
This colorwork in Round 27 recreates the tiny red berry & green accent clusters that dot the cream border in the photo. Use Waste yarn or a removable marker to map alternating picots on your first motif if desired, then repeat pattern exactly for each motif to ensure consistent design.
— Repeat Motif Instructions :
Round 28 :
Fasten off and weave in ends for completed motif. Make a total of 6 motifs for photographed runner (adjust motif count to desired length). Block each motif square to exact size before joining. (motifs completed = 1)
Info :
Create as many motifs as needed for your table runner length. Photograph shows six squares joined; a shorter runner could use 3-4 squares or a longer procession 8-10 depending on table size. Keep motif production consistent by using the same hook and yarn throughout.
— Join-As-You-Go (JAYG) Vertical Joining Rounds :
Round 29 :
Lay motif A (finished) with right side up. Place motif B with right side up aligned to one edge where the two squares will meet. Join with Cream using the JAYG method: on motif B, start on the edge corresponding to the join edge. Ch 1, sc in first st, *ch 3, sk 3, sc in next st* across until corner, at corner turn and sl st into corresponding picot/point on motif A to anchor, continue along edge matching spaces. You will work roughly 8-12 anchor points depending on mesh. Join and continue to attach second motif. (edge join completed)
Round 30 :
Continue JAYG for subsequent motifs: always match scallops and picots from the work already joined. When joining, work sc or ch-3 loops into spaces of the new motif, and join with sl st into corresponding stitch or picot on the attached motif. Keep tension gentle to avoid puckering. Join motifs until you have the desired chain of motifs (photo uses 6).
Info :
When joining squares, pin motifs together before working the JAYG to keep edges aligned. Work slowly for the first few joins to train consistent spacing. If your motif sizes vary slightly, adjust by adding or subtracting a sc or ch in one or two spaces to prevent ripples.
Round 31 :
After all motifs joined in a vertical column, fasten off and weave in ends. Press lightly with steam while pinned to lay seams flat. Your runner now looks like a column of square poinsettia motifs with slight gaps filled by lacy joins.
— Runner Outer Border Preparation (stabilize seam and add lace) :
Round 32 :
With Cream, work 1 round sc around entire outside edge of the joined motifs to even the perimeter. In corners place 3 sc in the corner spaces to keep them squared. Join. (sc around runner)
Round 33 :
Ch 3, dc across each side into the spaces created by sc round; on long sides work a repeating pattern: *2 dc, ch 2, 2 dc in next available mesh space, ch 3 between groups* to form long scalloped arches. In short ends mirror pattern to maintain symmetry. Join. (established outer arches)
Info :
Round 33 establishes the outer lace border that visually unifies the runner. Work slowly across the long sides to keep shell spacing consistent. Adjust stitch counts in edge spaces if your motifs were slightly larger or smaller than the sample.
Round 34 :
Ch 1, sc around to anchor outer arches; in each outer ch-2 space work a shell (5 dc) and ch 1 between shells. Place extended shells at the short ends to create points for tassel attachment. Join. (sc around + shells)
Round 35 :
Ch 1, working into each shell top: (sc, ch 3, sc) to create small picot tops along outer border. At short ends leave a small triangular point made of three shells; these will be the tassel anchor points. Join. (picot tops formed)
Info :
The outer border should be lacy but stable; if it feels too floppy, add an extra sc round before creating picot tops to firm it up. Blocking at this stage will open the lace and set the scallops evenly.
— Decorative Accent Rounds (tiny flower/berry clusters on border) :
Round 36 :
Change to Red and Variegated Green alternately. Working into every 3rd picot along the long sides, make small clusters to match the join motifs: with Red, ch1, make 3 sc cluster in picot space; skip one picot and make a Variegated Green 3 sc cluster; repeat alternately. This creates the dotted berry motif spaced along runner. Join.
Round 37 :
Change back to Cream. Work a final sc round around entire runner, weaving in and securing ends of colored clusters as you go. This secures decorative accents into the lace. Join. (final seaming round)
Info :
These tiny clusters echo the decorative clusters found between motifs in the photo and add a handcrafted rhythm to the length of the runner. Be consistent with spacing to maintain an even look.
— Final Scalloped Edge & Point Detail (finish outer edge) :
Round 38 :
Ch 1, sc in each stitch around. At every shell top work (ch 3, sl st into top of shell) to create a pointed lace tip. On short ends, emphasize triangular points by working extra picots. Join. (edge pointed)
Round 39 :
Ch 1, in each ch-3 tip work (sc, ch 3, sc) then in next two stitches sc firmly. This creates tiny framed picots for a vintage look. Fasten off leaving long tails for weaving. (edge completed)
Info :
After completing Round 39, block the entire runner gently to open the lace and set the shape. Use rust-proof pins and a steam iron or water spray; allow to dry completely before adding tassels.
— Tassel Assembly & Attachment :
Round 40 :
Make 2 tassels (one for each end) using Cream yarn. Wrap yarn around a 3 inch (7.5 cm) template 30-40 times for a medium-thick tassel. Tie yarn tightly at top, cut bottom loop, trim ends to even length (~2.5-3 inches). Create a decorative wrap with a small piece of Red yarn and secure with a knot and a small dab of fabric glue if desired.
Round 41 :
Attach tassels to the triangular point at each short end: fold loop of tassel and insert knot under several stitches at the tip, then pull loop through and pass tassel body through loop, tightening to form a lark's head hitch. Repeat for second tassel. Secure with a few invisible whip stitches and weave in ends. (tassels attached)
Info :
Trim tassels evenly and optionally comb them lightly for a soft look. If you prefer longer tassels, wrap more yarn for each tassel. Two tassels in the photograph complete the classic runner look.
— Blocking & Final Finishing :
Round 42 :
Pin runner to blocking board, stretching gently to even out scallops and align motifs. Focus on corners and outer scallops. Mist lightly with water or use a steam iron about 1-2 inches above fabric to set shape. Allow runner to dry completely before removing pins. (blocked runner)
Round 43 :
Weave in all remaining tails on the back of the runner with a yarn needle, trimming close to fabric. Inspect runner for loose floats or carried yarn showing on right side; tuck or weave into the back as needed for a neat finish. (finishing complete)
Info :
Final inspection: ensure tassels are symmetrical and firmly attached, check scallop spacing and re-block any sections that seem uneven. Press lightly if needed and display your runner centered on a dining or console table for best effect.
Completing this Red Poinsettia Cream Lace Table Runner brings a timeless holiday centerpiece to your table! The raised poinsettia petals, textured evergreen leaves, and delicate cream lace border combine to create a festive, heirloom-quality runner you can cherish or gift. Each motif is a small project in itself, and joining them into a long runner gives you a satisfying progression of progress. Enjoy blocking and finishing—those final touches really bring the design to life. 🧶🌟