🧢 Beautiful ✨ Detailed πŸ’ Adorable

Small Green Demon Dragon with Little Bat Wings Amigurumi Pattern

Small Green Demon Dragon with Little Bat Wings Amigurumi Pattern
4.4β˜… Rating
3-5 Hours Time Needed
3.3K Made This
βœ‚οΈ

Intermediate Level

Ideal for those with basic crochet experience, featuring slightly more advanced stitches and techniques to expand your skills.

⏱️

Afternoon Project

Takes 3-5 hours, perfect for an afternoon or evening of relaxing crochet.

🐰

Whimsical Buddy

Playful characters full of personality, designed to spark imagination and become cherished playtime favorites.

🧢 Jump to Pattern ↓

About This Small Green Demon Dragon with Little Bat Wings Amigurumi Pattern

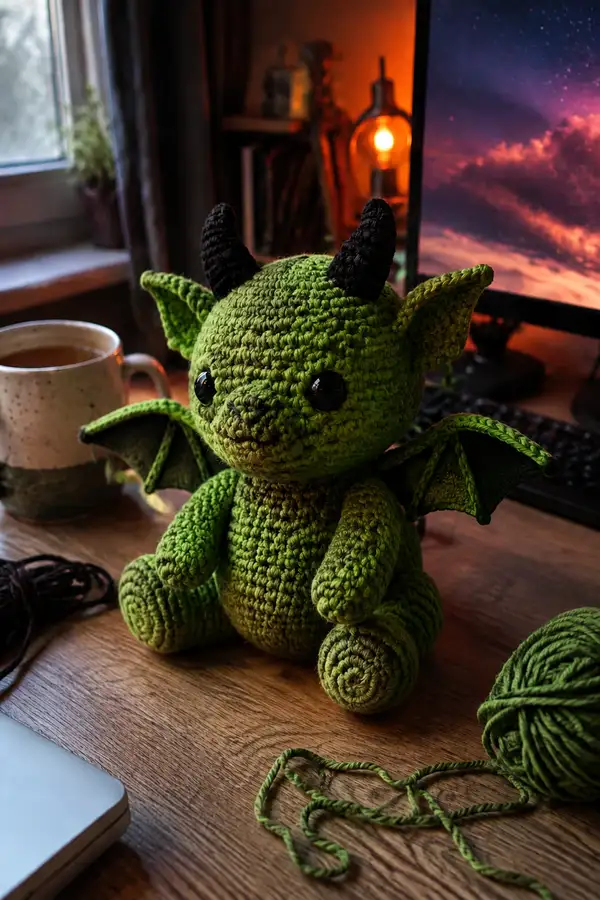
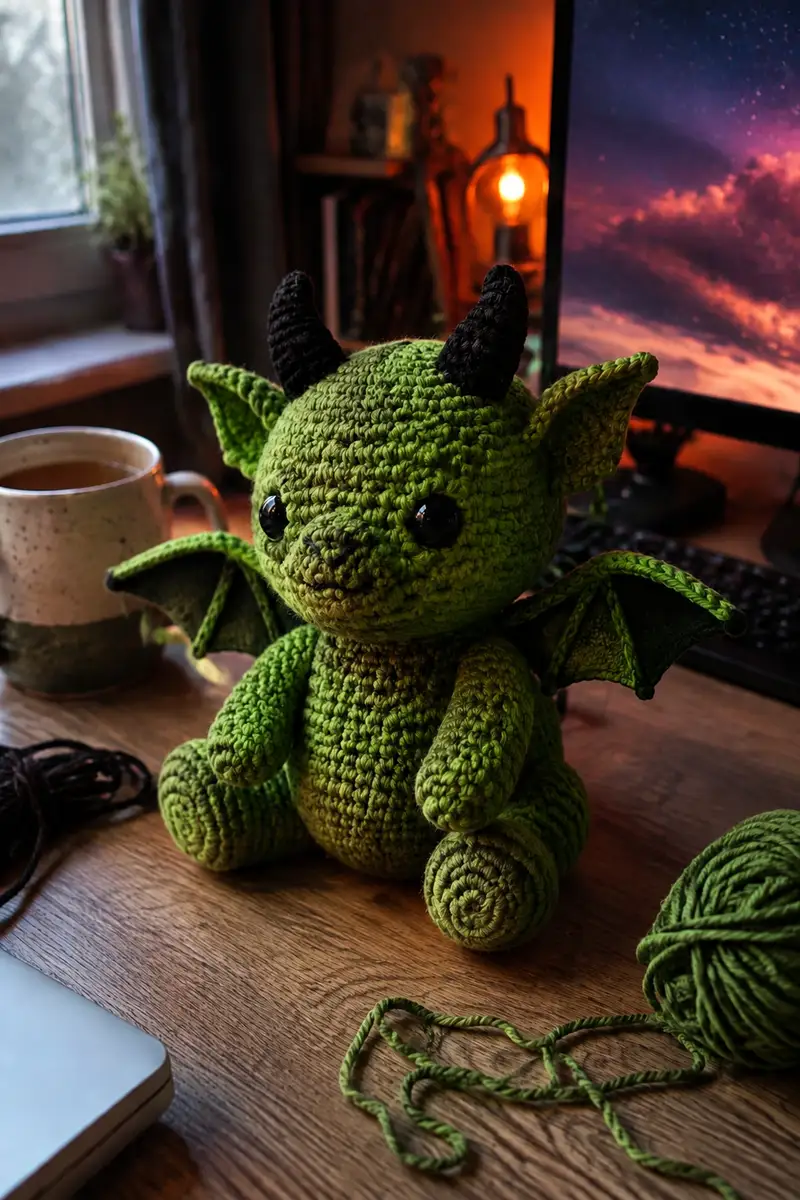
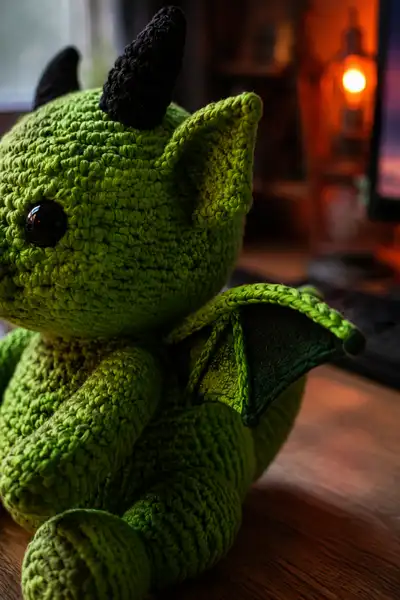
This pattern recreates a small, friendly demon-dragon amigurumi with a rounded head, plump body, short limbs, pointy ears and two spiraled black horns. The wings are bat-style with a darker inner membrane (felt or fabric) edged with a crocheted ridge to give structure. The finished doll features glossy safety eyes and embroidered nose details to add expression. The style is kawaii-inspired with gently exaggerated head-to-body proportions for maximum charm.

Small Green Demon Dragon with Little Bat Wings Amigurumi Pattern crochet pattern - detailed view of completed project

The design uses worsted weight yarn and simple shaping techniques to achieve smooth, rounded forms and defined wing structure. Instructions include detailed round-by-round counts, stuffing tips, and clear assembly notes so you can recreate the exact look shown.

Why You'll Love This Small Green Demon Dragon with Little Bat Wings Amigurumi Pattern

I love this little demon dragon because it balances cute and mischievous β€” the oversized head, shiny eyes and tiny bat wings give it so much personality. The neat ridges on the horns and the fabric-lined wings add professional-looking detail without complicated techniques. I also enjoy that it’s compact enough to finish in an afternoon yet layered with shaping challenges that feel satisfying to complete.

Small Green Demon Dragon with Little Bat Wings Amigurumi Pattern step 1 - construction progress Small Green Demon Dragon with Little Bat Wings Amigurumi Pattern step 2 - assembly progress Small Green Demon Dragon with Little Bat Wings Amigurumi Pattern step 3 - details and accessories Small Green Demon Dragon with Little Bat Wings Amigurumi Pattern step 4 - final assembly and finishing

Switch Things Up

I absolutely love how this pattern invites personalization β€” you can change colorways to make seasonal dragons or tiny guardians in jewel tones. Swapping the inner wing felt color or using variegated yarn for the body creates hugely different vibes.

I also enjoy tweaking proportions: use fewer increase rounds at the chest for a smaller torso or add extra even rounds to make a plumper body. For a fiercer look, make the horns longer or embroider tiny teeth; for a softer look, reduce horn size and use smaller eyes.

Finally, try adding accessories β€” a tiny scarf, a felt cape, or even miniature scales using surface crochet. I often add a little collar or bell for gifts; it transforms a standard amigurumi into a cherished keepsake.

Common Mistakes & How to Fix Them

βœ— Skipping stitch markers at round starts can cause misaligned features and uneven shaping; always mark your first stitch of each round βœ— Using yarn that is too soft or fluffy can make small details like horns and wing edges floppy; choose a smooth, sturdy worsted yarn βœ— Not stuffing gradually as you work causes difficulty reaching small areas later; stuff small amounts often for even firmness βœ— Placing safety eyes after too many rounds of stuffing can shift fabric; secure eyes between the recommended rounds and before final stuffing βœ— Forgetting to close small openings neatly creates visible gaps; finish with mattress or ladder stitch and weave in tails deeply βœ— Ignoring tension changes when switching hooks results in mismatched part sizes; use consistent tension or adjust hook sizes when changing yarn βœ— Sewing pieces without pinning first can lead to asymmetry; pin parts repeatedly and check front view before final stitching βœ— Overstuffing limbs creates visible lumps and makes sewing difficult; feet and hands should be firmer than arms and legs, but avoid overpacking

Small Green Demon Dragon with Little Bat Wings Amigurumi Pattern

Make a charming small green demon dragon amigurumi with little bat-style wings, pointy black horns, floppy ears and a cuddly rounded body. This pattern recreates the plush shown β€” olive-green yarn, shiny safety eyes and darker inner wing detail. Perfect for gifting or keeping on your desk as a whimsical companion with plenty of shaping and assembly guidance.

Intermediate 3-5 Hours

Materials Needed for Small Green Demon Dragon with Little Bat Wings Amigurumi Pattern

β€” Main Fabric

  • 01
    Worsted weight yarn (#4), approximately 120-150g in main green color (olive/bright grass green as seen)
  • 02
    40-50g in darker green for contrast (inner wing membrane edging and belly shading if desired)
  • 03
    20-30g black yarn for horns and small details
  • 04
    Small scraps (10-15g) of very dark green or black for nostrils/embroidery
  • 05
    Optional: one small oval of dark green felt (approx 10x10cm) for wing membrane lining

β€” Tools Required

  • 01
    3.5mm (E) crochet hook for main work (or size to obtain gauge with worsted yarn)
  • 02
    3.0mm (D) hook for tighter small parts and horns (optional)
  • 03
    2.75mm (C) hook for very tight stuffing points (optional)
  • 04
    8-12mm safety eyes (12mm used in pictured version) with washers
  • 05
    Polyester fiberfill stuffing
  • 06
    Yarn needle for sewing and embroidery
  • 07
    Stitch markers (at least 4)
  • 08
    Scissors
  • 09
    Pins for assembly and positioning
  • 10
    Optional: thin floral wire or pipe cleaner for wing structure
  • 11
    Optional: small piece of felt or fabric for wing membrane and fabric glue or hot glue for attaching

Progress Tracker

0% Complete

β€” Head :

Round 1 :

6 sc in magic ring (6)

Round 2 :

6 inc (12)

Round 3 :

(1 sc, 1 inc) x 6 (18)

Round 4 :

(2 sc, 1 inc) x 6 (24)

Round 5 :

(3 sc, 1 inc) x 6 (30)

Round 6 :

(4 sc, 1 inc) x 6 (36)

Round 7 :

(5 sc, 1 inc) x 6 (42)

Round 8 :

(6 sc, 1 inc) x 6 (48)

Round 9-20 :

1 sc in each st (48)

Info :

Place safety eyes between rounds 13-14, approximately 9-11 stitches apart depending on desired expression. For the look in the photo place eyes between rounds 14 and 15 and measure roughly 10 sts between centers (adjust if using different-sized eyes).

Round 21 :

(6 sc, 1 dec) x 6 (42)

Round 22 :

(5 sc, 1 dec) x 6 (36)

Round 23 :

(4 sc, 1 dec) x 6 (30)

Info :

Begin light stuffing now. Use small amounts of fiberfill pressed into the crown and sides to maintain a rounded top but leave chest area less stuffed for easier neck join. Maintain smooth, even pressure so stitches do not bulge.

Round 24 :

(3 sc, 1 dec) x 6 (24)

Round 25 :

(2 sc, 1 dec) x 6 (18)

Round 26 :

(1 sc, 1 dec) x 6 (12)

Info :

Increase stuffing firmness as you approach the neck so the head keeps its domed shape when joined. Use a blunt-ended stuffing tool or the handle of a crochet hook to push fill into small cavities.

Round 27-29 :

1 sc in each st (12)

Round 30 :

Fasten off leaving a long tail for sewing (do not close completely). The 12-st tube is your neck β€” leave long tail for sewing to body.

Info :

Embroider the small nostril marks and mouth now before final assembly if you prefer; use dark green or black yarn with a yarn needle and small satin stitches. Doing facial embroidery before complete closure makes tension easier to control.

β€” Muzzle / Snout (optional, sew to head front) :

Round 1 :

6 sc in magic ring (6)

Round 2 :

6 inc (12)

Round 3 :

(1 sc, 1 inc) x 6 (18)

Round 4-6 :

1 sc in each st (18)

Round 7 :

(1 sc, 1 dec) x 6 (12)

Round 8 :

1 sc in each st (12)

Info :

Stuff muzzle lightly and shape with fingers so it sits slightly proud of the head. Sew centered below eyes using the long tail left when fastening off. The muzzle in the photo is low-profile and sculpted directly into the face instead of a large protruding snout.

β€” Body :

Round 1 :

6 sc in magic ring (6)

Round 2 :

6 inc (12)

Round 3 :

(1 sc, 1 inc) x 6 (18)

Round 4 :

(2 sc, 1 inc) x 6 (24)

Round 5 :

(3 sc, 1 inc) x 6 (30)

Round 6 :

(4 sc, 1 inc) x 6 (36)

Round 7-12 :

1 sc in each st (36)

Round 13 :

6 inc evenly around (42)

Round 14-18 :

1 sc in each st (42)

Info :

If you want a slightly longer body or a chubbier belly mimic the photo by adding 2-4 extra even rounds here before beginning decreases. Carry any color changes internally or change yarn for belly panel now.

Round 19 :

(5 sc, 1 dec) x 6 (36)

Round 20 :

(4 sc, 1 dec) x 6 (30)

Info :

Begin stuffing the lower body moderately firm. The pictured dragon has a squat seated pose so the bottom needs a firm base; stuff firmly but not over-packed to allow sewing of legs.

Round 21-24 :

1 sc in each st (30)

Round 25 :

(3 sc, 1 dec) x 6 (24)

Round 26 :

(2 sc, 1 dec) x 6 (18)

Round 27 :

(1 sc, 1 dec) x 6 (12)

Round 28-30 :

1 sc in each st (12) β€” neck tube for sewing to head

Info :

Leave the top of the neck opening wide enough to insert the head neck tube. Use a locking stitch marker to identify front center of the body for symmetrical head alignment when sewing.

β€” Right Arm (make 2) :

Round 1 :

6 sc in magic ring (6)

Round 2 :

6 inc (12)

Round 3 :

(1 sc, 1 inc) x 6 (18)

Round 4-6 :

1 sc in each st (18)

Info :

Stuff the hand portion a bit firmer than the rest of the arm. Use small amounts of fiberfill pushed to the tip for a rounded end that looks like the photographic arms.

Round 7 :

(2 sc, 1 dec) x 6 (12)

Round 8-12 :

1 sc in each st (12)

Info :

For a natural arm curve you can stuff slightly more toward one side and shape with fingers. If you want poseable arms, insert thin floral wire lengthwise before closing, leaving ends folded down into body when attached.

Round 13 :

(1 sc, 1 dec) x 4 then 4 sc (8) β€” (Work dec 4 times evenly, finish remaining stitches)

Round 14-16 :

1 sc in each st (8)

Round 17 :

4 dec (4)

Round 18 :

Fasten off leaving long tail for sewing. Stuff lightly the arm length but keep the proximal end less firm to allow a neat seam.

Info :

Sew arms to the body at approximately body rounds 20-22 on either side of the front center. Pin and check symmetry before sewing permanently; the pictured dragon has slightly forward-facing arms.

β€” Left Arm :

Work identical to Right Arm :

Follow Rounds 1-18 above for the second arm. Mirror placement when sewing to the body for symmetrical result.

β€” Right Leg (make 2) :

Round 1 :

6 sc in magic ring (6)

Round 2 :

6 inc (12)

Round 3 :

(1 sc, 1 inc) x 6 (18)

Round 4 :

(2 sc, 1 inc) x 6 (24)

Round 5 :

(3 sc, 1 inc) x 6 (30)

Round 6-8 :

1 sc in each st (30)

Round 9 :

6 inc evenly around (36)

Round 10-13 :

1 sc in each st (36)

Round 14 :

(4 sc, 1 dec) x 6 (30)

Round 15 :

(3 sc, 1 dec) x 6 (24)

Info :

Stuff the foot firmly, focusing on the sole and toe area to create a flat base for the seated pose. Shape the foot so the dragon sits upright on the desk as in the photos.

Round 16-19 :

1 sc in each st (24)

Round 20 :

(2 sc, 1 dec) x 6 (18)

Round 21 :

(1 sc, 1 dec) x 6 (12)

Round 22 :

Fasten off leaving long tail for sewing. The 12-st tube will be used to attach legs to the lower body; stuff leg to be firm but allow flexible join.

β€” Left Leg :

Work identical to Right Leg :

Follow Rounds 1-22 above for the second leg. Make sure both legs are stuffed and sewn in the same orientation for symmetry.

β€” Ears (make 2) :

Round 1 :

6 sc in magic ring (6)

Round 2 :

6 inc (12)

Round 3 :

(1 sc, 1 inc) x 6 (18)

Round 4 :

1 sc in each st (18)

Round 5 :

(3 sc, 1 dec) x 4 + 2 sc (14) β€” shape base of ear

Round 6 :

1 sc in each st FLO (14) β€” foldable ridge

Round 7 :

(2 sc, 1 dec) x 3 + 2 sc (11)

Round 8 :

1 sc in each st (11)

Round 9 :

(1 sc, 1 dec) x 3 + 2 sc (8)

Round 10 :

Fasten off leaving long tail for sewing. Fold ear slightly along FLO ridge to create the cupped ear shape before attaching.

Info :

Pin ears to the head at rounds 8-10 spaced about 14-16 stitches apart (measure on your head placement) and angle slightly forward as in the photo to give expression.

β€” Horns (make 2) :

Round 1 :

6 sc in magic ring using black yarn (6)

Round 2 :

6 inc (12)

Round 3 :

(1 sc, 1 inc) x 6 (18)

Round 4-6 :

1 sc in each st (18)

Round 7 :

(2 sc, 1 dec) x 6 (12)

Round 8 :

(1 sc, 1 dec) x 6 (8)

Round 9 :

4 dec (4)

Round 10 :

Fasten off leaving long tail. Insert a small amount of stuffing and shape into a tapered cone; the horns in the photo are spiral-textured β€” you can create that by working spirals or surface slip stitches after attaching if desired.

Info :

When attaching horns, position them toward the top/back of the head with about 6-8 stitches between base points so they angle slightly inward. If you want ridged horns, run a thin contrasting yarn with surface loops around the cone after sewing.

β€” Wing Skeleton (outer ridge) (make 2) :

Round 1 :

6 sc in magic ring (6)

Round 2 :

6 inc (12)

Round 3 :

(1 sc, 1 inc) x 6 (18)

Round 4 :

(2 sc, 1 inc) x 6 (24)

Round 5 :

1 sc in each st BLO for a crisp ridge (24)

Round 6 :

1 sc in each st (24)

Round 7 :

(3 sc, 1 dec) x 6 (18)

Round 8 :

(2 sc, 1 dec) x 6 (12)

Round 9 :

Fasten off leaving long tail for sewing. This ridge forms the outer wing edge that will be sewn around the membrane.

Info :

Optionally insert thin floral wire along this ridge before final sewing to create poseable wings. Wrap wire ends and hide them inside the body later where you secure the wing join to prevent any sharp ends.

β€” Wing Membrane (make 2) :

Preparation :

Cut a teardrop/triangle shape from dark green felt approximately 9cm x 6cm to match the crochet ridge. You will edge this with your crocheted wing skeleton so it looks like the photo (darker inner membrane).

Round 1 :

With main green yarn, sl st around the edge of the felt, placing approx 10-12 slip stitches along each long side and 6 along the curved base, pulling yarn snug but not causing felt to pucker.

Round 2 :

Work 1 sc in each sl st around to create a crochet border (approx 28-30 sts depending on felt shape)

Round 3 :

Attach outer ridge to this border by sewing with mattress stitch or whip stitch through the back loops of the ridge and the crochet border around the felt to create a neat, visible seam.

Info :

If you prefer fully crochet wings instead of felt, make a shallow triangle with 1 sc rows and use BLO on the edge to create the ridge. Felt gives the crisp contrast seen in the photograph and is fast to execute.

Round 4 :

Edge final pass: sl st evenly around entire wing to tighten join and hide sewing knots. Fasten off and leave long tail for wing-to-body attachment.

β€” Tail (optional) :

Round 1 :

6 sc in magic ring (6)

Round 2 :

6 inc (12)

Round 3-6 :

1 sc in each st (12)

Round 7 :

(2 sc, 1 dec) x 3 (9)

Round 8 :

(1 sc, 1 dec) x 3 (6)

Round 9-12 :

1 sc in each st until desired tail length (6). Fasten off leaving long tail for sewing; stuff lightly and shape to a slight curve.

Info :

Sew tail to the center back of body at round 8-10. For the seated look, curve the tail slightly to one side before securing so it sits naturally.

β€” Finishing & Surface Embroidery :

Info :

Use small satin stitches in dark yarn to add nostrils, mouth lines and small cheek accents. The dragon in the photo has subtle, small nostrils and a short, downward-turned smile. Embroider before final secure sewing if possible.

Info :

Weave in all tails on the wrong side and use matching yarn for seams to keep them invisible. For glossy eyes, attach washers securely and place extra glue inside the head if the amigurumi will be handled frequently (not recommended for items for small children).

Info :

Optional: use a very small amount of watered-down brown paint or pastel chalk to add tiny shading around the eye sockets and on the belly for subtle depth. Seal any paint with a fabric-safe mat sealer.

Assembly Instructions

  • Attach head to body by inserting the neck tube of the head into the neck opening of the body (body rounds 28-30). Pin in place first, matching front center of head to front center marker on body, then sew with a ladder stitch all around using the long tail from the body
  • Pin arms to the sides at approximately body rounds 20-22 and seam using an invisible (whip or ladder) stitch through both arm and body. Make sure the arm seam is flush with the body so the stuffed shape sits naturally
  • Sew legs to the lower body at the widest part of the base (body rounds 6-10 depending on how many increase rounds you followed). Space legs evenly and check that the creature sits stably; add extra stitches at the base for reinforcement
  • Position ears on the top sides of the head at head rounds 8-10; angle them slightly forward and sew through the base with small stitches. Fold along the FLO ridge before final stitching to give the ear the cupped shape
  • Sew horns at the top-back of the head with the bases about 6-8 stitches apart. Use hidden stitches around the horn base and add a dab of glue inside if you need extra security
  • Attach wings to the back at the shoulder area (body rounds 10-14). Pin with the wing seam centered on the back so wings sit symmetrically; sew through crochet ridge and the body with strong sewing yarn. Insert wire if using for poseability and hide wire ends inside body
  • Sew tail to the back center (body rounds 8-10). Curve and position before final stitching to match the seated posture
  • Secure all loose ends by weaving them through several stitches inside the body and trimming close. Check for any gaps and reinforce seams as needed

Important Notes

  • πŸ’‘Use stitch markers consistently at the beginning of each round to avoid counting errors and maintain proper shaping
  • πŸ’‘Stuff body parts gradually as you work rather than waiting until the end, especially for narrow openings like arms and legs
  • πŸ’‘For safety eyes, position and secure before stuffing head fully - they cannot be repositioned once locked in place
  • πŸ’‘Maintain consistent tension throughout the project; too tight creates stiff, small pieces, too loose creates floppy, holey fabric
  • πŸ’‘When sewing pieces together, use yarn slightly thinner than working yarn for neater, less visible seams
  • πŸ’‘Pin all pieces in position before final sewing to ensure proper placement and symmetry
  • πŸ’‘For amigurumi, work tightly enough that stuffing doesn't show through stitches; if holes appear, reduce hook size
  • πŸ’‘If adding wire to wings or limbs, ensure ends are folded and secured to avoid any sharp edges

This adorable small green demon dragon is a delightful blend of mischief and charm β€” perfect for a quirky desk buddy or a handmade gift. The detailed rounds and assembly guidance help bring each feature to life, from the spiral horns to the fabric-lined wings. Enjoy the satisfying process of stitching, stuffing, and sewing your own tiny dragon friend. Share your finished creation and smile at every little characterful detail you made. πŸ‰πŸ§Ά

You ask,

we answer.

FAQs

What is the finished size of this amigurumi?

Based on the specified materials and hooks, the finished piece will measure approximately 22-28 cm (8.5-11 inches) tall when seated. Using thicker yarn and a larger hook will increase size proportionally.

Can I use different yarn weights for this pattern?

Yes! You can use any yarn weight, but adjust hook size accordingly (generally 1-2 sizes smaller than yarn recommendation for tight amigurumi fabric). Different weights will change final size and required stuffing.

Do I need to use safety eyes or can I embroider them?

Both options work well. Safety eyes give a glossy professional look and are secure for decorative pieces. Embroidered eyes are safer for toys intended for small children and allow more expressive customization.

How much stuffing will I need?

For this size project, approximately 50-80 grams of polyester fiberfill should be sufficient. Stuff firmly but not overly tight, allowing the piece to maintain its curve while still cuddly.

Can I make the arms and legs poseable?

Absolutely. Insert thin floral wire or pipe cleaners into limbs before stuffing. Bend wire ends and fold them inside the body before sewing to secure. For wings, wire along the outer ridge gives excellent poseability.

What if my stitch count is off?

If you notice a counting error, unpack back to the last correct round and re-work from there. Trying to compensate later usually distorts shaping. Use stitch markers and a row counter to avoid losing place.

How do I prevent holes when stuffing?

Work with tight, consistent tension and use an appropriately small hook. Stuff in small amounts and compress the fill into corners and small parts using a blunt tool rather than forcefully stuffing large amounts at once.

Can I customize colors and features?

Definitely! Change yarn colors for the body, wing membrane, horns, or belly. Add embroidery, accessories, or different eye sizes for unique personalities while following the basic structural rounds.