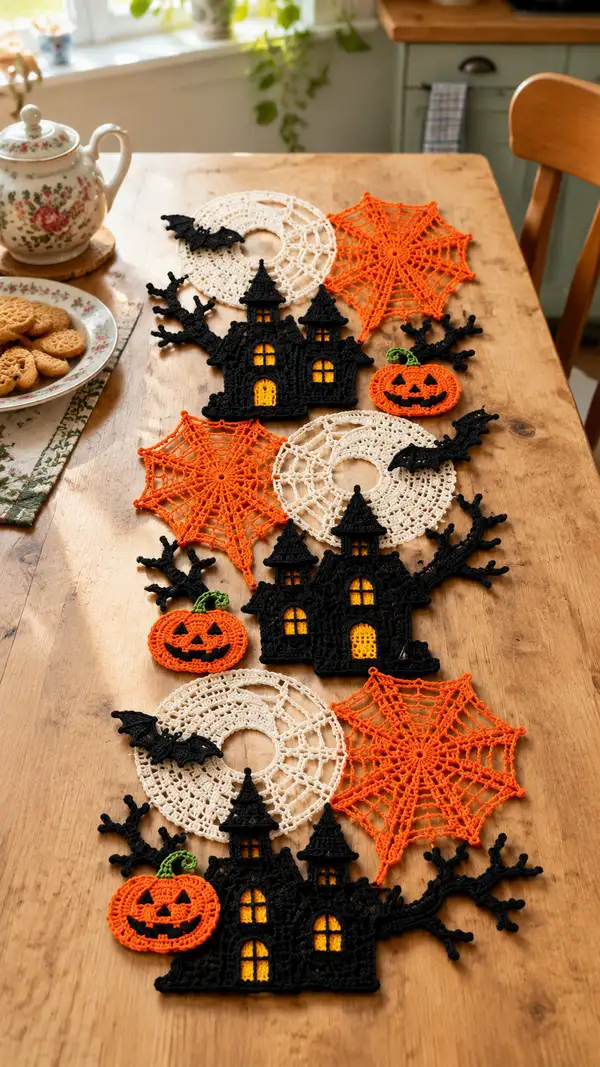
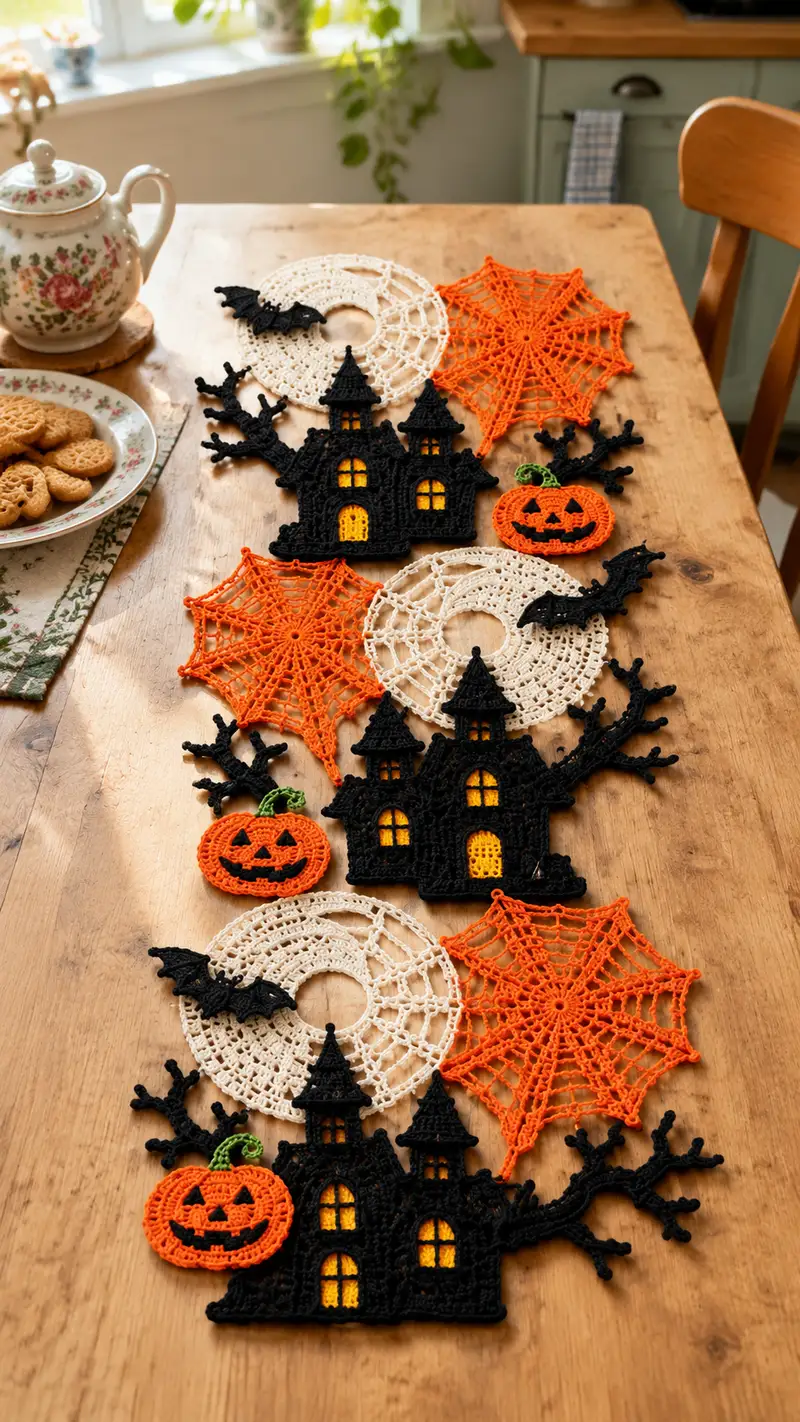
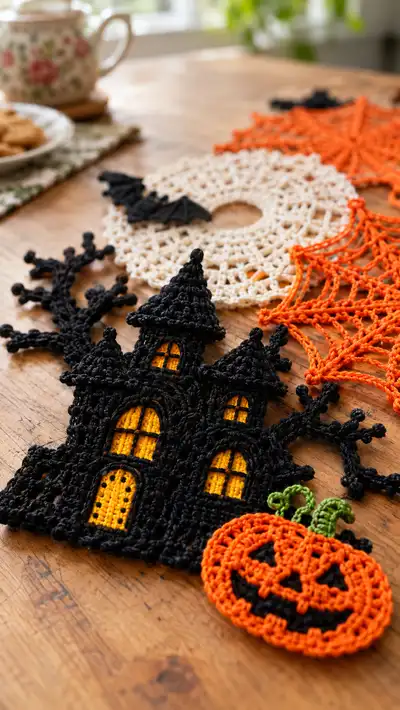
Create a charming Halloween table runner composed of crochet motifs: haunted houses with glowing windows, jack-o-lanterns, spiderwebs, lace rings and little bats. This pattern shows how to make each motif in crisp black, orange, cream and a pop of yellow and green to assemble into a runner. Worked with fine cotton thread and a small hook, these flat motifs are perfect for decorating a table or layering under candles and teapots for seasonal charm.
Progress Tracker
0% Complete
— Materials & Gauge :
Info :
Use size 10 cotton thread and a 1.75mm hook for crisp motifs. Gauge is not critical for motif scale, but 1 round spiderweb measures about 11-12cm across with this hook and thread. Block motifs lightly after finishing for even, flat shapes.
— Notes :
Info :
Work motifs flat in rounds or rows as indicated. All motifs are worked right-side facing unless stated. Join and finish ends neatly. Use blocking to open lace stitches for a professional finish. Where repeats are given, check stitch counts at the end of each round to maintain shape.
— Haunted House Main Panel (Make 1) :
Round 1 :
Ch 42, join with sl st to form a ring (do not twist). This ring is the starting base for working rounds back and forth around to create the house foundation (42 ch)
Round 2 :
Work 1 sc in each ch around, join with sl st to first sc (42)
Round 3 :
Ch1, 1 sc in same st, 1 sc in next 20 sts, hdc in next 2 sts, 2 dc in each of next 4 sts for a slight bulge (creates window arch bases), 1 hdc in next 2 sts, 1 sc in next 13 sts, join (42)
Info :
This early shaping places gentle bulges where windows and door will be placed. Mark central stitches where the door will sit; you will open a doorway later by creating an arch with dc clusters.
Round 4 :
Ch1, 1 sc in each st around working 3 sc across each of the small dc clusters created previously to flatten them (42)
Round 5 :
Ch3 (counts as dc), dc in same st, sk1, (dc, ch1, dc) in next st, sk1, dc in each of next 6 sts, (dc, ch1, dc) in next st, sk1, dc in each st to end, join (pattern creates decorative openings) (42)
Info :
Use this round to define window openings: the (dc,ch1,dc) picot-style cluster makes small open arches which will later be edged or backed with yellow window insets.
Round 6 :
Ch1, sc in each st and in each ch-1 space around to tidy openings (42)
Round 7 :
Ch1, (2 sc in next st, sc in next 5) x 6 (48)
Round 8 :
1 sc in each st around (48)
Round 9 :
Ch1, (sc in next 7, 2 sc in next) x 6 (54)
Info :
Rnds 7-9 widen the lower base slightly to give the house a decorative skirt and a stable bottom for later branch and pumpkin attachments.
Round 10 :
1 sc in each st around (54)
Round 11 :
Ch2 (counts as hdc), hdc in next 6 sts, (hdc in next 2, ch2, skip 1) x 6 creating six small open spaces that will be trimmed into window frames later, hdc in remaining to end, join (54)
Round 12 :
Ch1, sc in each st and in ch-2 spaces around to tidy (54)
Round 13 :
Ch1, 1 sc in next 8, dec over next 2 sts, 1 sc in next 6, (dec over next 2 sts, 1 sc in next 6) x 6 (48)
Info :
Begin shaping inward for the mid-wall. If your house silhouette looks too tall, stop decreases one round sooner; the following rounds create upper wall details and tower join points.
Round 14 :
1 sc in each st around (48)
Round 15 :
Ch3, (dc in next 3, ch2, sk2) x 8 forming vertical ribbed panels that will echo window spokes, join (48)
Round 16 :
Ch1, sc in each st and in ch-2 spaces to stabilize pattern (48)
Round 17 :
Ch1, (sc in next 5, dec) x 6 (42)
Round 18 :
1 sc in each st around (42)
Info :
At the end of round 18 stop: this is the top of the main rectangular wall. You will attach tower bases and roofs in subsequent sections. Block this panel flat and mark positions for tower joins and branch attachment points using pins.
Round 19 :
Ch1, sc around the top edge working 3 sc in each corner point (if any) to create a firm top edge for sewing towers (42)
Round 20 :
Sl st to turn, ch1, 10 sc centered for doorway base starting at mark, turn work to form arch rows (10)
Round 21 :
Working back and forth along the 10 sts: ch1, sc across, turn (10)
Round 22 :
Ch3, dc across the 10 sts to build arch height, make dc clusters to round the arch ends, fasten off and weave ends leaving tail for sewing (10)
Info :
Sew the rectangular arch into place on the main panel using the long tail. You will later edge the arch with a decorative row to define the door. Back the opening with yellow inset if you want the glowing effect.
Round 23 :
Edge the entire panel with 1 sc in each st, (picot, sc in next 4) x around to add a small decorative scallop (42)
Info :
Fasten off leaving long tail for joining to roof, towers and branch elements. Block flat and trim any stray threads before attaching other motifs. This main panel serves as the base for all other house details.
— Towers (Make 3; use same rounds; adjust height for different sized towers) :
Round 1 :
mr, 6 sc in mr (6)
Round 3 :
(1 sc, inc) x 6 (18)
Round 4 :
(2 sc, inc) x 6 (24)
Round 5 :
(3 sc, inc) x 6 (30)
Round 6 :
1 sc in each st around (30)
Round 7 :
Ch1, BLO sc in each st around to create a ridge for roof join (30)
Info :
Decide tower heights: for the center tower continue to round 20; for smaller towers stop at round 14. Mark the bottom edge that will be sewn to the house panel.
Round 8 :
1 sc in each st around (30)
Round 9 :
(5 sc, inc) x 5, sc in last 5 (35)
Round 10 :
1 sc in each st around (35)
Round 11 :
(6 sc, inc) x 5 (40)
Round 12 :
1 sc in each st around (40)
Round 13 :
(7 sc, inc) x 5 (45)
Round 14 :
1 sc in each st around (45)
Info :
At this stage stop for small towers (fasten off leaving long tail). For the central tower continue to round 20 to make it taller and more imposing. Use stitch counts to ensure even ruffling around top edge for roof placement.
Round 15 :
(8 sc, inc) x 5 (50)
Round 16 :
1 sc in each st around (50)
Round 17 :
(9 sc, inc) x 5 (55)
Round 18 :
1 sc in each st around (55)
Round 19 :
(10 sc, inc) x 5 (60)
Round 20 :
1 sc in each st around (60). Fasten off leaving long tail for sewing to house panel and for attaching roof cone.
Info :
Sew tower bases to top edge of main panel using the long tail, spacing towers evenly and ensuring the central tower sits slightly forward. Use small whip stitches for an invisible seam. Block towers to keep them flat at the join.
— Roof Cones (Make 3; 1 large, 2 small) :
Round 1 :
mr, 6 sc in mr (6)
Round 3 :
(1 sc, inc) x 6 (18)
Round 4 :
(2 sc, inc) x 6 (24)
Round 5 :
(3 sc, inc) x 6 (30)
Round 6 :
1 sc in each st around (30)
Round 7 :
(4 sc, inc) x 6 (36)
Round 8 :
1 sc in each st around (36)
Round 9 :
(5 sc, inc) x 6 (42)
Round 10 :
1 sc in each st around (42)
Round 11 :
Now shape to cone tip: (6 sc, dec) x 6 (36)
Round 12 :
(5 sc, dec) x 6 (30)
Round 13 :
(4 sc, dec) x 6 (24)
Round 14 :
(3 sc, dec) x 6 (18). Fasten off leaving long tail for sewing to tower top. Add a small picot at tip if desired: ch3, sl st in 3rd ch.
Info :
Make one large cone for the center tower and two smaller by omitting rounds 7-9 and fasten off at round 10. Sew cones to the tower tops aligning BLO ridge from tower round 7 for stable join.
— Window Insets (Make 4 small arched windows + 1 door backing) :
Round 1 :
Using bright yellow, mr, 6 sc in mr (6)
Round 3 :
(1 sc, inc) x 6 (18)
Round 4 :
Ch1, sc around, then in the top 6 sts work (dc, ch1, dc) to form a small arch for arched windows, join and fasten off leaving a long tail for stitching (18)
Info :
Sew each yellow inset to the back of the house main panel aligning with openings made earlier. Use small stitches around the arch and weave in the tail to the back. For a solid glow you can glue a small piece of yellow felt behind instead.
Round 5 :
For the door backing, work a slightly taller inset: mr, 8 sc (8), round 2: inc around (16), round 3: (1 sc, inc) x 8 (24). Fold and sew to back of door arch for a taller glowing doorway, fasten off (24)
— Window Mullions (Embroidered) :
Info :
Using black thread set on a fine sewing needle, embroider vertical and horizontal mullions across the yellow insets after sewing in place. Use simple running stitch to create quartered panes. Keep stitches small and consistent for neat look.
— Branch Element (Make 2 - left and right) :
Round 1 :
Ch 8, sl st to first ch to make small loop (8)
Round 2 :
Work 1 sc in each ch around the loop for a dense cord (8)
Round 3 :
Ch1, sc in next 2, (ch4, picot, sc in next 2) to create first twig, (sc in next 2, ch5, sl st in second ch from hook to make curled bud) repeat across to form 3 twigs, join (8 + twigs)
Round 4 :
Along the length of the branch work odd-length chains and anchor with sc stitches to create organic forks: *ch6, skip 1, sc in next, ch4, sl st back to previous sc* rep for natural looking forks. Fasten off at desired length (approx 22-28cm equivalent)
Round 5 :
Emphasize branch knobs by working small bobbles: into selected sc work (tr, ch1, tr) and sl st to anchor creating little knobbles. Fasten off leaving long tail for sewing (count approx 20-24 anchor points)
Info :
Make two branches, mirror the second one for symmetry. Sew branches to the sides of the house panel around round 9-12 of the main panel using matching black thread. Blocks and shape with a little starch for rigid branches.
— Pumpkin Motif (Make 2) :
Round 1 :
mr, 6 sc in mr (6)
Round 3 :
(1 sc, inc) x 6 (18)
Round 4 :
(2 sc, inc) x 6 (24)
Round 5 :
1 sc in each st around (24)
Round 6 :
Now create ridged sections to simulate pumpkin groves: *ch3, sk 1, sl st in next* around to create channels, join (24)
Round 7 :
Using BLO, sc in each st around to create a raised ridge (24)
Round 8 :
(1 sc, dec) x 8 (16) shaping slightly inward for the bottom
Round 9 :
1 sc in each st around (16)
Round 10 :
Fasten off and use black thread to embroider jack-o-lantern face: triangular eyes and a smiling mouth with small teeth using satin and backstitch. Alternatively, cut small black felt shapes and glue to surface.
Round 11 :
To add a stem: with green, mr, 6 sc in mr, work 3 rounds even (6,6,6) then work ch6, sl st back along ch to curl and attach to top center of pumpkin with a few stitches. Fasten off (6)
Info :
Make two pumpkins and sew one to each side of the house base near the lower edge. Position the stem slightly forward so it shows when house is displayed. Embroider face motifs carefully for symmetry.
— Spiderweb Motif (Make 3) :
Round 1 :
mr, ch8, join with sl st to form a ring with large center hole (this acts as the central loop)
Round 2 :
Ch1, work 24 sc evenly spaced around the ring into the space (24)
Round 3 :
Ch5 (counts as dc + ch2), *dc in next sc, ch2* repeat around to make 24 dc separated by ch2 sp (24 dc)
Round 4 :
Sl st into first ch2 sp, *(sc, ch4, sc) in each ch2 sp across to create extended spokes, sl st into next ch2 sp* around (24 spokes)
Info :
Work tensions evenly to keep spokes straight; pin each spoke flat on blocking board before proceeding to round 5 to ensure equal spacing and symmetry.
Round 5 :
Working in rounds joining spokes: into the ch4 arch of each spoke work *(sc, ch5, sc) around to create the first web loop, join* Repeat for each spoke (48 loops)
Round 6 :
Into each ch5 loop work *(dc, ch3, dc) to make a more open lace effect, join after completing circle (48)
Round 7 :
Edge with 1 sc in each dc and sc to create a finished edge, add picot points at each spoke tip: (sc, picot, sc) repeating around (48)
Info :
Make 3 spiderwebs in bright orange. Vary tension slightly for a lacy handmade look. Pin-block each web to open lace and starch lightly if you want a rigid coaster-style motif.
— Doily Ring Motif (Make 3) :
Round 1 :
Ch12, join with sl st to form small ring (12)
Round 2 :
Ch1, sc in each ch around (12)
Round 3 :
Ch3, (dc, ch2, dc) in next st, *sk1, (dc, ch2, dc) in next* repeat to form 6 arch petals, join (12)
Round 4 :
Into each ch-2 arch work 6 sc to widen and stabilize (36)
Round 5 :
Ch4, *(tr, ch2, tr) in top of each arch, ch4 between arches* repeat creating star spokes (36)
Round 6 :
Working along spokes slip st into center then ch6 and sl st into top of next spoke creating chain loops; repeat around to form airy rings (12 loops)
Round 7 :
Edge by working sc around each loop and add decorative picot at outermost points: *sc in loop 6 times, picot, sc in loop 6 times* repeat around (72 sc plus picots)
Round 8 :
Fasten off and block into a flattened ring with an open center. Make 3 of these in cream and stagger them when assembling the runner for visual depth.
Info :
The central hole in the ring is decorative; size can be adjusted by changing initial ch count. These rings act as airy filler motifs between houses and spiderwebs.
— Bat Motif (Make 4) :
Round 1 :
Ch8, sl st to form ring (8)
Round 2 :
Work 1 sc in each ch around (8)
Round 3 :
Ch1, sc in next 2, ch4, sl st back into second ch from hook to form wing tip, sc in next 2, ch4, sl st to form other wing, join (8)
Round 4 :
Along each wing work *(dc, ch1, dc, ch1, dc) to create scalloped wing edges; fasten off leaving tail for stitching (approx 6 scallops total)
Info :
Bats are small accent motifs. Work 4 and position flying near ring motifs or perched on doily edges. Use small stitches to tack them in place with invisible thread to avoid heavy seams.
— Finishing & Assembly Preparation :
Info :
Block all motifs on a foam board to the shapes shown in the photo: house panels flat and square, spiderweb spokes pinned taut, pumpkins slightly domed. Lightly spritz with water and starch for a crisper finish if desired. Allow to dry fully before joining.
Info :
Arrange motifs on a flat table to match desired runner layout: alternate house, doily ring and spiderweb, with pumpkins and bats filling side spaces. Take a photo of layout for reference before sewing.
— Assembly Stitching Guide :
Round 1 :
Use matching thread and whip stitch to join adjacent motifs: for lace-to-lace joins use single crochet join (sc through edge st of both motifs) to create a lacy seam that reads as part of the motif (work continuous sc around join).
Round 2 :
For attaching pumpkins to house base, use ladder stitch across 8-12 anchor points ensuring the pumpkin edge is nested into the house skirt. Reinforce with a second pass of small whip stitches if runner will be handled frequently.
Info :
When joining contrasting colors (black to cream or orange), use small stitches and pick up only the outermost loop of each motif to keep seams discreet. Hide tails by weaving across several stitches then trimming close.
Round 3 :
Use a fine sewing needle to tack yellow window insets to the back of the house panel and embroider mullions on the front. If desired, add small dots of fabric glue to secure inset before sewing for stability (use sparingly).
Info :
After assembly, give the entire runner one last light blocking to even edges and ensure seams sit flat. Press gently with a warm iron through a cloth if needed, or spray starch and reshape on the blocking board.
Round 4 :
Weave in all loose ends: use the tapestry needle to follow the path of stitches for each tail to hide ends. Trim close to fabric but not so close that the tail slips; tie a small knot in tails for extra security if desired.
Info :
Optional: for added stability lay a thin layer of matching felt behind larger motifs and tack in place to create a bit of body and prevent sagging under objects placed on top of the runner. Felt should not be glued directly if you want washable runner; instead tack with hand stitches.
These Halloween motifs bring vintage lace charm to spooky season with playful silhouettes and crisp color contrast. Combining classic doily techniques with characterful house and pumpkin shapes creates a runner that feels handmade and thoughtful. Each motif is satisfying to make and beautifully dramatic when assembled for a table display. Enjoy the slow, meditative process of tying each motif together into a seasonal centerpiece — happy hooking and creative decorating! 🧶🎃🕸️