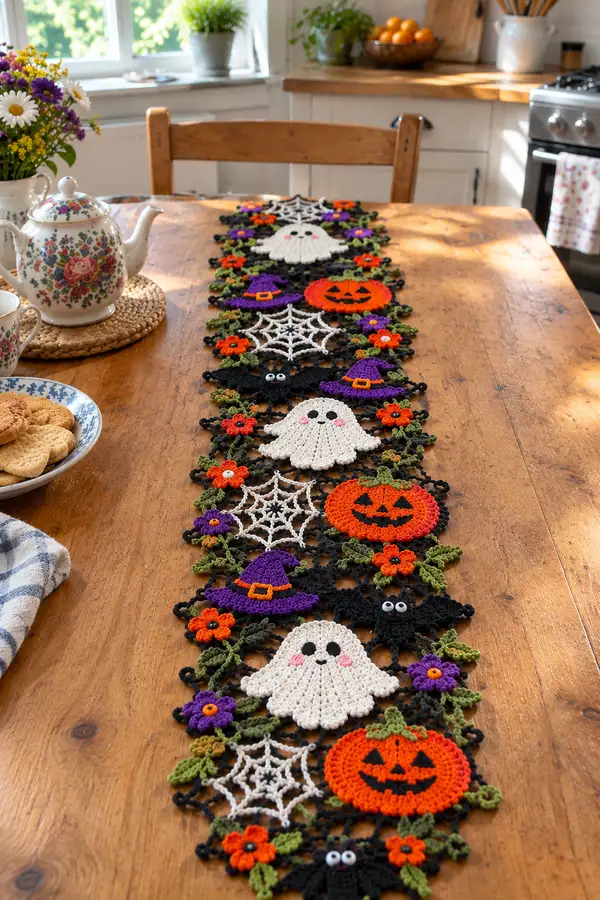
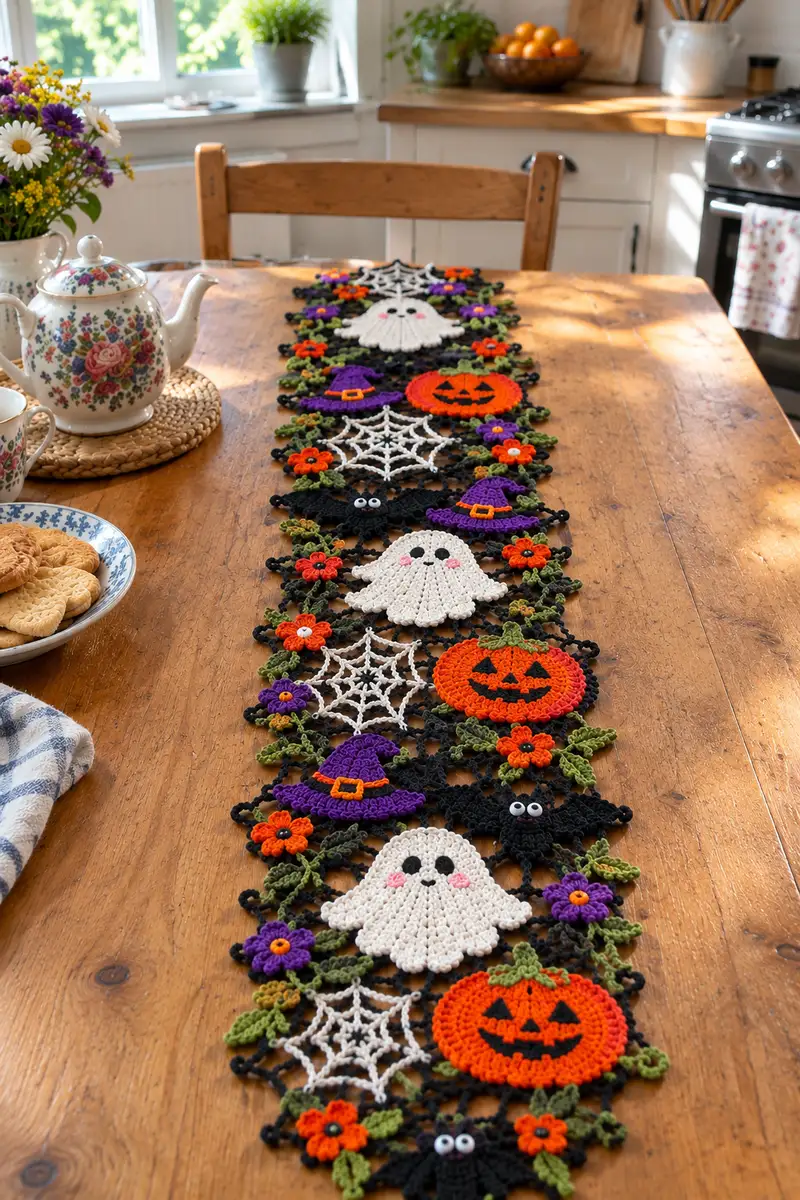
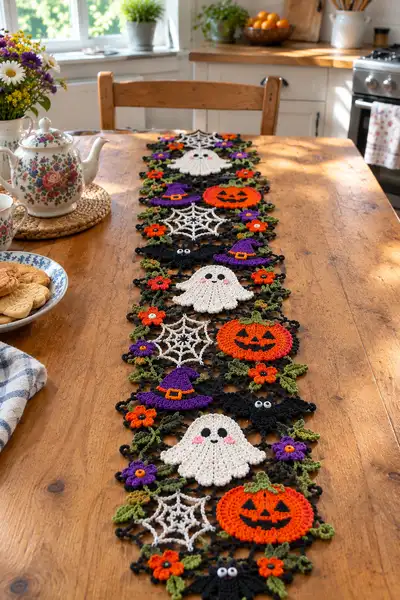
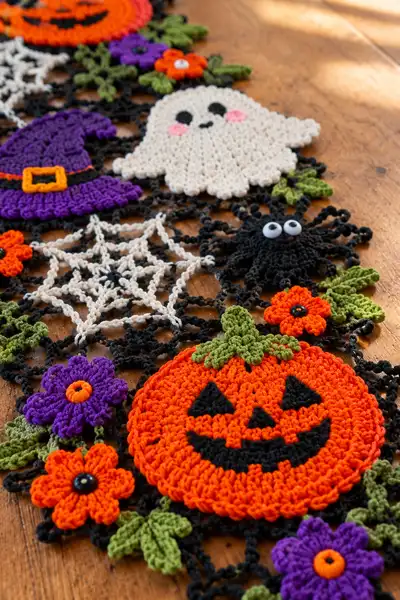
Create a festive Halloween table runner full of whimsical crochet motifs: smiling jack-o-lanterns, friendly ghosts, googly-eyed spiders, witch hats, lacy spiderwebs and bright autumn flowers. This modular, motif-based pattern uses small colorful pieces joined on a black lacy mesh for a dramatic table centerpiece. Suitable for makers who enjoy colorful colorwork and decorative joins — the finished runner is lightweight, machine-washable with care, and perfect for autumn displays.
Progress Tracker
0% Complete
— General Notes :
Info :
Work motifs flat in rounds/rows as specified. Join motifs to the black mesh background using slip stitches and chain arches as directed in the Joining section. Gauge is not critical but affects size — each large circular motif measures approx 8-10cm across when using a 3.5mm hook and worsted weight yarn. Use a smaller hook if your stitches are loose to keep mesh crisp.
Info :
All circular motifs start with a magic ring unless specified. Keep counts accurate; where an increase formula is given it uses the starting stitch count to compute the new total. Use stitch markers for round starts in continuous rounds; for joined rounds you may join with sl st to first ch or first st as specified.
— Pumpkin Motif :
Round 3 :
(1 sc, 1 inc) x 6 (18)
Round 4 :
(2 sc, 1 inc) x 6 (24)
Round 5 :
(3 sc, 1 inc) x 6 (30)
Info :
Switch to bright orange yarn at the end of Round 4 if starting from a different center color. Keep tail secure at center back to weave in later. Use tighter tension through these increase rounds to keep pumpkin firm.
Round 6 :
(4 sc, 1 inc) x 6 (36)
Round 7 :
(5 sc, 1 inc) x 6 (42)
Round 8 :
1 sc in each st (42)
Round 9 :
1 sc in each st BLO (42)
Round 10-12 :
1 sc in each st (42)
Info :
These rounds build the pumpkin body height. For a slightly flatter pumpkin work only 2 of these even rounds; for plumper pumpkin add one extra even round. If you want segment ridges, work alternating BLO and normal rounds to produce subtle ribs.
Round 13 :
(5 sc, 1 dec) x 6 (36)
Round 14 :
(4 sc, 1 dec) x 6 (30)
Info :
Begin shaping slightly inward to allow the final pumpkin to sit flat on the mesh. Place stitch marker every 6 stitches to track decreases precisely.
Round 15 :
(3 sc, 1 dec) x 6 (24)
Round 16 :
(2 sc, 1 dec) x 6 (18)
Round 17 :
1 sc in each st (18)
Round 18 :
Fasten off bright orange. Leave long tail for sewing to mesh (approx 25cm). (18)
Info :
Embroider jack-o-lantern face using black yarn before sewing to mesh: using surface slip stitch or small sc embroidery, make two triangle eyes, a triangle nose, and a smiling mouth. Alternatively, crochet a small black insert in rounds 1-3 to create facial features by changing color temporarily. For embroidered eyes use satin stitch with yarn needle for dense black shapes.
Round 19 (Stem) :
Join green yarn at the center top of round 1; ch 1, 6 sc in same st, sl st to first to form small stem disc. Fasten off leaving tail. (6)
Info :
Work an extra stem by chaining 4-6 and working 1 sc in each chain back across to create a small upright stem if desired; sew to center top with yarn tail.
— Ghost Motif :
Round 3 :
(1 sc, 1 inc) x 6 (18)
Round 4 :
(2 sc, 1 inc) x 6 (24)
Round 5 :
(3 sc, 1 inc) x 6 (30)
Info :
Work in cream yarn. Keep rounds neat; this motif transitions into shaping a wavy skirt for the ghost. Use stitch marker for round start in continuous rounds.
Round 6 :
(4 sc, 1 inc) x 6 (36)
Round 7 :
1 sc in each st (36)
Round 8 :
1 sc in each st (36)
Info :
To make scalloped base of ghost skirt, we will increase selectively and then alternate picot-like loops to create waves.
Round 9 :
(3 sc, 1 inc) x 6 (42)
Round 10 :
(1 sc in next 2 sts, ch 3, sl st in next st) x 14 then 1 sc remaining to complete round (42)
Round 11 :
Work into ch-3 loops: *(sl st, ch 2, 3 dc, ch 2, sl st) in each ch-3 loop* around to create shell picot scallops; join to base with sl st. (14 shells)
Info :
The scalloped edge gives the illusion of a floating ghost skirt. Keep shells even; use same stitch counts in each loop.
Round 12 :
Fasten off, leaving long tail for sewing to mesh. (14 shells)
Info :
Embroider facial features with black yarn: two oval eyes and small smile; add pink yarn for small cheeks using satin stitch. Embroider before attaching to mesh for easier handling.
— Spider Body Motif :
Round 3 :
(1 sc, 1 inc) x 6 (18)
Round 4 :
(2 sc, 1 inc) x 6 (24)
Round 5 :
1 sc in each st (24)
Info :
This flat disc forms the spider's body. Work tightly for dense fabric if sewing on googly eyes. Leave a longer tail if you plan to make the body slightly 3D with minimal stuffing.
Round 6 :
1 sc in each st BLO (24)
Round 7 :
Fasten off leaving tail for sewing. (24)
Round 8 (Leg Loops) :
With same black yarn, join at round edge and *ch 8, sl st in next st* repeat 8 times around to create 8 leg loops (8 ch-8 loops)
Round 9 :
Work into each ch-8: *(sc, hdc, 3 dc, hdc, sc) across ch-8, sl st into the base join* repeat 8 times to create plump legs. Fasten off and weave in ends.
Info :
Sew 2 small white buttons or attach googly eyes to the spider body. If you prefer embroidered eyes, embroider two white ovals then add small black pupils. For slightly raised body, insert tiny bit of stuffing but do not overfill or it will distort mesh.
— Spiderweb Medallion :
Round 1 :
6 sc in mr using cream yarn (6)
Round 3 :
(1 sc, 1 inc) x 6 (18)
Round 4 :
(2 sc, 1 inc) x 6 (24)
Round 5 :
Fasten off cream. Change to black and sl st to any st on round 4 to begin netting spokes. (24)
Round 6 :
With black yarn: *ch 8, sl st into next st* repeat 6 times evenly around forming 6 long spokes. Join with sl st. (6 ch-8 spokes)
Round 7 :
Working into chains: *join with sl st to mid chain of spoke 1 (approx 4th ch), ch 4, sl st into mid of next spoke* repeat around to create first hex ring. (6 ch-4 arches)
Round 8 :
Continue outward: *join with sl st, ch 6, sl st into mid of next spoke* repeat around forming larger web circle. (6 ch-6 arches)
Round 9 :
Fasten off leaving tail for attaching to mesh. Spread web gently and block to keep shape. (6 major arches)
Info :
The spiderweb is decorative and should be slightly taut. Block on a mat and pin out each spoke to keep circular shape. The number of spokes may be increased to 8 for a denser web; ensure symmetry when joining to mesh.
— Witch Hat Motif :
Round 1 :
6 sc in mr using purple yarn (6)
Round 3 :
(1 sc, 1 inc) x 6 (18)
Round 4 :
(2 sc, 1 inc) x 6 (24)
Round 5 :
1 sc in each st (24)
Info :
These rounds form the cone of the hat. Work in spiral to keep the cone smooth; do not join rounds with sl st unless specified. After the cone is the brim shaping.
Round 6 :
(3 sc, 1 inc) x 6 (30)
Round 7 :
1 sc in each st BLO (30)
Round 8 :
Switch to brim: (4 sc, 1 inc) x 5, (sc in last 0 sts) => (35)
Round 9 :
Work 1 round sc in each st FLO to create floppy brim edge (35)
Round 10 :
Fasten off purple. Join thin black strip for hat band: ch length to go around brim, sl st join. With gold yarn make small buckle: ch 5, join to make small ring, sc around to make little square. Sew buckle to band. Fasten off.
Info :
If you prefer a slightly taller hat, add an extra increase round (6 sc, 1 inc) to make cone larger. The hat sits gently on the mesh over a connecting chain arch.
— Flower Motif (small) :
Round 1 :
6 sc in mr using orange or purple (6)
Round 3 :
*ch 2, 3 dc in next st, ch 2, sl st in same st* repeat around to form 6 petals (6 petals)
Round 4 :
Fasten off. Sew small bead or contrasting yarn circle at center. (6 petals)
Info :
For five-petal flowers use ch 2, 5 dc shells instead. Make several in both orange and purple for color balance across runner.
— Leaf Motif :
Round 1 :
Ch 8 (or 10 for larger leaf), sc in 2nd ch from hook, hdc in next, dc in next 3 (or 5 for longer leaf), hdc, sc in last ch; turn to work along other side of chain: sc, hdc, dc x3, hdc, sc into first base to close leaf. Fasten off. (approx 14 sts total)
Info :
Make leaves in leaf green. Work 2-4 sizes of leaves for natural look. Slight curl is created by using one side tighter and the other side looser; practice to create varied results.
— Joining Mesh Background (Black) :
Info :
The runner is constructed by first making individual motifs, then creating a black mesh background to which the motifs are attached. The mesh is worked as a series of chain arches and joined mesh rows to create a lattice that rests under and between motifs. Plan motif placement first: the sample layout alternates Pumpkin - Spiderweb - Ghost - Witch Hat in a repeating strip with flowers and leaves filling corners and edges.
Mesh Setup Row 1 :
With black yarn, ch 120 (or to desired runner length; chain must be multiple of 6 plus 4). Turn and sl st into 4th ch from hook to create small picot foundation if desired. (120+ ch foundation)
Mesh Row 2 :
Sc in 2nd ch from hook and across to end to create firm base for mesh (120 sc)
Mesh Row 3 :
*ch 6, sk 5 sc, sl st in next sc* repeat across making chain arches across the foundation. End with sl st into last sc. (approx 20 ch-6 arches depending on foundation)
Mesh Row 4 :
Work back across: into each ch-6 arch work *(sl st, ch 6, sl st) into arch center, sl st into next base top* so arches stack. This builds a net of chain arches. Keep edge neat by working extra sc into ends if needed. (arches remain approx same count)
Info :
Adjust the number of chains and arches so motifs sit neatly. The mesh should be slightly looser than motif edges so motifs can be sewn to the mesh without pulling it out of shape. If you prefer a denser net, use ch-4 instead of ch-6 for smaller openings.
Mesh Row 5-22 :
Repeat Row 3-4 as required to reach mesh height that will accommodate motifs (approximately 18 alternating mesh rows will give tall net to slip motifs into). Keep a consistent pattern: odd rows chain arches from base, even rows chain arches across tops. (repeat for desired height)
Info :
For a runner like the sample, create 4 stacked motif columns across and repeat the stacked mesh lengthwise to fit motifs spacing. Always measure motif placement and pin them on mesh before final joining rounds.
— Attaching Motifs to Mesh (Process & Rounds) :
Info :
For stable attachment, pin motifs onto the unblocked mesh then use the long tails left on motifs to whip stitch them through mesh chains and around arch points. Alternatively, use black yarn and slip stitch around the outermost edging of motifs into chain arches to create a crocheted connection that blends into the mesh.
Attach Pumpkin :
Position pumpkin so outer edge overlaps approx 3-4 mesh arches. With orange tail or black yarn, whip stitch evenly around 18 outer edge stitches into mesh arches. If crocheting in place, join black yarn to mesh and work sl st into pumpkin outermost round every 2-3 stitches to secure. Ensure pumpkin sits flat and does not pull mesh tight.
Attach Ghost :
Position ghost scallops across 6-8 mesh arches; sew ghost by threading long cream tail through a tapestry needle and stitching through shell bases and mesh arches, anchoring each shell to an arch point. For additional stability, weave stitches across the last 2 inner rounds as well.
Attach Spiderweb :
Pin center of web to mesh, then use long black tail to stitch each spoke base to mesh arches at radial points. Attach outer arches at top points to arches of the mesh for a floating effect.
Attach Spider :
Attach spider body centrally in a small mesh cell; sew through body outer round to attach legs into chain loops so legs rest on adjacent mesh arches. Glue or sew on tiny eyes securely and weave ends in tightly.
Info :
Work symmetrically: attach opposite-side motifs first then fill in center to maintain straight runner edges. Use extra slip stitches around motif bases for permanence if this runner will be used frequently on tables.
— Decorative Edging and Picot Finish :
Round 1 (Edge) :
With black yarn and working around outermost mesh chain edges, sc evenly across perimeter. If perimeter count is P, sc across maintaining roughly 3-4 sc per mesh arch. This forms a firm border.
Round 2 :
*ch 3, sl st in next st* repeat around to create small picot loop edging, join and fasten off. Weave in ends for neat finish.
Info :
Add extra small leaves and flowers along the border where gaps appear: sew small orange flowers and green leaves at even intervals for cohesive look. Attach a small bead for flower centers if desired.
— Variation: Denser Runner (Alternate Mesh) :
Info :
For a denser, less see-through runner, work ch-4 mesh instead of ch-6 and add an extra mesh tier under each motif. This uses more black yarn but creates a stronger scaffold for heavier motifs and reduces table-through-holes.
— Final Finishing Touches :
Info :
After all motifs are attached and edges finished, lightly steam block the entire runner on a towel using a low-heat iron held above fabric (do not press) to relax joins and even tension. Pin motifs flat while drying. Trim any stray fibers and reinforce seams with extra slip stitches in high-stress areas.
Info :
Store runner flat or rolled to avoid crushing motifs. Spot clean with mild detergent; hand wash gently and lay flat to dry. Avoid machine washing where beads or googly eyes are used unless fully secured and removed if necessary.
This spooky seasonal table runner brings handcrafted Halloween charm to your table with playful pumpkins, ghosts, spiderwebs, and flowers. Each crochet motif is quick to make and so satisfying to join into the lacy black mesh — the bright colors pop beautifully for autumn displays. Enjoy the process of creating a modular runner that can be rearranged or expanded year after year. 🎃🍁🧶