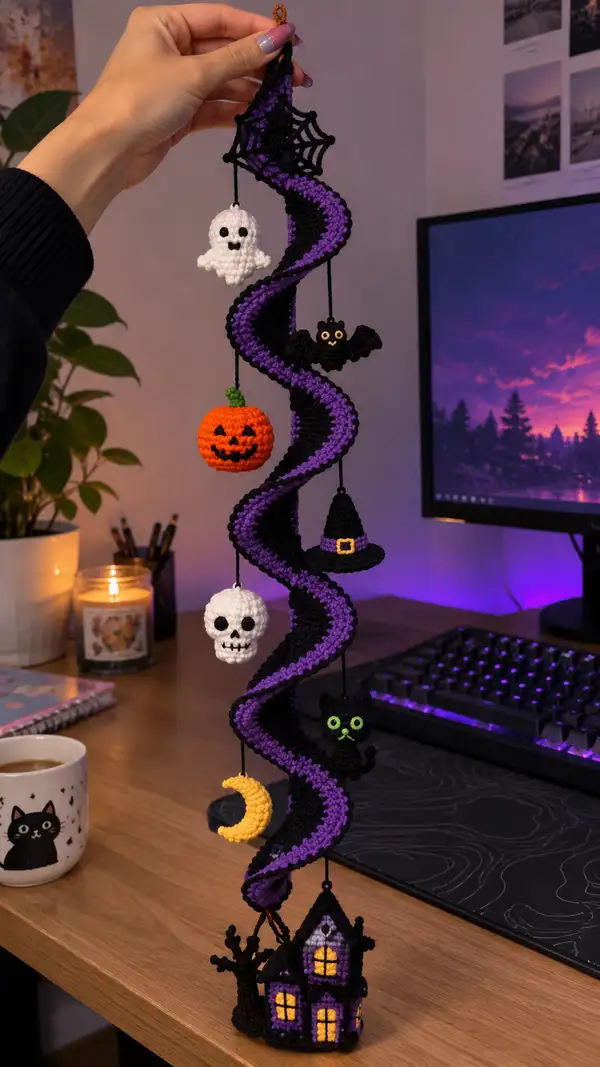
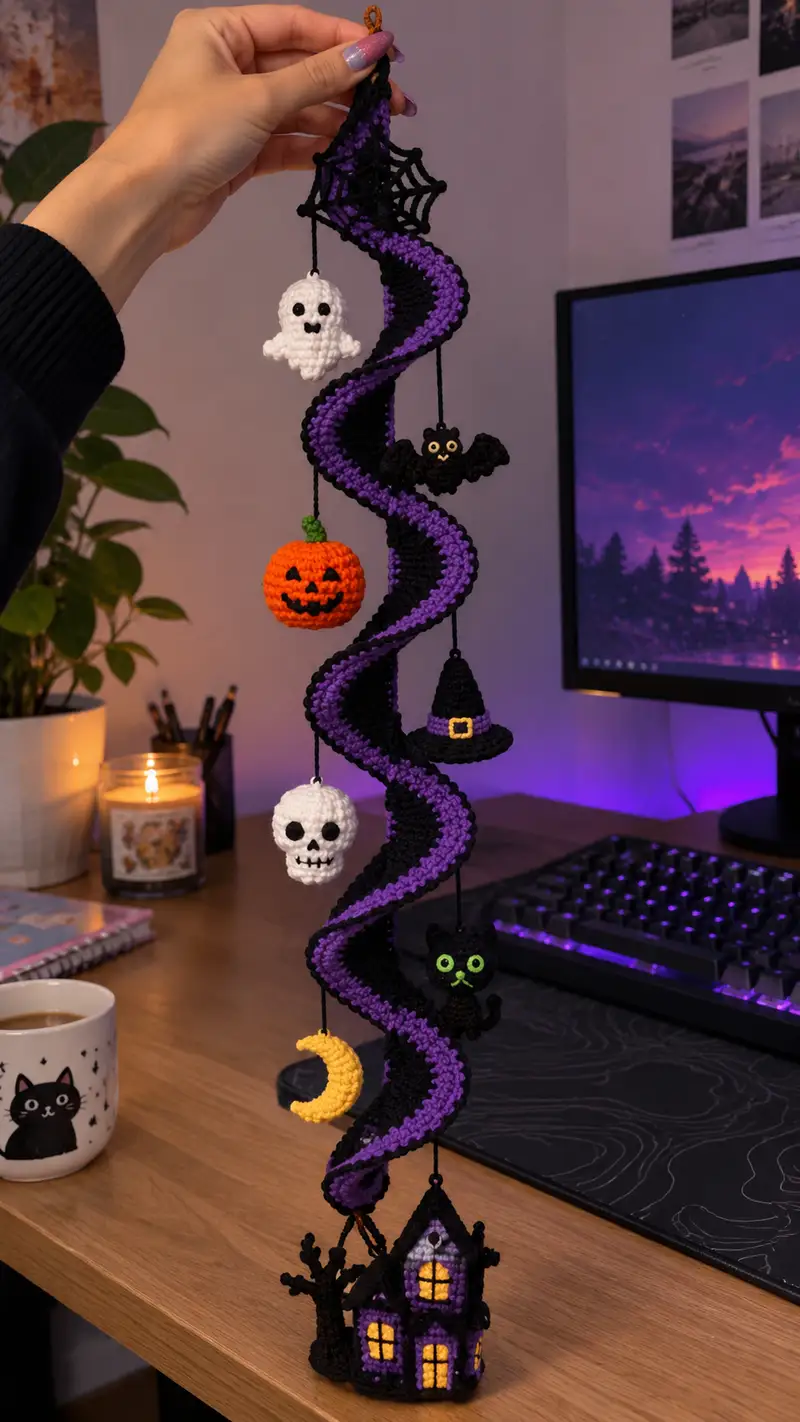
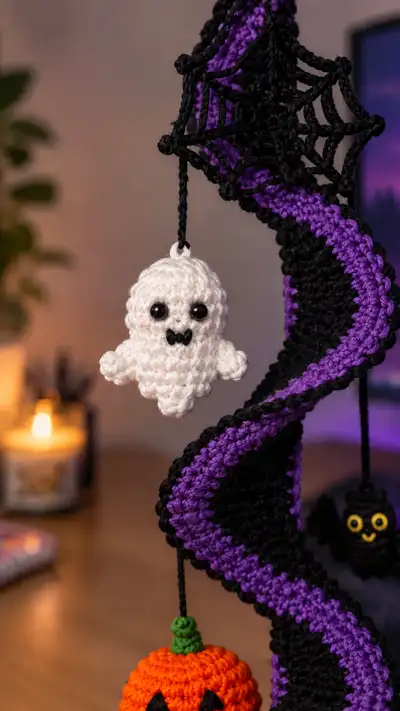
Create a dramatic hanging Halloween mobile with a twisted black-and-purple spiral and a collection of tiny amigurumi charms — ghost, pumpkin, skull, bat, witch hat, cat, moon and a haunted house base. This pattern includes step-by-step round-by-round instructions for every charm and the central spiral, plus assembly and finishing tips to make a sturdy decorative mobile.
Progress Tracker
0% Complete
— Spiral Column (central body) :
Note :
This spiral is worked in continuous rounds to create a long tubular strip with a contrasting inner panel. We will work alternating color panels and finish with a scalloped outer edge. Final length in photos ~70-80cm; adjust number of rounds to desired length.
Round 1 :
Using black yarn, make a magic ring, 6 sc in mr (6)
Round 3 :
(1 sc, 1 inc) x 6 (18)
Round 4 :
(2 sc, 1 inc) x 6 (24)
Round 5 :
(3 sc, 1 inc) x 6 (30)
Info :
We are forming a small tube that will be elongated by working many even rounds. Place a stitch marker at the first stitch of each round to keep track since this is worked continuously.
Round 6-10 :
1 sc in each st (30)
Info :
Work rounds 6-10 evenly to build the initial tube. At the end of round 10 we will switch to working the inner panel (purple) then the outer panel black to create a ribbon effect. Keep tension even and tight so stuffing does not show through.
Round 11 :
Change to purple yarn. 1 sc in each st (30)
Round 12-14 :
1 sc in each st (30)
Info :
The purple section will become the inner contrasting panel. If you want a wider inner stripe, add extra rounds here. Mark the first purple stitch to know the orientation later when shaping the spiral.
Round 15 :
Change to black yarn. 1 sc in each st (30)
Round 16-19 :
1 sc in each st (30)
Info :
Continue alternating sections of purple and black to reach the height you need. Each 5-6 rounds of black creates the outer panel that will curl around the purple. Repeat color blocks for length (recommend pattern: 5 rounds purple, 6 rounds black, repeat).
Round 20-63 :
Repeat the following color block 8 times or until desired length: Purple 5 rounds (1 sc each round), Black 6 rounds (1 sc each round). Maintain 30 sts each round. (30)
Info :
If you want a longer mobile, continue repeating blocks. For a spiral that stacks into 7-9 coils like photo, stop after approximately 44-48 color rounds total per column side which here equates to approx 64 rounds total; adjust as needed.
Round 64 :
Change to black yarn. 1 sc in each st (30)
Round 65 :
1 sc in each st BLO (30)
Info :
Working the next round in BLO creates a defined ridge that helps the spiral hold its twist. Keep it consistent; this will be the inner join for the scallop edge later.
Round 66 :
1 sc in each st (30)
Round 67 :
Prepare for scalloped edge: *sc 2, ch 3, skip 1* repeat around to create loop bases (repeat until end) (approx 10 base loops)
Round 68 :
Scallop: In each ch-3 loop work (1 sc, 3 dc, 1 sc) to create scallop. Join and fasten off. Weave in ends. Tube complete; leave long tail at top for hanging loop if desired.
Info :
To assemble the spiral twist, you will manipulate this tube into an S-curve spiral and stitch the inner purple panel to the inner edge along a central seam to create a spiral ridge. See assembly steps below for exact attachment points and spacing.
— Spiderweb Top (top decoration) :
Round 1 :
With black yarn, ch 8, sl st to form ring (8)
Round 2 :
Ch1, 16 sc into ring (16)
Round 3 :
Ch3 (counts as dc), *skip 1, dc in next* around creating lace spokes (8 dc total). Join (8)
Round 4 :
Ch2, *sc between spokes, ch4, sc between next two spokes* repeat to form radial loops (approx 8 ch-4 loops)
Round 5 :
In each ch-4 loop: sl st, ch4, sl st (create elongated loops). After finishing all loops, work small picot knots at outermost 8 points by ch3, sl st into third ch for decorative bobbles. Fasten off leaving tail to attach to spiral top.
Info :
The spiderweb is decorative and sits atop the spiral, with a small loop to hang the first charm cord. Use thin chain rope (see assembly) to attach the web so it sits slightly above the tube without collapsing.
— Haunted House Base (foundation) :
Note :
The haunted house is constructed in sections: base cube, roof peaks, windows and door appliques, and trunk/tree. Work the base as a flattened box with separate panels and join with slip stitches then stuff lightly.
Round 1 (Front panel) :
With purple yarn, mr, 6 sc in mr (6)
Round 3 :
(1 sc, inc) x 6 (18)
Round 4 :
(2 sc, inc) x 6 (24)
Round 5-10 :
1 sc in each st (24)
Info :
Work a second identical panel for back. For sides make narrower panels of 12-16 sts depending on preferred house depth. After panels are made join panels with sl sts leaving top edges for roof attachment.
Round 11 (Join and base) :
Sew front, back and side panels together using sl st or whip stitch leaving a small opening for stuffing. Stuff lightly and close, maintaining slightly flattened house shape (no full stuffing like toy—moderate firmness).
Round 12 (Roof base) :
Switch to black yarn. Ch 18, hdc in 2nd ch from hook and across to form a small rectangle, turn and work rows to create two triangular peaks by decreasing at ends every other row until you reach the roof point. Make two identical roof panels and join to top of house with sl sts.
Round 13 :
Make small yellow window appliques: mr, 6 sc (6); round 2: 6 inc (12); round 3: 1 sc each (12). Sew to house front and side panels. For crossbars embroider with black yarn.
Round 14 (Door) :
Using orange yarn, ch 6, sc across to form small door rectangle; sew centrally to front and embroider black outline and handle. Add tiny purple trims around windows and door to match photo accent.
Info :
Use small amounts of felt or embroidery to create glowing window effect if preferred. Keep house light — it should anchor the bottom but remain delicate enough to hang.
— Tree / Ground Details :
Round 1 :
With black or dark brown, mr, 6 sc (6)
Round 3-5 :
1 sc in each st (12)
Round 6 :
Begin shaping trunk: (3 sc, dec) x 3 (9)
Round 7-8 :
1 sc in each st (9)
Round 9 :
Fasten off leaving long tail for sewing. Use remaining yarn to crochet branched arms: ch6, sl st back along chain to create a twisted branch; make 3-4 branches and sew to side of house base.
Info :
Make the tree and base thin and slightly flat to keep the overall mobile balanced. You may add small crochet bats or vines to the trunk if desired.
— Ghost Charm (Make 1) :
Round 1 :
With white yarn, mr, 6 sc in mr (6)
Round 3 :
(1 sc, inc) x 6 (18)
Round 4 :
(2 sc, inc) x 6 (24)
Round 5 :
1 sc in each st (24)
Round 6 :
Change to FLO for slight ridge: 1 sc in each st FLO (24)
Round 7 :
(3 sc, dec) x 6 (18)
Info :
Attach safety eyes between rounds 5 and 6, spaced 6 stitches apart for the cute wide-eyed expression. Position eyes approximately centered horizontally on the round 5 - use pins to check placement prior to fastening backings.
Round 8 :
(2 sc, dec) x 6 (12)
Round 9 :
Stuff head lightly but firmly. (1 sc, dec) x 6 (8)
Round 10 :
6 dec (3) - this forms the top of head. Fasten off and weave in tail.
Round 11 (Arms and scalloped bottom) :
Using leftover white yarn, reattach at bottom center, ch 6, sl st back to create short arm branch; repeat on opposite side for second arm.
Round 12 (Frill) :
At bottom edge make small scallops: *(sc in next st, ch3, sl st into first ch)* repeat around to create ghost frill (6-8 scallops). Fasten off leaving long tail to create hanging loop.
Info :
Embroider a tiny mouth using black yarn or make a small bow-tie mouth as shown in photos. Add a tiny blush with fabric-safe pastel if desired.
— Pumpkin / Jack-o-lantern (Make 1) :
Round 1 :
With orange yarn, mr, 6 sc in mr (6)
Round 3 :
(1 sc, inc) x 6 (18)
Round 4 :
(2 sc, inc) x 6 (24)
Round 5 :
(3 sc, inc) x 6 (30)
Round 6-8 :
1 sc in each st (30)
Round 9 :
(3 sc, dec) x 6 (24)
Round 10 :
(2 sc, dec) x 6 (18)
Round 11 :
Start stuffing firmly. (1 sc, dec) x 6 (12)
Round 12 :
6 dec (6) Fasten off, leave tail.
Round 13 (Stem) :
With green yarn, ch 6, join to form small tube, 6 sc around for 3 rounds then sl st at base and sew to top. For vine add ch 10 tail and sl st back to create loop.
Round 14 (Face applique) :
Cut small black felt triangles or crochet tiny black triangles: mr, 4 sc (4) and sew into place for eyes and mouth. Embroider smile/teeth with black yarn to create jack-o-lantern face.
Info :
Use firm stuffing to maintain round shape. Crochet vertical ridges by sewing black lines from stem to base with yarn to give pumpkin ribbing if desired.
— Skull Charm (Make 1) :
Round 1 :
With white yarn, mr, 6 sc in mr (6)
Round 3 :
(1 sc, inc) x 6 (18)
Round 4 :
1 sc in each st (18)
Round 5 :
(2 sc, dec) x 6 (12)
Round 6 :
1 sc in each st (12)
Round 7 :
Start stuffing lightly, (1 sc, dec) x 4 (8)
Round 8 :
6 dec (4). Fasten off and close. Leave tail for sewing.
Round 9 (Jaw and face) :
Reattach white at lower front to crochet a jaw: ch6, sc back along chain, join and sew to lower skull to create jaw. Embroider hollow eyes and nose with black amigurumi thread or attach black felt circles. Add teeth by embroidering short vertical dashes with black yarn.
Info :
Position skull so it faces forward when hung; attach to cord via top loop or by sewing a small ring then knotting string through it.
— Bat Charm (Make 1-2) :
Round 1 (Body) :
With black yarn, mr, 6 sc (6)
Round 3-4 :
1 sc in each st (12)
Round 5 :
Dec 6 times evenly (6). Stuff lightly and fasten off leaving tail for sewing.
Round 6 (Wings) :
Make two wings: ch 8, sc in 2nd ch and across (7 sc), turn and work (sc, hdc, dc, hdc, sc) in decreasing stitches to create a scalloped wing shape. Make mirror for other wing and sew to body sides.
Round 7 :
Embroider or sew on tiny yellow felt circles for eyes. Add tiny embroidered smile with yellow/orange to match photo for friendly bat.
Info :
Adjust wing size to charm scale. For a hanging look, sew a short loop at the top of the bat's head for attaching cord.
— Witch Hat (Make 1) :
Round 1 :
With black yarn, mr, 6 sc (6)
Round 3 :
(1 sc, inc) x 6 (18)
Round 4 :
(2 sc, inc) x 6 (24)
Round 5-7 :
1 sc in each st (24)
Round 8 (Brim) :
Switch to purple for trim: ch 30, join to work around base of hat with sl sts to form brim. Work 1 sc in each ch around to make brim layer. Add small yellow buckle by crocheting a tiny square: mr, 4 sc (4) with yellow and sew to front.
Info :
Stiffen the brim slightly by adding a dab of glue and pressing flat optionally. Fasten off and add hanging loop to hat top.
— Black Cat Charm (Make 1) :
Round 1 (Head) :
With black yarn, mr, 6 sc (6)
Round 3 :
(1 sc, inc) x 6 (18)
Round 4-6 :
1 sc in each st (18)
Round 7 :
(1 sc, dec) x 6 (12) Start stuffing lightly
Round 8 :
1 sc in each st (12) Fasten off and leave tail for sewing
Round 9 (Ears x2) :
Ch4, sc back along chain to form small triangle ear. Make 2 and sew to top of head 6 stitches apart.
Round 10 (Body) :
Make a small teardrop body: mr 6 sc, round2 inc 6 times (12), round3-6 1 sc (12), round7 (3 sc, dec) x3 (9) stuff lightly and fasten off. Sew body to head.
Round 11 (Eyes) :
Sew on lime green felt circles or safety eyes and embroider small nose and whiskers with green yarn to match photo contrast.
Info :
Make cat small so it hangs proportionally below spiral coils. Sew tail as a small chain of ch10 with sc along it and sew to body side.
— Crescent Moon (Make 1) :
Round 1 :
With yellow yarn, ch 6, join to form ring, 10 sc around (10)
Round 2 :
Inc evenly to form a slightly oval shape (15)
Round 3 :
Shape by crocheting along edge with short rows: sc 7, turn, sc 5 back, then attach each short row to build crescent curve until desired thickness is reached. Stuff lightly.
Round 4 :
Finish shaping and fasten off leaving tail for sewing. Add small hanging loop at top with ch 6 and sl st to base.
Info :
Work crescent flat rather than in strict rounds so it has a thin profile, perfect for dangling without heavy weight.
— Assembly Cords and Hanging Loops :
Info :
Make braided cords to hang charms: cut three strands of black yarn approx 40-60cm each (adjust length for placement). Braid tightly and tie knots at both ends. Alternatively use small crocheted rope (ch 3, sc along) to create neat cords.
Round 1 :
Create a small ring at the very top of the spiral by ch 12, join into ring and weave tail through top of spiral tube; this will be the top hanging loop.
Info :
Attach charms to cords at their top loops by knotting through the charm's top stitch and securing with glue or sewing for extra safety. Space charms evenly along spiral coils so they hang between the twists without tangling each other.
Round 2 :
Attach spiderweb to top ring with a few stitches so it sits above spiral. Sew spiderweb center to the top stitch of spiral and secure knots on inside of tube.
Info :
For a floating effect, stagger charm lengths: e.g., ghost 8cm, pumpkin 20cm, skull 32cm, bat 44cm, hat 56cm, cat 68cm, moon 80cm from top. Adjust to match the spiral pitch.
— Final finishing and reinforcement :
Round 1 :
Thread a long yarn tail through the inner seam where the purple panel meets the black panel along the inner curve. Whip stitch along inner curve every 6-8 stitches to fix the spiral into twisted S-shape. Repeat on both sides of tube to lock spiral form.
Info :
If the mobile feels floppy, insert a piece of light floral wire inside the tube before final closing; secure wire ends by folding them and anchoring within the haunted house base so they don't poke through stitches.
Round 2 :
Double-check balance by holding top ring and ensuring charms hang freely without touching each other. Reposition or shorten cords as needed.
Info :
Weave in all ends into the spiral inside so they are hidden from view. Use small dots of fabric glue at critical seams if the mobile will be handled frequently.
This Spooky Spiral Halloween Mobile brings playful, handcrafted charm to any space — each tiny crochet friend adds personality to the twisting column of black and purple. The detailed instructions help you build a balanced, durable hanging decor that can be treasured year after year. I hope you enjoy making every little ghost, pumpkin, and cat as much as I enjoyed designing them! 🧶🎃👻