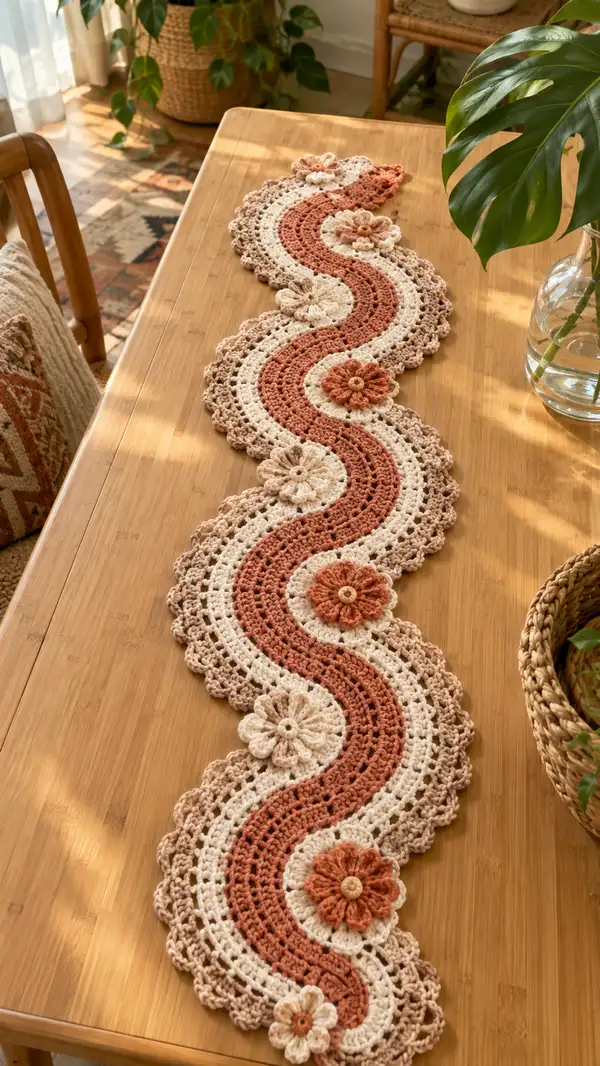
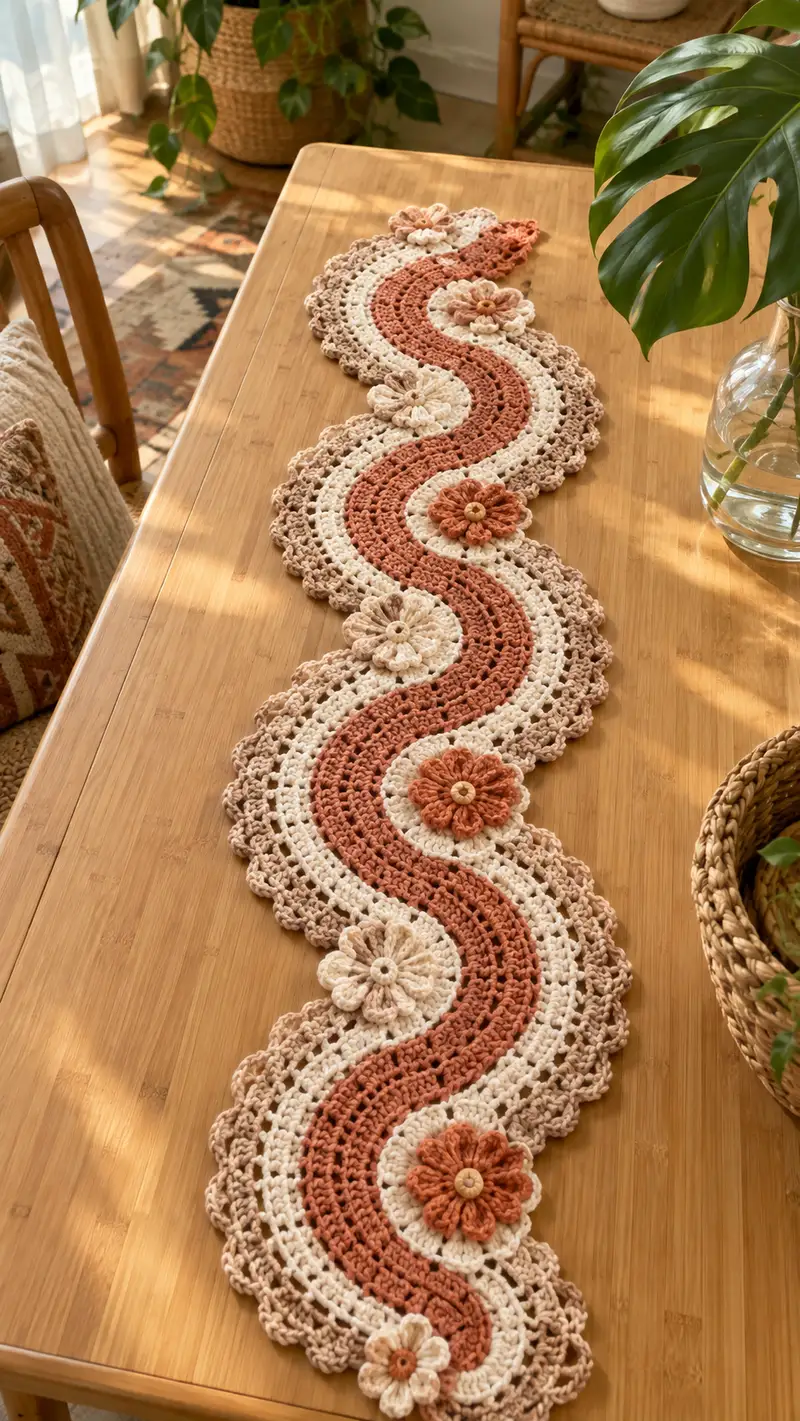
Create a warm, wavy table runner inspired by vintage boho style in terracotta, cream and soft beige. This pattern builds a sinuous scalloped runner from repeating wave motifs, finished with layered daisy appliques and a lacy outer edge. The finished piece is richly textured with shells, clusters and openwork that sit beautifully on a dining or console table.
Progress Tracker
0% Complete
— Wave Motif (Make 8 - each forms one semicircle) :
Info :
This runner is constructed from repeating semicircular wave motifs. Each motif is worked in rounds from the center out to create half-doily semicircles which are later joined in alternating orientation to form the wavy runner. Make a gauge swatch first: one finished motif (after rounds 1-24) should measure approx. 20cm across the widest part using 4.0mm hook and worsted cotton. Adjust hook size if needed.
Round 1 :
Make a magic ring, ch1, 6 sc in magic ring (6)
Round 2 :
Inc in each stitch around (12)
Round 3 :
(1 sc, inc) x 6 (18)
Round 4 :
(2 sc, inc) x 6 (24)
Round 5 :
(3 sc, inc) x 6 (30)
Info :
Change to terracotta (main wave color) at the end of Round 5 if you wish the center of the semicircle to be terracotta. We carried the look in the picture with terracotta forming the inner curve. Carry unused yarn neatly behind work or fasten off and weave in ends later.
Round 6 :
(4 sc, inc) x 6 (36)
Round 7 :
(5 sc, inc) x 6 (42)
Round 8 :
(6 sc, inc) x 6 (48)
Round 9 :
(7 sc, inc) x 6 (54)
Round 10 :
(8 sc, inc) x 6 (60)
Round 11 :
(9 sc, inc) x 6 (66)
Round 12 :
(10 sc, inc) x 6 (72)
Info :
Rounds 6-12 expand the semicircle; counts follow a pattern of +6 stitches per round. At the end of Round 12 you will have 72 anchor points (stitches) around the motif. This anchor count is used as the basis for later textured rows and shell placement. If making a larger motif, continue increases in the same pattern.
Round 13 :
1 sc in each st around (72)
Round 14 :
1 sc in each st BLO (72)
Round 15 :
(2 sc, ch2, sk1) x around to create a lace ridge; work last into next st to finish sequence (72 anchors, 36 ch-2 spaces)
Info :
Round 15 creates regular chain-2 spaces for later shell-work and visual openwork. Keep tension consistent; chain spaces give flexibility when joining motifs later.
Round 16 :
Join terracotta to chain-2 spaces with sl st, ch3 (counts as dc), *3 dc in same ch-2 sp, ch2, 4 dc in next ch-2 sp; rep from * around finishing last shell into final ch-2 space. This round forms alternating shells across the motif (24 shell groups; anchor points remain 72)
Round 17 :
Ch1, sc in top of first shell, *ch3, sc between shells at the space created by ch2, ch3, sc in next shell; rep from * around to create a picot-like spacing (72 anchors)
Round 18 :
Change to cream yarn. Ch2 (counts as hdc), hdc in same st, *sk 2 dc (from shells below) and work 5 dc cluster into the ch3 space, sk next dc shell cluster, hdc in next top of shell; rep from * around to accentuate the inner curve (72 points of attachment)
Info :
At this point the semicircle has a clear inner curve (terracotta), a middle cream band, and will gain an outer beige scallop. If you want the inner band thicker, add an extra even row of sc or hdc before Round 18.
Round 19 :
1 dc in each anchor around working into both loops for body consistency; if anchor points equal 72, this will produce 72 dc anchors around (72)
Round 20 :
(1 dc, 1 tr, 1 dc) in every 3rd anchor to create gentle raised ribs across the semi; rep around resulting in 24 rib groups (counts noted as 24 groups / 72 anchors)
Info :
These textured ribs help visually separate the center stripe from the outer lace scallop. Keep stitch placement even; use stitch markers every 6-8 ribs when working around tall stitches to avoid tension drift.
Round 21 :
Change to beige/taupe for outer lace. Ch4 (counts as tr + ch1), *sk 2 anchors, (3 tr, ch1, 3 tr) in next anchor (this creates a large shell in the outer position), sk 2 anchors, sl st into next anchor; rep from * around to form large shells. Count shells = 24 (each shell sits across a 3-anchor grouping)
Round 22 :
Ch1, sc in same st, *ch5, sc in middle top of next large shell; rep from * around producing 24 ch-5 loops for big scallops (24 loops)
Info :
Round 22 sets up large looped scallops for the classic wavy edge. If you prefer more delicate lace, change ch5 to ch4. These chain loops will become the basis for the final scalloped edged rounds.
Round 23 :
Work 7 dc into each ch-5 loop (7 dc per loop x 24 loops = 168 dc stitches this round). This fills the scallops with dense texture and creates a bold outer curve.
Round 24 :
Ch1, sc in first dc, *ch3, sc in 4th dc of next shell's group (or into top of shell), rep around. Maintain 24 ch-3 spaces for decorative picots (anchors remain organized by 24 scallops)
Info :
Round 23 produces a wide scallop and increases the stitch total substantially; treat the stitch count on this and following outer rounds as grouped repeats (24 main scallop groups) rather than a simple single-stitch anchor count. This is intentional to create the full scallop effect seen in the photo.
Round 25 :
For a crisp edge, sc around working (sc, ch3, sc) into the center of each 7-dc shell group to form decorative loops. This defines the outermost edge of the motif. End and fasten off if you prefer to join motifs by sewing.
Round 26 :
If you want a slightly larger motif repeat continue: *sl st to next sc, ch8, skip 2 sc, sl st into next sc to create larger scallops between shells; rep around. This optional round creates dramatic lace along outer curve.
Info :
Fasten off and weave ends. Make a total of 8 semicircular wave motifs (or as many as needed to reach your table length). Mirror every other motif when joining (flip some motifs so inner terracotta curves alternate sides) to create the continuous S-shaped wave shown in the reference photo.
— Daisy Appliques (Make 7 - Layered Flower with Button Center) :
Info :
Each daisy is layered: a small center round, a petal round in cream, and an overlay petal in terracotta for contrast in alternating motifs. Attach a small wooden button in the middle. Use 3.5mm hook for tighter petals.
Round 1 :
With cream, mr, ch1, 6 sc in mr, join with sl st (6)
Round 2 :
Change to terracotta or cream for petal color. *Ch3, 3 dc in same st, sl st in next st; rep around to make 6 petals. This creates petals that are clusters occupying one base stitch (6 petals)
Round 3 :
Switch to main petal yarn (cream or terracotta), join into ch space, *ch2, (sc, hdc, dc, hdc, sc) into ch space to create a fuller petal, sl st to next ch space; rep around to create 6 larger petals (6 petals)
Round 4 :
Ch1, sc around into the top of each petal to stabilize and create small rim (12 sc total around stabilizing points; you will be anchoring into petal tops rather than original base stitches)
Info :
Round 3 is the main decorative stage. Make sure petals are fluffed and blocked slightly to give volume. If you want a two-tone layered flower, make the base petals in cream and overlay with terracotta edging or add a second petal round with smaller petals stitched on top.
Round 5 :
Optional: Add a second accent ring by working ch4 loops between each petal and slip-stitching back into the base for a lacy over-petal. This creates a fuller, 3D flower like the photo.
Round 6 :
Fasten off leaving a long tail. Sew wooden button to center of flower using yarn tail or matching sewing thread. Make 7 daisies in alternating color placement: terracotta-center daisies placed on cream inner curve and lighter daisies placed on terracotta inner curve to mirror the sample photo.
Info :
For the tidyest finish, sew buttons using small stitches through the central magic ring area; weave tail through several stitches on the back and knot securely, then hide ends inside the flower backing.
— Joining Motifs into Runner (Edge-to-Edge Sewn Join) :
Info :
Pin motifs in alternating orientation (flip every other semicircle) so inner terracotta curves snake from one motif to the next forming an S-wave. Match outer scallops and inner chain spaces. Use pins to hold seams in place and check alignment with spacings for daisies placement — typically daisies are sewn to the center of the semicircle nearest the inner curve.
Round 1 :
Place first two motifs right sides together aligning outer scallops and inner chain spaces. Using tapestry needle and a length of matching beige yarn, sew through the top loops of the scallops using mattress or whip stitch in every other anchoring point. Sew along the full arc of the shared edge. Repeat for all motif joins so that motifs form a continuous strip. Approx. 6-8 stitches per shell group are used depending on scallop width.
Round 2 :
After sewing second motif, open seam and check curvature. The joined seam should be flexible enough to curve into an S-wave. If seam puckers, remove a few stitches and re-sew with looser tension. Fasten off and weave ends to the back.
Info :
Join motifs edge-to-edge in sets of pairs first (create mirrored pairs), then join pairs to the next pairs. This staged approach preserves alignment and makes it easy to correct any curve mismatches as you progress down the runner length.
Round 3 :
Before sewing last two joins, pin all daisies in the positions you want along the inner curves — typically one daisy per semicircle placed about 1.5-2 cm from the center curve. Mark placement with pins so you can sew daisies after the motifs are permanently attached.
Round 4 :
When all motifs are joined and pinned in S-wave orientation, baste the entire seam with a long running stitch using waste yarn to check final layout. Adjust motif spacing now rather than after finishing edge lace. Remove basting after adjustments.
Info :
Seam style: using a whip stitch will show a small ridge on the back; for a flatter join use mattress stitch by aligning sl st ridges and sewing from one motif to the next through back loops only. The goal is an invisible seam that allows the outer scallops to read as a continuous lace border.
— Outer Lace Edging (Work after all motifs are joined) :
Info :
Once motifs are joined, you will work an all-over outer edge to unify the runner. The edging follows the scallop rhythm and ties gaps between motif joins. Work the edging in beige/taupe to match the photo. Work around the entire assembled runner (a continuous round) while counting scallops as the repeat unit.
Round 1 :
With runner flat and right side up, join beige yarn to any outer scallop point with sl st, ch3 (counts as dc), *work 2 dc, ch2, 3 dc in same scallop center (forming a large shell), sl st into next scallop peak; rep along entire outer edge aligning shells into existing shells. Count shells across outer edge; for our 8-motif runner expect 24 large shells but count yours and ensure you have consistent repeats.
Round 2 :
Ch1, sc in same st, *ch4, sc in 3rd dc of each shell peak to create picot loops; rep around. This creates 24 ch-4 loops (or equivalent by your shell count)
Info :
Keep stitch tension slightly looser on the final edge to prevent curling. If outer edge puffs, block after finishing and steam lightly to relax fibers.
Round 3 :
Into each ch-4 loop: (sc, hdc, 5 dc, hdc, sc) to make pronounced scallop petals along the border. This will be a heavy decorative round; count scallop petals equal to number of loops (approx. 24).
Round 4 :
Ch1, sc evenly around including across seam joins; when crossing a join use sc through both motif loops to create a neat bridging seam. Work 1 sc per dc across flatter sections and 3 sc into the center top of each outer petal to help the edge sit flat (total sc count will vary with number of shells; maintain even distribution).
Round 5 :
Optional decorative picot round: *sc, ch3, sl st into same st to make tiny picots on every 4th sc across the edge. This delicate detail mimics the lacy scalloped border in the photo.
Info :
Fasten off and weave ends on the back. At this stage the runner should present as one continuous piece with a consistent scalloped border. If edges ripple, lightly wet-block and pin edges into shape, stretching gently so arcs sit evenly.
— Finishing Touches & Daisy Attachment :
Round 1 :
Position daisies on the inner curve of each semicircle. Typical placement is centered on the inner terracotta arc; measure approx. 4-5cm from the contour tip to find the best visual center. Pin daisies into place.
Round 2 :
Sew each daisy using matching yarn through back loops only of the central ring and the runner fabric. Use tight stitches to prevent rotation. Secure with several passes and weave ends into the back of the runner.
Round 3 :
Sew wooden button to center of each daisy. Make sure the button shank is flat against flower; small stitches through the shank and around the back will hold it. Use a knot tucked into the back of the flower and weave ends to prevent unraveling.
Info :
Check placement at eye level to ensure daisies sit harmoniously along the wave curve. You can vary daisies by changing top layer color or by adding a tiny bead under the button for extra shine.
Round 4 :
Steam-block or wet-block the entire runner. Pin scallops into perfect arcs measuring equal distance from center wave line. Allow to dry completely. This final blocking makes scallops crisp and the runner lie flat on the table.
Info :
Weave all ends using yarn needle into the nearest seam lines, trimming close. Inspect both sides of the runner and re-secure any loose sections. Your runner is now ready to display.
Completing this Terracotta Cream Wavy Daisy Table Runner is such a satisfying finish — the layered daisies and scalloped lace transform simple stitches into an eye-catching centerpiece! The warm palette and sinuous shape bring cozy charm to any table. I hope you take a moment to block and pin it just right — those scallops really sing after blocking. 🧶🌼 Enjoy styling it on a dining table, console, or sideboard and share your finished creation with friends! ✨