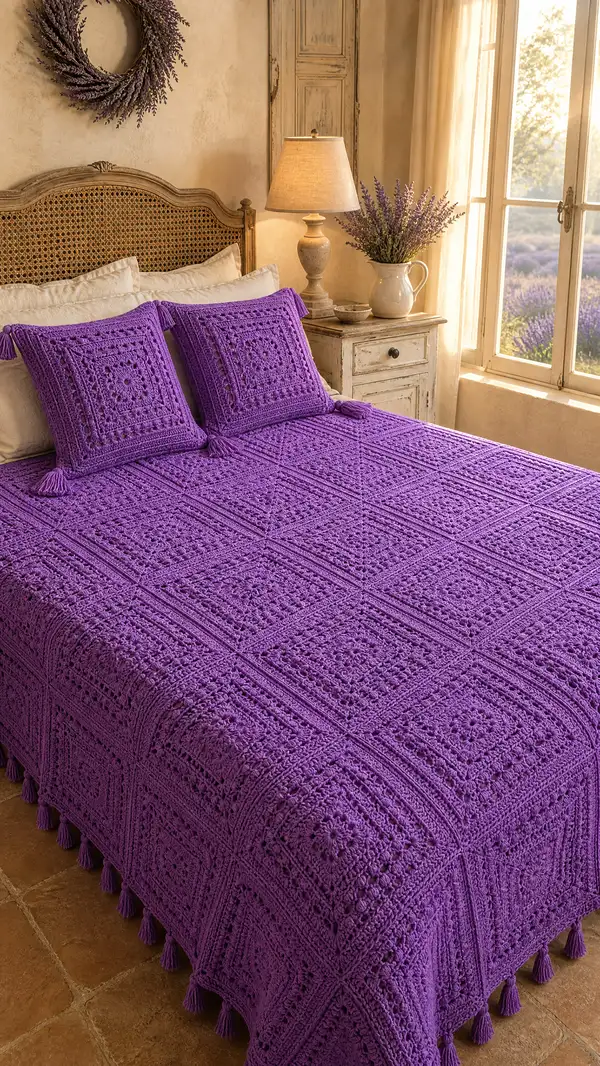
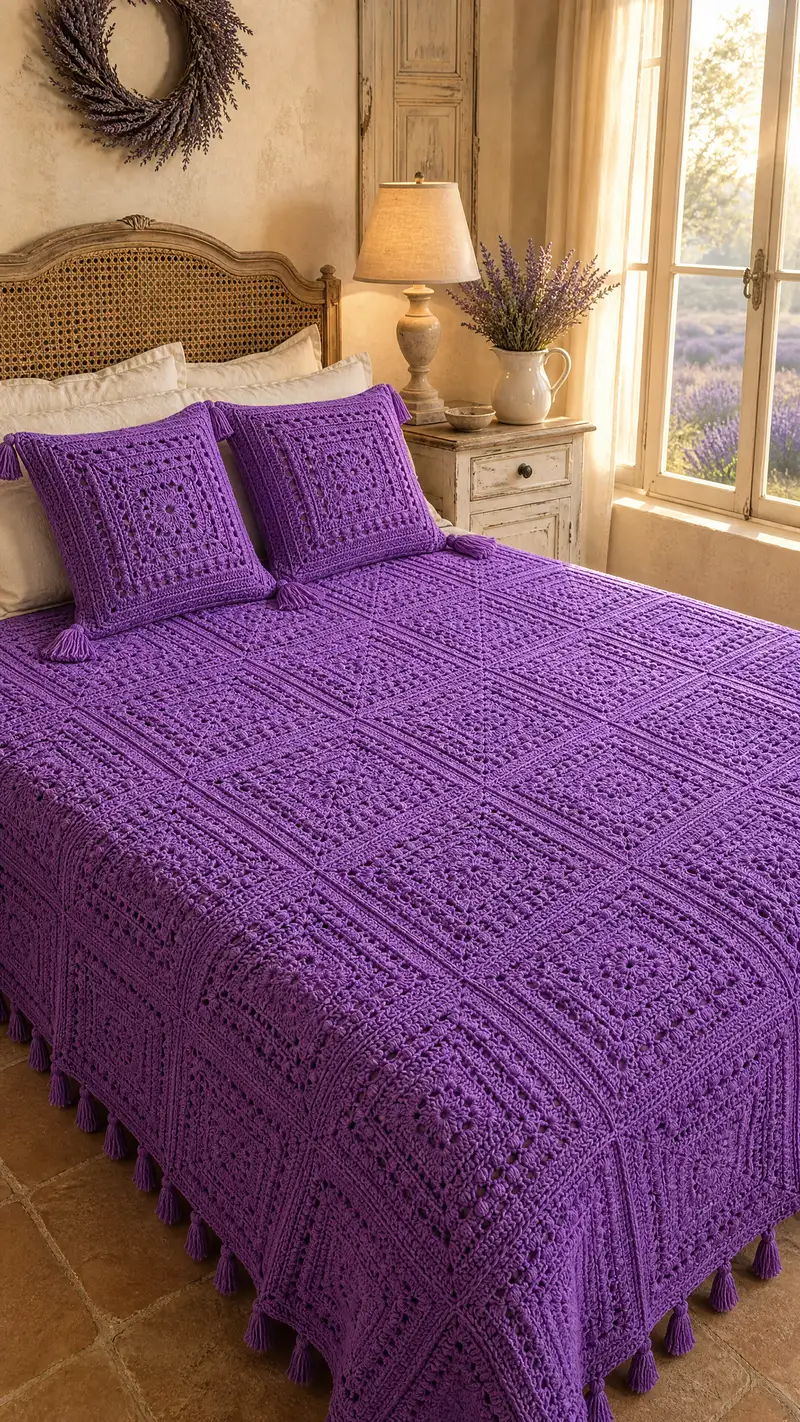
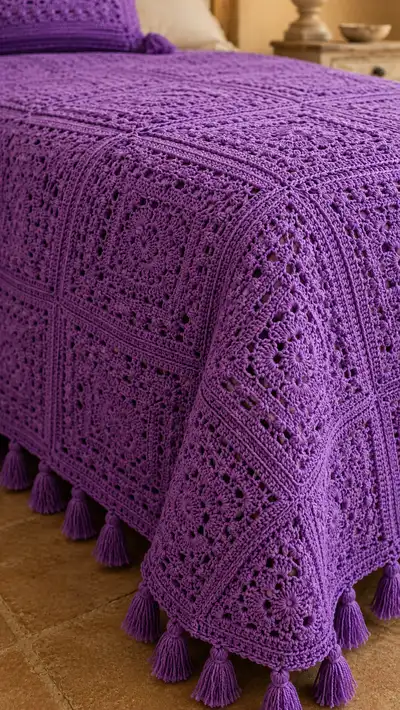
A richly textured, vintage-inspired bedspread made from large lavender granny squares joined into a full-coverage bedspread with coordinating pillow shams and decorative tassels. The design highlights raised post stitches, shell and cluster rounds, and a triple-ridged border for a luxurious, cozy drape. Clear, step-by-step motif and assembly instructions let you create the full spread and matching square pillow covers in a striking single-color finish.
Progress Tracker
0% Complete
— Make One Textured Motif (work 36 rounds to create a large square motif) :
Round 1 :
Start with a magic ring. Ch 3 (counts as first dc), work 7 dc into ring; tighten ring and join with sl st to top of beginning ch-3. (8)
Round 2 :
Ch 3 (counts as dc), 1 dc in same st, *1 dc in next 1 st, 2 dc in next st*; rep from * to * around, join with sl st to top of ch-3. (12)
Round 3 :
Ch 3, (1 dc in next st, 1 dc in next st, 2 dc in next st) repeat around. Join. (16)
Round 4 :
Ch 3, (1 dc in next 2 sts, 2 dc in next st) x 4 sets of 4-st sequences; join. (20)
Info :
Rounds 1-4 establish a small, even circular center. Keep stitches tidy and use the tail from the magic ring to tighten center for a neat starting point.
Round 5 :
Ch 3, work (1 dc in each of next 3 sts, 2 dc in next st) repeat around; join. (24)
Round 6 :
Ch 3, work (1 dc in each of next 4 sts, 2 dc in next st) repeat around; join. (28)
Round 7 :
Ch 3, (1 dc in each of next 5 sts, 2 dc in next st) x 4; join. (32)
Round 8 :
Ch 3, (1 dc in each of next 6 sts, 2 dc in next st) x 4; join. (36)
Info :
Keep stitch counts exact: at the end of Round 8 you should have 36 dc. Place a marker at zone where you want the eventual square corner to align; we will begin shaping into a square next.
Round 9 :
To begin square shaping: Ch 3, dc in next 8 sts, (2 dc, ch 2, 2 dc) in next st to form first corner, dc in next 8 sts, (2 dc, ch 2, 2 dc) for second corner, dc in next 8 sts, (2 dc, ch 2, 2 dc) for third corner, dc in next 8 sts, (2 dc, ch 2, 2 dc) for fourth corner; join. (Adds 8 corner ch2 spaces — total stitch count approx 36+8=44 accounting for corner chains)
Round 10 :
Ch 3, working around, dc in each dc along side until next corner ch-2 sp; in ch-2 sp work (2 dc, ch 2, 2 dc) to build square corner; rep around; join. (Count perimeter stitches: approximately 44 dc plus corner groupings — aim to have consistent side lengths)
Info :
From Rounds 9 onward we shape square corners. The stitch totals shift because we are adding corner groups and chain spaces; to keep consistency, measure side length rather than obsessing single-stitch totals. Each side should have the same number of dc between corners.
Round 11 :
Ch 1, sc evenly across each side working 1 sc in each dc and 1 sc in each ch-2 corner space (work 3 sc in corner space to make a small square corner stabilization). Join. (even round)
Round 12 :
Ch 2 (counts as hdc), hdc in each st around, working 3 hdc in each corner ch-2 space; join. (even round)
Round 13 :
Ch 1, sc in each st around but work a texture band: *sc in next 2 sts, bobble cluster in next st* repeat across each side; in corner spaces sc3; join. (even round)
Info :
Bobble/cluster technique: Wrap yarn 4 times, insert hook, pull loop, complete as described for a 4-loop bobble; close together to make a small raised bobble. Work bobbles consistently for uniform texture.
Round 14 :
Ch 3, dc in same st, (sk 1, 3 dc cluster in next group) across side to create a shell motif; at corners (3 dc, ch 2, 3 dc); join. (even round)
Round 15 :
Ch 1, sc in each st but in center-of-shell spaces work (2 sc, ch 1, 2 sc) to echo the shell; corners sc3; join. (even round)
Round 16 :
Info :
Change to 4.5mm hook if your fabric looks too tight; otherwise continue with 5mm for drape. This round will form a raised ridge using front post double crochet sequence.
Round 16 :
Ch 2, work 1 hdc in each of next 3 sts, *FLO double crochet 3 in next shell space, BLO double crochet across next ridge* repeat around; corners keep (3 hdc, ch 2, 3 hdc); join.
Round 17 :
Ch 1, sc in each st around working sc in the top of FLO and BLO stitches to flatten; corners sc3; join. (even round)
Round 18 :
Ch 3, *dc in next 5 sts, (2 dc, ch 2, 2 dc) in corner* repeat around; join. (this expands square, keep sides even)
Info :
Check your square against the pattern gauge: if your side length is +/- 0.5 in, adjust future rounds by adding or removing a repeat of dc along each side to keep layout measurements consistent with the desired bedspread size.
Round 19 :
Ch 1, sc in each st for a neat boxy row; corners work sc3 in ch-2; join.
Round 20 :
Ch 3, dc in each of next 8 sts, in the side center work cluster shell: (dc, ch1, dc) repeated 3 times separated by 1 ch; continue dc around with corners (2 dc, ch2, 2 dc); join. (even round)
Round 21 :
Ch 1, work a textured band using raised post clusters: *FPdc around next 3 dc to create a ridge, BPdc around the next 3 dc* alternate across each side; corners sc3 in ch-2; join.
Round 22 :
Ch 1, sc across working into posts where needed to create flat surface; corners sc3; join. (use this round to even out any height differences from post stitches)
Info :
At this stage the motif has strong texture. If you're making many squares, place completed motifs on blocking mats and shape them to the same dimensions. Blocking will open lacework and align ridges for easier joining.
Round 23 :
Ch 3, *dc in next 10 sts, (2 dc, ch 2, 2 dc) in corner* repeat; join. Increase perimeter to prepare for the final decorative border within the motif. (even round)
Round 24 :
Ch 1, sc around; in each corner ch-2 work sc3; join. (even round)
Round 25 :
Ch 2, hdc in each st around for sturdy base for outer shell; keep corners 3 hdc in ch-2; join.
Round 26 :
Ch 3, work 1 dc in each stitch across; where you want a deeply defined ridge, work FPdc for the next 6 stitches to create a raised line; repeat across each side and maintain corner groups; join.
Round 27 :
Ch 1, sc around working into post stitches where needed and smoothing edges; corners sc3; join. (even round)
Round 28 :
Ch 3, shell round: *skip 2, 5 dc in same st, skip 2, sl st in next* across each side; corners work (5 dc, ch2, 5 dc); join. (decorative shell accent)
Info :
If you prefer a denser square, substitute shells with clusters or a double-row of dc. These changes will affect gauge; adjust hook size accordingly.
Round 29 :
Ch 1, sc around to anchor shells; corners sc3; join. (even round)
Round 30 :
Ch 3, work 2 dc in each of the next 6 groups along each side to create a fuller edge; in corners work (2 dc, ch2, 2 dc); join. (even expansion round)
Round 31 :
Ch 1, sc in each st around to stabilize; work sc3 in corner ch-2; join.
Round 32 :
Ch 3, create a picot-style decorative round: (dc, ch 3, sl st to top of dc) along sides spaced evenly (approx every 6 dc); corners keep (2 dc, ch2, 2 dc); join.
Round 33 :
Ch 1, sc around working over picot joins and smoothing; corners sc3; join. (even round)
Round 34 :
Ch 2, hdc in each st around for a neat leveling round; corners 3 hdc in ch-2; join.
Round 35 :
Ch 1, work a final decorative ridge row: *FPsc (front post single crochet) in next 4 sts, sc in next 4* repeat along each side; corners sc3; join. This gives a braided, ridged look to the motif perimeter.
Info :
Fasten off leaving a long tail for weaving in and for easier joining with the next motif. Block each motif square flat to the same dimensions, paying attention to corner alignment and ridge orientation so joining lines match across all squares.
Round 36 :
Optional final round: Join with a contrasting or same color using sl st or crab stitch (reverse sc) around to give a subtle rope-edge finish. Work 1 sl st in each st; join and fasten off. (even round)
— Make Layout & Join Squares (work rounds 37-76 to prepare and join a 6x6 arrangement) :
Info :
Decide layout size: this pattern is written for a 6x6 motif layout (36 motifs) for a queen-size bedspread. You can scale to a 4x4 for a throw or 7x9 for larger beds. Each motif finished size target: approximately 12 x 12 inches after blocking. Measure and adjust if needed.
Round 37 :
Make 36 motifs following Rounds 1-36. Keep yarn tails long (approx 10-12 inches) for seaming or join-as-you-go. Block all motifs flat and square to target measurement. (construction step)
Round 38 :
Layout your bedspread on a large flat area: arrange in 6 rows of 6 motifs. Shift motifs so ridges meet and shells align for a pleasing continuous texture. Take a photo of the layout to reference placement when joining.
Round 39 :
Join row-by-row using join-as-you-go (JAYG) slip stitch method: For Row 1, lay Motif A (left) and Motif B (right) with RS facing. Attach yarn in the corner stitch of Motif A and ch 1, sc in first corner, then sl st through corresponding stitches of Motif B as you progress across the joining edge, alternating sc in A and sl st in B to create a neat seam. Continue until row is joined. (joining technique)
Info :
If you prefer a decorative seam, use whip stitch with an invisible join or a contrasting color sl st seam to highlight joins. JAYG gives the cleanest, flatter finish for bed linens.
Round 40 :
Join motifs across Row 1 until you have 6 motifs joined into a long strip. Repeat the same joining method to assemble all 6 rows individually (you will have 6 strips total).
Round 41 :
Once you have 6 strips, join the strips together along their long sides using the same JAYG method. Work from one corner across the long edge matching ridge alignment. Join all strips to complete the sheet of motifs. (assembly)
Round 42 :
After joining all motif seams, weave in all loose ends from motif making using a yarn needle; do not yet trim until blocking is complete. Pin the whole spread flat and steam or wet block as needed to ensure a flat, even bedspread surface.
Round 43 :
Info :
When joining, maintain the same join side orientation for all motifs: if the raised ridge is on the right of each motif, join them all with ridge-right orientation for pattern continuity. Work slowly on seams to avoid misaligned pattern repeats.
Round 44 :
If any joins are slightly gapped, reinforce by working a narrow row of sc across join on top side, or use a 3-needle bind-off like seam for a flatter join. Check that corners remain square and that the entire surface lays flat.
Round 45 :
Once joined and flattened, count motif seams from center and identify any small distortions; you can add a short relief row of hdc or sc across the affected motif to disguise and flatten irregularities.
Round 46 :
Info :
When performing JAYG: match every other stitch if your motif sides have different stitch counts; sometimes you may need to do 1 sc in two adjacent stitches at a corner to keep sides aligned. Mark adjustments on a paper map so you repeat the same correction on each seam.
Round 47 :
Once joined, measure the bedspread top. Target dimensions for 6x6 motifs should be approximately 72 x 72 inches (allowing some variance due to blocking and stitch tension). If your spread is too small, add an extra round of motif extension or add an extra column of motifs.
Round 48 :
Take this moment to tidy long tails left for joining and weave them along seam channels so they are invisible. Trim ends close after weaving in securely.
Round 49 :
Info :
If you prefer a reversible join, perform a flat slip-stitch join where you sl st through back loops only on each motif edge before finishing with a sc row on both sides to hide the join. This will add minimal bulk and be reversible.
Round 50 :
Now prepare for border attachment: make sure the bedspread is flattened and even. We'll work a multi-row border to frame the piece and create the tassel anchors.
— Border & Frame (work rounds 51-116 to create triple-ridged framed border and skirt) :
Round 51 :
Attach yarn to one corner of the assembled spread. Ch 1, work 1 sc along the seam channel (approx 1 sc per motif stitch) around the entire perimeter, working (sc, ch2, sc) in each outermost corner to form corner turning points; join with sl st. (even round)
Round 52 :
Ch 3, dc in each sc around to create a clean outer edge; in each corner work (2 dc, ch 2, 2 dc); join. (even round)
Round 53 :
Ch 1, sc in each st around; corners sc3; join. This neat sc round sets base for triple ridge. (even round)
Round 54 :
Info :
Triple ridge technique: we'll build three parallel ridges using FPdc/BPdc combinations separated by sc rows. These create a frame-like rib that reads as a raised rope around the entire bedspread.
Round 54 :
Ch 2, work FPdc in next 6 sts, *1 sc in next 6 sts* repeat around; at corners FPdc in corner area maintaining 6-post ridges on each side; join. (first ridge set)
Round 55 :
Ch 1 sc in each st smoothing post stitches; corners sc3; join.
Round 56 :
Ch 2, work BPdc across the same 6-st runs used for the first ridge to create a second parallel ridge; alternate with sc across plain sections; corners maintain (3 hdc) as needed; join. (second ridge)
Round 57 :
Ch 1 sc in each st; corners sc3; join. This evens the ridges and secures texture.
Round 58 :
Ch 3, work a decorative shell row: *skip 2, 5 dc in next st, skip 2, sl st in next* across each side; in corners (5 dc, ch2, 5 dc); join. (decorative outer shell)
Round 59 :
Ch 1, sc around to anchor shells; corners sc3; join.
Round 60 :
Ch 2, hdc in each st around for a neat leveling row; corners 3 hdc in ch-2; join.
Info :
Between each ridge and decorative row, block gently to ensure the border lays flat. Use pins to keep ridges even and straight on the long edges.
Round 61 :
Ch 3, create a braided rope look: *FPsc across next 8 sts, sc across next 8 sts* repeat across each side; corners sc3; join. (creates third ridge effect)
Round 62 :
Ch 1, sc in each st smoothing ridge joins; corners sc3; join.
Round 63 :
Ch 3, 1 dc in each st for two rounds to bulk the border for good drape: R63 1 dc in each st; join. (even round)
Round 64 :
Repeat Round 63 (1 dc in each st); join. (even round)
Round 65 :
Ch 1, sc in each st; corners sc3; join. This anchors the doubled dc rounds.
Round 66 :
Info :
Now we will add a draped skirt effect by working a matrix of openwork rows that stagger with the motif texture. This adds pleasing movement to the bedspread while keeping weight manageable.
Round 66 :
Ch 3, *dc, ch 2, sk 2* along the border edge to form openwork, treating corners as (2 dc, ch 2, 2 dc); join. (openwork row)
Round 67 :
Ch 1, sc into each dc and ch-space around to stabilize openwork; join. Corner sc3.
Round 68 :
Ch 3, work FPdc across first 6-8 sts to create small ridges cascading from the frame; alternate with 1 sc across intermediate 6-8 sts; join. (decorative)
Round 69 :
Ch 1, sc around; corners sc3; join.
Round 70 :
Ch 3, 1 dc in each st for 4 rounds to create a firm skirt base: R70 1 dc each st; R71 1 dc each st; R72 1 dc each st; R73 1 dc each st; join each round.
Round 71 :
Info :
Work the 4 dc rounds steadily to produce a stable weight for the skirt; this keeps the drape pleasing and helps the tassels hang evenly.
Round 72 :
After the 4 dc rounds, work a sc round to finish the skirt base; corners sc3; join. (even round)
Round 73 :
Ch 3, work a decorative picot edge: *dc, ch 3, sl st in top of dc* across sides to create small picots; corners (2 dc, ch2, 2 dc); join.
Round 74 :
Ch 1, sc around smoothing picots; corners sc3; join. Fasten off and weave in ends. This completes the main framed border. (finishing border)
Round 75 :
Info :
Measure the completed bedspread again to see final dimensions after border. If you want a longer skirt or larger overhang, add additional dc rounds now before finishing with the picot edge.
Round 76 :
If you added extra rounds, be sure to maintain the same stitch rhythm on all sides to keep the border square and even. Once happy, fasten off and block the whole spread once more for final shaping.
— Tassels & Corner Accents (work rounds 77-96 to create and attach uniform tassels) :
Round 77 :
Info :
Tassels add a playful finishing touch. We will make 24 tassels for a 6x6 layout (one at each corner and a tassel between motifs along skirt). Make tassels uniform by wrapping yarn around a 4-inch cardboard form.
Round 78 :
To make a tassel: wrap yarn approx 40-48 times around a 4 inch form for a medium-thickness tassel. Cut one end and slide off the form. Use a 6 inch strand to tie the top tightly and fold in half. Create a small head by wrapping a short yarn strand around the tied portion about 1/2 in down and knot tightly. Trim ends evenly. Repeat to make 24 tassels.
Round 79 :
Prepare tassel attachment points: spacing roughly every 4-5 inches along the skirt edge, pick stable sc posts for secure attachment. Make small loops of yarn through the base of each tassel for sewing.
Round 80 :
Attach tassels: Using a yarn needle, sew the top loop of each tassel through the selected stitch at the skirt edge and pass the loop through, then feed the tassel ends through the loop and pull to secure (lark's head knot). Add a couple of hidden whip stitches through the tassel head to anchor securely.
Round 81 :
Space tassels evenly: on a 6x6 layout you will place 4 tassels along each side and one at each corner for visual balance, totaling 24 tassels. Adjust counts if you added extra skirt rounds so tassel spacing remains even along the perimeter.
Info :
Secure tassels firmly with a knot and a few sewing passes through the top portion. Tie a final knot on the wrong side and weave tail into fabric for extra security. Trim tassels to equal length and comb with a soft brush for a full look.
Round 82 :
Optional: add a small decorative bead or wrapped yarn accent at the top of each tassel if you want extra weight and polish. Sew bead in place before attaching tassel to bedspread.
Round 83 :
After all tassels attached, step back and check length and fullness. Trim to a uniform length (approx 3.5-4 inches for medium tassels) and shape them gently with scissors so each tassel head is neat.
Round 84 :
Info :
If you’d like a lighter set of tassels, reduce wrap count to 30 times; for heavier tassels wrap 60 times. Keep the number consistent for visual balance.
Round 85 :
Weave in all tassel attachment tails and trim any loose ends on the bedspread reverse side. Steam or lightly press the tassels if they appear flattened from packaging or storage.
Round 86 :
Final check: ensure tassels are secure and spread lays flat. Make any minor corrections to seam tension or tassel spacing now. Your main bedspread is now complete and ready for matching pillow shams.
— Make Matching Pillow Shams (work rounds 87-148 to create two square shams with enclosed back or envelope style) :
Info :
These pillow shams are worked as one motif each (same motif as Rounds 1-36) with additional rounds to form a pillow flap or encloses. Target final pillow front dimension approx 18 x 18 inches (adjust by adding or subtracting rounds on the motif).
Round 87 :
Make 2 motif fronts following Motif Rounds 1-36. Block both to the same dimensions as your target size (approx 18 in square). These will be the decorative front panels.
Round 88 :
For the pillow back choose an envelope style: make 2 rectangular panels (Panel A and Panel B) to overlap the back. Each panel size should be the pillow size x 0.75 so that when overlapped they meet in the center with an overlap of approx 3-4 inches.
Round 89 :
Work Panel A: Ch foundation to desired width equal to pillow width (approx 18 in). Row 1: dc across; row 2: dc across; continue for height equal to approx 12 in; finish. Make Panel B the same size but mirror so overlap direction is correct.
Round 90 :
Info :
If you prefer a zippered or buttoned envelope back, substitute the overlapped panels with a single panel and add buttonholes across the top edge or sew in a concealed zipper along one side.
Round 91 :
Block Panel A and Panel B to the same dimensions as motif front. Lay the front motif over Panel A and Panel B such that both panels will overlap in the middle on the back. Pin around edges to check fit before sewing.
Round 92 :
Sew the front to Panel A and Panel B by aligning edges and working a sc or slip-stitch seam around three sides, leaving the overlapped side open for envelope closure. Use mattress stitch or a neat whip stitch for an invisible seam. Reinforce corners with extra passes.
Round 93 :
Once guest seams are sewn, add a decorative edge around the whole sham: Ch 1, sc around on RS; corners sc3; join. This frames the sham and hides seam edges. Fasten off and weave ends.
Round 94 :
Add corner tassels to each pillow sham: make 4 small tassels per sham (approx 20-28 wraps for smaller tassels) and attach at the front motif corners using the same lark's head method. Secure with extra stitches to hold through use.
Round 95 :
Optional: add a cushion inner (18 x 18 in insert) and slip it into envelope. If your motif and panels created a snug fit, you may choose a slightly smaller insert for a plumper look.
Round 96 :
Info :
For durability, reinforce the seam connecting the motif front to back panels by sewing through the motif perimeter and the backing fabric with small whip stitches. This helps the sham survive frequent use.
Round 97 :
Fasten off and weave in all ends. Trim tassel heads evenly and comb if you want a fuller finish. Repeat to make the second sham. Your matching pillow set is complete.
Round 98 :
Optional: add a hidden zipper to one side for easy removal. Carefully cut seam allowance and sew zipper in using a sturdy needle and thread, then hide zipper tape with a sc row on RS.
Round 99 :
Info :
Store one sham inside the other when not in use to save space and protect tassels. Rotate shams occasionally to prevent one-side wear if using daily on your bed.
Round 100 :
Trim and final tidy-up: remove any visible stray fibers, steam-block if necessary, and give the spread a last pass with a low-heat steam iron held slightly above the fabric to settle ridges and open lacework gently.
Round 101 :
Final inspection: confirm that every seam has been woven in securely, tassels are even and firmly attached, and the border does not have uneven puckers. Make any small corrections before use.
Info :
Bedspreads take time and repetition; maintain consistent tension across motifs and blocks. If joining is slow, block one row at a time and join that row to the rest to keep the project manageable on a large floor surface.
Round 102 :
Project care: Hand wash or gentle machine wash in cold water inside a large mesh bag. Lay flat to dry. Tassels may be re-fluffed with a brush once dry. Consider professional blocking for best archival care.
Round 103 :
Photo tips: when photographing your finished spread, open curtains or use soft diffuse light to highlight texture and ridges. Lavender color reads deepest with natural side lighting across the surface to emphasize relief.
Round 104 :
Congratulations — your Vibrant Lavender Granny Square Bedspread is finished. Package and gift it proudly or style it on your bed with neutral linens to let the texture and color shine.
— Advanced Decorative Details & Alterations (Rounds 105-160 provide optional texture and size adjustments) :
Round 105 :
Info :
If you prefer a denser bedspread, add an extra round of shell clusters (Round 28 style) to each motif before joining. This increases motif size by approx 1-1.5 inches per motif side.
Round 106 :
To make a king-size bedspread, add an extra column and row of motifs (making 7x7 or 7x8 layouts). You will need approx 49-56 motifs. Adjust yarn quantities accordingly (approx 2000-2400g worsted yarn).
Round 107 :
For a reversible join, perform two joining rows: first sl st join on RS, then sc row on WS to cover and tidy tails. This yields a neat reverse side suitable for frequent use.
Round 108 :
If you want added warmth, line the back with a lightweight cotton sheet sewn in with invisible stitch. Baste around the perimeter before final edge rounds to hold sheet in place.
Round 109 :
To alter motif size without changing stitch pattern, use a different hook size: 5.5mm will enlarge motifs (looser), 4.5mm will tighten and shrink. Make a gauge motif to calculate new motif count for layout before committing to the whole project.
Round 110 :
Info :
Adding an inset lattice between motifs: instead of joining directly, create a 2-3 row lattice (ch-spaced strips) and join motifs to the lattice strips for an airy effect. This will increase spread width and yarn usage.
Round 111 :
Decorative corner medallions: crochet small circular medallions (approx 4 in diameter) and sew them centered over motif outer corners for floral accents. Work medallion: magic ring, 12 dc; 2 rounds of shells; fasten off and sew.
Round 112 :
Colorwork option: add a contrast held-with-main color strand for one or more rounds to create a faint stripe around the spread. Carry the unused color neatly along the row or cut and weave ends if color change is infrequent.
Round 113 :
To create a scalloped lower edge: on skirt rounds substitute shell clusters for every other dc group and finish with a picot round to give a romantic scalloped hem.
Round 114 :
Durability tip: when making a bedspread for daily use, reinforce every 6th join seam with a short running stitch on the back using a matching yarn. This stabilizes seams against repeated stress from sleeping and movement.
Round 115 :
For travel-sized or stroller throws, reduce to a 3x3 motif grid and finish with the same border sequence scaled to the new dimensions for a matching mini collection.
Round 116 :
Final Info :
Store the bedspread rolled in acid-free tissue or cotton bag to avoid creases. Avoid plastic storage which can trap moisture and flatten tassels. Enjoy your heirloom-quality crocheted bedspread for years.
This joyful, textural bedspread project is a satisfying blend of modular technique and decorative finishing — a real showstopper for the bedroom. Each square motif knits together into a beautifully tactile surface that invites touch and brings color to your room. The lavender hue and deep ridges create a calming, vintage-modern look, while tassels provide gentle movement at the hem. Whether you make this as a statement piece or a cherished gift, it’s a labor of love that will be treasured for years. 🧶💜