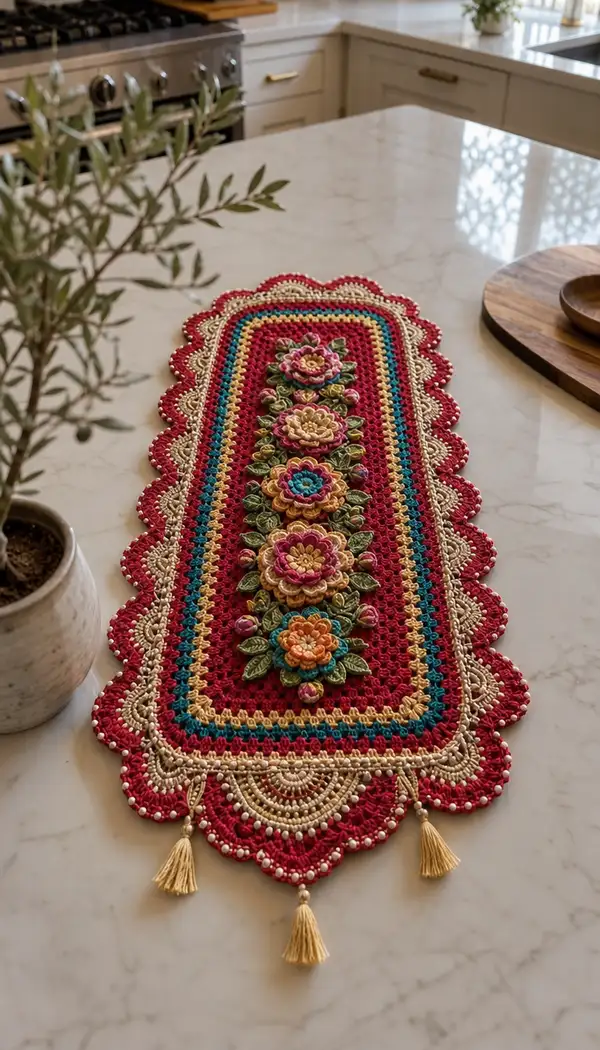
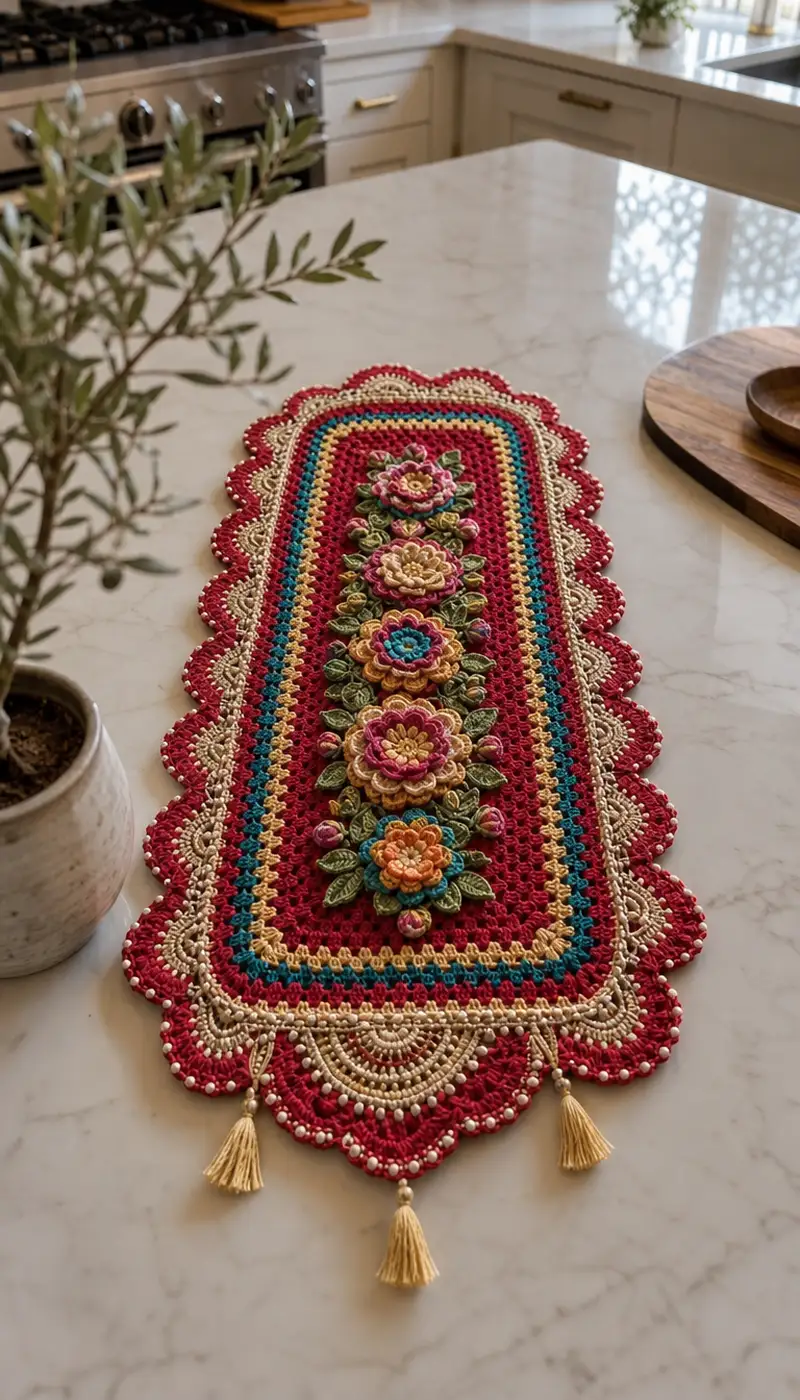
A richly detailed vintage-inspired table runner featuring a deep red background, layered concentric stripes, ornate scalloped edging with pearl accents, and a row of raised 3D floral motifs down the center. Finished with elegant cream tassels and bead-highlighted scallops, this runner brings a warm, handcrafted focal point to any table. The pattern uses textured stitches, color changes, and applique assembly to create a heirloom-quality accent piece.
Progress Tracker
0% Complete
— Notes & Gauge :
Info :
Gauge is not critical for overall look but important for final size and scallop spacing. With chosen yarn and 3.5mm hook, 10cm/4'' = approximately 18 sc x 18 rows. The final runner in sample measures approximately 34" long x 10" wide (not including tassels). Adjust foundation chain for desired width. Use stitch markers at round start. Work tightly enough so stuffing of small buds and attaching beads does not show through.
— Center Panel (Foundation Oval) :
Round 1 :
Ch 75, sc in 2nd ch from hook and in each ch across to last ch (74 sc); work 3 sc into last ch, now working on the opposite side of foundation chain sc into each chain back across (74 sc), work 3 sc in the final turning ch; join with sl st to first sc. Total = 74 + 3 + 74 + 3 = 154 sc (154)
Info :
Chain count 75 gives a nice narrow runner. If you prefer wider, add chains in increments of 2. Mark the first stitch of each round with a removable marker to keep track of round starts and to align border scallops later.
Round 2 :
1 sc in each st around working evenly. Join with sl st to first sc (154)
Round 3 :
1 sc in each st around. Join. (154)
Round 4 :
Change to deep red (if not already). 1 sc in each st around. Join. (154)
Round 5-8 :
Work 1 sc in each st around for 4 rounds total to build height and solid center field. Join each round. (154)
Info :
These rounds create the solid main field that anchors the runner. If making wider, counts will increase accordingly; maintain even rounds to keep shape stable prior to adding lacy rounds.
Round 9 :
Color change: mustard accent. *Ch1, sc in next 4 sts, ch1, sk 1 st* across the straight sections; at each oval end work (sc, ch1, sc) into the central increase area so that total counts remain 154; join. (154)
Round 10 :
Return to deep red. 1 sc in each st around. Join. (154)
Round 11 :
Teal stripe round. *[sc in next 3 sts, 2 dc cluster in next st]* repeat around, placing clusters evenly across straight sections; in end rounds place clusters into central chain of increases to maintain spacing. Count remains 154 (154)
Info :
Working modest-texture cluster stitches creates visual interest while keeping a stable base for the flowers to sit on. If you prefer a completely solid field, work sc rounds instead of clusters here.
Round 12-16 :
Work 1 sc in each st around in deep red for 5 rounds to build height and create a subtle frame for the next stripe rounds. Join each round. (154)
Round 17 :
Change to mustard: *[ch3 (counts as dc), sk next st, (dc, ch1, dc) in next st]* across straight panels to create a lacy V detail. At oval ends work (dc, ch1, dc, ch1, dc) into corner increases to preserve stitch count. Total stitches used remain equal to 154, because shells replace groups of sc in same position. Join. (154)
Round 18 :
Deep red: 1 sc in each st around to anchor shells and prepare for next stripe. Join. (154)
Round 19 :
Teal accent: 1 hdc in every 2nd stitch across the straight top and bottom, but work 2 hdc in corner increases to maintain count. Join. Total count remains 154 (154)
Info :
At this stage the runner center panel should be long and flat. Keep rounds even and check that oval ends remain symmetrical by counting increases at both ends. If one end is off by a few stitches, carefully redistribute the extra sc across the adjacent turns before moving to border rounds.
Round 20-24 :
Work 1 sc in each st around in deep red for 5 rounds to build height for flower placement. Join each round. (154)
Info :
Decide now where the 3D flower placement will be centered. We will attach six layered flowers spaced evenly along the long axis. Using a removable marker or pins, mark the centers where flowers will be sewn on. Count down the long side to place centers approximately every 9-10 rounds worth of vertical space; exact spacing in this foundation is roughly 9–10 cm between centers for this chain count.
— Border Foundation (Inner to Outer Layers) :
Round 25 :
Change to cream/beige. Work 1 sc in each st around in cream to begin the border. Join. (154)
Round 26 :
1 sc in each st BLO (back loops only) around to create a defined ridge for attaching lace shells later. Join. (154)
Round 27 :
Work *[sc in next 4 sts, shell (5 dc) in next st]* repeating around the long straight edges. At each oval end, work shells more closely to bridge corners: (shell, sc, shell) in the central increase area. This will slightly increase stitch count by +number of shells added; new total = 154 + repeat shells added. For our base chain of 75, place 22 shells across each straight side (estimate) resulting in total st count approx 176 (approx)
Info :
This round begins shaping the ornate lace border. Because shell placement sits on top of base stitches, we keep the physical foundation stitch count stable by placing shells at regular intervals; to maintain mathematical clarity, count shells on one straight edge and mirror on the other. For clarity, treat shell placement as decorative and allow small variations in global count.
Round 28 :
Switch back to deep red. 1 sc in each st (including stitches between shells) around to tether shells and begin the colorful banding. Join. (approx 176)
Round 29 :
Mustard band: *[ch1, sk 1 st, sc in next 2 sts, ch1]* repeat to create airy row between red and cream, anchoring at shells with sc to avoid gaps. Join. (approx 176)
Round 30 :
Teal narrow row: 1 hdc in each st around to create a color contrast band. Join. (approx 176)
Info :
At the end of this round, the runner has a fully banded inner border. Keep these rounds even and check overall flatness. If fabric buckles, block before proceeding to scalloped outer edge.
Round 31 :
Change to cream: work 1 sc in each st around to create a solid base for outer lace; join. (approx 176)
Round 32 :
Work 1 sc in each st BLO for another ridge to serve as the base for pearl picots and scallops. Join. (approx 176)
Info :
Working the BLO rounds creates a subtle ridge that shows between colored bands and gives an anchoring line for the ornate scallops. If you want a lower-profile border, skip the second BLO round and go straight to scallops.
— Outer Scalloped Lace Edge (Cream) :
Round 33 :
Shell foundation: *[sk 3 sts, (7 dc shell) in next st, sk 3 sts, sl st in next st]* repeat around the long straight sections, at oval ends work extended shells to bridge turns: (7 dc shell, ch2, 7 dc shell) in central corner sc. This establishes the scallop shapes. Count will vary slightly; shells spaced evenly across straight edges for symmetry. (approx 176 before shells)
Round 34 :
Decorative picot row: Into each shell peak work *[sc, ch3, sl st in 3rd ch (picot), sc]* to create a raised picot bead base. In the corner extended shells, add two picots spaced evenly. Join around. (shell-based repeats)
Info :
Work picots loosely to make small loops that can be embellished with beads. If adding pearls, either sew onto the picots after blocking or crochet a bead into each picot by pre-threading the yarn through the bead and slipping bead down to picot before closing the sl st.
Round 35 :
Bead accent round: With a beading needle pre-string 40–60 small pearl beads onto cream yarn. Work sl st across, placing a bead on every picot by slipping bead down and working sl st to lock bead in place; at the oval ends place beads to highlight the scallop peaks. This round will not change base counts; it is purely embellishment. (decorative)
Round 36 :
Final scallop anchor: Work a finishing round in sc across all shell peaks and between picots to anchor beads and create a neat edge. Join and fasten off, weaving in ends. (decorative)
Info :
After this round block your runner gently on a flat surface, pinning scallops to shape. Steam-block or wet-block depending on fiber. Allow to dry thoroughly before adding tassels or sewing on 3D elements.
— 3D Layered Flower Appliques (Make 6 identical) :
Info :
These layered flowers are worked in rounds from the center out using magic ring. Each flower has multiple petal rounds with color changes to create the layered dimensional look seen in the photo. Sew flowers onto center panel at marked positions after all pieces are complete and blocked lightly.
Flower Round 1 :
MR, ch1, 8 sc into magic ring, tighten, join with sl st to first sc (8)
Flower Round 2 :
Inc in each st around (16)
Flower Round 3 :
*sc in next st, inc* around (24)
Flower Round 4 :
Change to petal color (lighter pink or mustard). *[sc, ch3, sc] in next st (creates small loop petals), sk 1 st, sc in next st* repeat around. You will have 12 petal loops anchored to the round. Count is 24 base anchor stitches but loops create petal points. (24 anchors)
Info :
When making loop petals, keep the ch3 loops consistent size. These loops will be worked later to form fuller petals. Use a small hook (3.0mm) for petals for tighter shape if desired.
Flower Round 5 :
Working into each ch3 loop: *[(sc, hdc, 3 dc, hdc, sc) into loop]* to form 12 full petals. Join. Each petal uses the space of one loop and the round remains visually 12 petals anchored to original 24 base anchors. (12 petals)
Flower Round 6 :
Change to contrast mid-layer color (golden/mustard). Work round of sc between petals: sl st in next base anchor, *sc in next base st* around to stabilize. Count anchoring stitches remains 24. (24)
Flower Round 7 :
Repeat petal round but larger: *[(sc, hdc, 5 dc, hdc, sc) into the space behind each petal]* to create larger outer petals (12 outer petals). Join. (12 petals)
Flower Round 8 :
Change to another accent color (teal center or pink highlight). Work dimpled center: MR, ch1, 6 sc in MR, tighten and sew the small center piece into the center of the flower with whip stitch for additional color depth. Fasten off and weave tail. (6)
Info :
Layering the petals builds the 3D look. For a fuller flower, use two small centers: one flat disk sewn in then a slightly raised disk on top. Secure petals lightly with small stitches to the center so they do not flatten when washing or placing items on runner.
Flower Round 9 :
Optional edging: With cream yarn, work small sc border around entire flower edge to define shape (work 1 sc in back loop of each anchor st around the flower). Fasten off leaving long tail for sewing. (decorative)
Info :
Make 6 flowers following rounds 1-9. Slight color variation between flowers adds a hand-made collage effect: switch petal and center colors between flowers for visual interest. Block lightly to shape petals before sewing down.
— Leaves & Tiny Rosebuds (Make 18-24 leaves and 12 buds) :
Leaf Round 1 :
Ch 8, sc in 2nd ch from hook, hdc in next, dc in next 3, hdc in next, sc in last; now work along opposite side of chain: sc, hdc, dc3, hdc, sc; join at base with sl st and fasten off. Leaf length is approx 3–4 cm. This leaf uses 14 anchor stitches when worked flat. (leaf)
Leaf Round 2 :
For sharper leaves, after base sc round work 1 sc in each st BLO to create visible vein. Fasten off. (leaf)
Info :
Work leaves in two shades of green for depth. Flatten and steam-block with pins to set shape. Each flower will need 2–4 leaves depending on visual fullness.
Rosebud Round 1 :
MR, ch1, 6 sc in MR, tighten (6)
Rosebud Round 2 :
Working in BLO, *sc in each st around* (6) — this creates a small hollow that can be filled slightly with fiberfill to give a round bud
Rosebud Round 3 :
Ch2, work 6 sc into ch2 loop to form top petals; close and fasten off leaving tail for sewing. Make 12 buds. (6 top petal sc)
Info :
Sew a bud with a small dot of fiberfill inside to make it pop, then anchor to the center panel near flowers or tucked into leaf clusters for a natural look.
— Tassels & Bead Finishing (Ends) :
Tassel Step 1 :
Make 6 tassels (3 per end). Wrap cream yarn around a 6cm cardboard 40 times, tie a small piece of yarn around the top, fold and tie again 6–8mm below top to make a neat head. Trim ends evenly. Each tassel approx 5–6cm long. (tassel)
Tassel Step 2 :
Attach a small wooden bead at the top of each tassel with a few stitches to secure. Use the long tail left from attachment to sew tassel to the runner point at the oval ends. Sew through the runner and tie securely, then weave tail into fabric. (attachment)
Info :
For extra security, stitch tassels through a small button or loop anchor on the backside, especially if runner will be moved frequently. Trim and neaten tassel strands with fabric scissors and steam gently to even the fibers.
— Assembly & Attaching Appliques :
Assembly Step 1 :
Position the six layered flowers on the center panel at your marked centers. Each flower should be centered on the runner midline and spaced evenly; with this foundation chain 75 layout the centers are approx every 5.5–6cm along the long axis. Pin in place with T-pins through petals (avoid leaving pinheads in final product). (placement)
Assembly Step 2 :
Sew each flower down using a matched color yarn and a sharp yarn needle. Use invisible ladder stitches under the flower base and run 6–8 locking stitches through the center disk and back into the runner to ensure flowers do not shift. Knot securely and weave in ends. (sewing)
Assembly Step 3 :
Sew leaf clusters grouped around each flower: place 2–4 leaves per flower, overlapping slightly along the runner center line. Use small stitches at leaf bases to secure them, then tack edges if needed to prevent flipping. (leaves)
Assembly Step 4 :
Sew small rosebuds in pairs between flowers and near leaves to create a natural, organic composition. Sew buds with several stitches through the base and into the runner; reinforce with a knot. (buds)
Assembly Step 5 :
Trim any stray yarn tails and use a yarn needle to weave ends invisibly into adjacent stitches. Lightly press or use steam-blocking to settle applique components. (finishing)
Info :
Pin everything before sewing to make sure the row of flowers is aesthetically balanced and symmetrical. Sit the runner in its intended space to preview before stitching permanently. If you want the flowers removable for washing, attach using discreet buttons or snap fasteners sewn to the underside of each flower base.
— Final Blocking & Care :
Care Step 1 :
Lightly wet-block the entire runner on a flat blocking mat, pinning scallops and tassel positions to perfect shape; allow to dry fully. Use steam rather than soaking for yarns that might shift color. (blocking)
Care Step 2 :
Spot-clean as needed. If full wash necessary, hand-wash gently in cool water with mild detergent; reshape and dry flat. Remove beads or secure them extra if washing vigorously. (care)
Info :
Most cotton and cotton-blend yarns will hold blocking shape well. Avoid machine-drying as tassels and beads can tangle. Store flat or rolled to avoid scallops bending out of shape.
Completing this vintage floral table runner gives you a beautiful, heirloom-style focal piece for your home. Each stitch, shell, and layered petal comes together to create a textured, colorful tableau that feels luxurious and handmade. I love how the pearls and tassels echo the delicate scallops — the final result is elegant and inviting. 🧶🌸✨