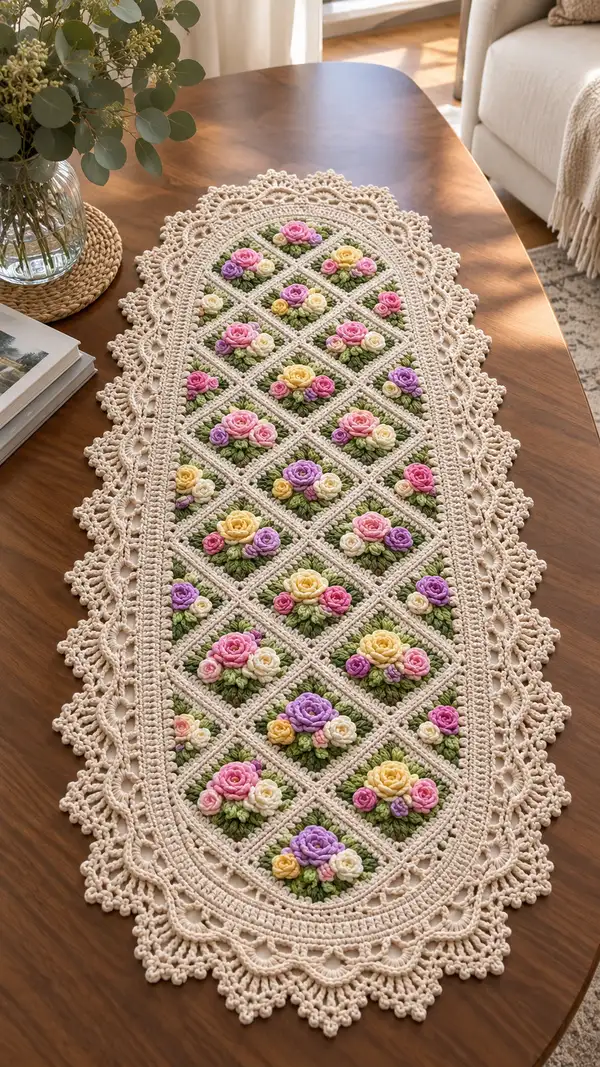
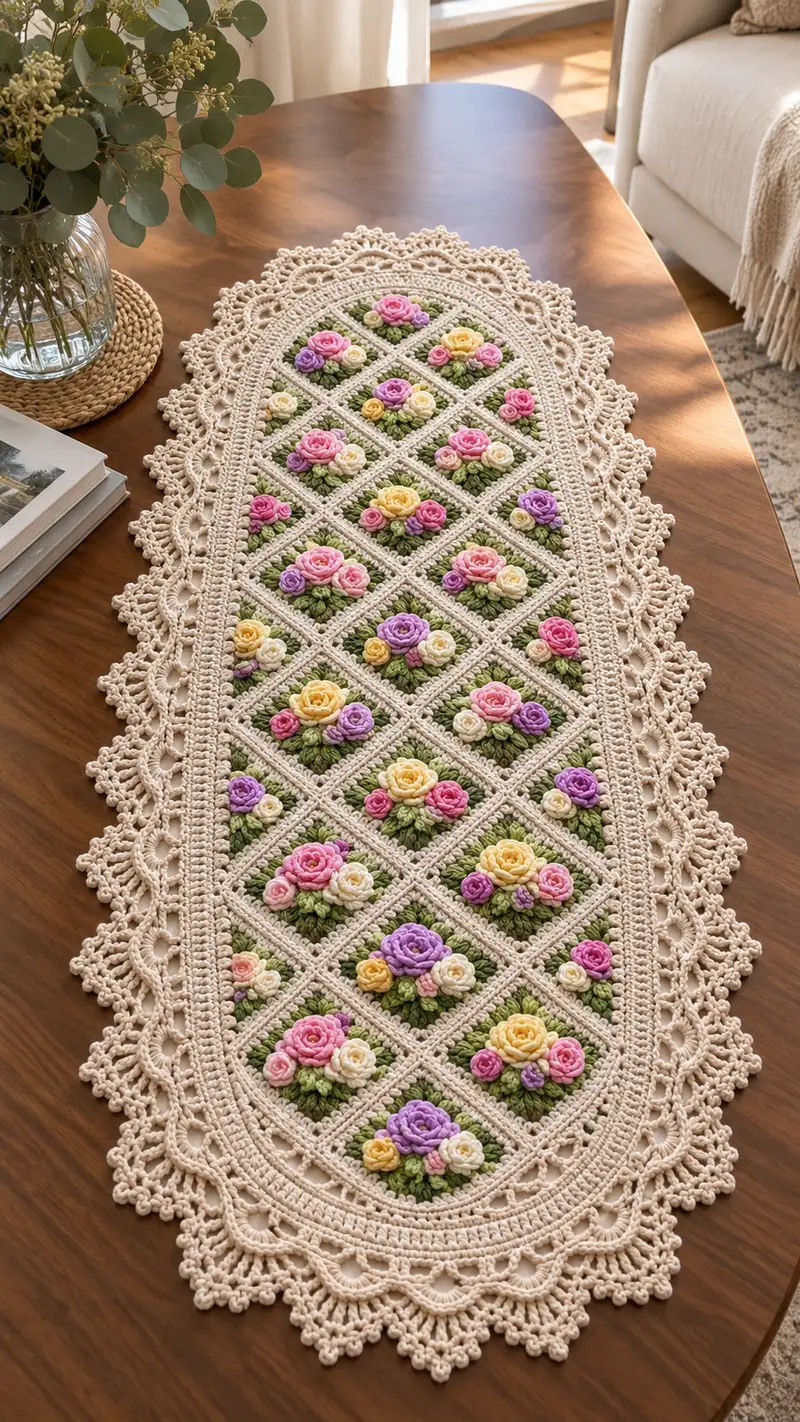
A beautifully detailed crochet table runner featuring raised 3D roses, lush puff-stitch leaves, lattice diamond motifs and an ornate scalloped lace border. This runner uses soft cream for the lattice and edging, with a fresh grass green background and pastel roses in pink, lilac, yellow and ivory to create an elegant antique-style centerpiece. The finished piece lies flat and drapes gently over a dining table, bringing handmade charm to any room.
Progress Tracker
0% Complete
— Notes & Gauge :
Info :
Gauge isn't critical for this decorative runner, but aim for each diamond motif to measure approximately 3.5" (9cm) across the flat diagonal when worked with worsted weight yarn and 3.5mm hook. The pattern is modular — you can increase or decrease the number of motifs to fit your table. Work tightly for the rosettes so the petals hold shape, and use a slightly smaller hook for detail rounds if needed.
Info :
Color key used throughout: CC = Cream (background & border), G1 = Grass Green (main motif ground), G2 = Leaf Green (leaf shading), R1 = Pink (rose), R2 = Lilac (rose), R3 = Yellow (rose), R4 = Ivory (small rose). Keep yarn bobbins or small balls for each motif color to avoid long floats.
— Rosette (Make 1 per motif) :
Round 1 :
Using R1 (or chosen rose color) and 3.25mm hook. mr, ch1, 6 sc in magic ring. Pull ring closed. (6)
Round 2 :
ch2 (counts as first dc), 2 dc in each st around (12). Join with sl st to top of ch2. (12)
Round 3 :
Change to 3.25mm hook if needed. *(ch1, puff in next st) twice, ch1, sl st into next st; repeat from * around to create petal bases — work 6 petal bases. After final petal sl st to base and fasten off leaving long tail for sewing. (Creates 6 petal loops)
Info :
Puff stitch method: yo, insert hook, yo, pull up loop (repeat 3 times to have 7 loops on hook) yo and pull through all loops, ch1 to secure. This makes a small compact puff ideal for layered petals.
Round 4 :
Rejoin to outer base of a petal loop with R1, *work 3 dc into the loop, sl st into space between petals; repeat around to create a full rose petal layer (6 groups of 3 dc). Fasten off with long tail for sewing.*
Round 5 :
With R1, rejoin behind first petal; for layered look, work 6 sl st around the inner circle to anchor petals and slightly cup them. Pull gently to shape rose. Fasten off. (No stitch count — decorative anchoring only)
Info :
For larger/full roses, optionally make a second petal round: slip into base of first petal, work (ch1, 5 dc cluster into petal loop, sl st between petals) to add volume. Use care to keep petals proportional to motif base.
Round 6 :
If adding an inner spiral center, with a contrasting shade of same rose color, ch1, make 8 sc around the central hole and pull tight, then hide tail behind rose. This secures the rosette center and adds fullness. Fasten off.
Info :
Make rosettes slightly smaller than the motif opening so they nest into the green ground comfortably. Keep long tails for sewing directly onto the square base later. Make required number of rosettes (one per motif).
— Leaf Cluster (Make 1 cluster per motif, or 2 small side leaves) :
Round 1 :
Using G2 (Leaf Green) and 3.25mm hook. ch6, starting in 2nd ch from hook: sc, hdc, dc, tr, dc along chain. Turn to work back along opposite side: dc, tr, dc, hdc, sc into corresponding stitches to create a pointed leaf shape. Sl st to base. (approx 10 sts across)
Round 2 :
Work 1 sc around base to neaten, place a small puff in the center of leaf for texture: yo, insert, pull up loop 3 times, finish puff and ch1 to secure. Fasten off leaving long tail. (Textural element)
Round 3 :
Make two smaller single-leaf variants by ch4, sc, hdc, sc and sl st back to base for fill-in leaves. Fasten off. These will be sewn clustered beneath the rosette.
Info :
Make leaf clusters consistently in size and tension; contrast G1 and G2 slightly for depth: use G1 as the ground and G2 for highlighted leaf puffs. Make one cluster per motif: typically three leaves (one larger center + two small flanking leaves).
— Square Diamond Motif Base (Make 1 motif square) :
Round 1 :
Using G1 and 3.5mm hook. Work mr, ch1, 6 sc in mr, close (6). (6)
Round 2 :
(inc) x 6 - i.e., 2 sc in each st around (12). (12)
Round 3 :
(1 sc, inc) x 6 (18). (18)
Round 4 :
(2 sc, inc) x 6 (24). (24)
Round 5 :
(3 sc, inc) x 6 (30). (30)
Info :
You are building a small circular base that will be squared off. Keep count precise — these increases form a round that will later be stitched into a square/diamond shape by working corner clusters.
Round 6 :
Change to CC (cream) if you prefer the lattice in cream — however in this runner the lattice frame is cream later; round 6 maintains ground in G1: 1 sc in each st around (30).
Round 7 :
1 sc in each st (30). (30)
Round 8 :
Transition to square: work *sc in next 6 sts, (sc, ch2, sc) in next st* repeat 4 times to create four corner ch2 spaces — distributing increases so final perimeter becomes square-like. Adjust stitch counts so you have 4 corner points spaced equally. (approx 34-36 depending on placement)
Info :
When forming the square, it's helpful to block the flat rounds to a small square template. The ch2 corners will be expanded in subsequent rounds to perfect the diamond when joined on the diagonal.
Round 9 :
Work 1 sc in each st and in each ch2 corner space work (2 sc, ch2, 2 sc) to enlarge corners. This defines a small square. Maintain even tension so each corner becomes a 90-degree corner. (count ~ 40-44)
Round 10 :
1 sc in each st around working 2 sc into the corner ch2 spaces as needed to keep the square flat. (count maintained)
Round 11 :
Work 2 rounds of 1 sc in each st but in the round closest to final motif edge, work 1 sc BLO to create a defined groove for the lattice frame. (maintain stitch count)
Info :
Place the rosette on the center of the square and pin; the square should have a small inner recess where the rosette will sit. If needed, make additional rounds to enlarge the square so the rosette nestles slightly inside the diamond-shaped cavity.
Round 12 :
Fasten off G1 leaving long tail for join; seam the rosette to the motif by whipstitching from the long tail through the backing rounds, anchoring petals gently so the rosette appears raised but stable. Sew leaf cluster beneath rose using leaf tails, tucking smaller leaves under petals as in photo.
Info :
When sewing the rosette, anchor at several even points (usually 6) so the flower does not flop. Hide ends toward the back of the square and weave into the base rounds. Repeat making motifs in the color arrangement you prefer — pictured runner alternates pastel roses for visual interest.
— Motif Repeat & Layout :
Info :
The pictured runner is composed of motifs arranged in a staggered diagonal grid (diamond layout). Decide your final layout: for the pictured size you will need 20 motifs (5 motifs along the length in center column and 2 offset columns on each side). For a shorter runner reduce motif count proportionally. Keep all motifs blocked to identical dimensions for neat joining.
Info :
Number each motif as you complete them and lay them out on a blocking board or table in the desired grid prior to joining. This is the best time to ensure color distribution is balanced and that rose colors are not clumped together.
— Joining Motifs (Join-As-You-Go Lattice) :
Round 1 :
Place two motifs RS together at the intended join edges. With CC and 3.5mm hook, join into corner stitch of first motif, ch1, sc across edge of first motif until corner, sl st into corresponding corner on adjacent motif to join; continue across so sl st connections are made at each joining stitch. (Number of sl st joins equals number of stitches along edge — maintain even joins.)
Round 2 :
Join motifs along second edge forming a triangle of three motifs (for staggered layout). Use slip-stitch seam with CC working through back loop only (BLO) of both motifs to create a slight ridge in the lattice. This creates the diagonal lattice threads visible in the runner. Fasten off and weave tails.
Info :
Work joins neatly: pick up the post or back loop nearest the motif edge so the seam is visible as a raised lattice line. Keep tension loose enough to avoid drawing squares in but snug enough that motifs lay flat.
Round 3 :
After joining rows into the full runner shape, with CC, work one round of sc around the entire assembled motifs to create a continuous frame: sc evenly across edges, working (sc, ch2, sc) in motif corner spaces to preserve corners. Count stitches and place markers every 10 repeats to keep even. (Stitch count varies by runner size)
Info :
This continuous frame will be the base for the inner decorative bands and the lace edging. If your motifs left small gaps between diamonds, fill these with short sc gussets so the outer round looks continuous and flat.
— Inner Decorative Bands (Work rounds to build framed border) :
Round 1 :
With CC and 3.5mm hook, 1 sc in each st around the joined motifs (work evenly) to create a uniform base for the next textured rows. (Stitch count follows previous round.)
Round 2 :
1 sc in each st BLO around to form a recessed track for later fan stitches. This creates the double-rail effect seen next to the lace edge. (Same count)
Round 3 :
Switch to G1 and work 1 round of sc in each st to give a defined ground color border immediately around motif faces, smoothing transition between motifs and CC frame. Fasten off G1 and weave ends. (Same count)
Info :
Placing this green round between the cream rails better mimics the organic joint between flower fields and the lattice. You can work additional rounds of G1 for a wider green panel if you prefer.
Round 4 :
Return to CC and work 1 round of hdc in each st to give a slightly raised band. This helps the outer lace sit evenly and creates the bold cream border lines in the photo. (Same count)
Round 5 :
Work 1 round of sc in each st. Place markers at quarter points for lace repetition planning. (Same count)
Info :
Add picot or small bead-like bobble rounds (see edging rounds below) in this area for added vintage detail if desired. In the pictured runner the inner bands are simple and allow the lace to stand out.
— Outer Lace Border (Detailed 20-round edging sequence) :
Round 1 :
With CC and 3.5mm hook, 1 sc in each st around, work (1 sc, ch3) in corner spaces to form loop starters. This evens out the perimeter for shells. (count maintained)
Round 2 :
1 hdc in each st around to broaden edge slightly. (count maintained)
Info :
The lace needs a stable base. These two rounds stabilize the runner and remove curling. Keep stitches even and turn corners with ch3 loops to maintain scallop symmetry.
Round 3 :
*Skip 2 sts, 7 dc in next st (shell), skip 2 sts, sl st into next st; repeat around.* Where shells meet corners work 9 dc in corner loop space. This establishes the large shell arches that are the foundation of the scalloped lace. (Count: number of shells varies with runner circumference)
Round 4 :
ch1, sc into top of each shell and into the sl st spaces to create a neat anchor round. Work (sc, ch3, sc) centered over each shell apex to form picot loops for the next layered arch. Fasten off and weave ends where necessary.
Round 5 :
Rejoin CC at the base of a shell. Work (sc, ch5, sc) centered over each shell apex to create a larger loop. In corner shells make (sc, ch7, sc). This adds tall arches that will receive cluster motifs in later rounds.
Info :
Make sure arches are identical in stitch count between repeats; use stitch markers to mark the center of each shell so ch-loop placements remain uniform. Blocking later will help shape these arches evenly.
Round 6 :
Into each ch5 arch work: sl st, ch3, (5 dc, ch3, 5 dc) all into the arch, sl st to close into base. This creates the oval fan motif with an internal picot. For corner arches, use 7 dc groups to maintain proportion. (Fan formed across each arch)
Round 7 :
sc in each st and around fan groups to anchor. Where fan meets neighbor fan, work 1 sc between them for spacing. Fasten off any color changes and weave ends. (Count maintained)
Round 8 :
Work a delicate bobble round: *ch3, skip 1, (bobble in next st), ch3, sl st into next st; repeat.* Bobble method: (yo, insert hook, pull loop, yo, pull through 2 loops) x3 then yo pull through remaining loops and ch1 to secure. This creates beaded tips on arch points.
Info :
Bobble and picot work are decorative — keep them consistent by using markers to denote where each bobble should sit. Tension here should be slightly looser to keep lace airy.
Round 9 :
1 sc in each st around but in each fan center work a small 5-st cluster: ch1, *(dc, ch1, dc) in fan center, sl st to next fan center* — this adds a small vertical rib inside arch for antique detail. (Same count)
Round 10 :
*ch1, sc into next 2 sts, picot, sc into next 2 sts, (5 dc shell into next st), sc into next 3 sts* around. This introduces smaller scallops atop the previously formed fans for layered lace effect.
Round 11 :
Work 1 round of sc around, anchoring the small scallops and smoothing transitions. Fasten and weave ends as needed.
Round 12 :
Begin final picot fringe layer: *in the space between large scallops work: (hdc, 3 sl st picot loop, hdc)* Repeat around. A sl st picot loop = sl st, ch3, sl st into base of that ch3 to create mini loop. This builds small loops to define outer edge.
Info :
This fringe is what gives the runner its ornate finished silhouette. Keep the outer loops small — typically 3-ch picot loops finished by sl st to base look most balanced at this scale.
Round 13 :
Working into each hdc from previous round, make (sc, ch5, sc) to elongate final scallops slightly. For corner areas make ch7 loops for symmetry. Keep counts even by pinning the loops to blocking mat and adjusting loop tension if necessary.
Round 14 :
Decorative beadlet round: *into each ch5 loop work (sc, picot, sc) then sl st into base between loops.* This places tiny bobbles at tip of the scalloped points creating that cluster-of-pearls look seen on vintage lace runners.
Round 15 :
Final finishing round: 1 sc in each st around, then work a final picot trim at regular intervals: *sc in 2, picot, sc in 2, sl st* around. Fasten off and weave all ends. Use blocking and light steam to form precise scallops.
Info :
Blocking: Lay runner flat on blocking mat, pin outer scallops to ensure symmetry. Lightly mist with water and use steam iron about 1" above fabric to set shape. Allow to dry completely before removing pins.
— Optional Extra Texture: Raised Lattice Rope (Work 6 rounds) :
Round 1 :
After inner bands, with CC work 1 round of front post hdc (FPhdc) around the vertical lattice lines to create a raised rope; FPhdc in each vertical post and sc in between posts. This emphasizes the lattice grid.
Round 2 :
Repeat FPhdc round for a thicker rope. On corners work FPdc for height. Fasten off and weave ends.
Info :
This raised rope is optional but gives the crisp antique look in the photo. Work carefully so posts are consistent; use a tapestry needle to tuck any loops inward that look loose.
— Finishing Touches :
Info :
Weave in all ends along the reverse side, trimming closely. Use matching yarn to make discreet repairs if a petal or leaf loses its shape — a few small mattress stitches can secure loose clusters. If you prefer a stiffer, vintage look, lightly starch the lace after blocking.
Info :
Label your motif placement and keep any leftover yarn in a small labeled bag for future repairs. The runner responds well to gentle hand washing with cool water and mild detergent; reshape and dry flat to retain scalloped edges.
This vintage-inspired table runner combines the warmth of handmade crochet with romantic floral detail to create a centerpiece you're proud to display. Each motif is a tiny work of art — the layered roses, clustered leaves and elegant scalloped edge come together to form a timeless heirloom. The modular construction means you can scale the runner for your table and customize colors to suit any decor. 🧶🌸 Whether gifted or kept, every stitch tells a story — enjoy creating and sharing this beautiful piece! ✨